Installing ST-LINK V2 on MAC OS X for development under STM32
Recently I came across a wonderful article on how to collect all the tools for developing in linux under stm32 controllers and I decided to return to the task I was trying to solve, namely to make everything work on Mac OS X (In my case, 10.9.1 Mavericks), since working in CooCox (and it is based on Eclipse) in a virtual machine is already pretty tired. In this article I will describe a step-by-step algorithm how to get the same thing to work in OS X.

So, you want to develop on STM32 in the Mac OS X environment, you have ST-LINK V2 separately or on a breadboard, then welcome under cat.
On the whole, with the exception of Microchip with their cross-platform MPLAB X for Pic development (at least I know only it), no one from the manufacturers cares about developers on platforms other than Windows, which creates a certain threshold of entry and scares a lot of developers, if you are, of course, not a user of the Arduino Development Tools.
')
Why not just take and use the whole algorithm that described the futurelink in OS X and be happy? Because apple cares about us, and therefore they cut out from the system all the components that are required to install and build packages from the repositories. The package manager itself is also missing, the main paradigm is that everything must be installed via the AppStore or, in extreme cases, download the program at your own risk and risk from “not installed sources” =). However, not everything is as bad as it may seem, all these fatal flaws can be successfully eliminated, and at the same time you can get acquainted with a powerful tool that will help us with this - the package manager .
Usually, at this moment everyone writes that you need to install Xcode from the AppStore, and then install the Command Line Tools (namely, we need them) and this method can also be used, but if you are not going to develop anything in Xcode (and you may be sorry place on ssd), then you can put the Command Line Tools separately. All commands that will be highlighted further need to be executed in the terminal.
Just type in the terminal:
In Maverick, a view window immediately pops up:
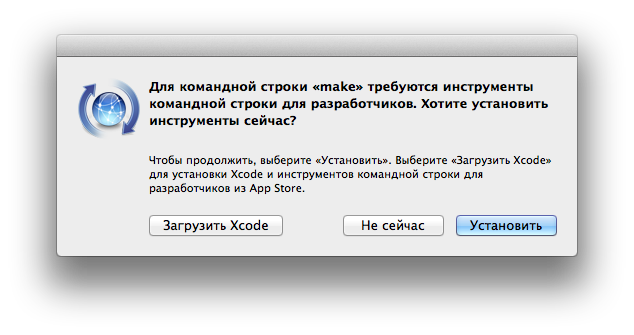
Click Install and get all the necessary utilities without Xcode itself.
Download and install images manually:
Image for Mountain Lion
Image for Mavericks
After all these operations, utilities such as make, gcc, git and others will be installed on the system.
Fortunately, the global open source community did not leave Mac users in trouble and rolled out several solutions to this effect.
Currently there are two worthy projects that can be used for these purposes Macports and Brew . If you have any of these managers, then you don’t need to install anything else; however, if you are thinking about what to put, then I personally recommend Brew.
Installing Brew is simple and straightforward, copy the line to the terminal and follow the instructions.
Everything! Now you have the opportunity to install packages from repositories!
For example, you can set yourself Midnight Commander:
Or wget (I recommend to install, you will need it later):
If you already had Brew installed, then I recommend that you update it with the command:
And then run:
But let's not be distracted from our main task, namely, to make friends with our programmer with the system.
Now we can install all the packages we need, the benefit of which is already very simple:
After installing these packages, we have everything you need to build a Texane project.
I will be guided by the fact that we will create a folder in your home directory and name it Embed Tools, but you can do it in any convenient folder.
We connect our board and run the command:
If everything is good, then the answer should be returned as follows:
To preserve compatibility and the original splint , I will make the same links, but again, you can do it in places convenient for you, you can not even make any links, and in the eclipse itself, refer directly to the installation path of the utilities.
It is very likely that there will be no opt directory on your system, which means you need to create it, and at the same time the bin directory in it:
Now create a link to st-util in the / opt / bin / directory:
Download GCC ARM TOOLCHAIN 4.8 , unpack and put everything in our Embed Tools folder. I downloaded the latest major release today, namely 4.8-2013-q4-major and my folder, respectively, is called gcc-arm-none-eabi-4_8-2013q4. You can download several different releases and generally different toolchains and copy them all into our Embed Tools, and then change the link to them in the opt directory, as the futurelink suggests to do (very convenient, by the way, you don’t have to change the link every time in projects if you change tulcheyna).
Create a link to the toolchain in the / opt / arm-toolchain directory:
And for those who have previously installed wget, you can use this command:
She downloads the toolchain, unpacks it into the Embed Tools folder and creates a link in / opt / arm-toolchain to it.
At the current stage, most users can proceed to the Development Environment item in the original splint . But maybe not everyone is familiar with the Eclipse in such detail that they are able to decipher the phrase about installing plug-ins “For both there are update sites, plug-ins are put in the standard way for the clips from the menus.” , So I decided to describe them in more detail.
In Eclipse, go to Help-> Install New Software
Click Add and enter
Name: Gnu Arm Eclipse PlugIn
Location: http://gnuarmeclipse.sourceforge.net/updates
In the list of repository plugins, select 2 marked checkboxes:

Since I don’t have J-Link, I didn’t put myself an experimental plugin, but maybe someone will try it too.
Click Add and enter
Name: Zylin Embedded CDT
Location: http://opensource.zylin.com/zylincdt
In this case, the checkbox option is unique, so note it.
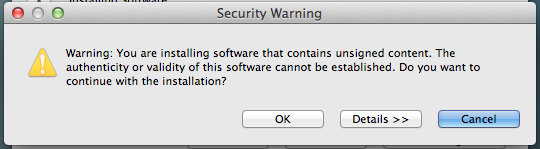
During the installation of the plug-ins, a security warning will be issued, which is answered in the affirmative.
Now you need to create your own C or C ++ project, and configure it as described in the tutorial .
That's all, I hope you all turned out. I wish you successful developments.
So, you want to develop on STM32 in the Mac OS X environment, you have ST-LINK V2 separately or on a breadboard, then welcome under cat.
On the whole, with the exception of Microchip with their cross-platform MPLAB X for Pic development (at least I know only it), no one from the manufacturers cares about developers on platforms other than Windows, which creates a certain threshold of entry and scares a lot of developers, if you are, of course, not a user of the Arduino Development Tools.
')
Why not just take and use the whole algorithm that described the futurelink in OS X and be happy? Because apple cares about us, and therefore they cut out from the system all the components that are required to install and build packages from the repositories. The package manager itself is also missing, the main paradigm is that everything must be installed via the AppStore or, in extreme cases, download the program at your own risk and risk from “not installed sources” =). However, not everything is as bad as it may seem, all these fatal flaws can be successfully eliminated, and at the same time you can get acquainted with a powerful tool that will help us with this - the package manager .
Training
Usually, at this moment everyone writes that you need to install Xcode from the AppStore, and then install the Command Line Tools (namely, we need them) and this method can also be used, but if you are not going to develop anything in Xcode (and you may be sorry place on ssd), then you can put the Command Line Tools separately. All commands that will be highlighted further need to be executed in the terminal.
Method 1:
Just type in the terminal:
make In Maverick, a view window immediately pops up:
Click Install and get all the necessary utilities without Xcode itself.
Method 2:
Download and install images manually:
Image for Mountain Lion
Image for Mavericks
After all these operations, utilities such as make, gcc, git and others will be installed on the system.
Install Package Manager
Fortunately, the global open source community did not leave Mac users in trouble and rolled out several solutions to this effect.
Currently there are two worthy projects that can be used for these purposes Macports and Brew . If you have any of these managers, then you don’t need to install anything else; however, if you are thinking about what to put, then I personally recommend Brew.
Installing Brew is simple and straightforward, copy the line to the terminal and follow the instructions.
ruby -e "$(curl -fsSL https://raw.githubusercontent.com/Homebrew/install/master/install)" Everything! Now you have the opportunity to install packages from repositories!
For example, you can set yourself Midnight Commander:
brew install mc Or wget (I recommend to install, you will need it later):
brew install wget If you already had Brew installed, then I recommend that you update it with the command:
brew update And then run:
brew doctor But let's not be distracted from our main task, namely, to make friends with our programmer with the system.
Installing ST-LINK V2
Now we can install all the packages we need, the benefit of which is already very simple:
brew install autoconf automake pkg-config libusb libusb-compat After installing these packages, we have everything you need to build a Texane project.
I will be guided by the fact that we will create a folder in your home directory and name it Embed Tools, but you can do it in any convenient folder.
cd ~ mkdir "Embed Tools" && cd "Embed Tools" git clone https://github.com/texane/stlink.git && cd stlink/ ./autogen.sh ./configure make We connect our board and run the command:
./st-util If everything is good, then the answer should be returned as follows:
2014-02-08T19:46:24 INFO src/stlink-usb.c: -- exit_dfu_mode 2014-02-08T19:46:24 INFO src/stlink-common.c: Loading device parameters.... 2014-02-08T19:46:24 INFO src/stlink-common.c: Device connected is: F4 device, id 0x10016413 2014-02-08T19:46:24 INFO src/stlink-common.c: SRAM size: 0x30000 bytes (192 KiB), Flash: 0x100000 bytes (1024 KiB) in pages of 16384 bytes Chip ID is 00000413, Core ID is 2ba01477. Target voltage is 2876 mV. Listening at *:4242... To preserve compatibility and the original splint , I will make the same links, but again, you can do it in places convenient for you, you can not even make any links, and in the eclipse itself, refer directly to the installation path of the utilities.
It is very likely that there will be no opt directory on your system, which means you need to create it, and at the same time the bin directory in it:
cd / sudo mkdir opt && cd opt sudo mkdir bin Now create a link to st-util in the / opt / bin / directory:
sudo ln -s ~/Embed\ Tools/stlink/st-util /opt/bin/st-util Installing ARM Toolchain
Download GCC ARM TOOLCHAIN 4.8 , unpack and put everything in our Embed Tools folder. I downloaded the latest major release today, namely 4.8-2013-q4-major and my folder, respectively, is called gcc-arm-none-eabi-4_8-2013q4. You can download several different releases and generally different toolchains and copy them all into our Embed Tools, and then change the link to them in the opt directory, as the futurelink suggests to do (very convenient, by the way, you don’t have to change the link every time in projects if you change tulcheyna).
Create a link to the toolchain in the / opt / arm-toolchain directory:
sudo ln -s ~/Embed\ Tools/gcc-arm-none-eabi-4_8-2013q4/bin /opt/arm-toolchain And for those who have previously installed wget, you can use this command:
cd ~/Downloads/ && wget https://launchpad.net/gcc-arm-embedded/4.8/4.8-2013-q4-major/+download/gcc-arm-none-eabi-4_8-2013q4-20131218-mac.tar.bz2 && tar -xvvjf gcc-arm-none-eabi-4_8-2013q4-20131218-mac.tar.bz2 -C ~/Embed\ Tools/ && sudo ln -s ~/Embed\ Tools/gcc-arm-none-eabi-4_8-2013q4/bin /opt/arm-toolchain She downloads the toolchain, unpacks it into the Embed Tools folder and creates a link in / opt / arm-toolchain to it.
Conclusion
At the current stage, most users can proceed to the Development Environment item in the original splint . But maybe not everyone is familiar with the Eclipse in such detail that they are able to decipher the phrase about installing plug-ins “For both there are update sites, plug-ins are put in the standard way for the clips from the menus.” , So I decided to describe them in more detail.
GNU Arm Eclipse
In Eclipse, go to Help-> Install New Software
Click Add and enter
Name: Gnu Arm Eclipse PlugIn
Location: http://gnuarmeclipse.sourceforge.net/updates
Add Gnu Arm Eclipse repository window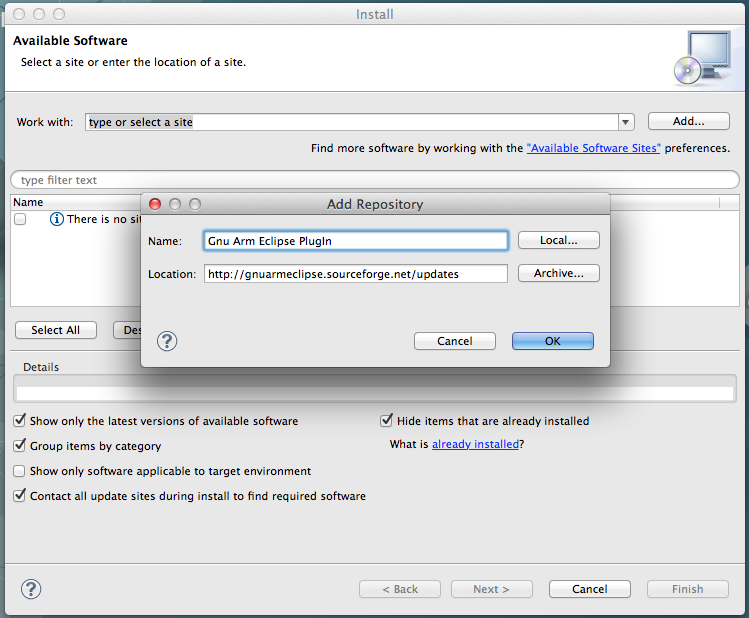
In the list of repository plugins, select 2 marked checkboxes:
Since I don’t have J-Link, I didn’t put myself an experimental plugin, but maybe someone will try it too.
Zylin Embedded CDT
Click Add and enter
Name: Zylin Embedded CDT
Location: http://opensource.zylin.com/zylincdt
Add Zylin Repository window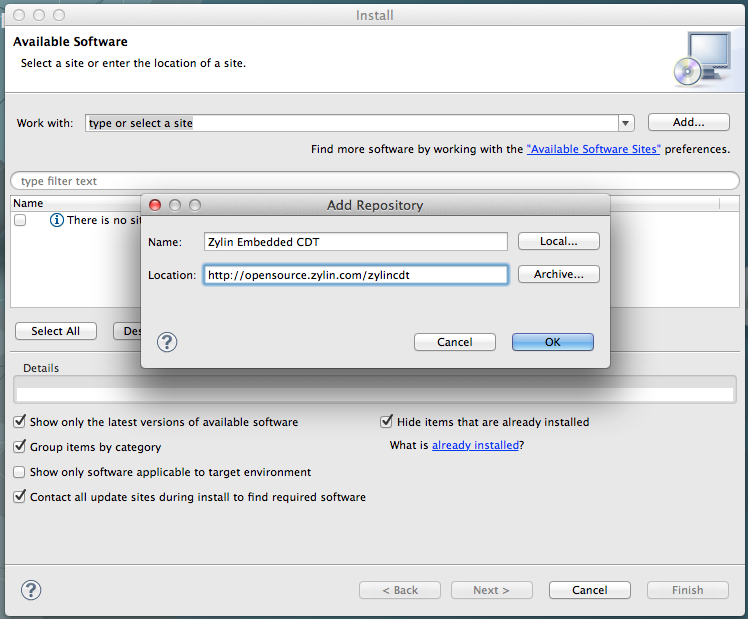
In this case, the checkbox option is unique, so note it.
During the installation of the plug-ins, a security warning will be issued, which is answered in the affirmative.
Now you need to create your own C or C ++ project, and configure it as described in the tutorial .
That's all, I hope you all turned out. I wish you successful developments.
Source: https://habr.com/ru/post/212057/
All Articles