New java ee leader? WildFly 8 in InfoboxCloud IaaS. Part 2. Domain Mode
In the first part, we deployed WildFly 8 to the InfoboxCloud Cloud Designer in Standalone mode. Let's see how you can deploy WildFly 8 in domain mode.
The goal: to deploy WildFly 8 in domain mode with a separate domain controller and two hosts on which 2 WildFly application servers can run in high availability mode.
')
Offline mode is more suitable for development scenarios when only one server is needed. Only in this mode Arquillian tests will work. Also, offline mode is suitable if you use a lot of WildFly servers with a self-written server management system.
Domain mode (Domain mode) allows you to centrally manage configurations WildFly. Using a domain is convenient for deploying and supporting clusters consisting of WildFly nodes.
WildFly elements in domain mode:
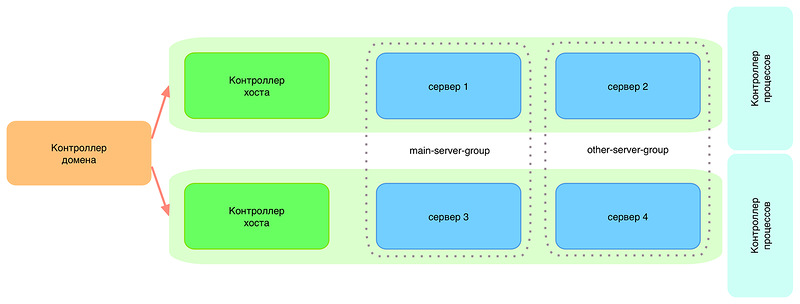
The following elements can be distinguished in the domain:
If something goes wrong when setting the domain mode, you can always see the host controller logs ( /usr/share/wildfly/domain/log/host-controller.log ) and the process controller ( / usr / share / wildfly / domain / log / process-controller.log ).
If you do not have an account with InfoboxCloud Cloud Designer - register for a trial version for free . Using the cloud is ideal for JavaEE deployment scenarios, as it allows not to use unnecessary resources during the development period, and when commissioning software systems into operation, allows flexibility in adapting resources to the real load. The cloud designer provides the ability to set the values of CPU, Ram, disk and other resources independently of each other, thereby creating servers suitable for your task.
Create a server for a domain controller and 2 hosts in the cloud designer (in case of difficulty, you can refer to the first part of the article cycle . At the time of setup, it is recommended to allocate more resources to each server you create, and after setting up and deploying applications, you can find the optimal minimum. and setting up WildFly. Since you only pay for the actual resources used per hour - setting up powerful servers is very pleasant and costs very little. we made the domain controller and hosts such:

We used the CentOS operating system on all hosts. After the servers are created, the generated server passwords will come to the mail. If you wish, you can change them in the server control panel. You are also free to switch to key access, which will make working with servers safer and protect bots from selecting passwords (do not forget to disable password access in this case).
In order not to waste your time on manually installing WildFly, dependencies and creating a service, we automated the installation process. If you need to install WildFly manually, you can view the installation script and understand what is happening or send the author advice on how to do better with the implementation :)
To install WildFly on each of the three servers created, run the script:
After the release of Java 8 in this post and in the InfoboxCloud Community, there will be links to an additional script for installing WildFly with JDK 8 included. While the latest version of JDK7 is being installed.
Upon completion of the installation, let's make it on all servers so that WildFly starts automatically when the server is loaded:
The domain configuration is set via the domain.xml file located in / usr / share / wildfly / domain / configuration . It is necessary to define the configuration of server groups (which can always be changed in real time).
As you can see, two server groups are defined by default: main-server-group and other-server-group . Profile and socket-binding-group are set for each group .
WildFly supports four pre-configured profiles:
The host.xml file located at / usr / share / wildfly / domain / configuration defines:
In our domain configuration, there will be no application servers running on the same host. We want to have a dedicated domain controller. To do this, you need to remove the contents from the servers section as
Note: Failure of a domain controller will not stop applications in the cluster. Fails - lift another or recover from snapshot. A domain controller is only needed to manage the domain and deploy applications to it.
The next step is to specify that the domain controller is running on the same host. To do this, configure the domain-controller section in host.xml as follows :
Next, add a user to manage the domain via /usr/share/wildfly/bin/add-user.sh .

Do not forget to save the base64 key secret value, which the utility writes after adding the user. We need it to configure the hosts. Just do not forget to answer the last question yes, as in the screenshot.
For security purposes in production use, it is recommended to limit the ip from which domain management is possible. This can be done in the /usr/share/wildfly/domain/configuration/host.xml file, replacing <any-address /> in the management section with <inet-address value = "$ {jboss.bind.address.management:127.0. 0.1} "/> and substituting 127.0.0.1 for the address from which domain control is allowed.
Now restart the domain controller with the command
In the WildFly control panel on port 9990 at the address of your domain controller, we see that so far no servers are connected to it on which our Java EE applications will run.

Host configuration is done in the host.xml file located at / usr / share / wildfly / domain / configuration .
We assign a unique name for each host (in the configuration below, the name is wh0 . For the other host, wh1 . The names must not be the same):
Specify how the host controller will connect to the domain controller.
Do not forget to change the ip – address specified in the configuration to the address of your host. You can use a private ip-address, since both the domain controller and the hosts are running in the same cloud. Also replace the username with the one you specified when adding the management user to the domain controller via ./add-user.sh .
It's time to set up a secret base64 key to access the domain controller. We act in the same place in host.xml host:
The last step in configuring hosts is to change the server section in hosts.xml .
For the first wh0 node:
for the second node wh1 :
All is ready. Reboot the hosts:
Now we’ll go back to the domain controller’s control panel:

We see that the hosts have appeared and you can manage them or deploy applications to them. For application servers 2 and 4, we deliberately turned off the automatic start in the servers section of the hosts.xml file. Try running them from the control panel of the domain controller.
In this article, WildFly 8 was successfully configured in the domain controller mode in the InfoboxCloud Cloud Designer . We left behind the balancer setting and many other details, which will be discussed in the following articles. For any questions about setting up or generally on the cloud, you can write to the author Yuri Trukhin or to the InfoboxCloud Community on Facebook . Successful work!
The goal: to deploy WildFly 8 in domain mode with a separate domain controller and two hosts on which 2 WildFly application servers can run in high availability mode.
')
Domain mode or offline mode?
Offline mode is more suitable for development scenarios when only one server is needed. Only in this mode Arquillian tests will work. Also, offline mode is suitable if you use a lot of WildFly servers with a self-written server management system.
Domain mode (Domain mode) allows you to centrally manage configurations WildFly. Using a domain is convenient for deploying and supporting clusters consisting of WildFly nodes.
WildFly elements in domain mode:
The following elements can be distinguished in the domain:
- Domain controller Application server running in domain mode. Will run at least one domain controller process. The domain controller manages centralized configurations that are distributed to the hosts in the domain.
- Host controller The process is responsible for coordinating the domain controller and the life cycle of the application servers. Through the host controller, applications are deployed from the domain controller to the application servers. In fact, the host is a virtual or physical server.
- Application server node. Normal java-processes that are executed on the application server. Each application server node belongs to a server group.
- Server group A logical combination of two hosts for use by different applications. For example, you can use the main-server-group for a stable version of the application and the other-server-group for the development version. Both applications will work without a point of failure and will be distributed between two hosts.
- Process controller Very lightweight processes. Their main function is to spawn the server and host controller processes and control their input / output streams.
If something goes wrong when setting the domain mode, you can always see the host controller logs ( /usr/share/wildfly/domain/log/host-controller.log ) and the process controller ( / usr / share / wildfly / domain / log / process-controller.log ).
Setting up WildFly 8 in domain mode in InfoboxCloud
1. Creating an account in InfoboxCloud
If you do not have an account with InfoboxCloud Cloud Designer - register for a trial version for free . Using the cloud is ideal for JavaEE deployment scenarios, as it allows not to use unnecessary resources during the development period, and when commissioning software systems into operation, allows flexibility in adapting resources to the real load. The cloud designer provides the ability to set the values of CPU, Ram, disk and other resources independently of each other, thereby creating servers suitable for your task.
2. Creating servers in InfoboxCloud for the domain controller and hosts
Create a server for a domain controller and 2 hosts in the cloud designer (in case of difficulty, you can refer to the first part of the article cycle . At the time of setup, it is recommended to allocate more resources to each server you create, and after setting up and deploying applications, you can find the optimal minimum. and setting up WildFly. Since you only pay for the actual resources used per hour - setting up powerful servers is very pleasant and costs very little. we made the domain controller and hosts such:
We used the CentOS operating system on all hosts. After the servers are created, the generated server passwords will come to the mail. If you wish, you can change them in the server control panel. You are also free to switch to key access, which will make working with servers safer and protect bots from selecting passwords (do not forget to disable password access in this case).
In order not to waste your time on manually installing WildFly, dependencies and creating a service, we automated the installation process. If you need to install WildFly manually, you can view the installation script and understand what is happening or send the author advice on how to do better with the implementation :)
To install WildFly on each of the three servers created, run the script:
wget repository.jelasticloud.com/scripts/wildfly8/linux64/wildfly-domain && chmod +x wildfly-domain && ./wildfly-domain && rm -rf wildfly-domain After the release of Java 8 in this post and in the InfoboxCloud Community, there will be links to an additional script for installing WildFly with JDK 8 included. While the latest version of JDK7 is being installed.
Upon completion of the installation, let's make it on all servers so that WildFly starts automatically when the server is loaded:
chkconfig --add wildfly chkconfig --level 234 wildfly on 3. Configure the domain.xml domain controller
The domain configuration is set via the domain.xml file located in / usr / share / wildfly / domain / configuration . It is necessary to define the configuration of server groups (which can always be changed in real time).
<server-groups> <server-group name="main-server-group" profile="full"> <jvm name="default"> <heap size="64m" max-size="512m"/> </jvm> <socket-binding-group ref="full-sockets"/> </server-group> <server-group name="other-server-group" profile="full"> <jvm name="default"> <heap size="64m" max-size="512m"/> </jvm> <socket-binding-group ref="full-sockets"/> </server-group> </server-groups> As you can see, two server groups are defined by default: main-server-group and other-server-group . Profile and socket-binding-group are set for each group .
WildFly supports four pre-configured profiles:
- default : Supports Java EE Web-profile and extensions to support REST and EJB remote invocations . For socket-binding-group , the value should be set to "standard-sockets" .
- full : Fully supports Java EE Full-profile and all the features of an application server without clustering. For socket-binding-group , the value should be set to "full-sockets" .
- ha : default profile with clustering enabled. For socket-binding-group , the value must be set to "ha-sockets" .
- full-ha : A complete Java EE profile with clustering support. For socket-binding-group , the value should be set to "full-ha-sockets" .
4. Configure host.xml for a domain controller
The host.xml file located at / usr / share / wildfly / domain / configuration defines:
- application servers that are part of the domain and server groups in which they belong.
- network interfaces and security settings for these application servers.
- hosted domain controller.
In our domain configuration, there will be no application servers running on the same host. We want to have a dedicated domain controller. To do this, you need to remove the contents from the servers section as
<servers></servers> Note: Failure of a domain controller will not stop applications in the cluster. Fails - lift another or recover from snapshot. A domain controller is only needed to manage the domain and deploy applications to it.
The next step is to specify that the domain controller is running on the same host. To do this, configure the domain-controller section in host.xml as follows :
<domain-controller> <local/> </domain-controller> Next, add a user to manage the domain via /usr/share/wildfly/bin/add-user.sh .
Do not forget to save the base64 key secret value, which the utility writes after adding the user. We need it to configure the hosts. Just do not forget to answer the last question yes, as in the screenshot.
For security purposes in production use, it is recommended to limit the ip from which domain management is possible. This can be done in the /usr/share/wildfly/domain/configuration/host.xml file, replacing <any-address /> in the management section with <inet-address value = "$ {jboss.bind.address.management:127.0. 0.1} "/> and substituting 127.0.0.1 for the address from which domain control is allowed.
<interfaces> <interface name="management"> <inet-address value="${jboss.bind.address.management:127.0.0.1}"/> </interface> <interface name="public"> <any-address/> </interface> <interface name="unsecure"> <!-- Used for IIOP sockets in the standard configuration. To secure JacORB you need to setup SSL --> <inet-address value="${jboss.bind.address.unsecure:127.0.0.1}"/> </interface> </interfaces> Now restart the domain controller with the command
service wildfly restart In the WildFly control panel on port 9990 at the address of your domain controller, we see that so far no servers are connected to it on which our Java EE applications will run.
5. Setting up hosts
Host configuration is done in the host.xml file located at / usr / share / wildfly / domain / configuration .
We assign a unique name for each host (in the configuration below, the name is wh0 . For the other host, wh1 . The names must not be the same):
<host name="wh0" xmlns="urn:jboss:domain:2.0"> ... </host> Specify how the host controller will connect to the domain controller.
<domain-controller> <!-- <local/> --> <!-- Alternative remote domain controller configuration with a host and port --> <remote host="10.127.5.203" port="9999" username="trukhinyuri" security-realm="ManagementRealm"/> </domain-controller> Do not forget to change the ip – address specified in the configuration to the address of your host. You can use a private ip-address, since both the domain controller and the hosts are running in the same cloud. Also replace the username with the one you specified when adding the management user to the domain controller via ./add-user.sh .
It's time to set up a secret base64 key to access the domain controller. We act in the same place in host.xml host:
<management> <security-realms> <security-realm name="ManagementRealm"> <server-identities> <secret value="secretBase64key"/> </server-identities> ... </security-realm> </security-realms> </management> The last step in configuring hosts is to change the server section in hosts.xml .
For the first wh0 node:
<servers> <server name="server-one" group="main-server-group"> <!-- Remote JPDA debugging for a specific server <jvm name="default"> <jvm-options> <option value="-agentlib:jdwp=transport=dt_socket,address=8787,server=y,suspend=n"/> </jvm-options> </jvm> --> </server> <server name="server-two" group="other-server-group" auto-start="false"> <!-- server-two avoids port conflicts by incrementing the ports in the default socket-group declared in the server-group --> <socket-bindings port-offset="150"/> </server> </servers> for the second node wh1 :
<servers> <server name="server-three" group="other-server-group"> <!-- Remote JPDA debugging for a specific server <jvm name="default"> <jvm-options> <option value="-agentlib:jdwp=transport=dt_socket,address=8787,server=y,suspend=n"/> </jvm-options> </jvm> --> </server> <server name="server-four" group="main-server-group" auto-start="false"> <!-- server-two avoids port conflicts by incrementing the ports in the default socket-group declared in the server-group --> <socket-bindings port-offset="150"/> </server> </servers> All is ready. Reboot the hosts:
service wildfly restart Now we’ll go back to the domain controller’s control panel:
We see that the hosts have appeared and you can manage them or deploy applications to them. For application servers 2 and 4, we deliberately turned off the automatic start in the servers section of the hosts.xml file. Try running them from the control panel of the domain controller.
In this article, WildFly 8 was successfully configured in the domain controller mode in the InfoboxCloud Cloud Designer . We left behind the balancer setting and many other details, which will be discussed in the following articles. For any questions about setting up or generally on the cloud, you can write to the author Yuri Trukhin or to the InfoboxCloud Community on Facebook . Successful work!
Source: https://habr.com/ru/post/212031/
All Articles