Easy build virtual machines with PuPHPet

Creating and managing development environments frustrates you, slows you down or distracts you from development? Do you have difficulties due to the fact that your local environment and the environment are different at delay? If so, I have a solution for you - PuPHPet !
Introduction
I can’t say for you with confidence, but one of my favorite corns * in development is the environment, whether creating and maintaining it for various projects with different needs, ensuring interaction of the development team, (especially distributed), or setting up environments for development, testing and combat environment. All this can be a time consuming task, especially when performed manually.
Depending on the requirements of management or customers, a variety of choices can lead to depression. All of them can pull in different directions (and pull!), Often at the same time.
Take for example the choice of database MySQL, PostgreSQL, Oracle or SQLServer. As well as NoSQL solutions such as Cassandra, Hadoop, and Redis. Or choose a server, such as Apache or Nginx. The list goes on and on. And when there is not always a sysadmin ready to help (say, a freelancer or a very small team of developers), the time spent on maintaining the development environment increases significantly, and we turn into DevOps *.
')
In order to finally do away with this state of affairs and make the whole process as efficient as possible, I set about studying Vagrant and Puppet . From conversations with colleagues and a thorough search on the Internet, it became clear that these two tools are in fact the standard for creating reusable media. If you are not familiar with these great tools, here are two brief excerpts from their respective guides:
Vagrant:
Designed to create and configure lightweight, portable and portable development environments. Vagrant will change according to your requirements.
Puppet:
Software that automates the management of the infrastructure throughout its life cycle, from redundancy and configuration to setting up interaction and reporting. Using Puppet, you can easily automate repetitive tasks, for example, quickly deploy critical applications, and actively manage changes, quickly scaling from 10 to 1000 servers, on your own equipment in the cloud.
However, like most people in the modern world, I am impatient. I knew that there must be a way to solve the above problems rather quickly, but without becoming a passionate fan.
Introduction to PuPHPet
After further googling, I stumbled upon PuPHPet, an excellent GUI tool that gives you a simple way to create a Puppet configuration for Vagrant, which you can immediately start using.
PuPHPet was originally conceived by Juan Treminio as a damn simple means of creating a working environment for, mainly, PHP developers.
It focuses on 5 directions:
- Deployment (memory, IP address, port forwarding)
- Basic server settings
- PHP (modules, libraries, configuration settings)
- Database (PostgreSQL, MySQL)
- Web server (Apache 2, Nginx)
If you need PHP 5.5 in conjunction with PostgreSQL and Nginx or PHP 5.4 with Apache 2 and MySQL, you can quickly create and load the necessary configuration.
With PuPHPet, the environment will be ready in half an hour and all you need to do is execute the command:
vagrant up This is how it is. In the folder with the unpacked PuPHPet, you need to use this command, wait a bit and be ready. Do not believe? Let's step by step analyze the whole process, from beginning to end.
When we finish, I strongly ask you - do not be afraid to change the configuration, change the options, add and remove packages and everything you can find. I am sure you will be impressed.
Required software
A quick note before we begin. One of the biggest problems I encountered when I first encountered PuPHPet is compatibility issues with the Vagrant and VirtualBox versions.
I am currently using Vagrant 1.3.5 and VirtualBox 4.3.2 and they work flawlessly. First, install these two packages.
Creating a configuration
When they are installed, open puphpet.com . At the very top, four configuration options are offered: Local (i.e., on the local computer), Digital Ocean, Rackspace, and Amazon Web Services. Choose Local, we will not consider other options now.
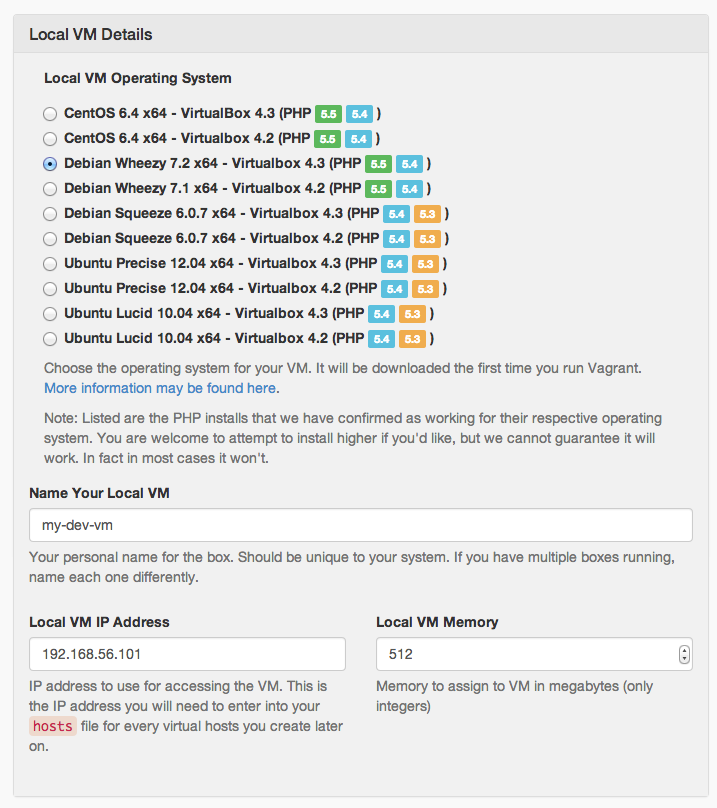
In the “Local VM Details” section, we can select the following options:
- operating system
- Hostname
- IP address
- RAM size
For our example, we use Debian Wheezy 7.2 x64 with VirtualBox 4.3. This will allow us to use PHP 5.4 or 5.5. The remaining 3 options can be left as is or changed if you see fit.
Next is the Local VM Forwarded Ports section. I didn’t touch anything here, but if you want, you can configure port forwarding from the local to the virtual machine here.
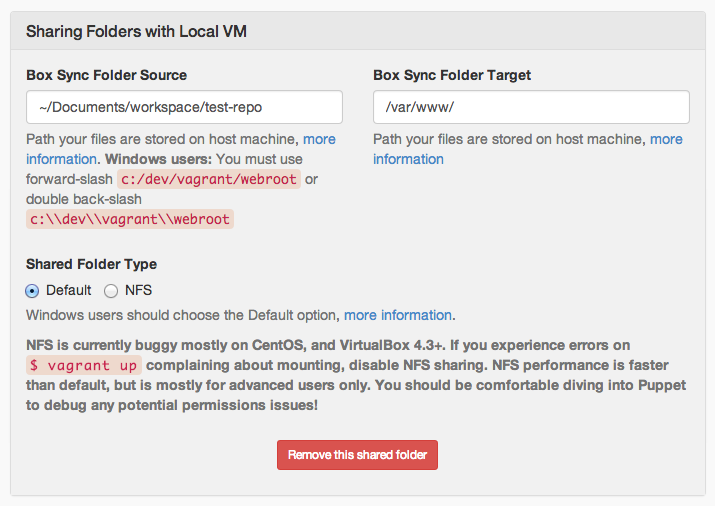
Folder sharing
Here, Vagrant and Puppet begin to show all their power and flexibility. In Box Sync Folder Source, you need to specify a local directory that will be synchronized with the directory in the virtual machine specified in the Box Sync Folder Target. I left this item by default, as well as the folder type in the Shared Folder Type.
This option is useful if you want to create several user directories in a virtual machine. Let's say you have a working folder with a project in ~ / Documents / workspace / your-project. You can map this directory directly to the root of the web server of your virtual machine. Thus, you can develop locally, without synchronization or the need for manual copying to the project working folder in the virtual machine.
Basic server settings
If you need specific packages to work, such as Git, subversion, Vim, etc., then you need to list them in this section. The only thing to remember is that the package name must be specified as well as in the selected operating system.

Web server
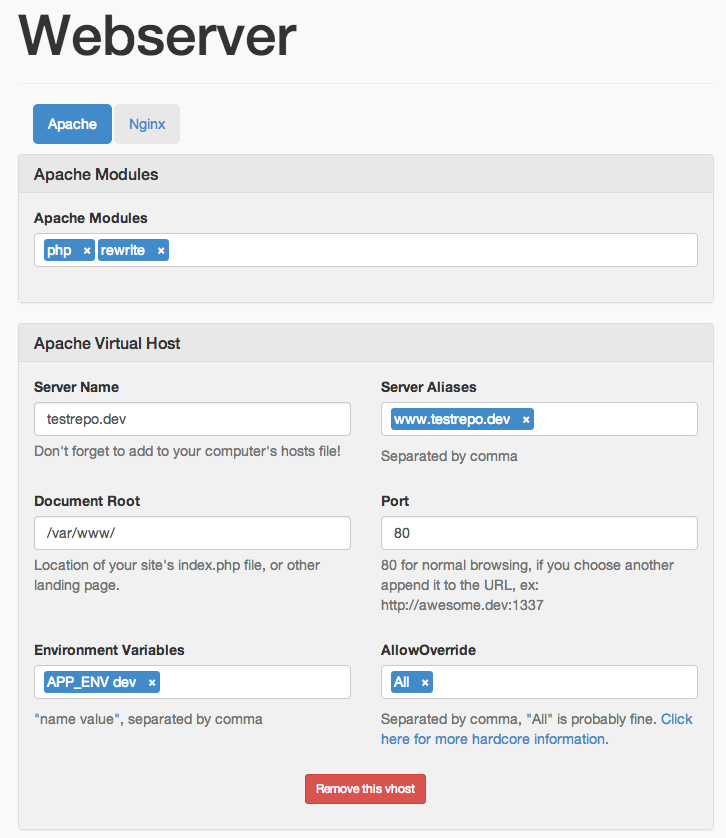
Apache or Nginx? Now I will choose Apache. Then you need to specify the modules that will be installed and enabled by typing Apache Modules in the field. To facilitate the process of entering module names, as well as to avoid errors, the input field will be presented with a pop-up list of available options.
Next comes the Virtual Host configuration. In the fields server name and alias specify the required domain name. In order for this setting to work, you need to add an entry for this domain with the appropriate ip in the hosts file of the local computer. In the Document Root field, you should specify the same directory as in Box Sync Folder Target to make synchronization easy and beautiful. If you do not have a special need, leave in the Port 80 field, i.e. default.
The remaining two settings, Environment Variables and AllowOverride, change only if your application needs it. (Note. Trans. - not quite understand the purpose of these two options, who in the course - please clarify).
Php
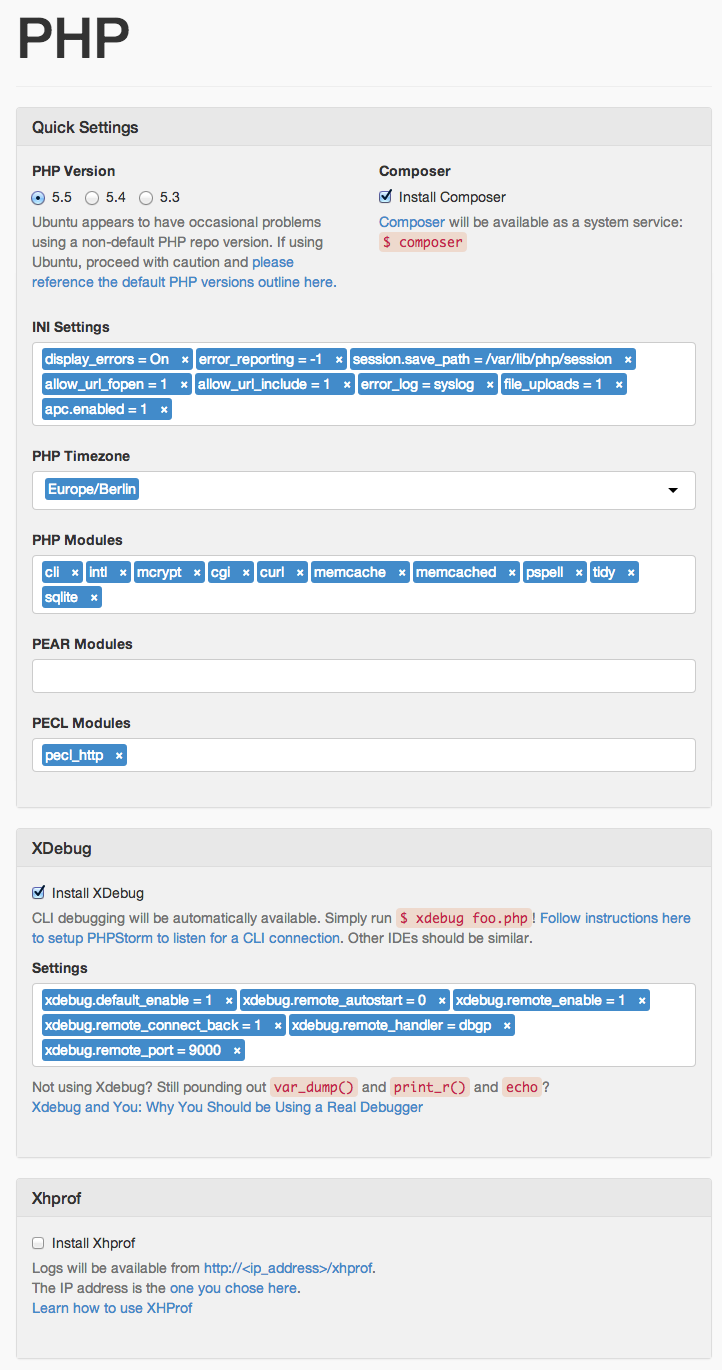
There are not so many options here, but the main ones, just the ones that are needed most often, are present. I left the default PHP 5.5 (I think, now it is hardly worth looking at the version below this one). I also noted the installation of Composer. If you have not used Composer, or are not sure if you need it, I advise you to get to know it better, it is worth it.
In the INI Settings section, I left the options already selected, and then added allow_url_fopen, allow_url_include, error_log, file_uploads, and apc.enabled. Feel free to do the same, or browse and select from the extensive list.
I changed PHP Timezone to Europe / Berlin as closest to my location. I advise you to do the same and choose the time zone you need. In PHP Modules, I stopped at the following list: cli, intl, mcrypt, cgi, curl, memcached, memcache, pspell, tidy and sqlite. Browse through the list and add the ones you need. For PEAR and Pecl modules, I left everything as it was.
I chose to install Xdebug (by default) but not Xhprof. I strongly recommend using XDebug for you too.
Database
So, now carefully. For our example, I chose MySQL, set a password for root, and left privileges for everyone. SitePoint database name, TestUser username and password testpassword. I do not have the setup SQL file in this example, so I’ll leave the last field blank.

Creating and loading configuration

Now, just click the big go ahead then, make it button. You will see that the download has begun. After it is finished, unpack the archive and go to the directory in your terminal. From there, run vagrant up.
The process of creating a virtual machine begins. If you have not previously loaded the Box file (OS image), which is specified when creating the configuration, you will have to wait a little longer, the image will be loaded first and only after that will the creation of the virtual machine begin. If everything goes well, you will see the following output:
vagrant up Bringing machine 'default' up with 'virtualbox' provider... [default] Importing base box 'debian-wheezy72-x64-vbox43'... [default] Matching MAC address for NAT networking... [default] Setting the name of the VM... [default] Clearing any previously set forwarded ports... [default] Creating shared folders metadata... [default] Clearing any previously set network interfaces... [default] Preparing network interfaces based on configuration... [default] Forwarding ports... [default] -- 22 => 2222 (adapter 1) [default] Running 'pre-boot' VM customizations... [default] Booting VM... [default] Waiting for machine to boot. This may take a few minutes... [default] Machine booted and ready! [default] Configuring and enabling network interfaces... [default] Mounting shared folders... [default] -- /vagrant [default] -- /var/www [default] -- /tmp/vagrant-puppet/manifests [default] Running provisioner: shell... [default] Running: /var/folders/_w/k6fxbl615w700lgkrtt0vb3w0000gn/T/vagrant-shell20131126-3538-kid3ga stdin: is not a tty ____ ____ _ _ ____ _ generated using | _ \ _ _| _ \| | | | _ \ ___| |_ ___ ___ _ __ ___ | |_) | | | | |_) | |_| | |_) / _ \ __| / __/ _ \| '_ ` _ \ | __/| |_| | __/| _ | __/ __/ |_ | (_| (_) | | | | | | |_| \__,_|_| |_| |_|_| \___|\__(_)___\___/|_| |_| |_| Created directory /.puphpet-stuff Running initial-setup apt-get update Finished running initial-setup apt-get update [default] Running provisioner: shell... [default] Running: /var/folders/_w/k6fxbl615w700lgkrtt0vb3w0000gn/T/vagrant-shell20131126-3538-1116fzj stdin: is not a tty Downloading http://apt.puppetlabs.com/puppetlabs-release-wheezy.deb Finished downloading http://apt.puppetlabs.com/puppetlabs-release-wheezy.deb Running update-puppet apt-get update Finished running update-puppet apt-get update Updating Puppet to latest version dpkg-preconfigure: unable to re-open stdin: No such file or directory Finished updating puppet to latest version: Puppet v3.3.2 Created empty file /.puphpet-stuff/update-puppet ... Info: Creating state file /var/lib/puppet/state/state.yaml Notice: Finished catalog run in 436.21 seconds Check the performance
Now that the virtual machine is created, log in to it. To do this, in the same directory run vagrant ssh. After logging in to quickly verify that everything is working run sudo netstat -tlnp. The output will show which services are running. It must comply with this:
Active Internet connections (only servers) Proto Recv-Q Send-Q Local Address Foreign Address State PID/Program name tcp 0 0 0.0.0.0:111 0.0.0.0:* LISTEN 1643/rpcbind tcp 0 0 0.0.0.0:39284 0.0.0.0:* LISTEN 1678/rpc.statd tcp 0 0 0.0.0.0:22 0.0.0.0:* LISTEN 2643/sshd tcp 0 0 127.0.0.1:5432 0.0.0.0:* LISTEN 13637/postgres tcp 0 0 127.0.0.1:25 0.0.0.0:* LISTEN 2399/exim4 tcp6 0 0 :::111 :::* LISTEN 1643/rpcbind tcp6 0 0 :::80 :::* LISTEN 31623/apache2 tcp6 0 0 :::22 :::* LISTEN 2643/sshd tcp6 0 0 ::1:5432 :::* LISTEN 13637/postgres tcp6 0 0 ::1:25 :::* LISTEN 2399/exim4 tcp6 0 0 :::37887 :::* LISTEN 1678/rpc.statd There you will see that Apache and PostgreSQL (Note: although MySql was in configuration) is working. If you look in / etc / apache2 / sites-enabled / you will see the configuration for your virtual host.
All is ready!
Filling for the first time may seem like too many steps. But now, when we have gone this way together, everything will turn out much faster. Moreover, you do not need to create a configuration every time from scratch.
If you drag puppet / hieradata / common.yaml onto puphpet.com, it will automatically fill in the form and all you have to do is edit it.
Translation of the first part of the Build Virtual Machines Easily With PuPHPet .
This and other translations from the Sitepoint site, as well as other articles on web development .
Source: https://habr.com/ru/post/212009/
All Articles