ROBOT based on: android, arduino, bluetooth. Reflex. Part 2
In the last article ROBOT based on: android, arduino, bluetooth. The beginning was proposed a general scheme of the robot and presented the technology of data transmission and reception between android and arduino. And in its completion is a list of ordered parts and modules. Details obtained (Fig. 1), comments taken into account, proceed to the creation of the first robot - a reflex robot.

Picture 1
Article 1. ROBOT based on: android, arduino, bluetooth. Start
Article 2. ROBOT based on: android, arduino, bluetooth. Reflex. Part 2.
It is assumed that the person reading the article already has an idea about:
-Basic electronics concepts
-The previous article
Create a robot that performs the following functionality:
-Has remote control using a smartphone (moving forward, backward, left, right)
-Transmits to the smartphone data about the distance to the object located in front of him (based on ultra sound sensor)
-Has an autonomous control mode: continuously moves around the room, when it encounters obstacles, changes its direction of movement, thereby circling the obstacle.
')
Our world is a complex system in which a huge number of objects interact with each other, subject to certain laws of physics, therefore creating a robot functioning within this system is a very laborious task. To simplify the process of creating the first robot, we use the concept of abstraction of the environment (in which the robot is placed) and the actions of the robot. In future articles we will complicate the environment and, accordingly, the actions of the robot.
The environment where our first robot will live will be a two-dimensional world and have the following characteristics:
1) Fully observable, i.e. Robot sensors provide access to complete information about the state of the environment at any time. Fully observable environment options are convenient because the robot does not need to maintain any internal state in order to be aware of everything that happens in this world.
2) Deterministic. If the next state of the environment is completely determined by the current state and the action performed by the robot, then this environment is called deterministic; otherwise, it is stochastic.
3) Episodic. In an episodic problem environment, the robot's experience consists of inseparable episodes. Each episode includes the perception of the environment by the robot, and then the execution of a single action. It is extremely important that the next episode does not depend on the actions taken in previous episodes. In episodic versions of the environment, the choice of action in each episode depends only on the episode itself.
4) Static. If the environment can change in the course of how the robot chooses the next action, then this environment is called dynamic for this robot; otherwise, it is static.
5) Continuous — The distinction between discrete and continuous media options may relate to the state of the environment, the way time is recorded, and the agent's perceptions and actions. In our case, it is considered that the state of the environment changes continuously. For example, the game of chess is discrete, since it has a finite number of different states.
6) A single agent is an environment in which there is one object (robot), and other objects do not affect it and do not compete with it.
1) Movement - the robot can move in two directions (back, forward) and turn around (left, right)
2) The sensors of the robot (ultrasonic sensor), allows you to determine the distance to the object. The distance can be determined from 0.02 meters to 4 meters.
Thus, we define that the robot created in this article is a simple reflex robot. Such robots select actions based on the current act of perception, ignoring the rest of the history of acts of perception.
Engine Driver HG7881. To control the motors of the robot, a device is needed that would convert low-power control signals into currents sufficient to control the motors. Such a device is called an engine driver.
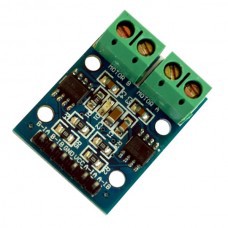
HG7881 is a two-channel driver for engines, power supply is possible from a source of 2.5 - 12 V. Description of driver outputs:
Table 1
In order to make the engines work in the desired way, we need to send logical signals (HIGH, LOW) to the outputs (B-IA, B-IB, A-IA, A-IB). Motor truth table:
table 2
Ultrasonic distance measuring sensor HC-SR04. Determines the distance to the object, measuring the time of reflection of the sound wave from the object.
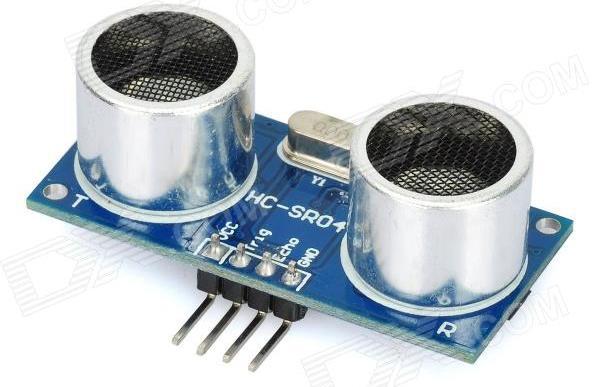
The sensor emits a short ultrasonic pulse (at time 0), which is reflected from the object and received by the sensor. The distance is calculated based on the time to echo and the speed of sound in the air.
A pulse of 10 μs duration is applied to the output (Trig), the ultrasonic module emits 8 packets of the ultrasonic signal with a frequency of 40 kHz and detects their echo. The measured distance to the object is proportional to the width of the echo (Echo) and can be calculated by the formula:
Pulse width / 58 = distance in cm.
We assemble the platform (Fig.2).
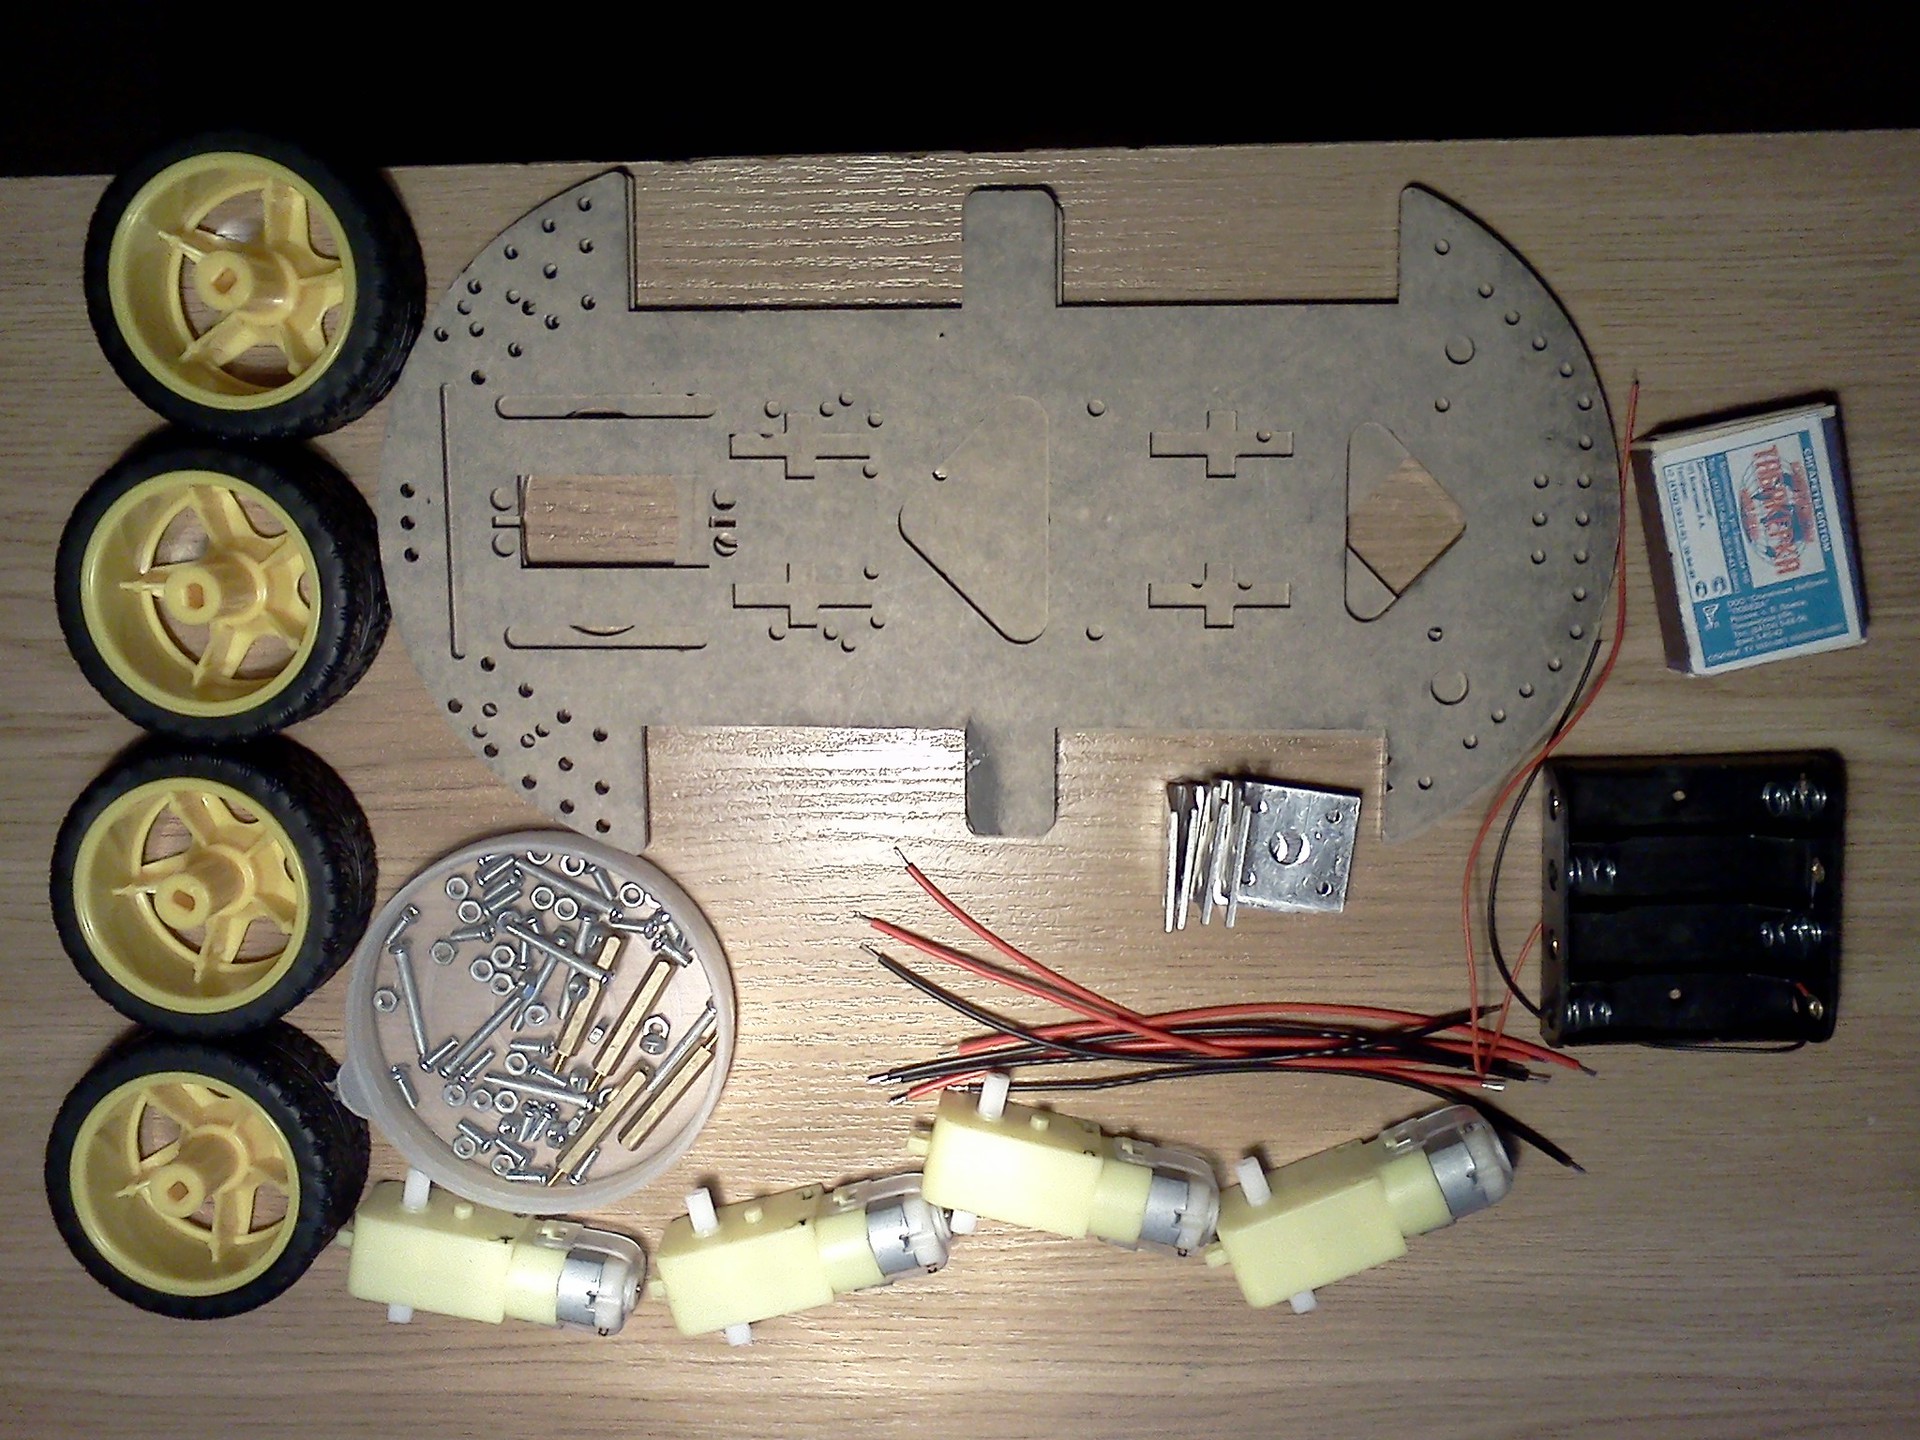
Figure 2
We connect the engines to the driver (Fig. 3). Two engines per driver connector, i.e. engines of the left side of the platform to the “Motor B” connector, engines of the right side - “Motor A”. The platform will be controlled in the same way as the tracked one. When moving forward and backward, all engines work synchronously in one direction, when turning right, the engines of the right side of the platform stop, and the left move synchronously, when turning left, the left side engines stop and the right move synchronously.
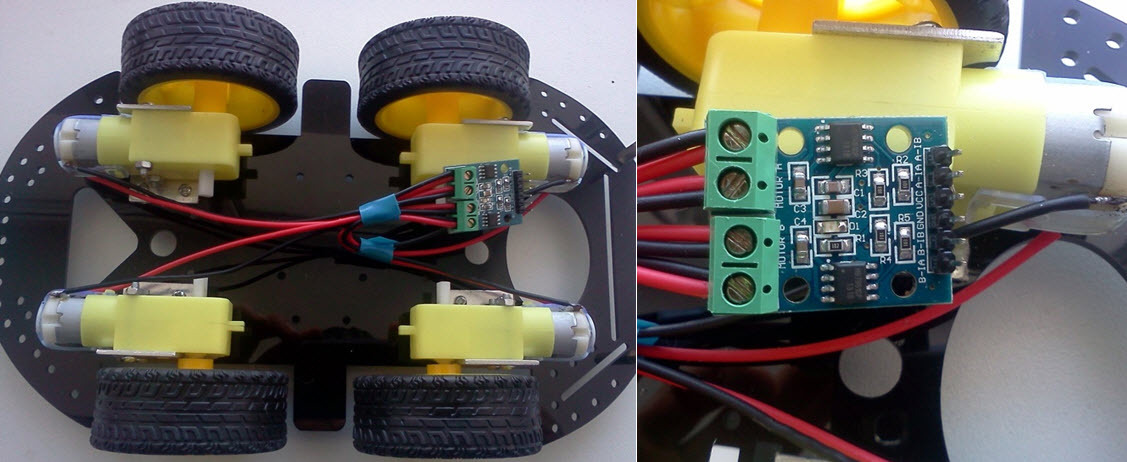
Figure 3
We fasten the upper part of the platform. We connect the driver of engines, arduino, batteries, BT module and ultrasonic sensor to the breadboard (Fig.4)
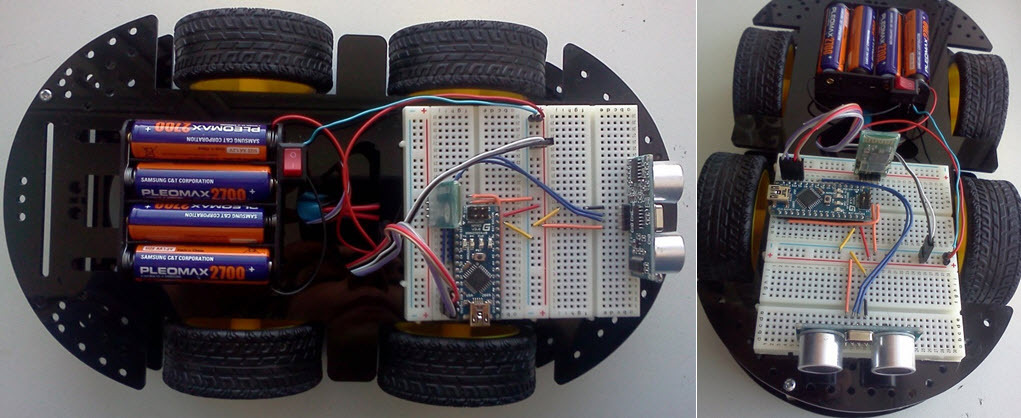
Figure 4
Connection diagram is presented in (Fig.5). The power supply of the Arduino, the ultrasonic sensor and the driver of the engines (and therefore of the engines themselves) is provided by 4 batteries connected in series (1.2 V., 2700 mA / h), the BT module is powered from the output of the Arduino 3.3 V.
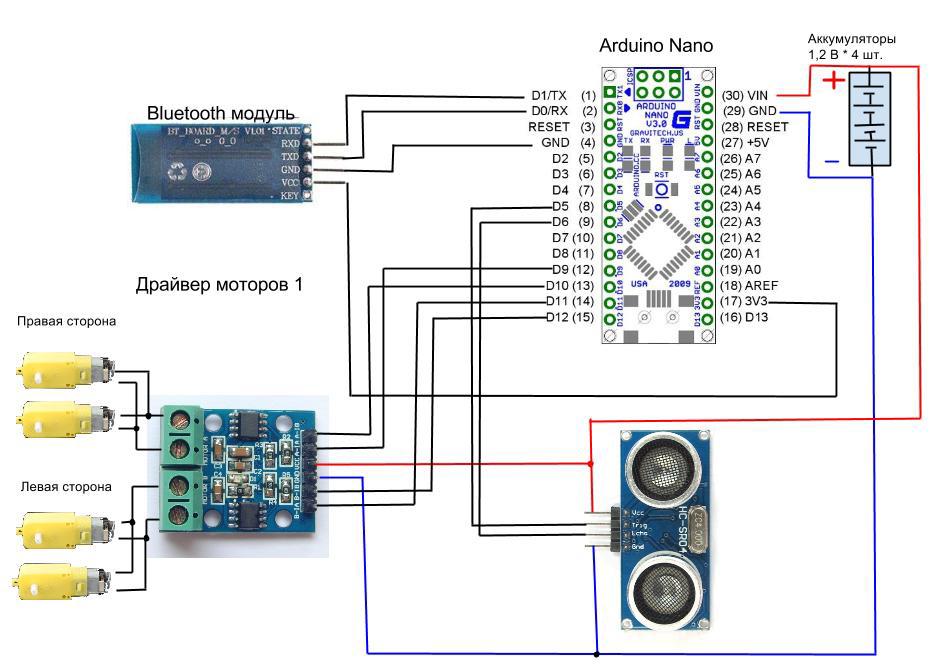
Figure 5
The robot is assembled, you must force it to execute commands sent from the android.
Let's load the sketch into Arduino, without forgetting to disconnect the power from the BT module (otherwise it will not be possible to load it):
We declare variables: R_A_IA, R_A_IB - determine the pin numbers of the engine control A (right side motors), L_B_IA, L_B_IB - conclusions governing the motor B (left side motors. We initiate the serial connection and set the data transfer rate in bit / s (baud) - 38400. We set the operating mode of the outputs of the control motors - OUTPUT (outputs). We supply the value HIGH to all the outputs, which means that the motors are disabled (table 2).
We define the functions: go_forward (), go_back (), go_right (), go_left (), stop_robot (), which start the engines in the forward or reverse direction of rotation, thereby setting the robot in motion - forward, backward, right, left, stop, respectively.
In the main program cycle, data is read and processed in the serial port from the BT module. Depending on the command received, one or another function is executed and the text about its execution is transmitted via the serial port.
Create a new project “Android application project”. As it was written in the last article, to work with BT it is necessary to set the right to use it with our application. To do this, go to the manifest, select the Permissions tab, click add, then Uses permission, and set the following rights: android.permission.BLUETOOTH, android.permission.BLUETOOTH_ADMIN
Create the main activity, in res / layout / activity_main.xml put the code:
This is what the main activity will look like:
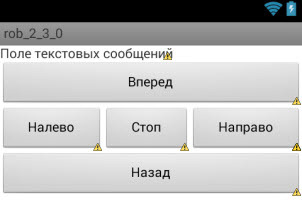
The txtrobot text box will display all the information we need. Buttons b0, b1, b2, b3, b4 will send commands to arduino (0, 1, 2, 3, 4)
Go to src /../ MainActivity.java here and our main code will be located.
In the previous article in step 4, a code was presented that allows you to send and receive data on BT. We take this code as a basis.
In the onPause () and onResume () activation states, we add a condition for checking the existence of BT in the android and determining whether it is enabled. In the previous article, this condition was absent in connection with what when the application was started, if the BT was disabled, it ended with an error and only after that it offered to turn on the BT.
Declare variables for storing buttons:
Find them by ID:
Let's write handlers for pressing these buttons to send commands:
Full application code:
This application allows you to control the robot using the android, sending commands on the BT to Arduino, and taking text answers from it. The first part of the task is completed.
To work with an ultrasonic sensor, we will use the finished library.
ultrasonic-HC-SR04.zip
Unpack the files and put them in the directory where the sketch is located
We connect library
The Ultrasonic constructor takes two parameters — the pin numbers to which Trig and Echo are connected, respectively:
We obtain data on the distance to the object in centimeters:
We transfer data to the serial port, for subsequent transmission through the BT module.
The symbols "*" and "#" indicate the beginning and end of the transmitted block of information about the distance to the object. This is necessary in order to clearly separate the necessary data from each other, since during their transfer a part is lost or arrives late.
Full sketch to load in arduino:
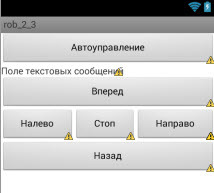
Add the button "b5" (automanagement) to the main activation. The code is below:
Thus, the main activity will take the form:
Let's declare b5 variable:
And the flag allows you to determine whether the automatic control is enabled or not:
Find it by ID:
Create a handler for its pressing:
And also we will make changes to the handler of the b0 button (Stop)
It remains to create an algorithm that allows the robot to move independently around the room and go around obstacles.
We process the obtained data on the distance to the object sent by arduino. If the distance to the object is less than 50 cm. Then we turn right, otherwise we go straight:
The following is the full Activity code:
The created application for android in conjunction with the presented arduino sketch allows you to remotely control the robot yourself and activate the autonomous control mode, in which the robot moves in the forward direction and, if necessary, circles obstacles.
The result of the work done is the simplest reflex robot. Further application of more complex algorithms based on the given template applications and sketches will allow you to create robots based on the model, on the target, on the utility, learning robots, etc.
For the following article I made an order for only one module:
RESULT: 524.65
In the comments to the previous article, the commanderxo user habr advised not to reinvent the wheel, but to use the standard protocol Firmata (a protocol for exchanging data between arduino and the server). Unfortunately, I did not find a workable library for android in conjunction with BT. I don’t have enough time and energy to write my library, so in this article I continue to reinvent the wheel. If someone from Habr users has information about such a library, please share.
Picture 1
Table of contents
Article 1. ROBOT based on: android, arduino, bluetooth. Start
Article 2. ROBOT based on: android, arduino, bluetooth. Reflex. Part 2.
It is assumed that the person reading the article already has an idea about:
-Basic electronics concepts
-The previous article
Formulation of the problem
Create a robot that performs the following functionality:
-Has remote control using a smartphone (moving forward, backward, left, right)
-Transmits to the smartphone data about the distance to the object located in front of him (based on ultra sound sensor)
-Has an autonomous control mode: continuously moves around the room, when it encounters obstacles, changes its direction of movement, thereby circling the obstacle.
')
Some theory
Our world is a complex system in which a huge number of objects interact with each other, subject to certain laws of physics, therefore creating a robot functioning within this system is a very laborious task. To simplify the process of creating the first robot, we use the concept of abstraction of the environment (in which the robot is placed) and the actions of the robot. In future articles we will complicate the environment and, accordingly, the actions of the robot.
Environment abstraction
The environment where our first robot will live will be a two-dimensional world and have the following characteristics:
1) Fully observable, i.e. Robot sensors provide access to complete information about the state of the environment at any time. Fully observable environment options are convenient because the robot does not need to maintain any internal state in order to be aware of everything that happens in this world.
2) Deterministic. If the next state of the environment is completely determined by the current state and the action performed by the robot, then this environment is called deterministic; otherwise, it is stochastic.
3) Episodic. In an episodic problem environment, the robot's experience consists of inseparable episodes. Each episode includes the perception of the environment by the robot, and then the execution of a single action. It is extremely important that the next episode does not depend on the actions taken in previous episodes. In episodic versions of the environment, the choice of action in each episode depends only on the episode itself.
4) Static. If the environment can change in the course of how the robot chooses the next action, then this environment is called dynamic for this robot; otherwise, it is static.
5) Continuous — The distinction between discrete and continuous media options may relate to the state of the environment, the way time is recorded, and the agent's perceptions and actions. In our case, it is considered that the state of the environment changes continuously. For example, the game of chess is discrete, since it has a finite number of different states.
6) A single agent is an environment in which there is one object (robot), and other objects do not affect it and do not compete with it.
Abstraction of robot actions
1) Movement - the robot can move in two directions (back, forward) and turn around (left, right)
2) The sensors of the robot (ultrasonic sensor), allows you to determine the distance to the object. The distance can be determined from 0.02 meters to 4 meters.
Thus, we define that the robot created in this article is a simple reflex robot. Such robots select actions based on the current act of perception, ignoring the rest of the history of acts of perception.
Brief information on used parts and modules
Engine Driver HG7881. To control the motors of the robot, a device is needed that would convert low-power control signals into currents sufficient to control the motors. Such a device is called an engine driver.
HG7881 is a two-channel driver for engines, power supply is possible from a source of 2.5 - 12 V. Description of driver outputs:
Table 1
| Conclusion | Description |
| B-IA | Engine B Input A (IA) |
| B-ib | Engine B Input B (IB) |
| GND | Earth (Minus) |
| VCC | Operating voltage 2.5-12V (Plus) |
| A-IA | Engine A Input A (IA) |
| A-IB | Engine A Input B (IB) |
In order to make the engines work in the desired way, we need to send logical signals (HIGH, LOW) to the outputs (B-IA, B-IB, A-IA, A-IB). Motor truth table:
table 2
| IA | IB | Engine condition |
| L | L | Off |
| H | L | Forward |
| L | H | Reverse |
| H | H | Off |
Ultrasonic distance measuring sensor HC-SR04. Determines the distance to the object, measuring the time of reflection of the sound wave from the object.
The sensor emits a short ultrasonic pulse (at time 0), which is reflected from the object and received by the sensor. The distance is calculated based on the time to echo and the speed of sound in the air.
A pulse of 10 μs duration is applied to the output (Trig), the ultrasonic module emits 8 packets of the ultrasonic signal with a frequency of 40 kHz and detects their echo. The measured distance to the object is proportional to the width of the echo (Echo) and can be calculated by the formula:
Pulse width / 58 = distance in cm.
Assembly of the robot and connection of all modules
We assemble the platform (Fig.2).
Figure 2
We connect the engines to the driver (Fig. 3). Two engines per driver connector, i.e. engines of the left side of the platform to the “Motor B” connector, engines of the right side - “Motor A”. The platform will be controlled in the same way as the tracked one. When moving forward and backward, all engines work synchronously in one direction, when turning right, the engines of the right side of the platform stop, and the left move synchronously, when turning left, the left side engines stop and the right move synchronously.
Figure 3
We fasten the upper part of the platform. We connect the driver of engines, arduino, batteries, BT module and ultrasonic sensor to the breadboard (Fig.4)
Figure 4
Connection diagram is presented in (Fig.5). The power supply of the Arduino, the ultrasonic sensor and the driver of the engines (and therefore of the engines themselves) is provided by 4 batteries connected in series (1.2 V., 2700 mA / h), the BT module is powered from the output of the Arduino 3.3 V.
Figure 5
The robot is assembled, you must force it to execute commands sent from the android.
Sketch for Arduino STEP 1 - Remote control of the robot
Let's load the sketch into Arduino, without forgetting to disconnect the power from the BT module (otherwise it will not be possible to load it):
Sketch for Arduino STEP 1
// char incomingbyte; // //motors A (RIGHT) int R_A_IA = 9; // A-IA int R_A_IB = 10; // A-IB //motors B (LEFT) int L_B_IA = 11; // B-IA int L_B_IB = 12; // B-IB // void setup() { Serial.begin(38400); //motors RIGHT pinMode(R_A_IA,OUTPUT); digitalWrite(R_A_IA, HIGH); pinMode(R_A_IB,OUTPUT); digitalWrite(R_A_IB, HIGH); //motors LEFT pinMode(L_B_IA,OUTPUT); digitalWrite(L_B_IA, HIGH); pinMode(L_B_IB,OUTPUT); digitalWrite(L_B_IB, HIGH); } void go_forward(){ //motors LEFT digitalWrite(L_B_IA, LOW); digitalWrite(L_B_IB, HIGH); //motors RIGHT digitalWrite(R_A_IA, LOW); digitalWrite(R_A_IB, HIGH); } void go_back(){ //motors LEFT digitalWrite(L_B_IA, HIGH); digitalWrite(L_B_IB, LOW); //motors RIGHT digitalWrite(R_A_IA, HIGH); digitalWrite(R_A_IB, LOW); } void go_right(){ //motors LEFT digitalWrite(L_B_IA, LOW); digitalWrite(L_B_IB, HIGH); //motors RIGHT digitalWrite(R_A_IA, LOW); digitalWrite(R_A_IB, LOW); } void go_left(){ //motors LEFT digitalWrite(L_B_IA, LOW); digitalWrite(L_B_IB, LOW); //motors RIGHT digitalWrite(R_A_IA, LOW); digitalWrite(R_A_IB, HIGH); } void stop_robot(){ //motors LEFT digitalWrite(L_B_IA, LOW); digitalWrite(L_B_IB, LOW); //motors RIGHT digitalWrite(R_A_IA, LOW); digitalWrite(R_A_IB, LOW); } // void loop() { if (Serial.available() > 0){ incomingbyte = Serial.read(); if (incomingbyte == '1'){ go_forward(); Serial.println("FORWARD"); } if (incomingbyte == '2'){ go_back(); Serial.println("BACK"); } if (incomingbyte == '3'){ go_right(); Serial.println("RIGHT"); } if (incomingbyte == '4'){ go_left(); Serial.println("LEFT"); } if (incomingbyte=='0'){ stop_robot(); Serial.println("STOP"); } } } We declare variables: R_A_IA, R_A_IB - determine the pin numbers of the engine control A (right side motors), L_B_IA, L_B_IB - conclusions governing the motor B (left side motors. We initiate the serial connection and set the data transfer rate in bit / s (baud) - 38400. We set the operating mode of the outputs of the control motors - OUTPUT (outputs). We supply the value HIGH to all the outputs, which means that the motors are disabled (table 2).
We define the functions: go_forward (), go_back (), go_right (), go_left (), stop_robot (), which start the engines in the forward or reverse direction of rotation, thereby setting the robot in motion - forward, backward, right, left, stop, respectively.
In the main program cycle, data is read and processed in the serial port from the BT module. Depending on the command received, one or another function is executed and the text about its execution is transmitted via the serial port.
Android application STEP 1 - Remote control robot
Create a new project “Android application project”. As it was written in the last article, to work with BT it is necessary to set the right to use it with our application. To do this, go to the manifest, select the Permissions tab, click add, then Uses permission, and set the following rights: android.permission.BLUETOOTH, android.permission.BLUETOOTH_ADMIN
Create the main activity, in res / layout / activity_main.xml put the code:
main activity STEP 1
<LinearLayout xmlns:android="http://schemas.android.com/apk/res/android" android:layout_width="fill_parent" android:layout_height="fill_parent" android:orientation="vertical" > <TextView android:id="@+id/txtrobot" android:layout_width="wrap_content" android:layout_height="wrap_content" android:text=" " /> <LinearLayout android:layout_width="match_parent" android:layout_height="wrap_content" > <Button android:id="@+id/b1" android:layout_width="wrap_content" android:layout_height="wrap_content" android:layout_weight="100" android:text="" /> </LinearLayout> <LinearLayout android:layout_width="match_parent" android:layout_height="wrap_content" > <LinearLayout android:layout_width="wrap_content" android:layout_height="match_parent" android:layout_weight="100" > <Button android:id="@+id/b4" android:layout_width="wrap_content" android:layout_height="wrap_content" android:layout_weight="100" android:text="" /> <Button android:id="@+id/b0" android:layout_width="wrap_content" android:layout_height="wrap_content" android:layout_weight="100" android:text="" /> <Button android:id="@+id/b3" android:layout_width="wrap_content" android:layout_height="wrap_content" android:layout_weight="100" android:text="" /> </LinearLayout> </LinearLayout> <LinearLayout android:layout_width="match_parent" android:layout_height="wrap_content" > <Button android:id="@+id/b2" android:layout_width="wrap_content" android:layout_height="wrap_content" android:layout_gravity="center" android:layout_weight="100" android:text="" /> </LinearLayout> </LinearLayout> This is what the main activity will look like:
The txtrobot text box will display all the information we need. Buttons b0, b1, b2, b3, b4 will send commands to arduino (0, 1, 2, 3, 4)
Go to src /../ MainActivity.java here and our main code will be located.
In the previous article in step 4, a code was presented that allows you to send and receive data on BT. We take this code as a basis.
In the onPause () and onResume () activation states, we add a condition for checking the existence of BT in the android and determining whether it is enabled. In the previous article, this condition was absent in connection with what when the application was started, if the BT was disabled, it ended with an error and only after that it offered to turn on the BT.
if (btAdapter != null){ if (btAdapter.isEnabled()){ // } } Declare variables for storing buttons:
Button b0, b1, b2, b3, b4; Find them by ID:
b0 = (Button) findViewById(R.id.b0);// b1 = (Button) findViewById(R.id.b1);// b2 = (Button) findViewById(R.id.b2);// b3 = (Button) findViewById(R.id.b3);// b4 = (Button) findViewById(R.id.b4);// Let's write handlers for pressing these buttons to send commands:
b0.setOnClickListener(new OnClickListener() { public void onClick(View v) { MyThred.sendData("0"); } }); b1.setOnClickListener(new OnClickListener() { public void onClick(View v) { MyThred.sendData("1"); } }); b2.setOnClickListener(new OnClickListener() { public void onClick(View v) { MyThred.sendData("2"); } }); b3.setOnClickListener(new OnClickListener() { public void onClick(View v) { MyThred.sendData("3"); } }); b4.setOnClickListener(new OnClickListener() { public void onClick(View v) { MyThred.sendData("4"); } }); Full application code:
Application code Step 1
package com.example.rob_2_3_0; import java.io.IOException; import java.io.InputStream; import java.io.OutputStream; import java.util.UUID; import com.example.rob_2_3_0.R; import android.os.Bundle; import android.os.Handler; import android.app.Activity; import android.util.Log; import android.view.View; import android.view.View.OnClickListener; import android.widget.Button; import android.widget.TextView; import android.widget.Toast; import android.bluetooth.*; import android.content.Intent; public class MainActivity extends Activity { private static final int REQUEST_ENABLE_BT = 1; final int ArduinoData = 1; final String LOG_TAG = "myLogs"; private BluetoothAdapter btAdapter = null; private BluetoothSocket btSocket = null; private static String MacAddress = "20:11:02:47:01:60"; // MAC- private static final UUID MY_UUID = UUID.fromString("00001101-0000-1000-8000-00805F9B34FB"); private ConnectedThred MyThred = null; public TextView mytext; Button b0, b1, b2, b3, b4; boolean fl=false; Handler h; @Override protected void onCreate(Bundle savedInstanceState) { super.onCreate(savedInstanceState); setContentView(R.layout.activity_main); btAdapter = BluetoothAdapter.getDefaultAdapter(); mytext = (TextView) findViewById(R.id.txtrobot); if (btAdapter != null){ if (btAdapter.isEnabled()){ mytext.setText("Bluetooth . ."); }else { Intent enableBtIntent = new Intent(BluetoothAdapter.ACTION_REQUEST_ENABLE); startActivityForResult(enableBtIntent, REQUEST_ENABLE_BT); } }else { MyError("Fatal Error", "Bluetooth "); } b0 = (Button) findViewById(R.id.b0);// b1 = (Button) findViewById(R.id.b1);// b2 = (Button) findViewById(R.id.b2);// b3 = (Button) findViewById(R.id.b3);// b4 = (Button) findViewById(R.id.b4);// b0.setOnClickListener(new OnClickListener() { public void onClick(View v) { MyThred.sendData("0"); } }); b1.setOnClickListener(new OnClickListener() { public void onClick(View v) { MyThred.sendData("1"); } }); b2.setOnClickListener(new OnClickListener() { public void onClick(View v) { MyThred.sendData("2"); } }); b3.setOnClickListener(new OnClickListener() { public void onClick(View v) { MyThred.sendData("3"); } }); b4.setOnClickListener(new OnClickListener() { public void onClick(View v) { MyThred.sendData("4"); } }); h = new Handler() { public void handleMessage(android.os.Message msg) { switch (msg.what) { case ArduinoData: byte[] readBuf = (byte[]) msg.obj; String strIncom = new String(readBuf, 0, msg.arg1); mytext.setText(" Arduino: " + strIncom); break; } }; }; } @Override public void onResume() { super.onResume(); if (btAdapter != null){ if (btAdapter.isEnabled()){ BluetoothDevice device = btAdapter.getRemoteDevice(MacAddress); Log.d(LOG_TAG, "*** Device***"+device.getName()); try { btSocket = device.createRfcommSocketToServiceRecord(MY_UUID); Log.d(LOG_TAG, "... ..."); } catch (IOException e) { MyError("Fatal Error", " onResume() : " + e.getMessage() + "."); } btAdapter.cancelDiscovery(); Log.d(LOG_TAG, "*** ***"); Log.d(LOG_TAG, "***...***"); try { btSocket.connect(); Log.d(LOG_TAG, "*** ***"); } catch (IOException e) { try { btSocket.close(); } catch (IOException e2) { MyError("Fatal Error", " onResume() " + e2.getMessage() + "."); } } MyThred = new ConnectedThred(btSocket); MyThred.start(); } } } @Override public void onPause() { super.onPause(); Log.d(LOG_TAG, "...In onPause()..."); if (btAdapter != null){ if (btAdapter.isEnabled()){ if (MyThred.status_OutStrem() != null) { MyThred.cancel(); } try { btSocket.close(); } catch (IOException e2) { MyError("Fatal Error", " onPause() " + e2.getMessage() + "."); } } } }//OnPause private void MyError(String title, String message){ Toast.makeText(getBaseContext(), title + " - " + message, Toast.LENGTH_LONG).show(); finish(); } // private class ConnectedThred extends Thread{ private final BluetoothSocket copyBtSocket; private final OutputStream OutStrem; private final InputStream InStrem; public ConnectedThred(BluetoothSocket socket){ copyBtSocket = socket; OutputStream tmpOut = null; InputStream tmpIn = null; try{ tmpOut = socket.getOutputStream(); tmpIn = socket.getInputStream(); } catch (IOException e){} OutStrem = tmpOut; InStrem = tmpIn; } public void run() { byte[] buffer = new byte[1024]; int bytes; while(true){ try{ bytes = InStrem.read(buffer); h.obtainMessage(ArduinoData, bytes, -1, buffer).sendToTarget(); }catch(IOException e){break;} } } public void sendData(String message) { byte[] msgBuffer = message.getBytes(); Log.d(LOG_TAG, "*** : " + message + "***" ); try { OutStrem.write(msgBuffer); } catch (IOException e) {} } public void cancel(){ try { copyBtSocket.close(); }catch(IOException e){} } public Object status_OutStrem(){ if (OutStrem == null){return null; }else{return OutStrem;} } } } This application allows you to control the robot using the android, sending commands on the BT to Arduino, and taking text answers from it. The first part of the task is completed.
Sketch for Arduino STEP 2 - Autonomous control of the robot
To work with an ultrasonic sensor, we will use the finished library.
ultrasonic-HC-SR04.zip
Unpack the files and put them in the directory where the sketch is located
We connect library
#include "Ultrasonic.h" The Ultrasonic constructor takes two parameters — the pin numbers to which Trig and Echo are connected, respectively:
Ultrasonic ultrasonic(5, 6); We obtain data on the distance to the object in centimeters:
float dist_cm = ultrasonic.Ranging(CM); // We transfer data to the serial port, for subsequent transmission through the BT module.
Serial.print("*"); Serial.print(dist_cm); Serial.print("#"); The symbols "*" and "#" indicate the beginning and end of the transmitted block of information about the distance to the object. This is necessary in order to clearly separate the necessary data from each other, since during their transfer a part is lost or arrives late.
Full sketch to load in arduino:
Sketch for Arduino STEP 2
#include "Ultrasonic.h" // char incomingbyte; int i=0; //motors A (LEFT) int R_A_IA = 9; // A-IA int R_A_IB = 10; // A-IB //motors B (RIGHT) int L_B_IA = 11; // B-IA int L_B_IB = 12; // B-IB // Ultrasonic ultrasonic(5, 6); // void setup() { Serial.begin(38400); //RIGHT pinMode(R_A_IA,OUTPUT); digitalWrite(R_A_IA, HIGH); pinMode(R_A_IB,OUTPUT); digitalWrite(R_A_IB, HIGH); //LEFT pinMode(L_B_IA,OUTPUT); digitalWrite(L_B_IA, HIGH); pinMode(L_B_IB,OUTPUT); digitalWrite(L_B_IB, HIGH); } void go_forward(){ //LEFT digitalWrite(L_B_IA, LOW); digitalWrite(L_B_IB, HIGH); //RIGHT digitalWrite(R_A_IA, LOW); digitalWrite(R_A_IB, HIGH); } void go_back(){ //LEFT digitalWrite(L_B_IA, HIGH); digitalWrite(L_B_IB, LOW); //RIGHT digitalWrite(R_A_IA, HIGH); digitalWrite(R_A_IB, LOW); } void go_right(){ //LEFT digitalWrite(L_B_IA, LOW); digitalWrite(L_B_IB, HIGH); //RIGHT digitalWrite(R_A_IA, LOW); digitalWrite(R_A_IB, LOW); } void go_left(){ //LEFT digitalWrite(L_B_IA, LOW); digitalWrite(L_B_IB, LOW); //RIGHT digitalWrite(R_A_IA, LOW); digitalWrite(R_A_IB, HIGH); } void stop_robot(){ //LEFT digitalWrite(L_B_IA, LOW); digitalWrite(L_B_IB, LOW); //RIGHT digitalWrite(R_A_IA, LOW); digitalWrite(R_A_IB, LOW); } // void loop() { if (Serial.available() > 0){ incomingbyte = Serial.read(); if (incomingbyte == '1'){ go_forward(); } if (incomingbyte == '2'){ go_back(); } if (incomingbyte == '3'){ go_right(); } if (incomingbyte == '4'){ go_left(); } if (incomingbyte=='0'){ stop_robot(); } } float dist_cm = ultrasonic.Ranging(CM); // Serial.print("*"); Serial.print(dist_cm); Serial.print("#"); } Android application STEP 2 - Autonomous control of the robot
Add the button "b5" (automanagement) to the main activation. The code is below:
main activity STEP 2
Content
<LinearLayout xmlns:android="http://schemas.android.com/apk/res/android" android:layout_width="fill_parent" android:layout_height="fill_parent" android:orientation="vertical" > <LinearLayout android:layout_width="match_parent" android:layout_height="wrap_content" > <Button android:id="@+id/b5" android:layout_width="wrap_content" android:layout_height="wrap_content" android:layout_weight="1" android:text="" /> </LinearLayout> <TextView android:id="@+id/txtrobot" android:layout_width="wrap_content" android:layout_height="wrap_content" android:text=" " /> <LinearLayout android:layout_width="match_parent" android:layout_height="wrap_content" > <Button android:id="@+id/b1" android:layout_width="wrap_content" android:layout_height="wrap_content" android:layout_weight="100" android:text="" /> </LinearLayout> <LinearLayout android:layout_width="match_parent" android:layout_height="wrap_content" > <LinearLayout android:layout_width="wrap_content" android:layout_height="match_parent" android:layout_weight="100" > <Button android:id="@+id/b4" android:layout_width="wrap_content" android:layout_height="wrap_content" android:layout_weight="100" android:text="" /> <Button android:id="@+id/b0" android:layout_width="wrap_content" android:layout_height="wrap_content" android:layout_weight="100" android:text="" /> <Button android:id="@+id/b3" android:layout_width="wrap_content" android:layout_height="wrap_content" android:layout_weight="100" android:text="" /> </LinearLayout> </LinearLayout> <LinearLayout android:layout_width="match_parent" android:layout_height="wrap_content" > <Button android:id="@+id/b2" android:layout_width="wrap_content" android:layout_height="wrap_content" android:layout_gravity="center" android:layout_weight="100" android:text="" /> </LinearLayout> </LinearLayout> Content
Thus, the main activity will take the form:
Let's declare b5 variable:
Button b0, b1, b2, b3, b4, b5; And the flag allows you to determine whether the automatic control is enabled or not:
boolean fl=false; Find it by ID:
b5 = (Button) findViewById(R.id.b5);// Create a handler for its pressing:
b5.setOnClickListener(new OnClickListener() { public void onClick(View v) { Log.d(LOG_TAG, " "); if (!fl){ Log.d(LOG_TAG, " "); fl=true; b1.setEnabled(false); b2.setEnabled(false); b3.setEnabled(false); b4.setEnabled(false); MyThred.sendData("1"); Log.d(LOG_TAG, " 1"); } } }); And also we will make changes to the handler of the b0 button (Stop)
b0.setOnClickListener(new OnClickListener() { public void onClick(View v) { MyThred.sendData("0"); if (fl) { fl = false; b1.setEnabled(true); b2.setEnabled(true); b3.setEnabled(true); b4.setEnabled(true); } } }); It remains to create an algorithm that allows the robot to move independently around the room and go around obstacles.
We process the obtained data on the distance to the object sent by arduino. If the distance to the object is less than 50 cm. Then we turn right, otherwise we go straight:
byte[] readBuf = (byte[]) msg.obj; String strIncom = new String(readBuf, 0, msg.arg1); sb.append(strIncom);// int beginOfLineIndex = sb.indexOf("*");// int endOfLineIndex = sb.indexOf("#");// // *# if ((endOfLineIndex > 0) && (beginOfLineIndex == 0)) { String sbprint = sb.substring(beginOfLineIndex+1, endOfLineIndex-3); mytext.setText(" Arduino: " + sbprint); if (fl){ int dist = Integer.parseInt(sbprint); if (dist<50) { MyThred.sendData("3"); } else { MyThred.sendData("1"); } } } sb.delete(0, sb.length()); The following is the full Activity code:
Application code Step 2
package com.robot.rob_2_3; import java.io.IOException; import java.io.InputStream; import java.io.OutputStream; import java.net.Socket; import java.util.UUID; import com.robot.rob_2_3.R; import android.os.Bundle; import android.os.CountDownTimer; import android.os.Handler; import android.app.Activity; import android.util.Log; import android.view.View; import android.view.View.OnClickListener; import android.widget.Button; import android.widget.TextView; import android.widget.Toast; import android.bluetooth.*; import android.content.Intent; public class MainActivity extends Activity { private static final int REQUEST_ENABLE_BT = 1; final int ArduinoData = 1; final String LOG_TAG = "myLogs"; private BluetoothAdapter btAdapter = null; private BluetoothSocket btSocket = null; private static String MacAddress = "20:11:02:47:01:60"; // MAC- private static final UUID MY_UUID = UUID.fromString("00001101-0000-1000-8000-00805F9B34FB"); private static final long MILLIS_PER_SECOND = 0; private ConnectedThred MyThred = null; public TextView mytext; Button b0, b1, b2, b3, b4, b5; boolean fl=false; Handler h; private StringBuilder sb = new StringBuilder(); @Override protected void onCreate(Bundle savedInstanceState) { super.onCreate(savedInstanceState); setContentView(R.layout.activity_main); btAdapter = BluetoothAdapter.getDefaultAdapter(); mytext = (TextView) findViewById(R.id.txtrobot); if (btAdapter != null){ if (btAdapter.isEnabled()){ mytext.setText("Bluetooth . ."); }else { Intent enableBtIntent = new Intent(BluetoothAdapter.ACTION_REQUEST_ENABLE); startActivityForResult(enableBtIntent, REQUEST_ENABLE_BT); } }else { MyError("Fatal Error", "Bluetooth "); } b0 = (Button) findViewById(R.id.b0);// b1 = (Button) findViewById(R.id.b1);// b2 = (Button) findViewById(R.id.b2);// b3 = (Button) findViewById(R.id.b3);// b4 = (Button) findViewById(R.id.b4);// b5 = (Button) findViewById(R.id.b5);// b0.setOnClickListener(new OnClickListener() { public void onClick(View v) { MyThred.sendData("0"); if (fl) { fl = false; b1.setEnabled(true); b2.setEnabled(true); b3.setEnabled(true); b4.setEnabled(true); } } }); b1.setOnClickListener(new OnClickListener() { public void onClick(View v) { MyThred.sendData("1"); } }); b2.setOnClickListener(new OnClickListener() { public void onClick(View v) { MyThred.sendData("2"); } }); b3.setOnClickListener(new OnClickListener() { public void onClick(View v) { MyThred.sendData("3"); } }); b4.setOnClickListener(new OnClickListener() { public void onClick(View v) { MyThred.sendData("4"); } }); b5.setOnClickListener(new OnClickListener() { public void onClick(View v) { Log.d(LOG_TAG, " "); if (!fl){ Log.d(LOG_TAG, " "); fl=true; b1.setEnabled(false); b2.setEnabled(false); b3.setEnabled(false); b4.setEnabled(false); MyThred.sendData("1"); Log.d(LOG_TAG, " 1"); } } }); h = new Handler() { public void handleMessage(android.os.Message msg) { switch (msg.what) { case ArduinoData: byte[] readBuf = (byte[]) msg.obj; String strIncom = new String(readBuf, 0, msg.arg1); sb.append(strIncom);// int beginOfLineIndex = sb.indexOf("*");// int endOfLineIndex = sb.indexOf("#");// // *# if ((endOfLineIndex > 0) && (beginOfLineIndex == 0)) { // , String sbprint = sb.substring(beginOfLineIndex+1, endOfLineIndex-3); // mytext.setText(" Arduino: " + sbprint); if (fl){ int dist = Integer.parseInt(sbprint); if (dist<50) { MyThred.sendData("3"); } else { MyThred.sendData("1"); } } } sb.delete(0, sb.length()); break; } }; }; } @Override public void onResume() { super.onResume(); if (btAdapter != null){ if (btAdapter.isEnabled()){ BluetoothDevice device = btAdapter.getRemoteDevice(MacAddress); Log.d(LOG_TAG, "*** Device***"+device.getName()); try { btSocket = device.createRfcommSocketToServiceRecord(MY_UUID); Log.d(LOG_TAG, "... ..."); } catch (IOException e) { MyError("Fatal Error", " onResume() : " + e.getMessage() + "."); } btAdapter.cancelDiscovery(); Log.d(LOG_TAG, "*** ***"); Log.d(LOG_TAG, "***...***"); try { btSocket.connect(); Log.d(LOG_TAG, "*** ***"); } catch (IOException e) { try { btSocket.close(); } catch (IOException e2) { MyError("Fatal Error", " onResume() " + e2.getMessage() + "."); } } MyThred = new ConnectedThred(btSocket); MyThred.start(); } } } @Override public void onPause() { super.onPause(); Log.d(LOG_TAG, "...In onPause()..."); if (btAdapter != null){ if (btAdapter.isEnabled()){ if (MyThred.status_OutStrem() != null) { MyThred.cancel(); } try { btSocket.close(); } catch (IOException e2) { MyError("Fatal Error", " onPause() " + e2.getMessage() + "."); } } } }//OnPause private void MyError(String title, String message){ Toast.makeText(getBaseContext(), title + " - " + message, Toast.LENGTH_LONG).show(); finish(); } // private class ConnectedThred extends Thread{ private final BluetoothSocket copyBtSocket; private final OutputStream OutStrem; private final InputStream InStrem; public ConnectedThred(BluetoothSocket socket){ copyBtSocket = socket; OutputStream tmpOut = null; InputStream tmpIn = null; try{ tmpOut = socket.getOutputStream(); tmpIn = socket.getInputStream(); } catch (IOException e){} OutStrem = tmpOut; InStrem = tmpIn; } public void run() { byte[] buffer = new byte[1024]; int bytes; while(true){ try{ bytes = InStrem.read(buffer); h.obtainMessage(ArduinoData, bytes, -1, buffer).sendToTarget(); }catch(IOException e){break;} } } public void sendData(String message) { byte[] msgBuffer = message.getBytes(); Log.d(LOG_TAG, "*** : " + message + "***" ); try { OutStrem.write(msgBuffer); } catch (IOException e) {} } public void cancel(){ try { copyBtSocket.close(); }catch(IOException e){} } public Object status_OutStrem(){ if (OutStrem == null){return null; }else{return OutStrem;} } } } The created application for android in conjunction with the presented arduino sketch allows you to remotely control the robot yourself and activate the autonomous control mode, in which the robot moves in the forward direction and, if necessary, circles obstacles.
The result of the work done is the simplest reflex robot. Further application of more complex algorithms based on the given template applications and sketches will allow you to create robots based on the model, on the target, on the utility, learning robots, etc.
For the following article I made an order for only one module:
| Name | Link | Price ye | Price, rub | Qty | Amount |
| Wifi module | dx.com/p/hi-link-hlk-rm04-serial-port-ethernet-wi-fi-adapter-module-blue-black-214540#.UutHKD1_sd0 | 14.99 | 524.65 | one | 524.65 |
RESULT: 524.65
In the comments to the previous article, the commanderxo user habr advised not to reinvent the wheel, but to use the standard protocol Firmata (a protocol for exchanging data between arduino and the server). Unfortunately, I did not find a workable library for android in conjunction with BT. I don’t have enough time and energy to write my library, so in this article I continue to reinvent the wheel. If someone from Habr users has information about such a library, please share.
Source: https://habr.com/ru/post/211999/
All Articles