COOLRF: the right choice of sockets and switches smart home
What qualities should the sockets and switches of a smart home have? They should be inexpensive, cute in appearance, have minimum dimensions “in depth” and be able to work in the “button” mode (like a standard bell button). Finding one such switch in a series of any manufacturer is not an easy task. Find a series of switches - a task from the field of fiction. But fiction sometimes happens. Today we will introduce you to the sockets and switches LK60, which are perfect for the installation of embedded modules COOLRF. There are a lot of photos under the cut (traffic!).
A brief introduction to the course for those who first saw our project
We are developing a complete system of smart home. The “first sign” of our system is a DIY-dimmer. Here are its main characteristics:
')
If you want to join in the discussion of the features of the system, please read all our previous articles and comments to them. Most likely the questions after such an introduction will be much less.
- 2.4 GHz radio channel operation (own protocol, without licensing restrictions, or ZigBee implementation based on Atmtel BitCloud)
- Encrypted connection
- Installation without changing the standard wiring of an ordinary apartment
- Low power consumption
- The usual look of switches
- The possibility of independent expansion of both hardware and software functionality
- Open source code of both software and hardware
')
If you want to join in the discussion of the features of the system, please read all our previous articles and comments to them. Most likely the questions after such an introduction will be much less.
Want to keep abreast of all project events? It is not difficult at all!
You just need to subscribe to the update of our company in Habré and in the VKontakte group .
With VKontakte questions usually does not arise. To subscribe to Habr's updates, you need to go to the company’s page and click the “Subscribe” button in the block on the right.
With VKontakte questions usually does not arise. To subscribe to Habr's updates, you need to go to the company’s page and click the “Subscribe” button in the block on the right.
The find happened by chance. Last week in our group of VKontakte, we announced the following development - a relay module connected outside the outlet. It seemed to us that there would be absolutely not enough space in the wall behind the standard socket to accommodate the micromodule with the relay. One of the users showed that you can use strongly protruding outlets, there should be enough space behind them.
Walking around OBI today such a nice outlet was found (the price tag is 82 rubles):

This socket was with a very small mechanism in depth. It is even less deep than our “reference” switch-button from past posts. Protective curtains from the research spokes of children - in stock. Here is a photo in the same box:

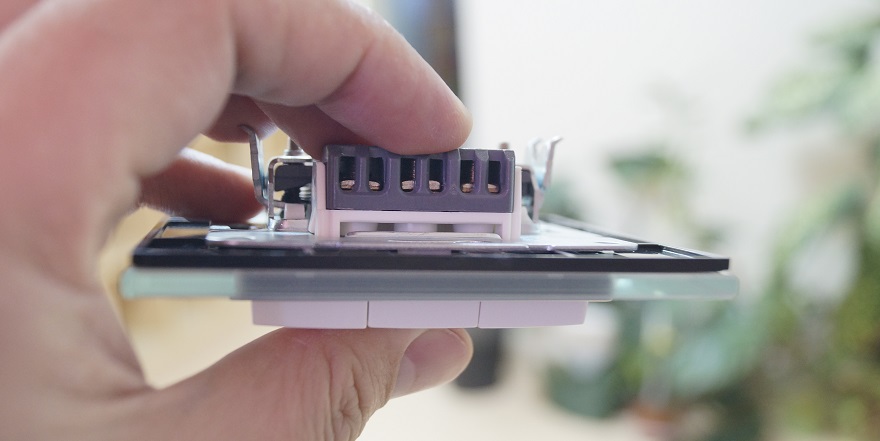
In general, the LK60 series turned out to be very promising. It seems to be produced like a Russian (“sort of like”, since the phrase “made in ..” could not be found anywhere) by the company. It is very inexpensive (premium decor is an exception). Not for the first year, available a bunch of colors as the switches themselves, and the framework. There are two types of frames - budget (ordinary plastic) and non-budget (for example glass and natural wood). All the switches of the series are not very deep; almost 3 cm of the sub-platform depth remains under the module. Consider what we bought and were able to touch with their own hands.
Three key switch
Unlike most two-button switches, usually implementing the scheme “one input - two outputs”, here we see the scheme “three inputs - three outputs”. Sometimes it may be useful. Price 117 rub.

Illuminated two-button switch
The standard scheme "one input - two outputs." Price 92 rubles.

The backlight is implemented like this:

Bell button
One-button one-switch without fixing with a wonderful bell pattern. Price 67 rub.

Traditionally, to control the lighting of a smart home, we assume the use of buttons, rather than conventional switches. This will allow the dimming control to be implemented using a one-button switch. He pressed, waited until the lighting caught fire at the desired brightness, was delighted, went on. Either pressed and immediately released, the lamps were lit at full power. Connecting conventional switches to do so will not work.
If you disassemble the call button, you can see that the same mechanism is used externally as in other components. But with the springs installed on special places like this:

A careful comparison of the different components of the LK60 showed that, indeed, they are all made on the basis of identical enclosures. And they all contain special grooves for the springs. To convert an ordinary switch into a switch-button, you just need to simply put a “magic” spring in it.

Thus, you can get two and three-key variations of special "home-house" switches. And do not bother with getting rid of the picture "bell" on the button to control the lamp. The picture is by the way made on the conscience (perhaps by a laser), and it will not work to remove it without harming the base.
Budget framework
There are different colors. In OBI there were only white and gray. Price 17 rubles.

Wearing a switch on the form look like this:

Non budgetary framework
We bought a sample frame "light glass". Made with high quality, even in the prescribed form a little and “fidgety”. Price 365 rubles.

The OBI consultants assured that it would be possible to disassemble this frame and insert any of its drawings behind the glass. The first turned out to be true, and the second - frank lies. The frame can be easily disassembled into components, but the color of the glass is caused not by the removable insert, but by spraying paint on the back side. This is how the frame looks like on the switch:

Pretty not boring. Especially for those who are fan of the Chinese glass switches LIVOLO. Frames are different - not only glass, but also wooden. The color of the "liner" frame (on our - silver) can also be varied. In OBI, there were only two colors of glass, so the tree could not be touched.
Total
The LK60 series should be great for managing our modules. The switches of this series can be easily modified to the functionality of the "buttons", take up very little space in the wall boxes, will satisfy most of the expectations in appearance. Prices for the components of the line also pleased. Yes, glass is certainly expensive, but this is only for those who want to show off.
By the way for those who wish. Conventional frames may well be refined by LEDs, which are lit by signals from the control radio module. It is enough to drill a hole of the required diameter in the frame and put the LED on it with glue. From the outside it will look quite adequate, the frame design allows you to place everything you need from the inside.
For those who want to show off more strongly - it is quite possible to modify the glass framework. At a minimum, engrave the captions / icons for the buttons on the back of the glass. As a maximum, you can add a highlight and another indication of something. There is no empty space behind the glass frame, but it is possible to make grooves for wires and placement of SMD LEDs in a plastic substrate. It can turn out very beautiful and functional piece. We will definitely try to do this and tell you about our achievements in our next posts.
UPD. Continuation of a story.
Source: https://habr.com/ru/post/211971/
All Articles