Virtualization with OpenVZ

There are many articles on Habré that container virtualization is bad or good, but I couldn’t find the step-by-step instructions on how to install and configure it. I will try to fill this gap.
Virtualization is a very hot topic, as it allows more efficient use of server resources. And, I admit, I was very pleased to meet OpenVZ.
')
OpenVZ is an implementation of virtualization technology at the operating system level, which is based on the Linux kernel. OpenVZ allows you to run multiple isolated copies of the operating system, so-called containers (Virtual Environments, VE) on a single physical server.
Since OpenVZ is based on the Linux kernel, only GNU / Linux distributions can be used as guest systems. However, operating system-level virtualization in OpenVZ also provides many advantages, namely, ease of administration, dense placement of virtual containers in the host system (this usually has a positive effect on the cost of VPS hosting) and slightly better performance than full virtualization technologies. .
Of course, there are enough flaws. The main one is that, unlike KVM, OpenVZ modules are not included in the vanilla core, so the latter requires a separate core and its version is far from the last. At the time of publication of this article, the latest stable version is 2.6.32-042stab084.14. From this, in fact, it follows that not every distribution kit can act as a host system on OpenVZ, but only with the 2.6.32 kernel and around the version. Therefore, let's say, OpenVZ - the kernel under Ubuntu 12.04 LTS is unlikely to start (which I have already tried), because the kernel here is version 3.8. But not everything is so bad, since for RedHat 6 (CentOS 6, Scientific Linux 6) and Debian 7 everything is simply installed and these distributions are officially supported by Parallels.
The next drawback is that all containers work under one core (the host system core) and adding the necessary kernel module will not be as easy as in the case of full virtualization technologies. As a result, the NFS server or other services that require tight integration with the kernel will not be able to run on OpenVZ containers. About some other disadvantages and advantages of virtualization systems can be read for example here .
The theory without practice is dead, so it's time to describe the installation and configuration of the host system for OpenVZ. I chose CentOS 6.5 as the host system. Add repositories to install the OpenVZ kernel and utilities for working with containers:
# wget -P /etc/yum.repos.d/ http://ftp.openvz.org/openvz.repo # rpm --import http://ftp.openvz.org/RPM-GPG-Key-OpenVZ Install the kernel and utilities:
# yum install vzctl vzquota ploop The official manual says that with vzctl from version 4.4 settings of the kernel parameters (/etc/sysctl.conf) is not necessary .
Reboot and check the kernel version:
# uname -a Linux centos 2.6.32-042stab084.14 # 1 SMP Mon Dec 16 18:16:56 MSK 2013 x86_64 x86_64 x86_64 GNU/Linux If the version is the same, then everything is done correctly, otherwise you should check which kernel loads GRUB. We proceed to the creation of the container:
# vzctl create 103 --ostemplate debian-7.0-x86_64 --config vswap-2g - 2014-01-14 16:54:54 - http://download.openvz.org/template/precreated/debian-7.0-x86_64.tar.gz Resolving download.openvz.org ... 199.115.104.11 , 2620 : e6 :: 104:11 Connecting to download.openvz.org | 199.115.104.11 | 80 ... connected . HTTP request sent , awaiting response ... 200 OK Length: 303736979 ( 290M ) [ application / x - gzip ] Saving to : ` /vz/template/cache/debian-7.0-x86_64.tar.gz ' 43 % [ =========================== >] 132,616,648 2.17M / s eta 2m 1s The template for creating a container with Debian 7 will be downloaded from the OpenVZ website and installed.
# vzlist -a CTID NPROC STATUS IP_ADDR HOSTNAME 103 - stopped - Set the configuration for the new container:
# vzctl set 103 --onboot yes --save # - # vzctl set 103 --hostname debian7.example.com - save # # vzctl set 103 --save --ipadd 192.168.1.31 # IP , VENET - # vzctl set 103 --save --nameserver 8.8.8.8 -nameserver 8.8.4.4 # DNS - # vzctl set 103 --save --cpus 4 # - cpu- # vzctl set 103 --save --ram 8G # RAM # vzctl set 103 --save --swap 4G # swap # vzctl set 103 --save --diskspace 100G # # vzctl start 103 # # vzctl exec 103 passwd # root- Thus, a container was created on Debian 7. VENET connections were configured to communicate with the outside world.
In the future, you can somewhat correct the configuration of the container by editing the configuration file:
# vim /etc/vz/conf/103.conf # RAM PHYSPAGES = " 0:2097152 " # Swap SWAPPAGES = " 0:1048576 " # Disk quota parameters ( in form of softlimit : hardlimit ) DISKSPACE = " 104857600:104857600 " DISKINODES = " 200000:220000 " QUOTATIME = "0" # CPU fair scheduler parameter CPUUNITS = "1000" VE_ROOT = "/vz/root/$VEID" VE_PRIVATE = "/vz/private/$VEID" OSTEMPLATE = "debian-7.0-x86_64" ORIGIN_SAMPLE = "vswap-2g" ONBOOT = "yes" HOSTNAME = "debian7.example.com" NETIF = "ifname = eth0 , mac = 00:18:51:CF:E9:09 host_ifname = veth104.0 , host_mac = FE:FF:FF:FF:FF:FF" NAMESERVER = "8.8.8.8 8.8.4.4" CPUS = " 4" Physically, the container is located at / vz / private / 103:
# cd /vz/private/103 # ls bin dev home lib64 media opt root sbin srv tmp var boot etc lib lost + found mnt proc run selinux sys usr If the container works, then all changes should be added using the path / vz / root / 103, which is synchronized with / vz / private / 103.
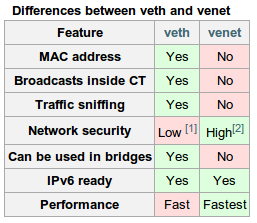
OpenVZ has the ability to configure the VETH (Virtual ETHernet) or VENET (Virtual NETwork) network device inside the container. VETH allows broadcasts-messages inside the container and has a MAC address on the interface, so you can configure automatic receiving of the address using DHCP or configure Samba server, which also requires broadcasts-messages. The VETH interface is only set using vzctl, all further interface settings (IP assignments, gateway, etc.) must be carried out in the container itself. However, most likely, VENET connections will be more than enough. The advantages of the latter can be attributed to the high speed of work in comparison with VETH and its quick setup by the resources of the host machine.
Something more about container network connections can be read on the official OpenVZ wiki .
Now I will give the process of creating a container with a VETH connection. To do this, you must first create a vmbr0 bridge. Install the bridge-utils package and then configure the vmbr0 interface:
# vim /etc/sysconfig/network-scripts/ifcfg-vmbr0 DEVICE = "vmbr0" BOOTPROTO = "static" IPV6INIT = "no" ONBOOT = "yes" TYPE = "Bridge" DELAY = 0 IPADDR = 192.168.1.30 NETMASK = 255.255.255.0 GATEWAY = 192.168.1.1 And we reconfigure eth0 as follows:
# vim /etc/sysconfig/network-scripts/ifcfg-eth0 DEVICE = "eth0" ONBOOT = "yes" IPV6INIT = "no" TYPE = "Ethernet" BRIDGE = "vmbr0" Previously eth0 in this example had a static IP of 192.168.1.30.
Create /etc/vz/vznet.conf with the following content:
# vim /etc/vz/vznet.conf #! /bin/bash EXTERNAL_SCRIPT = "/usr/sbin/vznetaddbr" Restart the host machine.
This time, as an example, choose another distribution to create a container with a VETH network connection:
# vzctl create 102 --ostemplate centos-6-x86_64 --config vswap-1g And accordingly we configure:
# vzctl set 102 --save --onboot yes # vzctl set 102 --save --hostname centos6.example.com # vzctl set 102 --save --netif_add eth0,,,FE:FF:FF:FF:FF:FF # VETH- # vzctl set 102 --save --nameserver 8.8.8.8 --nameserver 8.8.4.4 # vzctl set 102 --save --cpus 4 # vzctl set 102 --save --ram 8G # vzctl set 102 --save --swap 4G # vzctl set 102 --save --diskspace 100G # vzctl start 102 # vzctl exec 102 passwd Set the network configuration of the new container and restart the network:
# cat << _EOF_ > /vz/root/102/etc/sysconfig/network-scripts/ifcfg-eth0 DEVICE = "eth0" HOSTNAME = "centos6" IPV6INIT = "no" MTU = "1500" TYPE = "Ethernet" ONBOOT = yes BOOTPROTO = static IPADDR = 192.168.1.32 NETMASK = 255.255.255.0 GATEWAY = 192.168.1.1 _EOF_ # vzctl exec 102 /etc/init.d/network restart For Ubuntu / Debian, the network settings are in / etc / network / interfaces:
# cat << _EOF_ > /vz/root/102/etc/network/interfaces auto lo eth0 iface lo inet loopback iface eth0 inet static address 192.168.1.32 netmask 255.255.255.0 gateway 192.168.1.1 _EOF_ # vzctl exec 102 /etc/init.d/networking restart As a result, the network connection (VETH) should look like this:
# ip a 1: lo : <LOOPBACK,UP,LOWER_UP> mtu 16436 qdisc noqueue state UNKNOWN link / loopback 00:00:00:00:00:00 brd 00:00:00:00:00:00 inet 127.0.0.1 / 8 scope host lo inet6 :: 1 /128 scope host valid_lft forever preferred_lft forever 2: venet0 : <BROADCAST,POINTOPOINT,NOARP> mtu 1500 qdisc noop state DOWN link / void 3: eth0 : <BROADCAST,MULTICAST,UP,LOWER_UP> mtu 1500 qdisc noqueue state UNKNOWN link / ether 00:18:51 : c0 : eb : 63 brd ff : ff : ff : ff : ff : ff inet 192.168.1.35/24 brd 192.168.1.255 scope global eth0 inet6 fe80 :: 218:51 ff : fec0 : eb63/64 scope link valid_lft forever preferred_lft forever When VENET like this:
# ip a 1: lo : <LOOPBACK,UP,LOWER_UP> mtu 16436 qdisc noqueue state UNKNOWN link / loopback 00:00:00:00:00:00 brd 00:00:00:00:00:00 inet 127.0.0.1 / 8 scope host lo inet6 :: 1 /128 scope host valid_lft forever preferred_lft forever 2: venet0 : <BROADCAST,POINTOPOINT,NOARP,UP,LOWER_UP> mtu 1500 qdisc noqueue state UNKNOWN link / void inet 127.0.0.2/32 scope host venet0 inet 192.168.1.31/32 brd 192.168.1.31 scope global venet0 : 0 3: eth0 : <BROADCAST,MULTICAST> mtu 1500 qdisc noop state DOWN link / ether 00:18:51 : a6 : 29: b0 brd ff : ff : ff : ff : ff : ff Containers or their quotas are managed through the vzctl utility. I will describe the most popular commands:
# vzctl start $CTID # $CTID # vzctl stop $CTID # # vzctl restart $CTID # # vzctl destroy $CTID # , # vzctl exec $CTID command # # vzctl enter $CTID # $CTID - # vzctl set $CTID different_options - save # Of course, it is also possible to set quotas for each of the containers without overloading them.
The limitation of the disk volume and the inode number is as follows (the syntax for setting such software_limit: hardware_limit ):
# vzctl set 101 --diskspace 1000000:1100000 --save # 1000000 - 1GB # vzctl set 101 --diskinodes 90000:91000 --save # - . # vzctl set 101 --quotatime 600 --save # hardware limit You can also configure the priority of disk I / O (disk I / O). The highest level is 7, the lowest is 0. By default, disk I / O is set to 4, but this can be changed:
# vzctl set 101 --ioprio 6 --save And check:
# grep IOPRIO /etc/vz/conf/101.conf IOPRIO = " 6" So you can increase / decrease the number of cores to 3, which will use the container:
# vzctl set 101 --cpus 3 --save If the host system has fewer cores - then of course the desired changes will not occur.
Setting the amount of RAM and swap memory is as follows:
# vzctl set 101 --physpages 512M --save # vzctl set 101 --swappages 512M --save You can read more about quotas at openvz.org/User_Guide/Managing_Resources
To view all containers and their states, you can use the vzlist utility:
# vzlist -a CTID NPROC STATUS IP_ADDR HOSTNAME 101 42 running 192.168.1.31 ubuntu1310.example.com 102 17 running - centos6.example.com 103 20 running - debian7.example.com 104 20 running - debian72.example.com It is very important to recall container dumps. To do this, there is a third-party utility that has the name vzdump. With its help, you can conveniently copy / migrate / save a container almost without stopping work. First you need to install it:
# rpm -ivh "http://ftp.openvz.org/contrib/utils/vzdump/vzdump-1.2-4.noarch.rpm" And you can use it like this:
# vzdump --suspend 102 INFO: starting new backup job : vzdump --suspend 102 ... INFO: backup mode : suspend INFO: starting first sync /vz/private/102/ to /vz/dump/vzdump-openvz-102-2014_02_02-14_05_46.tmp INFO: Finished Backup of VM 102 ( 00:02:14 ) INFO: Backup job finished successfuly And immediately there is an opportunity to restore the dump to a new car with a new CTID:
# vzrestore /vz/dump/vzdump-openvz-102-2014_02_02-14_05_46.tar 201 INFO: restore openvz backup '/vz/dump/vzdump-openvz-102-2014_02_02-14_05_46.tar ' using ID 201 INFO: extracting archive '/vz/dump/vzdump-openvz-102-2014_02_02-14_05_46.tar ' INFO: Total bytes read : 649799680 ( 620MiB , 62MiB / s ) INFO: extracting configuration to '/etc/vz/conf/201.conf ' INFO: restore openvz backup '/vz/dump/vzdump-openvz-102-2014_02_02-14_05_46.tar ' successful For convenient management of virtual machines, I can advise Proxmox or OpenVZ Web Panel
It seems that this is what I wanted to write about. Feel free to write comments if you have any questions.
Useful resources:
www.ibm.com/developerworks/ru/library/l-openvz_1/index.html
blog.shaggy-cat.ru/2010/03/openvz_25.html
openvz.org/Quick_installation
openvz.org/Installation_on_Debian
openvz.org/Quick_Installation_CentOS_6
openvz.org/User_Guide/Managing_Resources
www.altlinux.org/OpenVZ
openvz.org/Cloning_VE
openvz.org/Backup_of_a_running_container_with_vzdump
www.howtoforge.com/clone-back-up-restore-openvz-vms-with-vzdump
owp.softunity.com.ru
www.janoszen.com/2013/01/22/lxc-vs-openvz
Source: https://habr.com/ru/post/211915/
All Articles