Basics of creating a 2D character in Unity 3D 4.3. Part 2: Running Character
Part 1: character preparation and animation of rest
Part 2: Running Character
Part 3: jumping (and falling)
Hello. We continue the work begun in the first part. Now we have a platform and a character standing on it with a rest animation. It is time to teach our character to run left and right on the platform.
Load the scene from the first part. Let me remind you that last time we imported several sprites into the Assets - Sprites folder. Just in case, at the bottom of the post again give a link to the sprites. Among them should be a sprite called Run . We will use it to create running animation. To do this, we need to do the same to turn a single sprite into a collection, just like when creating a rest animation. In brief, let me remind you: select the sprite, set the Sprite Mode property as Multiple in the Inspector window, click on the Sprite Editor below, cut the image in Grid or Automatic mode.

')
Now in the Hierarchy window, select Character and go to the Animation window. Click on the field with the Idle animation and select Create New Clip to create a running animation. Let's save the animation file in the Assets - Animations folder with the name Run .
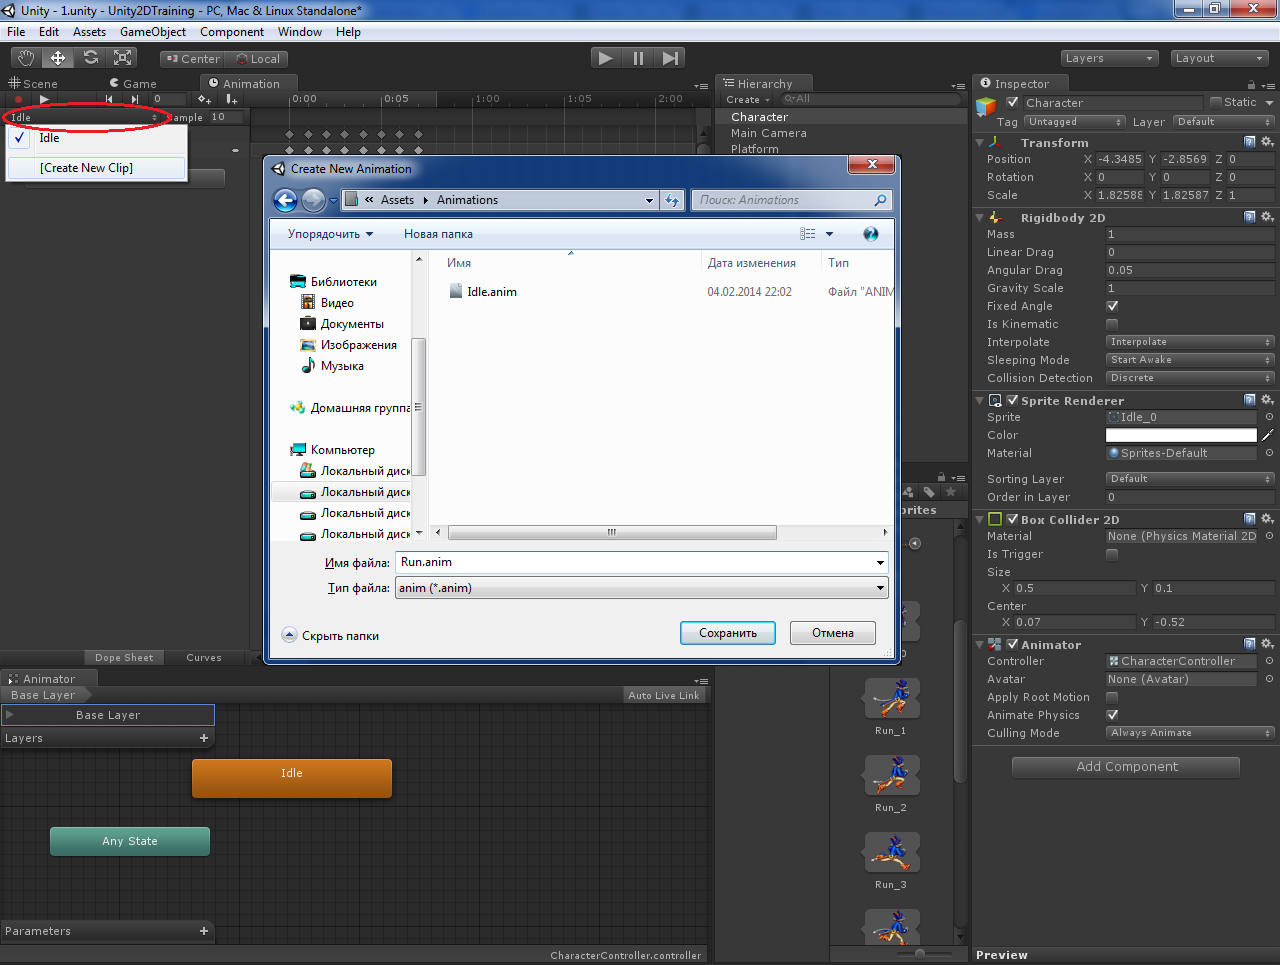
The newly created Run animation has become current in the Animation window. We expand the Run sprite in the Project window, select all Run_0 ... Run_9 files and drag them into the Animation window. Set while the Sample value is 24.

We have already done all this in the first part, and now there will be something new. Go to the window Animator . Now three animations are displayed there: Any State , Idle and Run . We have to set the conditions for the transition from the Idle animation to the Run animation, that is, from the rest state to the running state. In the lower left corner there is a Parameters field. Click on the plus sign, select Float and call the new parameter as Speed . Thus, we have created a parameter such as a number with a floating point, denoting the speed of movement of the character. It is precisely depending on the value of this parameter that switching from rest animation to running animation will occur. Now we right-click on the Idle animation, select Make Transition and left-click on the Run animation. A line with an arrow will appear between the animations. Move the rectangles of the animation with the mouse, if it is hard to see. Click on the line with the arrow. The Inspector window displays the transition properties between animations. Let's pay attention to the bottom of the window, in the Conditions section. Click on the Exit Time parameter and change it to Speed . The second Greater field is left unchanged, and in the third field we enter the value 0.01 . We have created a condition for the transition from rest animation to running animation - it occurs when the value of the speed parameter becomes a little more than zero.

Now you need to do a reverse transition - from Run to Idle . We do everything exactly the opposite: Make Transition from Run to Idle , select the transition, in the Conditions set Speed - Less - 0.01 .

Now we have two animations and transition conditions between them. But so far nothing will work, because all that we have done is to be “revived” with the help of a script. Let's move to the Project window and create a subfolder of Scripts in the Assets folder. Add a new C # Script to it , name it CharacterControllerScript and open it for editing.

I will give a full listing of the script with detailed comments, and below I will also explain what is happening in it.
So, we have entered several variables: to set the maximum movement speed, to determine the direction (left / right) and to work with the Animator component. Almost all actions take place in the FixedUpdate method. In it, we get the value of the X axis, which changes when you press the left-right or AD keys on the keyboard (if you did not change the corresponding project settings!). Then set this value to the Speed parameter of the Animator component. Note that we take the modulus of this value using the Mathf.Abs method, since when creating conditions for the transition between rest and run animations, we compare the value of the parameter with a positive number of 0.01 . We do not care here which way the character is running. What matters is the magnitude of the value. Next, set the speed of movement along the X axis in accordance with the value of the maximum speed. And finally, we check in which direction the character is running, and in which direction he is at this moment turned. If he runs to the right, and turns to the left - turns it to the right by inverting its size along the X axis. And vice versa. In this simple way we got rid of the need to do two animations instead of one: for running to the right and for running to the left.
Save the script. In Unity, drag it onto our Character in the Hierarchy window. Run the game, click left-right or AD.

Captain Claw can now run! The speed of the animation was quick. It can be reduced by decreasing the Sample value in the Animation window for the Run animation (a value of 12 will be normal). If simultaneously with the game you can see the Animator window, then you will see that during rest Idle animation (running blue progress bar) works, and during running there is a transition to Run animation, and, accordingly, it works.
That's all for now. It remains for us to deal with jumps ... and find out at the same time a few new things!
Link to sprites.
Update: added a video of the result.
Part 2: Running Character
Part 3: jumping (and falling)
Hello. We continue the work begun in the first part. Now we have a platform and a character standing on it with a rest animation. It is time to teach our character to run left and right on the platform.
Load the scene from the first part. Let me remind you that last time we imported several sprites into the Assets - Sprites folder. Just in case, at the bottom of the post again give a link to the sprites. Among them should be a sprite called Run . We will use it to create running animation. To do this, we need to do the same to turn a single sprite into a collection, just like when creating a rest animation. In brief, let me remind you: select the sprite, set the Sprite Mode property as Multiple in the Inspector window, click on the Sprite Editor below, cut the image in Grid or Automatic mode.
')
Now in the Hierarchy window, select Character and go to the Animation window. Click on the field with the Idle animation and select Create New Clip to create a running animation. Let's save the animation file in the Assets - Animations folder with the name Run .
The newly created Run animation has become current in the Animation window. We expand the Run sprite in the Project window, select all Run_0 ... Run_9 files and drag them into the Animation window. Set while the Sample value is 24.
We have already done all this in the first part, and now there will be something new. Go to the window Animator . Now three animations are displayed there: Any State , Idle and Run . We have to set the conditions for the transition from the Idle animation to the Run animation, that is, from the rest state to the running state. In the lower left corner there is a Parameters field. Click on the plus sign, select Float and call the new parameter as Speed . Thus, we have created a parameter such as a number with a floating point, denoting the speed of movement of the character. It is precisely depending on the value of this parameter that switching from rest animation to running animation will occur. Now we right-click on the Idle animation, select Make Transition and left-click on the Run animation. A line with an arrow will appear between the animations. Move the rectangles of the animation with the mouse, if it is hard to see. Click on the line with the arrow. The Inspector window displays the transition properties between animations. Let's pay attention to the bottom of the window, in the Conditions section. Click on the Exit Time parameter and change it to Speed . The second Greater field is left unchanged, and in the third field we enter the value 0.01 . We have created a condition for the transition from rest animation to running animation - it occurs when the value of the speed parameter becomes a little more than zero.
Now you need to do a reverse transition - from Run to Idle . We do everything exactly the opposite: Make Transition from Run to Idle , select the transition, in the Conditions set Speed - Less - 0.01 .
Now we have two animations and transition conditions between them. But so far nothing will work, because all that we have done is to be “revived” with the help of a script. Let's move to the Project window and create a subfolder of Scripts in the Assets folder. Add a new C # Script to it , name it CharacterControllerScript and open it for editing.
I will give a full listing of the script with detailed comments, and below I will also explain what is happening in it.
using UnityEngine; using System.Collections; public class CharacterControllerScript : MonoBehaviour { // . public float maxSpeed = 10f; // / private bool isFacingRight = true; // private Animator anim; /// <summary> /// /// </summary> private void Start() { anim = GetComponent<Animator>(); } /// <summary> /// FixedUpdate, . . Animator /// Animate Physics = true /// </summary> private void FixedUpdate() { // Input.GetAxis . -1 1. // //-1 ( ), //1 ( D) float move = Input.GetAxis("Horizontal"); // Speed . // anim.SetFloat("Speed", Mathf.Abs(move)); // RigidBody2D. , // . rigidbody2D.velocity = new Vector2(move * maxSpeed, rigidbody2D.velocity.y); // , if(move > 0 && !isFacingRight) // Flip(); // . else if (move < 0 && isFacingRight) Flip(); } /// <summary> /// /// </summary> private void Flip() { // isFacingRight = !isFacingRight; // Vector3 theScale = transform.localScale; // theScale.x *= -1; // , , transform.localScale = theScale; } } So, we have entered several variables: to set the maximum movement speed, to determine the direction (left / right) and to work with the Animator component. Almost all actions take place in the FixedUpdate method. In it, we get the value of the X axis, which changes when you press the left-right or AD keys on the keyboard (if you did not change the corresponding project settings!). Then set this value to the Speed parameter of the Animator component. Note that we take the modulus of this value using the Mathf.Abs method, since when creating conditions for the transition between rest and run animations, we compare the value of the parameter with a positive number of 0.01 . We do not care here which way the character is running. What matters is the magnitude of the value. Next, set the speed of movement along the X axis in accordance with the value of the maximum speed. And finally, we check in which direction the character is running, and in which direction he is at this moment turned. If he runs to the right, and turns to the left - turns it to the right by inverting its size along the X axis. And vice versa. In this simple way we got rid of the need to do two animations instead of one: for running to the right and for running to the left.
Save the script. In Unity, drag it onto our Character in the Hierarchy window. Run the game, click left-right or AD.
Captain Claw can now run! The speed of the animation was quick. It can be reduced by decreasing the Sample value in the Animation window for the Run animation (a value of 12 will be normal). If simultaneously with the game you can see the Animator window, then you will see that during rest Idle animation (running blue progress bar) works, and during running there is a transition to Run animation, and, accordingly, it works.
That's all for now. It remains for us to deal with jumps ... and find out at the same time a few new things!
Link to sprites.
Update: added a video of the result.
Source: https://habr.com/ru/post/211847/
All Articles