FreeRTOS + STM32F4 C ++ for Linux
Good day! It has been a long time since I last programmed under AVR and now I decided to recall such an undoubtedly interesting and fascinating area of development - development for microcontrollers. The ARM STM32 was chosen as the platform, and in order not to waste time on trifles, the Cortex-M4 was immediately launched. STM32F4DISCOVERY debug board with STM32F407 on board. A megabyte of flash and 128 kb of memory makes it possible not to bother much about saving resources and writing in C ++.
So, the task: to learn from scratch to blink LEDs under the STM32 in FreeRTOS, but it is fashionable to do it - in C ++, and not on pure C.
The implication is that you are already working with Eclipse, know how to add add-ons to it, and know in general terms how Linux works.
After reading a bunch of manuals, hautushek and other information on the Internet, I put everything and ... nothing happened, did not work, did not compile, and if compiled, it would not start on a piece of iron. In the end, all the same, everything turned out, and, since I am not a fan of the rake, I decided to write this post.
')
Tulchain
Installing and setting up the development environment took me two days. Therefore, I will give a set that really worked for me and will describe in detail the problems I encountered:
- Eclipse Kepler (for C / C ++)
- GCC
- texane / stlink
The trouble was with GCC for arm-none-eabi. There are a lot of variants of the toolchain, I tried two and really earned both. However, there is still a slight difference between them:
- GNU Arm toochain can be found here.
- Mentor Graphics CodeSourcery EABI can be taken here , will be asked to enter their data, send a link to download by mail ..
By the way, at first I installed arm-linux-gnueabi from my Linux distro. It’s not worth it, it’s not suitable for our purposes, but if Linux is on your ARM, then yes, it’s the most.
So, we put the compiler wherever we want, but we will definitely write the path to it in the user's PATH. How to do it - depends on the operating system with which you work. I threw this pair of tulcheins into / opt and made a symlink / opt / arm-toolchain - as it were, by default.
Programmer
Next, we clone stlink from Github in any convenient way. Going as usual:
Do not forget about libusb-dev, it was not installed in my Debian Wheezy. If there is not enough of any other, we put them as it is done in your system.
Development environment
Further, the most interesting for me is setting the clip for the development. I did not succeed in setting up the project so that everything compiles and runs on pure Eclipse. Therefore, you can put useful plugins. However, after a certain degree of clarity of settings has been achieved - you can dig deeper and customize the project for yourself without plug-ins.
There are enough different plugins for ARM development, here are a couple:
- GNU Arm Eclipse can be found here.
- Zylin CDT is here
For both there are update sites, plug-ins are installed in a standard way for a clip from a menu. We put both.
Next, create a C ++ project in Eclipse, choose what it will be under ARM (ARM Cross GCC tulchein), then choose the tulchein type depending on which compiler you chose: CodeSourcery or ARM GCC. In general, plugins support all sorts of different sets of compilers - you can play around with them.

There is one problem here - I did not find libnosys.a in CodeSourcery. I had to take it from the GNU Arm GCC. In general, the flight is normal.

findings
Now, a small digression about what problems the plugin solves. You will have to deal with this if you customize the project for yourself and you are a beginner. For me it was all a discovery, because I never wrote firmware before.
- there is no libc on the controller. Firmware is compiled statically.
- and there is no operating system (it will be built into the project), no bootloader - the program will start running immediately after switching on.
The plugin solves a handful of tasks - it provides us with the necessary CMSIS and Standard Perepherials in the project we have just created. These libraries are needed to work with the controller's periphery.
You can, of course, fasten libopencm3 instead of the libraries provided by the manufacturer, but this is a topic for a separate article.
The pgagin also provides a linker scripts set. Honestly, I ran into them for the first time. The linker script describes the structure of the binary file, the section, the entry point, and much more. Collecting all this piece by hand manually is dreary and uninteresting, while the project has not even started on a piece of iron, but then what is the scope for studying.
Plugin is configured from the project properties, in fact, in the project they store their settings.
Configuring the debugger
In general, this piece can be done at the very end, but the fact that debugging has worked is already a sign that everything is set up. Therefore, we will do it in advance.
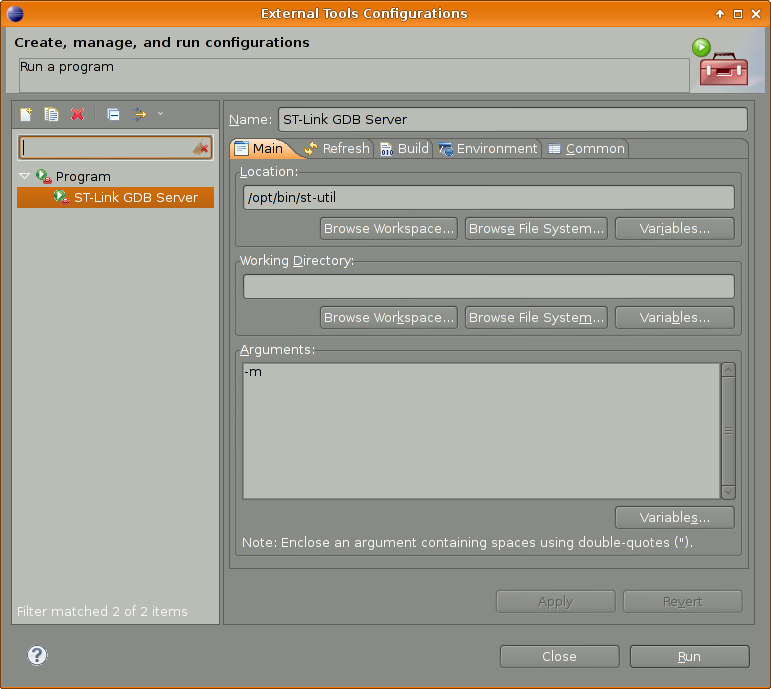
Naturally, GDB is used as a debugger. Configure the GDB server application, which will be the utility from texane / stlink.
Go to the External Tools and add the toolkit. It will need to be run every time if we need debugging, with the board connected. The utility will upload a debug image and serve as a server. The key -m just tells it not to fall off every time the connection with the debugger is interrupted, which is very convenient in my opinion.
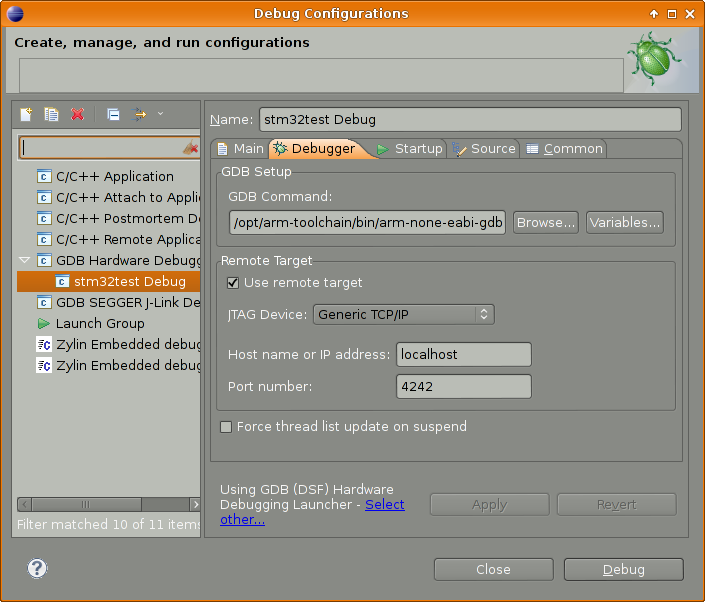
Next, create a debug target. Everything is simple, we take a tulchein debugger, specify port 4242 - this is the default GDB server port.
We start the debugging server, we connect to the target - it will assemble the project, flood the binary into the piece of hardware and launch it. You can debug.
FreeRTOS
Since everything that is necessary for the project to be able to be assembled at all is given to us by the plug-in (which, by the way, created even the flashing template with a LED), you can take to assemble it and fill it with a piece of iron. If the LED blinks and everything works, we begin to integrate the OS.
The structure of the project created by the plugin will have the libs directory, where CMSIS, StdPeriph and others are already located. That's where we throw FreeRTOS. Further, in order for the operating system to work, you need to configure it. Manuals (including official ones) for setting up FreeRTOS on the Internet with a shaft, therefore I will not describe it here. In short, do the following:
1) create FreeRTOSConfig.h and put it to RTOS headers
2) take from the portable port for our piece of iron and put the port files along with the rest of the RTOS sources.
3) find the source manager RTOS memory manager, for example, heap_2.c and put it there too.
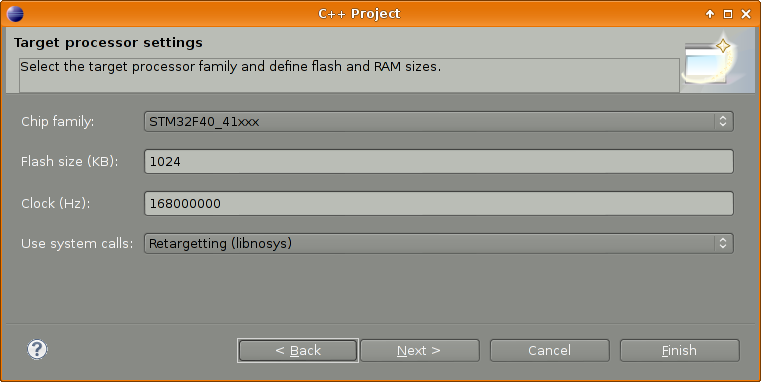
By the way, in the config from RTOS you need to specify the real clock processor, the same one that was specified when creating the project. I have this 168000000.
And also add this:
And enable vTaskDelay as it will be used for waiting between the blinks of the LED:
Do not forget to set the path to our FreeRTOS in the project settings:

In general, there are many different settings in the project, from which the compiler, assembler and linker parameters are formed. You can play, see what will happen;)
The minimum is configured, now you can try to collect. If something is forgotten, it will simply not be collected or it will not work.
And nowdancing app!
We will write the application in C ++, and we will move from pure C to C ++. I have not written in these languages for a long time, so do not judge strictly.
Project on githaba .
With Tasks, there is one nuance with which I, while switching to C ++, have suffered a little:
The first parameter is a pointer to the method in which the task is implemented. The fourth parameter in xTaskCreate is a pointer to an instance of the Task class. It is necessary to pass a pointer to an instance, otherwise the implementation method will not have access to the Task class variables - in this case, the pin LED and the delay.
But everything else is simple. Have a nice day and successful builds. Questions welcome!
PS And what kind of environment under Linux for this purpose do you use? ;)
PPS We must understand that this post is not written by a system programmer and is designed to help high-level comrades who want to enter the world of firmware development. Therefore, the assembler guru please do not be angry ^ - ^
So, the task: to learn from scratch to blink LEDs under the STM32 in FreeRTOS, but it is fashionable to do it - in C ++, and not on pure C.
The implication is that you are already working with Eclipse, know how to add add-ons to it, and know in general terms how Linux works.
After reading a bunch of manuals, hautushek and other information on the Internet, I put everything and ... nothing happened, did not work, did not compile, and if compiled, it would not start on a piece of iron. In the end, all the same, everything turned out, and, since I am not a fan of the rake, I decided to write this post.
')
Tulchain
Installing and setting up the development environment took me two days. Therefore, I will give a set that really worked for me and will describe in detail the problems I encountered:
- Eclipse Kepler (for C / C ++)
- GCC
- texane / stlink
The trouble was with GCC for arm-none-eabi. There are a lot of variants of the toolchain, I tried two and really earned both. However, there is still a slight difference between them:
- GNU Arm toochain can be found here.
- Mentor Graphics CodeSourcery EABI can be taken here , will be asked to enter their data, send a link to download by mail ..
By the way, at first I installed arm-linux-gnueabi from my Linux distro. It’s not worth it, it’s not suitable for our purposes, but if Linux is on your ARM, then yes, it’s the most.
So, we put the compiler wherever we want, but we will definitely write the path to it in the user's PATH. How to do it - depends on the operating system with which you work. I threw this pair of tulcheins into / opt and made a symlink / opt / arm-toolchain - as it were, by default.
Programmer
Next, we clone stlink from Github in any convenient way. Going as usual:
# git clone github.com/texane/stlink# cd stlink# ./automake# ./configure --prefix=/usr/binDo not forget about libusb-dev, it was not installed in my Debian Wheezy. If there is not enough of any other, we put them as it is done in your system.
Development environment
Further, the most interesting for me is setting the clip for the development. I did not succeed in setting up the project so that everything compiles and runs on pure Eclipse. Therefore, you can put useful plugins. However, after a certain degree of clarity of settings has been achieved - you can dig deeper and customize the project for yourself without plug-ins.
There are enough different plugins for ARM development, here are a couple:
- GNU Arm Eclipse can be found here.
- Zylin CDT is here
For both there are update sites, plug-ins are installed in a standard way for a clip from a menu. We put both.
Next, create a C ++ project in Eclipse, choose what it will be under ARM (ARM Cross GCC tulchein), then choose the tulchein type depending on which compiler you chose: CodeSourcery or ARM GCC. In general, plugins support all sorts of different sets of compilers - you can play around with them.
There is one problem here - I did not find libnosys.a in CodeSourcery. I had to take it from the GNU Arm GCC. In general, the flight is normal.
findings
Now, a small digression about what problems the plugin solves. You will have to deal with this if you customize the project for yourself and you are a beginner. For me it was all a discovery, because I never wrote firmware before.
- there is no libc on the controller. Firmware is compiled statically.
- and there is no operating system (it will be built into the project), no bootloader - the program will start running immediately after switching on.
The plugin solves a handful of tasks - it provides us with the necessary CMSIS and Standard Perepherials in the project we have just created. These libraries are needed to work with the controller's periphery.
You can, of course, fasten libopencm3 instead of the libraries provided by the manufacturer, but this is a topic for a separate article.
The pgagin also provides a linker scripts set. Honestly, I ran into them for the first time. The linker script describes the structure of the binary file, the section, the entry point, and much more. Collecting all this piece by hand manually is dreary and uninteresting, while the project has not even started on a piece of iron, but then what is the scope for studying.
Plugin is configured from the project properties, in fact, in the project they store their settings.
Configuring the debugger
In general, this piece can be done at the very end, but the fact that debugging has worked is already a sign that everything is set up. Therefore, we will do it in advance.
Naturally, GDB is used as a debugger. Configure the GDB server application, which will be the utility from texane / stlink.
Go to the External Tools and add the toolkit. It will need to be run every time if we need debugging, with the board connected. The utility will upload a debug image and serve as a server. The key -m just tells it not to fall off every time the connection with the debugger is interrupted, which is very convenient in my opinion.
Next, create a debug target. Everything is simple, we take a tulchein debugger, specify port 4242 - this is the default GDB server port.
We start the debugging server, we connect to the target - it will assemble the project, flood the binary into the piece of hardware and launch it. You can debug.
FreeRTOS
Since everything that is necessary for the project to be able to be assembled at all is given to us by the plug-in (which, by the way, created even the flashing template with a LED), you can take to assemble it and fill it with a piece of iron. If the LED blinks and everything works, we begin to integrate the OS.
The structure of the project created by the plugin will have the libs directory, where CMSIS, StdPeriph and others are already located. That's where we throw FreeRTOS. Further, in order for the operating system to work, you need to configure it. Manuals (including official ones) for setting up FreeRTOS on the Internet with a shaft, therefore I will not describe it here. In short, do the following:
1) create FreeRTOSConfig.h and put it to RTOS headers
2) take from the portable port for our piece of iron and put the port files along with the rest of the RTOS sources.
3) find the source manager RTOS memory manager, for example, heap_2.c and put it there too.
By the way, in the config from RTOS you need to specify the real clock processor, the same one that was specified when creating the project. I have this 168000000.
#define configCPU_CLOCK_HZ ( ( unsigned long ) 168000000 ) #define configTICK_RATE_HZ ( ( portTickType ) 1000 ) And also add this:
#define vPortSVCHandler SVC_Handler #define xPortPendSVHandler PendSV_Handler #define vPortSVCHandler SVC_Handler #define xPortSysTickHandler SysTick_Handler And enable vTaskDelay as it will be used for waiting between the blinks of the LED:
#define INCLUDE_vTaskDelay 1 Do not forget to set the path to our FreeRTOS in the project settings:
In general, there are many different settings in the project, from which the compiler, assembler and linker parameters are formed. You can play, see what will happen;)
The minimum is configured, now you can try to collect. If something is forgotten, it will simply not be collected or it will not work.
And now
We will write the application in C ++, and we will move from pure C to C ++. I have not written in these languages for a long time, so do not judge strictly.
Project on githaba .
With Tasks, there is one nuance with which I, while switching to C ++, have suffered a little:
void Application::attach(Task *task) { FNMETHOD impl = &Task::impl; pdTASK_CODE proc = ((pdTASK_CODE)(task->*impl)); xTaskCreate( proc, (signed char *) "test", configMINIMAL_STACK_SIZE, task, 2, (xTaskHandle *) 0); } The first parameter is a pointer to the method in which the task is implemented. The fourth parameter in xTaskCreate is a pointer to an instance of the Task class. It is necessary to pass a pointer to an instance, otherwise the implementation method will not have access to the Task class variables - in this case, the pin LED and the delay.
But everything else is simple. Have a nice day and successful builds. Questions welcome!
PS And what kind of environment under Linux for this purpose do you use? ;)
PPS We must understand that this post is not written by a system programmer and is designed to help high-level comrades who want to enter the world of firmware development. Therefore, the assembler guru please do not be angry ^ - ^
Source: https://habr.com/ru/post/211578/
All Articles