Example of jQuery UI + PHP and GD. Application of the image
Introduction
Hello! I greet Habrom for the first, and I hope not the last, time. Despite the fact that I have been reading Habr for a long time, the idea to write something useful appeared quite recently, when at work I was faced with a very interesting task - the development of an online collage editor. Since there was no special range of development tools, we decided to do it using js + jQuery and php GD. The process of implementing the plan turned out to be very interesting, and a bunch of positive emotions and new skills received pushed me to write an article on Habr. In this article I will try to tell you about some interesting points that I encountered when developing an online editor.
Task
According to the original plan of the article, I would like to describe the whole development process, but then I changed my mind, since the article would have turned out to be too long and would have many obvious and understandable things for everyone. Therefore, the outline of the article was reworked, and I decided to leave only the most interesting and important, as I see it, moments.
Total: it will be a question of use of jQuery UI together with PHP library GD. In this article, I will try, as best as I can, to show and tell you about using jQuery UI features such as dragging and resizing elements. As well as the formation of images from the created and processed by the user elements (pictures).
To make it clearer and clearer, I think it would not be bad to make a working example ( you can see it here ). The example implements one of the parts of the online editor, namely working with applications, in which the user can add additional elements to the picture, drag and drop them and resize, after which all this “art” should be assembled into a single picture.
Something I say a lot, it's time to get down to business, let's start.
Decision
For the impatient, I will immediately post a working example: link
And the source: link
For a start it is worth deciding what we will use and where.
On the client side (in the browser), we will use the jQuery library and several of its plugins, namely Draggable and Resizable, which does not need a view.
On the server, we will use php and the GD library, which is installed on almost every server and hosting, unlike the more advanced version of ImageMagick.
')
The development process will begin with the client side. We need to create a workspace in which the user can drag and resize images. And also it is necessary to add a panel to the page, in which there will be several options for applications.
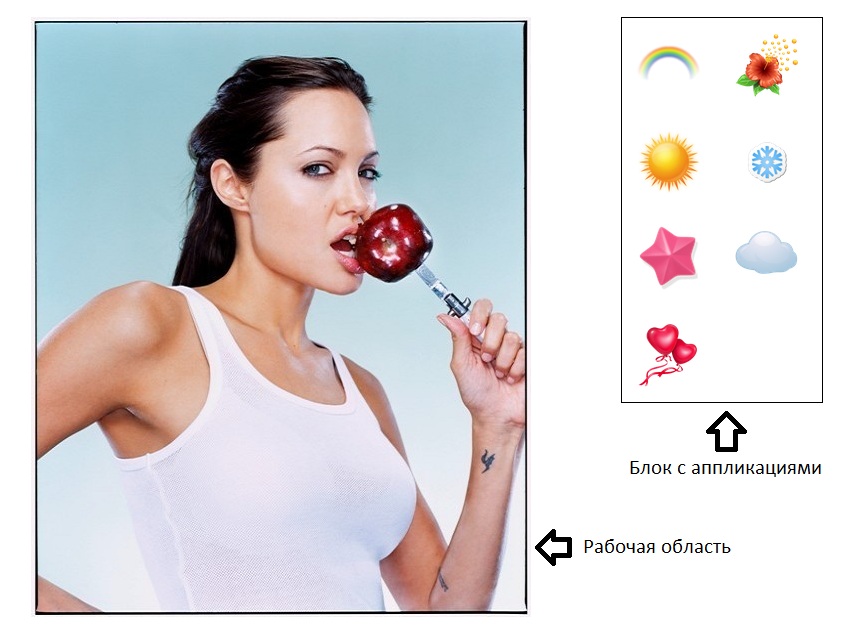
I will show a small piece of html, for a better understanding:
<div class="work_area"> <img src="/resources/images/angelina.jpg" width="500" height="600" id="main_img_big" /> </div> <div class="applications_div"> <img src="/resources/applications/1.png" width="64" height="64" /> <img src="/resources/applications/2.png" width="64" height="64" /> <img src="/resources/applications/3.png" width="64" height="64" /> <img src="/resources/applications/4.png" width="64" height="64" /> <img src="/resources/applications/5.png" width="64" height="64" /> <img src="/resources/applications/6.png" width="64" height="64" /> <img src="/resources/applications/7.png" width="64" height="64" /> </div> We need to add elements of the application to the workspace when the user clicks on the desired image-application. Since the number of added elements is neither predictable, the addition needs to be made dynamic, for this you can use the following code:
var num_elem = 0; // function addApplication(element){ var applicImg = element.clone(); // // applicImg.removeAttr('width'); applicImg.removeAttr('height'); // var allElement = '<div class="applic_new_el_div" id="move_applic_'+num_elem+'"><span class="close_applic"></span></div>'; $('.work_area').append(allElement); // applicImg.addClass('applic_new_el'); // $('#move_applic_'+num_elem).css({ 'top': '0px', 'left': '0px' }); applicImg.attr('id', 'applic_'+num_elem); // $('#move_applic_'+num_elem).append(applicImg); init_drag(num_elem); // init_resize(num_elem); // num_elem ++; // } As you have already noticed, not only the picture is added, but also with the diva, which is wrapped in a span. Span will play the role of a “cross”, which, if necessary, will remove an unnecessary application from the working area.
After adding the application, it is necessary to call the plug-ins to add the ability to resize and move the picture.
To enable resize, we will use the Resizable plugin, call it using this function:
// function init_resize(num_el){ $('#move_applic_'+num_el).resizable({ aspectRatio: true, // handles: 'ne, nw, se, sw', // alsoResize: "#applic_"+num_el // - }); } To make the picture move around the workspace, we will use the Draggable plugin, to call it, we will write the following function:
// function init_drag(num_el){ $('#move_applic_'+num_el).draggable({ cursor: 'move', // containment: '.work_area', // scroll: false, // drag: null // }); } At this work with the application is over. All that remains to be done on the client side is to collect all the data about the added applications and send them to the server for processing. To create the same image on the server as in the browser, we need to know the path to each image application, the size (width and height) and position on the page, relative to the work area.
In order not to reload the page, as well as for ease of data transfer, let's use ajax. The code for collecting data about applications and sending is not a server that looks like this:
// . function ajaxMakeImage(){ // var arrayWidth = []; var arrayHeight = []; var arraySrc = []; var arrayTop = []; var arrayLeft = []; var srcImage = $('#main_img_big').attr('src'); var workAreaTop = $('.work_area').offset().top; var workAreaLeft = $('.work_area').offset().left; var num = 0; $('.applic_new_el_div').each(function(e) { arrayWidth[num] = $(this).width(); arrayHeight[num] = $(this).height(); arraySrc[num] = $(this).children('.applic_new_el').attr('src'); arrayTop[num] = $(this).offset().top; arrayLeft[num] = $(this).offset().left; num++; }); // $.ajax({ type: "POST", url: "/ajax_action.php", data: { 'arraySrc': arraySrc, // 'arrayWidth': arrayWidth, // 'arrayHeight': arrayHeight,// 'arrayTop': arrayTop, // 'arrayLeft': arrayLeft, // 'srcImage': srcImage, // ( ) 'workAreaTop': workAreaTop, // 'workAreaLeft': workAreaLeft, // }, dataType: "json", success: function(data){ if(data.result == 'success'){ // // $('#test_show').attr('src', data.imgSrc); alert(' '); }else{ // error // @todo } } }); } Work in the browser is over. Now you need to write a script on the server that will process the data and generate a picture based on it.
As I said before, we will use the GD library for working with pictures.
Since applications can be absolutely any size, you need to resize each application. Let's write for this a small function:
function resizePhotoPNG($source, $path, $height, $width){ $rgb = 0xffffff; // $size = getimagesize($source);// $xRatio = $width / $size[0]; // $yRatio = $height / $size[1]; // $ratio = min($xRatio, $yRatio); $kRatio = ($xRatio == $ratio); // $new_width = $kRatio ? $width : floor($size[0] * $ratio); // $new_height = !$kRatio ? $height : floor($size[1] * $ratio); // // $new_left = $kRatio ? 0 : floor(($width - $new_width) / 2); // $newTop = !$kRatio ? 0 : floor(($height - $new_height) / 2); // $img = imagecreatetruecolor($width, $height); imagealphablending($img, false); imagesavealpha($img, true); $photo = imagecreatefrompng($source); // imagecopyresampled($img, $photo, $new_left, $newTop, 0, 0, $new_width, $new_height, $size[0], $size[1]); // imagepng($img, $path); // // imagedestroy($img); imagedestroy($photo); // return $path; } Now, having the resize function, it remains only to process all applications with its help and save it in a temporary folder. After that, it is necessary to apply each application to the main image in turn, of course, not forgetting to shift them along the X and Y axes. Offsets along the axes will be equal to the left and top spaces in the browser, relative to the work area.
Displacement deposition can be done as follows:
// $arrayApplication – // $mainImg – foreach($arrayApplication as $k=>$oneAppl){ // $imageFon = imagecreatefrompng($oneAppl); imagealphablending($imageFon, false); imagesavealpha($imageFon, true); // imagecopy($mainImg, $imageFon, $applX[$k]-$imgX, $applY[$k]-$imgY, 0, 0, imagesx($imageFon), imagesy($imageFon)); } This completes the processing of pictures, it remains only to save the resulting picture and pass the path to it to the browser.
To save use the following code:
imageJpeg($mainImg, $pathForImg, 100); // $pathForImg 100 // imagedestroy($mainImg); Now we send the answer to the browser, in which we give the path to the created image:
$result = array( 'result' => 'success', // 'imgSrc' => $resultSrc // ); echo json_encode($result); // JSON This completes the application of the image on the picture.
If I’m not really bothered, and the article will be useful to someone, I will try to write a few more articles on creating a collage (uploading photos, applying filters, text overlay, etc.).
The list of useful links, based on which I wrote the article:
- Image processing and GD
- jQuery Draggable Plugin
- jQuery Resizable Plugin
- working example
- Sample sources
Thanks for attention!
Source: https://habr.com/ru/post/211260/
All Articles