Setting up a SoftEtherVPN VPN server under Linux

As it was already written in Habré, literally at the beginning of January of this year, under the GPL2 license, a very interesting and, in its way, unique project, SoftEther VPN, was transferred . It was written by students of the Japanese University of Tsukuba. This product positions itself as a VPN server with support for a huge number of tunneling protocols: L2TP, L2TP / IPsec, L2TPv3 / IPsec, MS-SSTP, EtherIP / IPsec, OpenVPN, SSL-VPN (proprietary), L2VPN, and such clever things like tunneling through ICMP and DNS. It supports tunneling at the third and at the second level, can VLAN and IPv6. It works on almost all known platforms (even ARM and MIPS) and, moreover, does not require root rights. The full specification can be found here . To be honest, when I saw the list of features of this program - I just could not believe my eyes and thought: “If THIS works, then I MUST test it!”
This article will describe the process of installing and configuring SoftEther VPN Server under Linux. In the next article I will try to draw beautiful comparative performance graphs.
This software has an extremely pleasant interface for Windu, but under Linux all configuration is done through the CLI. The manual is certainly good, but for example it seemed to me too detailed, and besides with a bias towards the graphical interface and excessively colorful Japanese pictures. Therefore, I decided to lay out the main CLI commands for those who are too lazy to shovel a lot of English letters.
For starters, let's install this miracle. I had a VPS with a 64-bit Debian 7 on board, so the choice was obvious. Immediately I warn you: you need to install only from GitHub (at the moment release version 4.04 build 9412)! On the official website, you can download the source code for different platforms, but the ambush is that the makefiles are generated there in some sadistic-Western way, and you get only two files at the output - the server binary itself and its CLI scale. No copying to / usr / bin / and other civilized things is written there. In contrast, the Github makefile behaves much more friendly (although the init script still doesn’t, the infection).
Before you install the program, I recommend to go here and find out what it needs for installation. For example, I needed to install a number of libraries (then they can be demolished):
# apt-get install libreadline-dev libssl-dev libncurses5-dev zlib1g-devDuring the process, the installer will ask you to read the License Agreement, as well as indicate your platform and OS bitness. By the way, he will install the prog anyway in / usr / vpnserver /, and binaries in / usr / bin /, keep in mind. If the installation path is not liked, it can be changed by hand in the makefile. At the end of the installation, he will say:# git clone github.com/SoftEtherVPN/SoftEtherVPN.git# cd SoftEtherVPN\# ./configure# make# checkinstall
- Installation completed successfully.From here you can logically understand how this magic starts and stops. You can leave and so, but you can take off. Site simple init-script , which will be more familiar to us the way to do the same.
')
Execute 'vpnserver start' to run the SoftEther VPN Server background service.
Execute the SoftEther VPN Bridge background service.
Execute 'vpnclient start' to run the SoftEther VPN Client background service.
Execute 'vpncmd' to run SoftEther VPN Command-Line Utility to configure VPN Server, VPN Bridge or VPN Client.
-------------------------------------------------- ------------------
So, the VPN server is installed and you can start it:
We start the configuration. In general, the manual offers us two ways to do this: through its own command line vpncmd or through the configuration file vpn_server.config , with great preference given to the first method. The manufacturer considers the operations with the configuration file to be a risky exercise and in every possible way tries to discourage us from this. The fact is that the server continuously reads this file and any changes in it instantly affect the operation of the server. The only case when setting from the config file is justified is when the VPN server is turned off. I do not know why this is done, but the author, in any case, knows better. And in general, the program has a good CLI, after working with which you simply forget about the existence of a config file as unnecessary.# vpnserver startSoftEther VPN Server Service Started.
By the way, immediately after the installation I noticed that the program for some reason knocked at 130.158.6.77:80. It turned out that there is nothing suspicious, just in this way the server sends keepalive packages to its website (keepalive.softether.org:80) so that different PPP sessions do not break on timeout. Immediately after installation, I disabled this feature with the KeepDisable command.
So, immediately after starting the VPN server is already running and accepts connections to TCP ports 443 (SSL VPN), 992, 1194 (OpenVPN) and 5555 (you can change the port numbers with the ListenerCreate and ListenerDelete commands), but to start using it you need to make a number of settings. Go to the CLI with the vpncmd command:
Choice 1 will take us to the server editing mode, choice 2 to the client properties editing mode, and choice 3 will take us to the test and create server certificates mode. Selecting 1, the server will offer to enter the ip address of the server to which we want to connect (Hostname of IP Address of Destination :), just press Enter, because going to edit the local server. For the third and last time, the program will ask us the name of the virtual hub (Specify Virtual Hub Name :), with which we will work. We are not going to work with virtual hubs yet, so again press Enter and get into the command line of the server itself.# vpncmdvpncmd command - SoftEther VPN Command Line Management UtilitySoftEther VPN Command Line Management Utility (vpncmd command)Version 4.04 Build 9412 (English)Compiled 2014/01/15 17:22:14 by yagi at pc25Copyright (c) SoftEther VPN Project. All Rights Reserved.By using vpncmd program, the following can be achieved.1. Management of VPN Server or VPN Bridge2. Management of VPN Client3. Use of VPN Tools (certificate creation and Network Traffic Speed Test Tool)Select 1, 2 or 3:
It is necessary to clarify what virtual hubs are in the terminology of the developer. A virtual hub is a kind of rather independent instance of a VPN server that has its own set of settings for virtual interfaces, security policies, and VPN protocols. In total, you can create up to 4096 virtual hubs, while they will not intersect with each other either at the 2nd or 3rd level - that is, they will be completely isolated from each other. Each virtual hub works with its own set of users and knows nothing about the users of another virtual hub, even though they are on the same physical server. On the other hand, if we want, we can configure their interaction with each other, in the author’s terminology this is called Virtual bridge / router. Thus, the virtual hub is what we will work with after specifying certain global server settings.
After logging in to vpncmd, we will receive an invitation:
You can enter help and read the list of commands.Connection has been established with VPN Server "localhost" (port 443).You have administrator privileges for the entire VPN Server.VPN Server>
The first thing we need to do is set the root password of the server. This is done by the ServerPasswordSet command. Further, as I wrote with the KeepDisable command, we disable the keepalive packages.
Next, create a virtual hub with the HubCreate <virtual hub name> command, for example
You can set the admin password for the new hub, then you can delegate the administration of this hub to another person. And for simplicity, you can press Enter and do not do this (for this, in the future there is the SetHubPassword command). After creating the hub, we must go into the administration mode of this hub with the Hub vpn command. You can view the status of the hub using the StatusGet command. I will not give the output of this command here, because It is long and fairly clear. The hub can be turned off with the Offline command and returned back with the Online command.VPN Server>hubcreate vpnHubCreate command - Create New Virtual HubPlease enter the password. To cancel press the Ctrl+D key.Password:
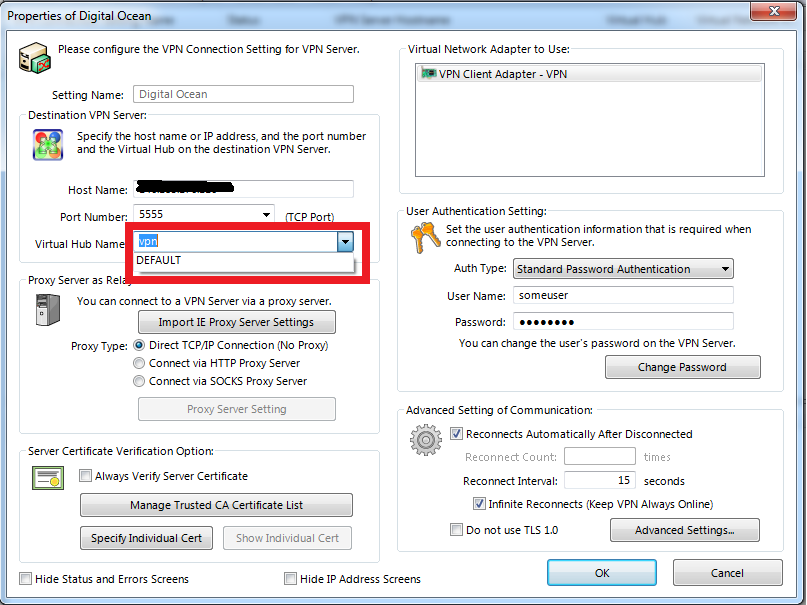
I liked the SetEnumDeny team. The fact is that when in the VPN client you enter the address of the VPN server, it immediately gives you the names of all the virtual hubs registered on the server, as in the picture. This command prohibits displaying the name of this hub in the list. Type a small, but a bonus to security.
Okay, let's do some more interesting things. Create a user with the UserCreate command and set a password for it using the UserPasswordSet . The commands are very simple, just a minimum of English is enough to understand the conversational server messages. At this stage, for simplicity, we will not bother with the certificates, but rather trust the self-signed server certificate that it generated during the installation phase.
That's basically all, the minimum installation is complete and we can cling to our server by specifying its IP address and any of the ListenerList ports. The author recommends port 5555, since this port does not require root rights in the system. I already quoted the VPN client window above, everything is intuitive and very beautiful there. Authentication passes and establishes a VPN tunnel. However, in this form of use of the tunnel is small, because it allows you to access only the server itself and nowhere else.
Let's say our task is wider, and we want to use a VPN server to access the corporate network. For this we need to configure NAT. This is done quite simply with the SecureNATEnable command. Automatically along with NAT and DHCP is enabled.
In general, SecureNAT is quite an interesting technology from the authors SoftEtherVPN. As we know, the translation of network addresses in * NIX-systems is carried out in the kernel, respectively, to configure NAT you need to have superuser rights. The creators of SoftEtherVPN decided that it was too redundant and wrote their own custom TCP / IP stack for filtering and rubbing into userspace. Cool idea, I do not know whether it was worth it, but it works - it is a fact!
You can change the SecureNatHostSet interface address (by default 192.168.30.1/24), and the range of issued addresses and other DHCP options (for example, the default gateway and DNS server) - with the DhcpSet command. Isn't it friendly CLI? For example, if you enter “secure?” And press Enter, then a list of possible autocompletions will appear:
By default, no packet filtering is applied, i.e. VPN clients can unlimitedly go to the corporate subnet and use the corporate Internet, if there is one. If you wish, you can add firewall rules with the AccessAdd command. As criteria for a firewall, you can specify the user name, MAC and IP addresses of the source and destination, ports, protocols and TCP flags. And the most important thing is that it works, I checked! Consider also that the filtering rules of different virtual hubs do not affect each other in any way, which allows you to flexibly control access to the corporate environment.VPN Server/vpn>secure?"secure": The command-name is ambiguous.The specified command name matches the following multiple commands.SecureNatDisable - Disable the Virtual NAT and DHCP Server Function (SecureNat Function)SecureNatEnable - Enable the Virtual NAT and DHCP Server Function (SecureNat Function)SecureNatHostGet - Get Network Interface Setting of Virtual Host of SecureNAT FunctionSecureNatHostSet - Change Network Interface Setting of Virtual Host of SecureNAT FunctionSecureNatStatusGet - Get the Operating Status of the Virtual NAT and DHCP Server Function (SecureNat Function)Please re-specify the command name more strictly.
Dynamic DNS from softether.net is available as a nice bonus. You can register your VPN server in DDNS with the DynamicDnsSetHostname command, after which you need to enter the desired domain name of the 3rd level. It will turn out something like myvpn.softether.net. Agree, a trifle, but nice and, moreover, completely free!
Let's talk about VPN protocols. I tested L2TP / IPsec and OpenVPN. Setting up two seemingly such different protocols turned out to be quite simple. OpenVPN is enabled initially on port 1194 UDP, but in order for it to work, you need to enter the global server mode ( Hub command without parameters), enter IPsecEnable , and then answer a number of questions to see if we want to enable Naked L2TP, encrypted L2TP / IPsec, and L2TPv3 / IPsec. The most important questions are the Pre-shared key (PSK) for IPsec and Default Hub. With PSK, everything is clear, this is the key that needs to be entered on the client device, but I'll tell you more about Default Hub.
The fact is that the same OpenVPN does not work through IPsec, but inherits the account policy from IPsec. Therefore, when trying to connect using the OpenVPN protocol, a username and password will be requested. The username must be entered in the format "user @ hub", but if we specify which hub to use by default, then the "@ hub" can be omitted.
You can generate a config file for OpenVPN using the OpenVpnMakeConfig command, and then specify the location where to save the generated file. This file can be immediately fed to the OpenVPN client and the connection will go. The file is provided in two options at once - Layer2VPN and Layer3VPN, that is, a VPN server as a switch, and a VPN server as a router. Both works great. Conveniently!
Setting up L2TP / IPsec turned out to be generally trivial: after the IPsecEnable command, you don’t need to change anything, and in the settings for example the Windows built-in VPN client you need to specify the “L2TP IPsec VPN” protocol, specify the pre-shared key (PSK) in the advanced settings, which we already installed, well, of course, enter the credentials in the format I mentioned above.
Similarly, everything is configured on Android. It was tested on 4.2.1, everything works using only standard tools.
Conclusion: SoftEtherVPN is a very powerful and, most importantly, convenient tool for building VPN tunnels. Of course, I have tested far from all the possibilities, but in most cases there are enough of those that I wrote. In the near future I will try to lay out comparative tests of performance, as well as tests of such funny pieces like VPN over ICMP and DNS. I don’t want to communicate with SSL VPN and MS SSTP, because reluctance to mess with certificates, besides, we still need to look at features such as Load Balancing aka clustering, fault tolerance, authorization from RADIUS and AD and Layer2 VPN, including VLAN trunking!
So, it seems to me, the software is, at least, in order to look at it more closely. The manufacturer positions its product as in everything superior OpenVPN, even promises throughput under gigabit. In general, it is necessary to test! At this stage, I really like this thing.
Source: https://habr.com/ru/post/211136/
All Articles