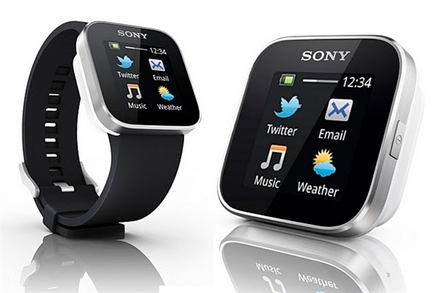
We write applications for Sony SmartWatch and SmartWatch 2
 Sony SmartWatch is quite an interesting device of its time, the development for which for some reason was bypassed in Habré. Well, if so - let's fix it! As an example, we will develop a simple application for managing any audio player.
The article is intended for those who already at least minimally know which side to keep development tools for Android, as well as those who have seen those watches or read reviews about them, and, accordingly, presents their functionality. We will develop immediately under the first and second versions of the SmartWatch .
')
Install the required libraries
Launch the Android SDK Manager and go to Tools -> Manage Add-on Sites
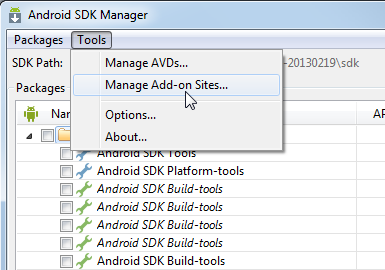
On the User Defined Sites tab, add the address with the SDK under the clock:
dl-developer.sonymobile.com/sdk_manager/Sony-Add-on-SDK.xmlIn fact, this SDK supports not only watches, but also some other tricky devices from Sony, such as, for example, the Smart Headset ... But so far we are only interested in watches.
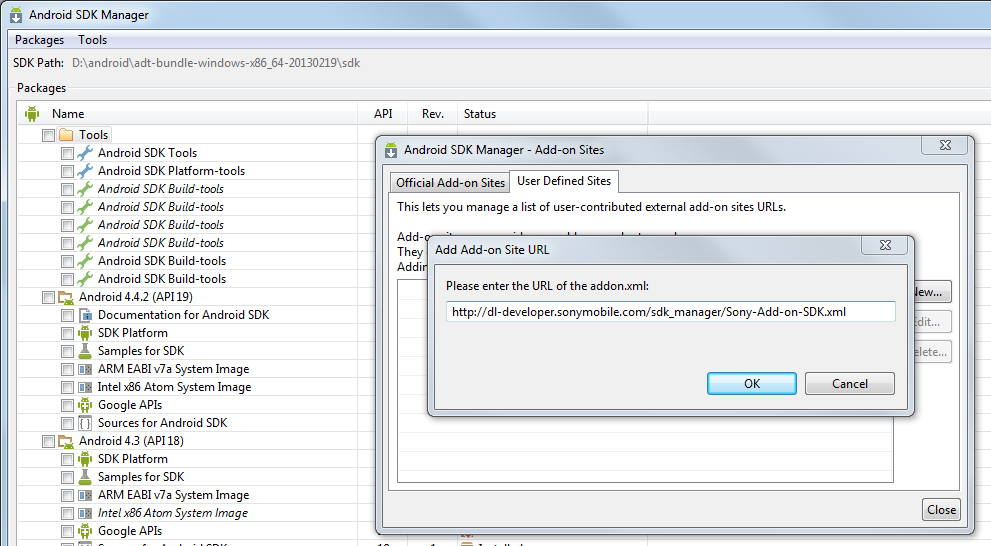
And now we select new packages that appear in the list and install them:

In addition to the necessary libraries themselves, after installation, be sure to look in the [Android SDK directory] / sdk / add-ons / addon-sony_add-on_sdk_2_1-sony-16 / samples folder . There are examples of using absolutely all the features of the watch, we will talk only about the chosen ones.
Clock emulator
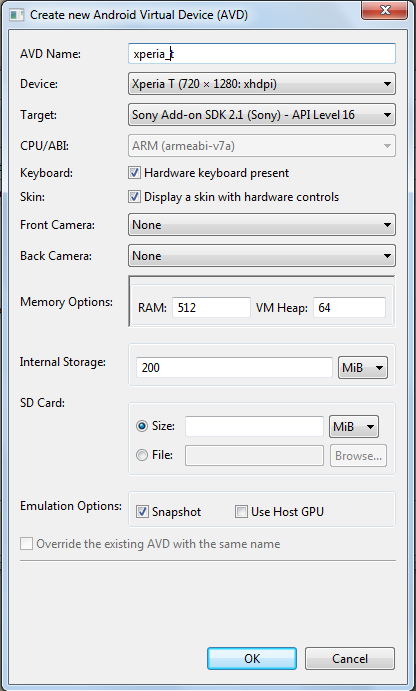
In principle, it is much easier and more convenient to develop for real watches, but nevertheless, an emulator goes along with the SDK. To use it, let's go to AVD Manager and create one of the new devices from Sony that appeared in the list, for example, Xperia T. The main thing is that Sony Add-on SDK would be selected as the Target parameter.
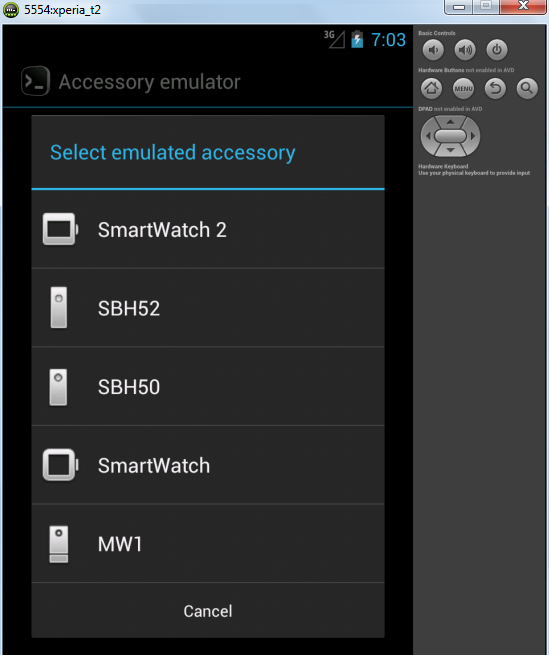
Now, if you run such a device on emulation, you can find Accessory emulator in the list of applications on the emulated device.

Which emulates the watch we need (and not only, as mentioned above).
Project plan
Now, what exactly are we going to develop? It seems to me that doing all sorts of hello word is boring, so let's write an application to control the player! Any player on the phone. This is the appropriate scale of action. ;)
- The application will be controlled by gestures and clicks. The gesture from right to left and back is the next / previous track, up / down is louder / quieter. Click in the center - pause / continue playback.
- In addition to the application screen itself, we will implement a widget (for the clock), which on click will call the main program window.
- Let's make a blank for the application settings screen - well, just in reserve.
- It should support both versions of the SmartWatch (the first and second, as suggested by the cap).
We connect libraries to the project in IntelliJ IDEA
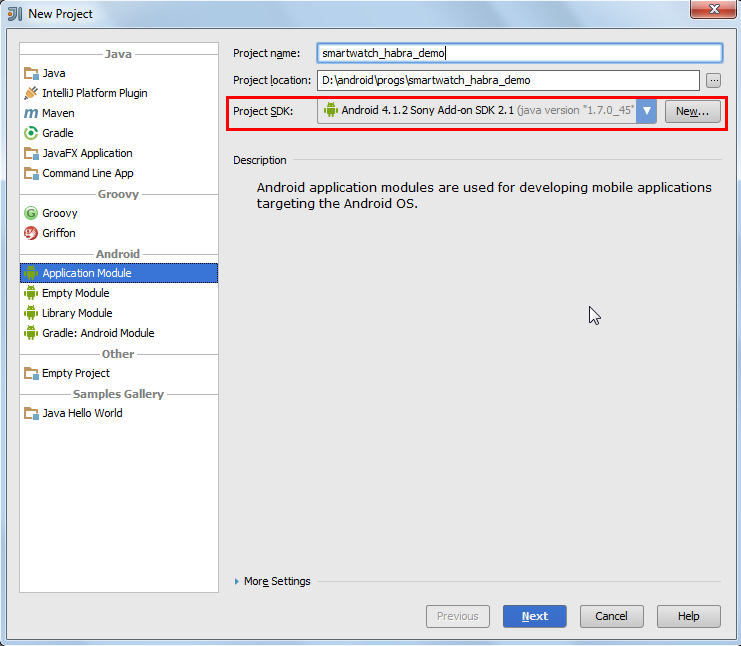
Since I use IntelliJ IDEA , I will give an example on it. To begin with - we will create a project, as the version of the SDK, select the option from Sony.
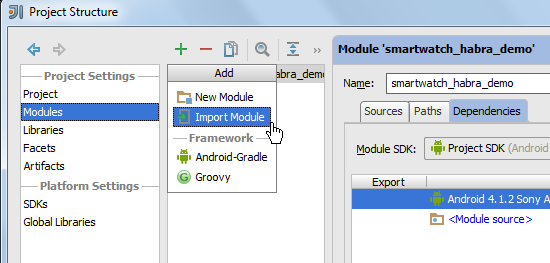
In addition, for work, we will connect to the project a couple of modules from that samples folder - in particular, SmartExtensions / SmartExtensionAPI and SmartExtensions / SmartExtensionUtils . The second, theoretically, you can not connect, and write all its contents from scratch, but we, adherents of the dark side of power, appreciate the efficiency and convenience, and the desire to write from scratch that already exists is alien to us. I removed the instructions for connecting myself under the spoiler, since there everything is simple.
We connect libraries.
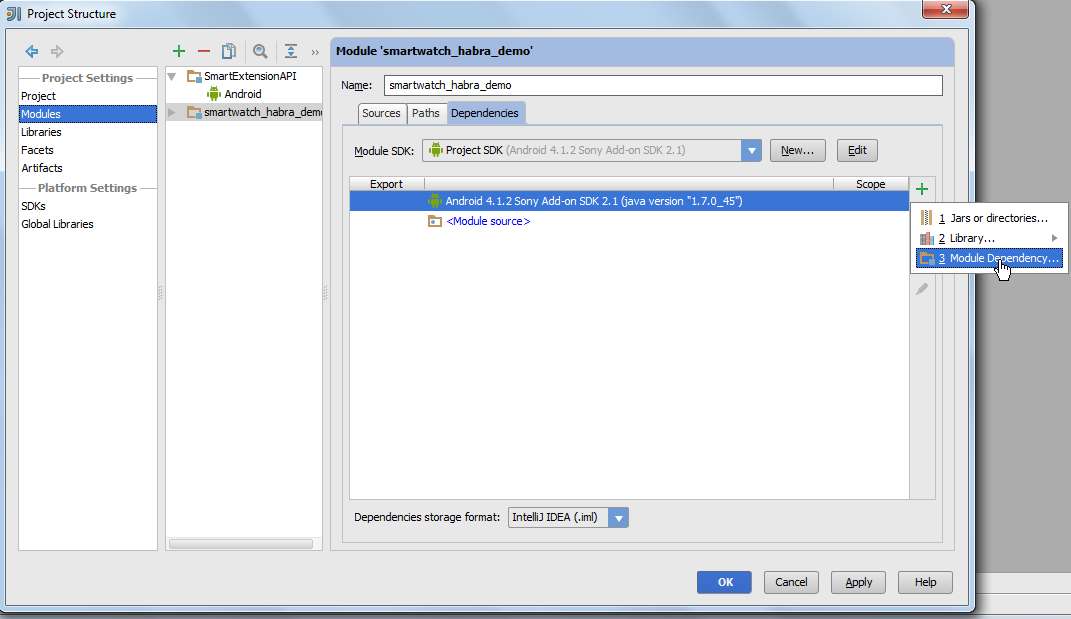
Go to File -> Project Structure , there - on the Modules tab, click on the “plus sign” and select the Import Module
Find the folder SmartExtensionAPI :
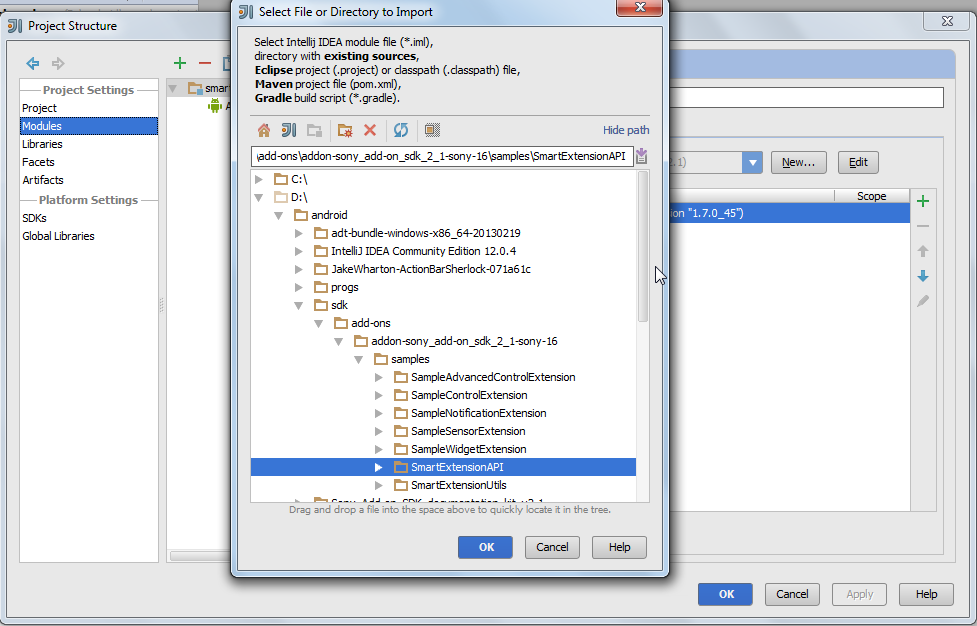
Next OK and Next-> Next-> Next to the bitter end, like in the good old days.
Then we connect the added module to the main project.
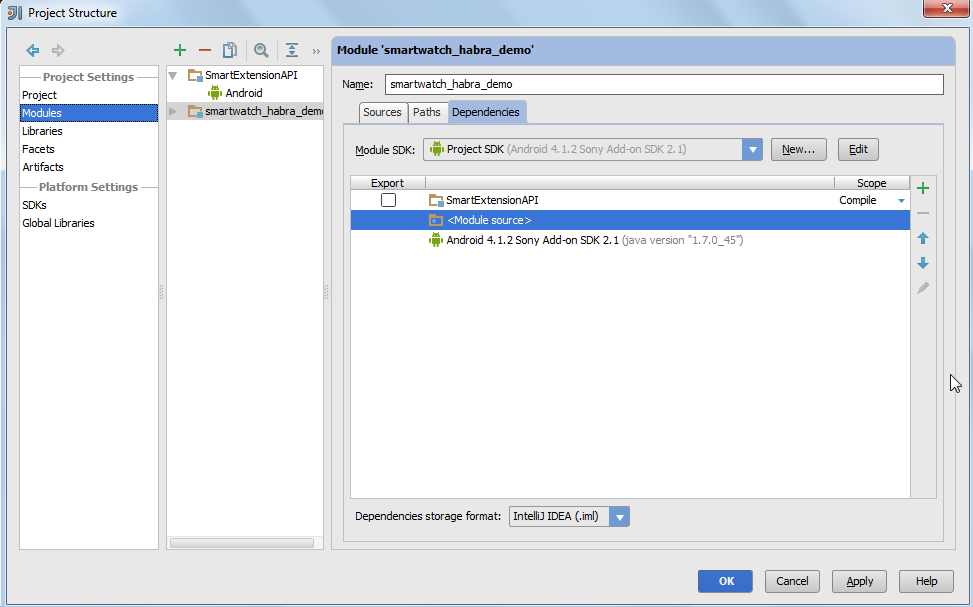
Similarly, we are connecting SmartExtensionUtils .
Find the folder SmartExtensionAPI :
Next OK and Next-> Next-> Next to the bitter end, like in the good old days.
Then we connect the added module to the main project.
Similarly, we are connecting SmartExtensionUtils .
Configure base classes and parameters
Let's start with the manifest.
AndroidManifest.xml
<?xml version="1.0" encoding="utf-8"?> <manifest xmlns:android="http://schemas.android.com/apk/res/android" package="com.smartwatch_habra_demo"> <uses-sdk android:minSdkVersion="9" android:targetSdkVersion="16"/> <uses-permission android:name="com.sonyericsson.extras.liveware.aef.EXTENSION_PERMISSION" /> <application android:label="- " android:icon="@drawable/icon"> <activity android:name="DemoConfigActivity" android:label=" " > <intent-filter> <action android:name="android.intent.action.MAIN" /> </intent-filter> </activity> <service android:name="DemoReceiverService" /> <receiver android:name="DemoExtensionReceiver" android:permission="com.sonyericsson.extras.liveware.aef.HOSTAPP_PERMISSION" > <intent-filter> <!-- Generic extension intents. --> <action android:name="com.sonyericsson.extras.liveware.aef.registration.EXTENSION_REGISTER_REQUEST" /> <action android:name="com.sonyericsson.extras.liveware.aef.registration.ACCESSORY_CONNECTION" /> <action android:name="android.intent.action.LOCALE_CHANGED" /> <!-- Notification intents --> <action android:name="com.sonyericsson.extras.liveware.aef.notification.VIEW_EVENT_DETAIL" /> <action android:name="com.sonyericsson.extras.liveware.aef.notification.REFRESH_REQUEST" /> <!-- Widget intents --> <action android:name="com.sonyericsson.extras.aef.widget.START_REFRESH_IMAGE_REQUEST" /> <action android:name="com.sonyericsson.extras.aef.widget.STOP_REFRESH_IMAGE_REQUEST" /> <action android:name="com.sonyericsson.extras.aef.widget.ONTOUCH" /> <action android:name="com.sonyericsson.extras.liveware.extension.util.widget.scheduled.refresh" /> <!-- Control intents --> <action android:name="com.sonyericsson.extras.aef.control.START" /> <action android:name="com.sonyericsson.extras.aef.control.STOP" /> <action android:name="com.sonyericsson.extras.aef.control.PAUSE" /> <action android:name="com.sonyericsson.extras.aef.control.RESUME" /> <action android:name="com.sonyericsson.extras.aef.control.ERROR" /> <action android:name="com.sonyericsson.extras.aef.control.KEY_EVENT" /> <action android:name="com.sonyericsson.extras.aef.control.TOUCH_EVENT" /> <action android:name="com.sonyericsson.extras.aef.control.SWIPE_EVENT" /> <action android:name="com.sonyericsson.extras.aef.control.OBJECT_CLICK_EVENT" /> <action android:name="com.sonyericsson.extras.aef.control.MENU_ITEM_SELECTED" /> </intent-filter> </receiver> </application> </manifest> The essence of what is happening is this: we create a class in the application that will receive events from the clock, transfer them to the processing service, which will perform some meaningful actions. The only activity we need for the settings window, if we don’t need one, we could throw it out completely.
The receiver class is quite simple:
DemoExtensionReceiver.java
public class DemoExtensionReceiver extends BroadcastReceiver { @Override public void onReceive(final Context context, final Intent intent) { intent.setClass(context, DemoReceiverService.class); context.startService(intent); } } Well, now let's get to the service itself:
DemoReceiverService.java
public class DemoReceiverService extends ExtensionService { public static final String EXTENSION_KEY = "com.smartwatch_habra_demo"; //todo , "." public DemoReceiverService() { super(EXTENSION_KEY); } @Override protected RegistrationInformation getRegistrationInformation() { return new DemoRegistrationInformation(this); } @Override protected boolean keepRunningWhenConnected() {// return false; } @Override public WidgetExtension createWidgetExtension(String hostAppPackageName) { // return new DemoWidget(this,hostAppPackageName); } @Override public ControlExtension createControlExtension(String hostAppPackageName) {// boolean IsSmartWatch2= DeviceInfoHelper.isSmartWatch2ApiAndScreenDetected( this, hostAppPackageName); if (IsSmartWatch2){ return new DemoControl2(this,hostAppPackageName); }else{ return new DemoControl(this,hostAppPackageName); } } } Laconic enough, right? Key points are explained with comments, questions like should not arise. We need ControlExtension to process and draw the main application on the clock, WidgetExtension is for the same purposes, but for the widget.
But RegistrationInformation is information for registering our extension in the clock management program so to speak.
DemoRegistrationInformation.java
public class DemoRegistrationInformation extends RegistrationInformation { public static final int WIDGET_WIDTH_SMARTWATCH = 128; public static final int WIDGET_HEIGHT_SMARTWATCH = 110; public static final int CONTROL_WIDTH_SMARTWATCH = 128; public static final int CONTROL_HEIGHT_SMARTWATCH = 128; public static final int CONTROL_WIDTH_SMARTWATCH_2 = 220; public static final int CONTROL_HEIGHT_SMARTWATCH_2 = 176; Context mContext; protected DemoRegistrationInformation(Context context) { if (context == null) { throw new IllegalArgumentException("context == null"); } mContext = context; } @Override public ContentValues getExtensionRegistrationConfiguration() { String iconHostapp = ExtensionUtils.getUriString(mContext, R.drawable.icon); ContentValues values = new ContentValues(); values.put(Registration.ExtensionColumns.CONFIGURATION_ACTIVITY,DemoConfigActivity.class.getName()); //, " ". - . values.put(Registration.ExtensionColumns.CONFIGURATION_TEXT," -");// , . - . values.put(Registration.ExtensionColumns.NAME, "--");//, values.put(Registration.ExtensionColumns.EXTENSION_KEY,DemoReceiverService.EXTENSION_KEY); // values.put(Registration.ExtensionColumns.HOST_APP_ICON_URI, iconHostapp); // values.put(Registration.ExtensionColumns.EXTENSION_ICON_URI, iconHostapp); // , 48x48 values.put(Registration.ExtensionColumns.NOTIFICATION_API_VERSION,getRequiredNotificationApiVersion());// values.put(Registration.ExtensionColumns.PACKAGE_NAME, mContext.getPackageName()); return values; } @Override public int getRequiredNotificationApiVersion() { // return 0; } @Override public int getRequiredSensorApiVersion() { // return 0; } //--------------------------------------------- // //--------------------------------------------- @Override public boolean isWidgetSizeSupported(final int width, final int height) { return (width == WIDGET_WIDTH_SMARTWATCH && height == WIDGET_HEIGHT_SMARTWATCH); } @Override public int getRequiredWidgetApiVersion() { // return 1; } //--------------------------------------------- // //--------------------------------------------- @Override public int getRequiredControlApiVersion() { // return 1; } @Override public int getTargetControlApiVersion() { // return 2; } @Override public boolean isDisplaySizeSupported(int width, int height) { return (width == CONTROL_WIDTH_SMARTWATCH_2 && height == CONTROL_HEIGHT_SMARTWATCH_2) || (width == CONTROL_WIDTH_SMARTWATCH && height == CONTROL_HEIGHT_SMARTWATCH); } } It is worth staying in more detail. The fact is that the Sony API we downloaded is universal for a whole bundle of Sony devices, and no one is stopping us from writing an application (extension) that can run on all these devices at once. Or only on the chosen ones.
Once this is the case, we need to tell which screen sizes and API versions for sensors, widgets, etc. we need to support. We need to specify:
- Support for different sensors (accelerometers, etc.) - getRequiredSensorApiVersion. We do not need it at all, so the API version = 0.
- Notification (Notification) - pop-up notification messages; we don't need them either. So in getRequiredNotificationApiVersion again 0.
- “Controller” is that “usual program window on the clock”. For him, we need to determine the version. In addition, we will have to specify the supported screen sizes of the first and second hours, and only them, no other devices, we do not need. Therefore, we transmit:
- getRequiredControlApiVersion - version 1 (to support the first version of the watch). If they transmitted 2, only Smartwatch 2 would be supported, the first ones would not start.
- getTargetControlApiVersion is the target version of the API, here 2 for Smartwatch 2 support again
- isDisplaySizeSupported - we get the size of the device screen and determine whether we want to run on it or not.
- “Widget” (Widget) is an image in the list of widgets. Similarly, you need to specify the desired version and screen size. Important point: the second version of the clock widgets do not support. Alas.
Plus a pack of parameters in getExtensionRegistrationConfiguration , but everything is clear from the comments.
The main window of the program
Here it is important to realize the following point. On the clock in the first version of the clock, we can only send images. Pictures. Everything. Nothing more. There is no other way to draw. In the second version, extended controllers appeared, but we initially write to support both versions, so only the images.
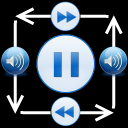
If you want to use Layout capabilities for rendering, for example, to render components - no problem, but click coordinates and other interactions will have to be processed manually. A joyless prospect ... But nonetheless. This is what our picture will look like:
And this is the code that will answer for everything:
DemoControl.java
public class DemoControl extends ControlExtension { static final Rect buttonStopPlaySmartWatch = new Rect(43, 42, 85, 88); public DemoControl(Context context, String hostAppPackageName) { super(context, hostAppPackageName); } @Override public void onTouch(final ControlTouchEvent event) {// if (event.getAction() == Control.Intents.CLICK_TYPE_SHORT) { if (buttonStopPlaySmartWatch.contains(event.getX(), event.getY())){ MusicBackgroundControlWrapper.TogglePausePlay(mContext); } } } @Override public void onSwipe(int direction) {// if (direction== Control.Intents.SWIPE_DIRECTION_UP){ MusicBackgroundControlWrapper.VolumeUp(mContext); } if (direction==Control.Intents.SWIPE_DIRECTION_DOWN){ MusicBackgroundControlWrapper.VolumeDown(mContext); } if (direction==Control.Intents.SWIPE_DIRECTION_LEFT){ MusicBackgroundControlWrapper.Next(mContext); } if (direction==Control.Intents.SWIPE_DIRECTION_RIGHT){ MusicBackgroundControlWrapper.Prev(mContext); } } @Override public void onResume() {// Bitmap mPicture = BitmapFactory.decodeResource(mContext.getResources(), R.drawable.control_picture); showBitmap(mPicture); } } The purpose of the onSwipe and onTouch events is self - explanatory , onResume is called every time the program is visible, for example, the clock has gone out of hibernation or an application icon has been selected. In principle, this is sufficient for most interactions with the application.
MusicBackgroundControlWrapper is a small, self- paced class designed to control a player using emulation of multimedia key presses. It does not work normally with all players and phones, but where it works, it works with a bang. If you know the best way (with support for Android 2.3 and higher!) - please share in the comments.
MusicBackgroundControlWrapper.java
public class MusicBackgroundControlWrapper { public static void KeyPressDownAndUp(int key,Context context){ long eventtime = SystemClock.uptimeMillis() - 1; Intent downIntent = new Intent(Intent.ACTION_MEDIA_BUTTON, null); KeyEvent downEvent = new KeyEvent(eventtime, eventtime, KeyEvent.ACTION_DOWN, key, 0); downIntent.putExtra(Intent.EXTRA_KEY_EVENT, downEvent); context.sendOrderedBroadcast(downIntent, null); eventtime++; Intent upIntent = new Intent(Intent.ACTION_MEDIA_BUTTON, null); KeyEvent upEvent = new KeyEvent(eventtime, eventtime, KeyEvent.ACTION_UP, key, 0); upIntent.putExtra(Intent.EXTRA_KEY_EVENT, upEvent); context.sendOrderedBroadcast(upIntent, null); } public static void VolumeUp(Context context){ AudioManager audioManager =(AudioManager)context.getSystemService(Context.AUDIO_SERVICE); int max=audioManager.getStreamMaxVolume(AudioManager.STREAM_MUSIC); int current=audioManager.getStreamVolume(AudioManager.STREAM_MUSIC); if (current<max){ current++; } audioManager.setStreamVolume(AudioManager.STREAM_MUSIC, current,0); } public static void VolumeDown(Context context){ AudioManager audioManager =(AudioManager)context.getSystemService(Context.AUDIO_SERVICE); int current=audioManager.getStreamVolume(AudioManager.STREAM_MUSIC); if (current>0){ current--; } audioManager.setStreamVolume(AudioManager.STREAM_MUSIC, current,0); } public static void TogglePausePlay(Context context){ KeyPressDownAndUp(KeyEvent.KEYCODE_MEDIA_PLAY_PAUSE,context); } public static void Next(Context context){ KeyPressDownAndUp(KeyEvent.KEYCODE_MEDIA_NEXT, context); } public static void Prev(Context context){ KeyPressDownAndUp(KeyEvent.KEYCODE_MEDIA_PREVIOUS, context); } } To support the second version of the watch, we will inherit DemoControl2 from DemoControl , with a couple of changes - we will transfer another image to onResume (), and check other coordinates on onTouch.
DemoControl2.java
public class DemoControl2 extends DemoControl { static final Rect buttonStopPlaySmartWatch2 = new Rect(59, 52, 167, 122); public DemoControl2(Context context, String hostAppPackageName) { super(context, hostAppPackageName); } @Override public void onTouch(final ControlTouchEvent event) {// if (event.getAction() == Control.Intents.CLICK_TYPE_SHORT) { if (buttonStopPlaySmartWatch2.contains(event.getX(), event.getY())){ MusicBackgroundControlWrapper.TogglePausePlay(mContext); } } } @Override public void onResume() {// Bitmap mPicture = BitmapFactory.decodeResource(mContext.getResources(), R.drawable.control_picture2); showBitmap(mPicture); } } Widget
So, the widget. A canonical widget has a resolution of 92x92 pixels for the first version of the clock and is not supported in principle for the second one. You can stretch it to higher resolutions (up to 128x110 ), but then it will get out of style and close the standard controls and displays.
We will need only one action from him - on click to launch our main application on the clock. The class responsible for this is also very simple, all the details are in the comments.
DemoWidget.java
public class DemoWidget extends WidgetExtension { public DemoWidget(Context context, String hostAppPackageName) { super(context, hostAppPackageName); } @Override public void onStartRefresh() { // / . showBitmap(new DemoWidgetImage(mContext).getBitmap()); } @Override public void onStopRefresh() { // . , . } @Override public void onTouch(final int type, final int x, final int y) { if (!SmartWatchConst.ACTIVE_WIDGET_TOUCH_AREA.contains(x, y)) { // - return; } // ( ) if (type == Widget.Intents.EVENT_TYPE_SHORT_TAP || type==Widget.Intents.EVENT_TYPE_LONG_TAP) { Intent intent = new Intent(Control.Intents.CONTROL_START_REQUEST_INTENT); intent.putExtra(Control.Intents.EXTRA_AEA_PACKAGE_NAME, mContext.getPackageName()); intent.setPackage(mHostAppPackageName); mContext.sendBroadcast(intent, Registration.HOSTAPP_PERMISSION); } } } Although there is an interesting point. Included with the API, among utilities, there is a class specifically for widgets that independently render the Layout into a picture. Sin does not take advantage of this opportunity, even if for the purpose of training We will render through the DemoWidgetImage class.
DemoWidgetImage.java
public class DemoWidgetImage extends SmartWatchWidgetImage { public DemoWidgetImage(Context context) { super(context); setInnerLayoutResourceId(R.layout.music_widget_image); } @Override protected void applyInnerLayout(LinearLayout innerLayout) { // - . . } } Settings window
Well, then you need at least. Since we have already registered the name of the activation in the class DemoRegistrationInformation , here we just need to fill it with something at least. I will not even comment. Just a code.
DemoConfigActivity.java
public class DemoConfigActivity extends Activity { @Override public void onCreate(Bundle savedInstanceState) { super.onCreate(savedInstanceState); setContentView(R.layout.config); } } config.xml
<?xml version="1.0" encoding="utf-8"?> <LinearLayout xmlns:android="http://schemas.android.com/apk/res/android" android:orientation="vertical" android:layout_width="match_parent" android:layout_height="match_parent"> <TextView android:layout_width="wrap_content" android:layout_height="wrap_content" android:textAppearance="?android:attr/textAppearanceMedium" android:text=" " android:id="@+id/textView" android:layout_gravity="center_horizontal"/> </LinearLayout> How to publish the application in Google Play
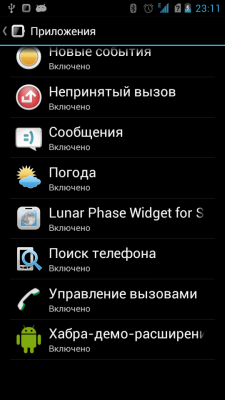
In order for your application to be located in the application store’s clock management utility, you need to add it to the program description on Google Play:
- To support SmartWatch - “LiveWare extension for SmartWatch”
- To support SmartWatch 2 - “Smart Connect extension for SmartWatch 2”
- If both are needed, we add both lines accordingly.
Tellingly, the application can also be installed by a person who does not have a clock. Install, do not run and slap the minimum score, yes. Get used to it, this is the world of Google Play! But the evaluation is not important for us, it is important for us that the world is getting a little bit better, right ...?
What else can you finish in the sample application?
- Settings window (for example, invert gestures).
- More correct and universal way to control players. In Android 4.4, the necessary API is already implemented ( Remote controllers seem to be called), but for older ones - the problem.
- Make (think up, find) an automatic calculation of coordinates for objects on the view. What would not count hands every time, suddenly Sony will create a third watch with a third resolution.
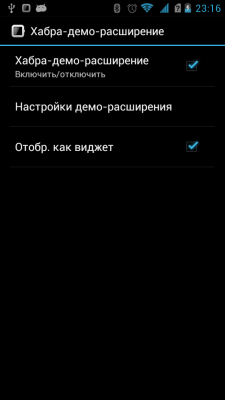
The result of our work


The source code of the example from the article
github.com/Newbilius/smartwatch_habra_demo
Source in the face of the site Sony
developer.sonymobile.com/knowledge-base/sony-add-on-sdk
And again, if you have questions about other features of the clock - see the examples folder (the full path was listed above), there are examples of using absolutely all sensors and features. The purpose of this article is to give you the opportunity to make a “quick start” and get interested, I hope I did it.
PS If you need a ready-made application described in this article, but there is no desire to develop - on Google Play you already have this, and even more functional ones - but either they are paid, or not quite the same, or with similar disadvantages.
PPS I don’t have the second version of the watch in my hands, so everything that is written about them is information from examples or documentation, plus checking on the emulator, I didn’t check it on the real watch of the second version. The first version of the watch is there, everything is exactly and checked.
Source: https://habr.com/ru/post/210898/
All Articles