What to do if you got an Android with a broken touch screen

One day, Nexus 4 came into my hands. It is rare in our area, so I would like to use it as the main phone. Unfortunately, his touch is broken. One of the sores of all modern smartphones. Well, it was decided to restore. I bought a touch on ebay. Now wait for a slow mail Russia mesyatok-another. I wanted to learn more about the device, to work with it while the package is traveling. At the same time to check whether everything works. And then maybe the camera or the speakers also crumbled. In this article, we consider the capture of the control device, if the touch is broken.
Intelligence
During the test, nexus 4, usb cable, ubuntu as an axis for work, information from the Internet and brains will be used.
')
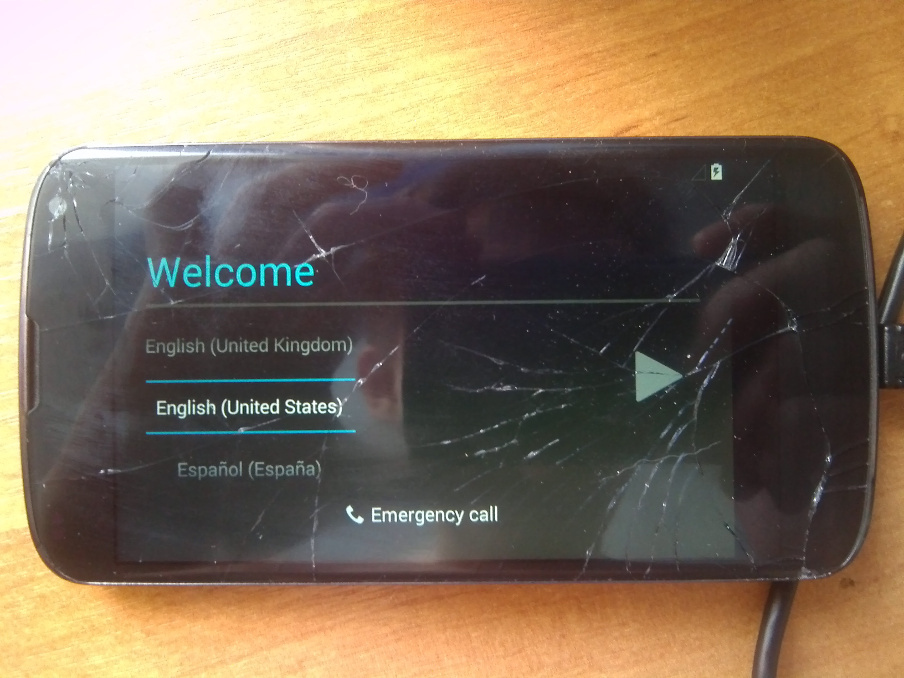
First of all I want to note - the phone is completely in stock condition. The previous owner made a complete reset of all data. After switching on, the Welcome screen appears with a choice of language. Device control can not be carried out without further intervention.
Let me remind you that nexus 4 does not have OTG, so the mouse cannot be connected to it without a special cable with external power. I do not have this, you can order on the same ebay, but wait again.
Figachim
The first thing I put CWM.
Install programs for working with androids:
sudo apt-get install android-tools-adb This is both fastboot and adb.
You can install recovery via fastboot:
fastboot flash recovery recovery.img Naturally, the notouch version is chosen. By the way, I also unlocked the bootloader (fastboot oem unlock command). I changed the firmware to the last one right away. I do not even remember why. For other phones, you need to look for your instructions. Some devices can be delivered through the built-in recovery, some have special programs for firmware.
Boot into CWM. We are looking for the item mounts and storage and mount the system (or then do it through adb - mount -o remount, rw / system ). It will be useful.
In the console on the computer we write
adb devices Issues tsiferki and recovery. What you need!
Fine. Our tasks include: skipnut welcome screen and enable usb debugging.
To do this, download build.prop in the current folder
adb pull /system/build.prop ./ Open the downloaded file and replace the line:
ro.setupwizard.enterprise_mode=1 on
ro.setupwizard.enterprise_mode=0 ro.setupwizard.mode=DISABLED persist.service.adb.enable=1 persist.service.debuggable=1 persist.sys.usb.config=mtp,adb If you see fit, you can correct any other lines. I kind of turned off the lock screen for convenience, but now it's too lazy to look for which line is responding. If not difficult, check in the comments.
Save and load back.
adb push ./build.prop /system/ Let's write the last lines in default.prop . Just in case.
adb shell echo "persist.service.adb.enable=1" >> default.prop echo "persist.service.debuggable=1" >> default.prop echo "persist.sys.usb.config=mtp,adb" >> default.prop Let's try to reboot
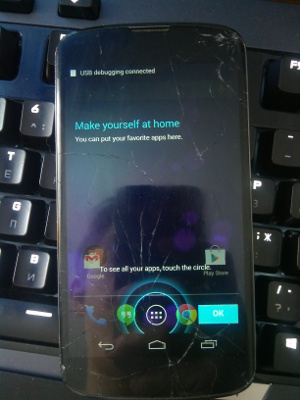
The screen has reset.
However, adb devices shows offline.
We kill adb team
adb kill-server Making an adb devices request
Still offline. It seems sailed. But no! The point is the keys.
We are looking for a folder in the home directory /.android
There should have been generated the file adbkey.pub . It must be thrown on the device.
Reboot into recovery, mount data, execute
cd ~/.android adb push ./adbkey.pub /data/misc/adb/adb_keys Reboot again. We look adb devices - everything is there!
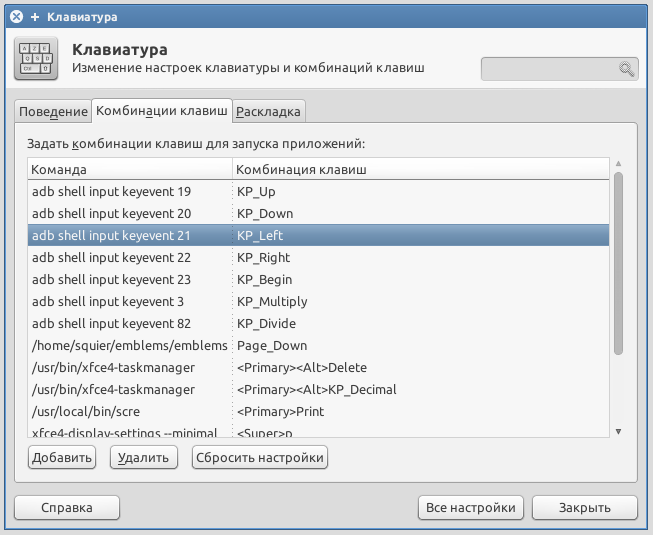
Then I, for example, assigned buttons on the nadpad of the adb shell command input keyevent XX
Code List
0 -> "KEYCODE_UNKNOWN"
1 -> KEYCODE_MENU
2 -> "KEYCODE_SOFT_RIGHT"
3 -> KEYCODE_HOME
4 -> "KEYCODE_BACK"
5 -> KEYCODE_CALL
6 -> KEYCODE_ENDCALL
7 -> "KEYCODE_0"
8 -> "KEYCODE_1"
9 -> "KEYCODE_2"
10 -> "KEYCODE_3"
11 -> "KEYCODE_4"
12 -> "KEYCODE_5"
13 -> "KEYCODE_6"
14 -> "KEYCODE_7"
15 -> "KEYCODE_8"
16 -> "KEYCODE_9"
17 -> KEYCODE_STAR
18 -> "KEYCODE_POUND"
19 -> "KEYCODE_DPAD_UP"
20 -> KEYCODE_DPAD_DOWN
21 -> KEYCODE_DPAD_LEFT
22 -> "KEYCODE_DPAD_RIGHT"
23 -> "KEYCODE_DPAD_CENTER"
24 -> "KEYCODE_VOLUME_UP"
25 -> KEYCODE_VOLUME_DOWN
26 -> "KEYCODE_POWER"
27 -> KEYCODE_CAMERA
28 -> "KEYCODE_CLEAR"
29 -> KEYCODE_A
30 -> KEYCODE_B
31 -> KEYCODE_C
32 -> KEYCODE_D
33 -> KEYCODE_E
34 -> "KEYCODE_F"
35 -> KEYCODE_G
36 -> "KEYCODE_H"
37 -> KEYCODE_I
38 -> "KEYCODE_J"
39 -> KEYCODE_K
40 -> "KEYCODE_L"
41 -> KEYCODE_M
42 -> "KEYCODE_N"
43 -> KEYCODE_O
44 -> "KEYCODE_P"
45 -> "KEYCODE_Q"
46 -> "KEYCODE_R"
47 -> KEYCODE_S
48 -> "KEYCODE_T"
49 -> "KEYCODE_U"
50 -> "KEYCODE_V"
51 -> KEYCODE_W
52 -> "KEYCODE_X"
53 -> KEYCODE_Y
54 -> "KEYCODE_Z"
55 -> KEYCODE_COMMA
56 -> "KEYCODE_PERIOD"
57 -> "KEYCODE_ALT_LEFT"
58 -> "KEYCODE_ALT_RIGHT"
59 -> "KEYCODE_SHIFT_LEFT"
60 -> "KEYCODE_SHIFT_RIGHT"
61 -> "KEYCODE_TAB"
62 -> KEYCODE_SPACE
63 -> "KEYCODE_SYM"
64 -> "KEYCODE_EXPLORER"
65 -> "KEYCODE_ENVELOPE"
66 -> "KEYCODE_ENTER"
67 -> "KEYCODE_DEL"
68 -> KEYCODE_GRAVE
69 -> "KEYCODE_MINUS"
70 -> KEYCODE_EQUALS
71 -> KEYCODE_LEFT_BRACKET
72 -> "KEYCODE_RIGHT_BRACKET"
73 -> KEYCODE_BACKSLASH
74 -> "KEYCODE_SEMICOLON"
75 -> “KEYCODE_APOSTROPHE”
76 -> KEYCODE_SLASH
77 -> KEYCODE_AT
78 -> KEYCODE_NUM
79 -> KEYCODE_HEADSETHOOK
80 -> "KEYCODE_FOCUS"
81 -> "KEYCODE_PLUS"
82 -> KEYCODE_MENU
83 -> “KEYCODE_NOTIFICATION”
84 -> "KEYCODE_SEARCH"
85 -> "TAG_LAST_KEYCODE"
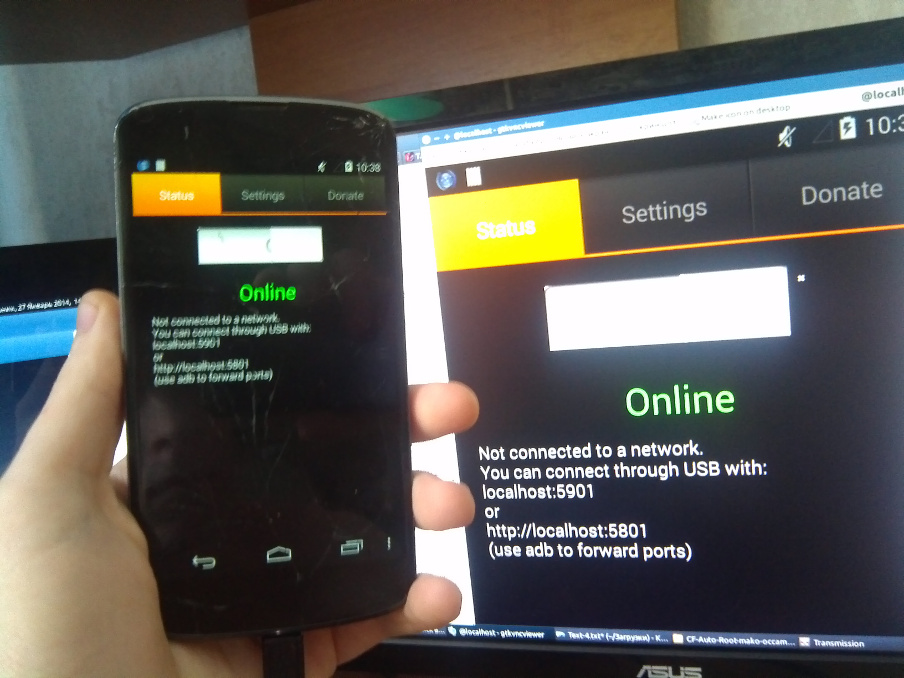
Although you can just put the VNC server (need root).
I set via adb
adb install vncfwq_1386321119498.apk adb shell am start -n com.schumi.vncs/com.schumi.vncs.VNC_serverActivity From the numpad I set the settings, turn on it turned out by typing the command to the zone off - adb shell input tap 400 300 (these are the coordinates of the tyke)
Well, so as not to go into the settings of the wifi
adb forward tcp:5901 tcp:5901 We start the vnc client, enter localhost: 5901 and do whatever it pleases.
That's all. Durable you glass, dear!
PS: I think everything can also be done with a broken display. You only need to take screenshots. It seems like a manual .
Source: https://habr.com/ru/post/210472/
All Articles