Work with geofences (geofences) in Android
Good afternoon, habrovchane. Today I would like to talk about Location APIs in general and about geofences (geofences) in particular, which were presented at Google I / 0 2013 ( video and presentation ). Despite the fact that the event occurred more than half a year ago, there is still no imputed information about this in the Habré (just one mention ). I will try to correct the situation a little.
What are Location APIs?
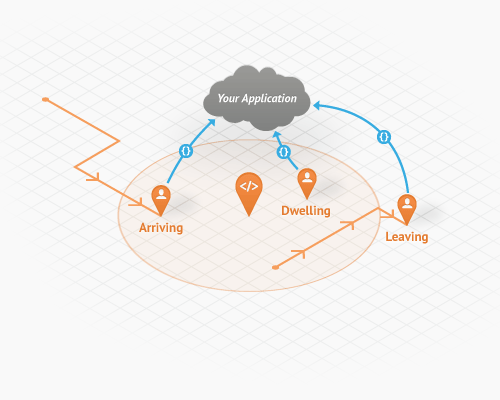
Location APIs are part of the Google Play services, which is designed to create applications that work with the location of the device. Unlike similar functions in the LocationManager , the API data is distinguished by improved energy saving. The following functionality is currently available: determining the location of the device, working with geofences and recognizing user activity. Positioning balances accuracy of determination with energy consumption, and also provides access to the most frequent locations. Activity recognition allows you to find out what the device user is doing: riding a car, riding a bicycle, walking, or staying in one place. Well, actually, working with geo-zones allows you to send messages when a device user enters a specific zone, leaves it, or is in a zone for a certain period of time.
In my opinion, the official example is quite complicated and confusing. This is due to the fact that in it:
- tried to show all the features of the Location APIs
- a lot of comments and exception handling, which could be missed in the example
- all actions are performed from activit
Based on this, in this article I will focus only on geofences and omit some exception handling.
Note : Google Play services may be disabled on the device. This can disrupt the work of many applications and the system honestly warns the user about this before disconnecting them. But it will still be good practice to check this in your application using GooglePlayServicesUtil.isGooglePlayServicesAvailable and somehow alert the user.
Task
So, for example, let's write an application in which you can explicitly specify the coordinates and radius of the geofence. When entering / leaving it, a notification will be added to the status bar with the geofence id and type of movement. After exiting the geofence we will remove it.
')
Sources for the impatient
Algorithm
In general, the process is as follows:
- From the activit we create a service to which we transmit data on the geofence.
- The service initializes the LocationClient .
- When the LocationClient is initialized, we add geofence ( Geofence ) and the corresponding PendingIntent to it .
- When geofences are added, we disconnect from LocationClient and stop the service.
- Further, all hope for PendingIntent , which will launch the IntentService when entering the zone or leaving the zone. The service adds notifications to the status bar and creates a service for deleting spent geofences.
- The newly created service initializes the LocationClient again.
- When the LocationClient was initialized, we delete the spent geofences.
- When geofences are removed, we disconnect from the LocationClient and stop the service.
- Profit!
As we see, the main actor is the LocationClient . He is responsible for accessing the API for locating and working with geofences.
To the point!
First you need to connect Google Play services. How to do this is described here .
Next, in the activation, we initialize the display elements. From this area, we are interested in calling the service when handling button clicks:
int transitionType = Geofence.GEOFENCE_TRANSITION_ENTER | Geofence.GEOFENCE_TRANSITION_EXIT; MyGeofence myGeofence = new MyGeofence(mId, latitude, longitude, radius, transitionType); Intent geofencingService = new Intent(activity, GeofencingService.class); geofencingService.putExtra(GeofencingService.EXTRA_ACTION, GeofencingService.Action.ADD); geofencingService.putExtra(GeofencingService.EXTRA_GEOFENCE, myGeofence); activity.startService(geofencingService); Here we create an Intent for our service ( GeofencingService ) and transfer the necessary data to it. Since GeofencingService is responsible for adding and deleting geofences (in the example I decided not to divide these actions into different services), we need to transfer the type of operation that should be performed by the service. In this case, the addition ( GeofencingService.Action.ADD ). The service also needs data on the geofence. We pass them as an object of the class MyGeofence, which is essentially a wrapper over Geofence.Builder (we'll talk about it later).
So, we transfer the coordinates of the center and the zone radius, as well as the type of movement. The latter can be of three types: GEOFENCE_TRANSITION_ENTER, GEOFENCE_TRANSITION_EXIT and GEOFENCE_TRANSITION_DWELL. If with the first two everything is clear, then by the third clarification is needed. GEOFENCE_TRANSITION_DWELL indicates that the user has entered the zone and spent some time in it. To use this signal, you must set setLoiteringDelay when building a geofence. In this example, GEOFENCE_TRANSITION_DWELL is not used.
Go to the service. The service implements GooglePlayServicesClient.ConnectionCallbacks , GooglePlayServicesClient.OnConnectionFailedListener , LocationClient.OnAddGeofencesResultListener , LocationClient.OnRemoveGeofencesResultListener interfaces. This allows him to be fully responsible for working with the LocationClient .
In onStartCommand, we get the type of operation (ADD or REMOVE) and pull the data necessary to perform this action. After that, we initialize and run the LocationClient :
mAction = (Action) intent.getSerializableExtra(EXTRA_ACTION); switch (mAction) { case ADD: MyGeofence newGeofence = (MyGeofence) intent.getSerializableExtra(EXTRA_GEOFENCE); mGeofenceListsToAdd.add(newGeofence.toGeofence()); break; case REMOVE: mGeofenceListsToRemove = Arrays.asList(intent.getStringArrayExtra(EXTRA_REQUEST_IDS)); break; } mLocationClient = new LocationClient(this, this, this); mLocationClient.connect(); Before adding the mGeofenceListsToAdd geofence , we called the toGeofence () method of the MyGeofence class object . I already said that MyGeofence is a wrapper over Geofence.Builder :
public MyGeofence(int id, double latitude, double longitude, float radius, int transitionType) { this.id = id; this.latitude = latitude; this.longitude = longitude; this.radius = radius; this.transitionType = transitionType; } public Geofence toGeofence() { return new Geofence.Builder() .setRequestId(String.valueOf(id)) .setTransitionTypes(transitionType) .setCircularRegion(latitude, longitude, radius) .setExpirationDuration(ONE_MINUTE) .build(); } Geofence.Builder is a utility class for creating Geofence . We set the necessary parameters, and then call the build () method to create the object. Above is the required minimum of parameters. Here you should pay attention to setExpirationDuration . The fact is that registered geofences can be deleted only in two cases: after a specified time has elapsed or with an explicit removal. Therefore, if you pass NEVER_EXPIRE as a parameter, then you must take care of deleting the object yourself. Location APIs have a limitation: a maximum of 100 geozones per application at a time.
After the LocationClient connects, the onConnected Google interface callbackPlayServicesClient.ConnectionCallbacks will work. In it, we perform addition or deletion depending on the current type of action:
@Override public void onConnected(Bundle bundle) { Log.d("GEO", "Location client connected"); switch (mAction) { case ADD: Log.d("GEO", "Location client adds geofence"); mLocationClient.addGeofences(mGeofenceListsToAdd, getPendingIntent(), this); break; case REMOVE: Log.d("GEO", "Location client removes geofence"); mLocationClient.removeGeofences(mGeofenceListsToRemove, this); break; } } As we see, addGeofences one of the parameters requires PendingIntent , which will work when moving. In our case, PendingIntent will run the IntentService :
private PendingIntent getPendingIntent() { Intent transitionService = new Intent(this, ReceiveTransitionsIntentService.class); return PendingIntent.getService(this, 0, transitionService, PendingIntent.FLAG_UPDATE_CURRENT); } After performing the action, we have OnAddGeofencesResultListener or onRemoveGeofencesByRequestIdsResult triggered , in which we disconnect from the LocationClient and stop the service:
@Override public void onAddGeofencesResult(int i, String[] strings) { if (LocationStatusCodes.SUCCESS == i) { Log.d("GEO", "Geofences added " + strings); for (String geofenceId : strings) Toast.makeText(this, "Geofences added: " + geofenceId, Toast.LENGTH_SHORT).show(); mLocationClient.disconnect(); stopSelf(); } else { Log.e("GEO", "Error while adding geofence: " + strings); } } @Override public void onRemoveGeofencesByRequestIdsResult(int i, String[] strings) { if (LocationStatusCodes.SUCCESS == i) { Log.d("GEO", "Geofences removed" + strings); mLocationClient.disconnect(); stopSelf(); } else { Log.e("GEO", "Error while removing geofence: " + strings); } } The last part of the application is the IntentService , which is launched when the user of the device crosses the geofence boundary. All actions are performed in onHandleIntent :
@Override protected void onHandleIntent(Intent intent) { if (LocationClient.hasError(intent)) { Log.e(TRANSITION_INTENT_SERVICE, "Location Services error: " + LocationClient.getErrorCode(intent)); return; } int transitionType = LocationClient.getGeofenceTransition(intent); List<Geofence> triggeredGeofences = LocationClient.getTriggeringGeofences(intent); List<String> triggeredIds = new ArrayList<String>(); for (Geofence geofence : triggeredGeofences) { Log.d("GEO", "onHandle:" + geofence.getRequestId()); processGeofence(geofence, transitionType); triggeredIds.add(geofence.getRequestId()); } if (transitionType == Geofence.GEOFENCE_TRANSITION_EXIT) removeGeofences(triggeredIds); } Here we mainly use the static methods of LocationClient . First, we check for errors using hasError . Then we get the type of movement and the list of geozones triggered using getGeofenceTransition and getTriggeringGeofences, respectively. Call the processing of each geofence and save its id. And finally, we delete geofences in case this movement was an exit from the geofence.
To delete geofences, we again create a service to which we transfer the type of operation (REMOVE) and the id list for deletion:
private void removeGeofences(List<String> requestIds) { Intent intent = new Intent(getApplicationContext(), GeofencingService.class); String[] ids = new String[0]; intent.putExtra(GeofencingService.EXTRA_REQUEST_IDS, requestIds.toArray(ids)); intent.putExtra(GeofencingService.EXTRA_ACTION, GeofencingService.Action.REMOVE); startService(intent); } That's all!
I hope the example is clear and interesting. I wish you all good applications!
UPDATE:
The article and code are very outdated in 2 years.
Thank you Vilkaman for updating the code in the repository.
More information about working with the updated Location API can be found in his article.
Source: https://habr.com/ru/post/210162/
All Articles