Legalization of income freelancer in Ukraine. Part 1: state registration of business
 Sooner or later, any freelancer thinks about how to stop hiding their income from the state. The advantages are obvious: there is official work experience, a bank is more willing to give out loans, to obtain a tourist visa abroad, you do not need to look for workarounds, you sleep, in the end, calmer. The easiest way to get out of the shadow in Ukraine is to become an entrepreneur or, as it is officially called, an individual - an entrepreneur.
I have been working as a freelance entrepreneur since 2007 and managed to accumulate considerable experience in receiving money from abroad, both through online exchanges like oDesk and Elance, and working directly with customers. At one time, I was the initiator of some changes on oDesk, helping to simplify the legal receipt of money to my business account. Today, I lead the development in our Ukrainian startup Taxer.ua, from which experience in cooperation with the state has accumulated even more.
I want to tell as much detail as possible, revealing as many details as possible, so I plan to split this tutorial into several parts:
')
- State registration of an entrepreneur: the choice of the tax system, the application.
- Drawing up foreign economic activity contracts, receiving money from customers: exchanges oDesk, Elance and directly.
- Conducting FEA accounting: acts, accounts, income book and exchange difference.
- Payment of taxes and reporting to the regulatory authorities: whether to submit a currency declaration.
As you may have guessed, the first article dedicated to the very beginning - state registration. Any business starts with registration and the business of a freelancer is no exception. A year ago, not everyone could manage the whole procedure on their own. Today, legislation allows you to become an entrepreneur, if you’re not leaving your home, then you have made just one short sortie. The following legislative initiatives contributed to this:
- implementation of filing an application for state registration of FLP in electronic form;
- The choice of the tax system during the state. registration;
- payment of state. registration fees for electronic money;
- issuing a single registration form without the need for separate registration with the tax inspectorate and the pension fund.
The process of becoming an entrepreneur will consist of two stages: the choice of the tax system and the actual state registration itself. Given some preparatory actions, the complete scheme will be as follows:
- choose a tax system
- get digital signature keys (EDS)
- fill out and send an application for state registration in electronic form, pay for state. toll
Go
1. Choice of taxation system
“Choice” is not the right word. In total there are two tax systems - general and simplified. Until recently, the entrepreneur was registered by default on the general system, and the simplified system could be switched upon completion of registration. From January 1, 2014, the simplified taxation system can be selected directly during state registration.
The simplified system is currently divided into 6 groups, of which 2 is provided for legal. persons and 4 for FLP. A comparison table can be found, for example, here . In the absolute majority of cases, the choice will be between the second and third simplified groups. Brief comparison:
- the second group pays a fixed tax (in the region of UAH 250 per month), the third group pays 5% of the total turnover (the costs do not reduce the tax base);
- the second group can receive up to 1 million UAH per year, the third - up to 3 million UAH per year;
- the second group can provide services only to the population and other payers of the EH, in the third group there are no such restrictions;
- the second group reports once a year, the third - once a quarter.
Summarizing, if you are a programmer / designer / layout designer and tester and are going to provide services abroad, your group is the third, if you provide services to the public or to the Ukrainian companies that pay EH, then you can choose the second group.
To select a simplified system, you need to make a statement. You can create it through this interactive wizard .
After the application is formed, it must be printed out and signed. You will need this document later in the process of drafting an application for state registration. There is one nuance here - since the second group of businessmen pay a single tax in advance, then a bank receipt with a single tax (EN) for the next month must be attached with the application. You can create a payment order through the calendar . If you want to become an entrepreneur of the 3rd group, then you do not need to pay the EH.
The last thing you need to do in connection with the choice of a simplified taxation system is to register an income book. However, this must be done after you complete the state. registration. An article on how to register and keep a book of income accounting is here .
2. Receiving EDS keys
This is the only attack on
For state. registration will fit free keys that are issued by the information department at the Ministry of Revenue. There is an office for receiving keys in each regional center. To obtain EDS keys, you need to fill out an application and come with the original passport and identification code to your local issuing center. Their addresses are listed on this page . The application form is here , an example of filling here . I will also share a link to our interactive wizard , which will generate you a ready application in DOCX or ODT formats. It is possible to register in the center of issue by phone for a certain convenient time. The procedure for issuing keys usually takes 15 minutes. More information about the process of obtaining free EDS tax can be found in the previous article on Habré and in our knowledge base .
If you received an EDS, then it's time to move on to the next step.
3. Filling and sending an application for state. registration in electronic form, payment of state. duties
The original plan was to write about how easy, simple and cross-platform you can send an electronic application through Takser. But due to recent legislative changes (yes, not everything is changing for the better), at the moment an application in electronic form can be sent exclusively through the registration portal. The registration portal works on Silverlight (read: it works only on Windows) and, to put it mildly, not without problems. But while we are in the process of negotiations with the IRC - the technical administrator of registration of FLP from the state, we have to use what we have.
So, we need Windows, Silverlight and the registration portal site: rp.irc.gov.ua

To use the portal you need to create an account. This can be done using the received EDS keys. Follow the “Register” link. If you don’t have Silverlight you’ll be prompted to install it. Do not forget to restart the browser after installation. In addition to Silverlight, it will also require a special cryptoadapter, which is a set of dlls containing crypto libraries for various ACCs. The crypto adapter actually performs all the crypto-transformations.

If, finally, everything is set correctly, you will see a window for reading digital signature. In the upper field, you need to select the ADC that issued your keys. In the case of free keys Mindokhodov this “Accreditation Center for Certification Key ID_DD M_ndohodіv”. In the second field, you can choose where to read the closed part of the key - from an optical disk, a removable disk (USB-drive) or from the file system. However, it is not at all clear from which name directory the keys will be read in case of selecting the “file system”, therefore, the working choice will be the choice between “optical disk” and “removable disk”. In the third field, you must select a drive letter to read the key file. In the last field you need to enter the password from the key. Immediately I will warn you: you need to copy the open part of the key (your .cer files) yourself into the correct folder of the crypto manager. This is usually C: \ Certificates \ <your ADCS folder> (if you receive the ADCS keys of the Ministry of Revenues, this will be C: \ Certificates \ PD).
In the next step, everything is simple - fill in the email and password. A registration letter will be sent to the email, following the link from which you need to go to activate the profile.

After successful confirmation of the email, you can enter the profile using the same procedure for verifying the digital signature as during registration. Now you can start creating an application.


The application itself is filled in on several pages. In principle, all fields are more or less clear. The process looks like this (curve layout is attached).
Page 1: general statement
Page 2: KVEDy

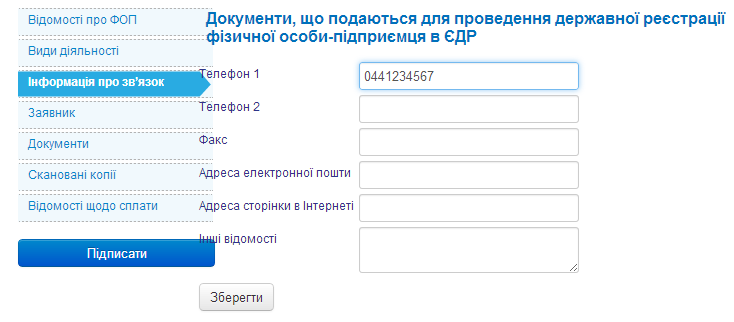
Page 3: Contact Information
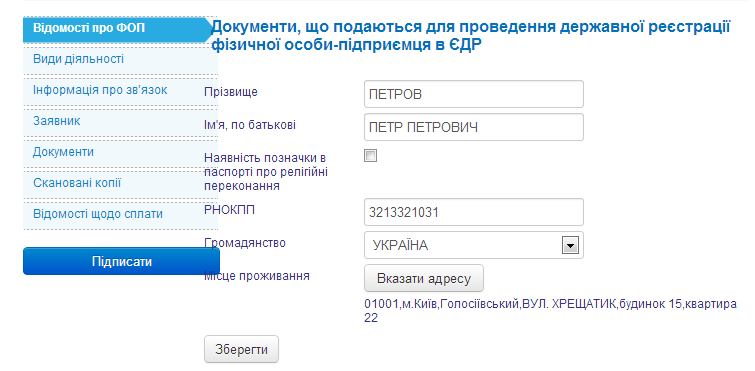
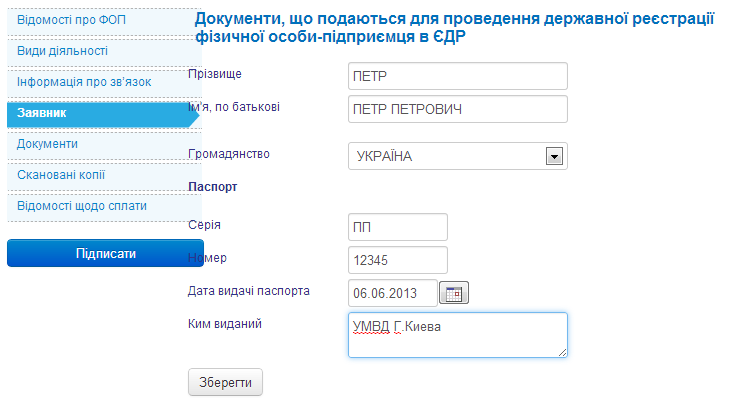
Page 4: Applicant Information
Page 5: selection of attached documents
In general, here it is necessary to tick the following checkboxes: application cards for state registration, identification code and application for the choice of a simplified taxation system. At the same time, if you want to become an entrepreneur of 2 groups, you need to add a new document with the appropriate name through the field at the very bottom of the page. Please note that the only checkbox, which is designated as mandatory, is not necessary to mark (hello, intuitive interface). Attachment of document on state payment The fee will happen automatically at the payment step. The download of the scanned copies of the selected documents occurs in the next step.
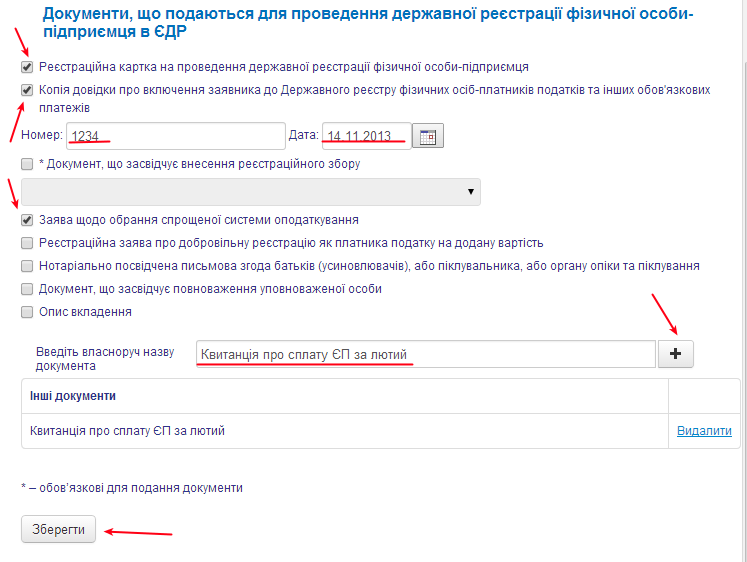
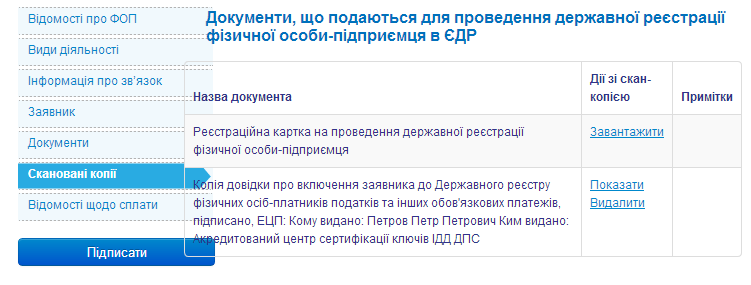
Page 6: Download Scan Copies
In this place we need to upload scanned copies of the documents selected in the previous step. Let's start with the identification code file. File download occurs immediately with the imposition of EDS. Therefore, when you click on the link “Download”, a signature block will open. Select the “Download file to file” option to download an already signed file. Next, select the file first to download, and then in the signature block below. Do not forget to convert the scanned copy file to TIFF (without compression!).

After clicking on the “Write” button, your EDS will be superimposed on the file. Now you need to click on the “Save” button at the very bottom. The file and the signature will be uploaded to the server, after which the page will look like this:
Now you need to download a scanned copy of the application (card). It is curious that nowhere is there any information about what it is and how to do it, no. In fact, it is a completed form number 10, used for registration in the usual paper-petitional way. The electronic registration not only did not get rid of, but did not even provide for its automatic formatting, although all the data for filling was already entered in the previous steps. But never mind, here is a link to our interactive wizard . Fill in all fields, choose the office format to your liking: DOCX, ODT, print, sign, and scan back. An example of filling in the application is here . And there is an empty form, if you prefer to fill in everything yourself.
Here you will need a scanned copy of the application for the choice of a simplified taxation system, which was discussed at the beginning of the article. And do not forget to scan and download the receipt for payment of EH, if you noted it in the previous step.
The process of downloading all files is the same as loading an identification code file.
Go to the last step of the application - payment.
Page 7: payment
It should be noted that the payment of state. duties became a stumbling block and the reason for the refusal of electronic registration in some areas for several months. The fact is that the wording of the law changed the wording “the scan of the payment receipt for state payment. duties ”on the“ electronic receipt ”. What is this explanation was not, and the state. The registrars decided, away from sin, to send everyone a refusal. This went on for three months. But now the problem was solved by the fact that they really introduced electronic payment of the duty.
The choice is small:

You can pay via iPay using plastic cards. When you go to the payment page you are met with a form where you need to fill in the details of the recipient. The recipient will be your local registration service. Details are collected on the website of the State Registration Service .
The amount of duty - 34 hryvnia. 10 hryvnia commission iPay.
Upon successful payment, the page will look like this:

And on the documents page there will be a check mark in front of the item on the document confirming payment of the registration fee.
Now everything is ready to send the application. It remains only to once again impose a digital signature and the data will be sent to the state. to the registrar. When you click on the “Edit” button, you will again see the cryptoadapter, actions with it are similar to all previous ones. If the signature was applied correctly, the application will go to the signed state and will be moved to the appropriate section. To send a request, you must select the desired action from the drop-down menu in the last column:
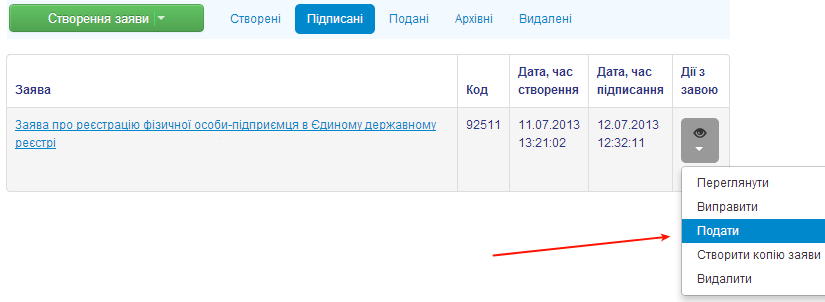
The application will again change its status and will now be displayed in the “Submitted” section. Over time, the processing status will be updated until, finally, registration is successfully or unsuccessfully completed. Unfortunately, no email notifications will not be sent, so you should periodically go to the page yourself, checking the status of the application. If the application is rejected for any reason, then the reason will be displayed on the same page. You can also call the contact number that you left, with explanations of the reasons for the refusal and suggestions for correction.
If the registration is successful, the application status will change to “Registered”, but it will take another day or two before the data on the entrepreneur will be processed in the tax and pension fund. Already after registration in all the necessary regulatory bodies, the state registrar will receive all the necessary data for the formation of an extract confirming the registration.
You will be able to view the statement in electronic form, and in paper form the documents should come by mail to the registration address (or you can pick them up yourself if you want to save time). All registration should take no more than 3 business days and usually takes as much.
Fuh
Now you are an entrepreneur. Congratulations! You can fearlessly engage in any permitted economic activity and receive legal income.
In the following series: drawing up foreign economic activity contracts, receiving money from clients through the exchanges oDesk, Elance and directly, drawing up acts and bills, reporting and taxes for freelancers.
Source: https://habr.com/ru/post/210004/
All Articles