"Perfect" cluster. Part 2.2: Highly available and scalable web server, the best technologies to guard your business

In continuation of the series of articles on the “Ideal” cluster, I want to share recipes for creating reliable, productive and easy-to-manage web-systems.
In order to ensure reliable and fast work of websites and web-systems, our company conducted an examination of the technical means available on the market. We were guided by a simple goal: to achieve scalability and at the same time high performance of our systems.
')
The cluster, in fact, was built from scratch. There was a frontend-backend architecture. The databases went to MariaDB Galera, all sites moved to unified web nodes.
In the course of long work, disputes and discussions, ready-made solutions were born, which Acronis is happy to share with you. We exist to help.
My other publications on the “Ideal” cluster
- Acceleration and optimization of PHP-site. What technologies should be chosen when setting up a server for PHP
- "Perfect" cluster. Part 3.1 Implementing MySQL Multi-Master Cluster
- "Perfect" cluster. Part 2.2: Highly available and scalable web server, the best technologies to guard your business
- About virtual hetzner cluster
- Frontend: NGINX + Keepalived (vrrp) on CentOS
- HAPRoxy for Percona or Galera on CentOS. Its configuration and monitoring in Zabbix
- Zabbix 2.2 riding on nginx + php-fpm and mariadb
Now we will talk about several important aspects:
- How to deploy a secure, scalable web-system on the example of a virtual cluster in Proxmox-based Hetzner
- How to easily manage all systems from one free and convenient control panel
- How, using the most modern technologies, to achieve maximum performance and safety
You may ask, how is this article different from hundreds of others?
- how to set up a free CentOS-based ISPConfig web-based control panel (official documentation talks about using the panel in a Debian environment)
- How to configure the ISPConfig web panel itself to work without apache2 (The documentation strongly suggests using it with apache2)
- I will share the recipe for creating a productive php application server using nginx + php-phm and apache2 + php-fpm / mod_ph backends.
- I'll tell you about the installation and configuration of MariaDB, instead of MySQL
Concept:
- Take, for example, the hypervisor based on the free Proxmox system
- For each service, we will create our own virtual environment based on OpenVZ (thanks to colleagues from Parallels for a great product)
- We have a gw.local container, it forwards individual ports to other containers using iptables
- There is isp. local where the nginx + php-fpm-based ISPConfig control panel is running
- There is front01.local. Nginx is working on it in the traffic proxying mode on one of its upstream (servers of the execution of our sites)
- There is app01.local on which the php execution environment lives. It can be apache + php-fpm / mod_php or nginx + php-fpm
- There is db.local on which lives the main database MariaDB
On all servers except app01.local, all unsolicited services, including ssh, have been removed, the interaction between them takes place through a gray private network. Only those ports that are necessary for the operation of our sites are open to the public network (80, 443, etc.)
Proxmox Known issues
Do not forget to include autoloading containers created

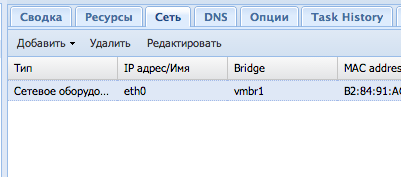
When you create a network for the bridge vmbr1 , Proxmox assigns it a virtual name eth0 , so you have to delete the created network and redo everything correctly
In order to enter the container, it is necessary to start it and in the terminal enter the vzctl enter command number_container
In the article about Proxmox (link to it at the very beginning), we said that we use a file where the firewall rules of our official public network are written, which ideally nobody should know about except us.
nano /etc/iptables.up.rules *nat :PREROUTING ACCEPT [2164:136969] :POSTROUTING ACCEPT [58:3659] :OUTPUT ACCEPT [0:0] # Nat -A POSTROUTING -o vmbr0 -j MASQUERADE # ISPConfig Web Panel -A PREROUTING -d *.*.*182/32 -p tcp -m tcp --dport 8080 -j DNAT --to-destination 192.168.8.3:8080 -A PREROUTING -d *.*.*.182/32 -p tcp -m tcp --dport 8081 -j DNAT --to-destination 192.168.8.3:8081 # app01. ssh server -A PREROUTING -d *.*.*.182/32 -p tcp -m tcp --dport 22 -j DNAT --to-destination 192.168.8.4:22 COMMIT # Change the ssh port of our hypervisor to 2222
nano /etc/ssh/sshd_config Port 2222 General presets for all our containers
# Be sure to add to the hosts file, on all containers where the ISPConfig agents will be, these lines:
nano /etc/hosts 192.168.8.1 gw.local 192.168.8.2 front01.local 192.168.8.3 isp.local 192.168.8.4 app01.local 192.168.8.5 db01.local # Change the time zone to your
ln -sf /usr/share/zoneinfo/Europe/Moscow /etc/localtime yum install wget nano wget ntpdate -y # These repositories should be, because here we will find a lot of packages that are not in the basic repositories.
wget http://dl.fedoraproject.org/pub/epel/6/x86_64/epel-release-6-8.noarch.rpm wget http://rpms.famillecollet.com/enterprise/remi-release-6.rpm sudo rpm -Uvh remi-release-6*.rpm epel-release-6*.rpm rm *.rpm -f # This repository is useful to us, but we will turn it off by default.
rpm --import http://dag.wieers.com/rpm/packages/RPM-GPG-KEY.dag.txt cd /tmp wget http://dag.wieers.com/rpm/packages/rpmforge-release/rpmforge-release-0.3.6-1.el5.rf.x86_64.rpm && rpm -ivh rpmforge-release-0.3.6-1.el5.rf.x86_64.rpm # Turn off, we will use through --enablerepo = rpmforge
sed -i 's/enabled = 1/enabled = 0/g' /etc/yum.repos.d/rpmforge.repo # And this is a gem for web systems and not only, there really is a lot of things that an administrator needs in his work. Musthave
wget -q -O - http://www.atomicorp.com/installers/atomic | sh # We put useful software
yum install nano mc screen sudo nscd htop ntp zip unzip pigz iotop sysstat lsof strace atop multitail -y yum --enablerepo=rpmforge install htop -y # Remove unwanted service for this container
yum remove -y sendmail httpd sshd samba bind openssh -y # Update the system
yum update -y # Remove mysql
yum remove mysql* mysql-* # Install mariadb for service purposes ISPConfig
yum install mariadb-server mariadb-devel mariadb-client -y # Install cron
yum install -y cronie cronie-anacron crontabs sysstat -y # Add cron to autoload and run
/etc/init.d/crond start && chkconfig crond on # Customize mariadb
nano /etc/my.cnf [mysqld] skip-name-resolve default_storage_engine=InnoDB innodb_file_per_table = 1 # network connect_timeout = 60 wait_timeout = 28800 max_connections = 200 max_allowed_packet = 512M max_connect_errors = 1000 # performance query_cache_size = 32M tmp_table_size = 32M max_heap_table_size = 32M thread_cache_size = 16 table_open_cache = 600 innodb_flush_log_at_trx_commit = 2 innodb_flush_method = O_DIRECT transaction-isolation = READ-COMMITTED log_error = /var/log/mysql/mysql-error.log #slow_query_log_file = /var/log/mysql/mysql-slow.log # Add mariadb to autoload
chkconfig --levels 235 mysqld on && /etc/init.d/mysqld start Setting up the gw.local environment
You need to create an OpenVZ (New CT) container with the CentOS 64 environment. This virtual machine will serve our public and private network.
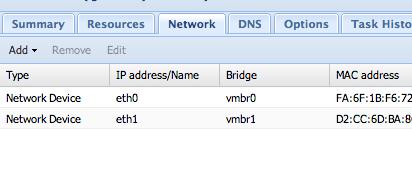
We will need the vmbr0 network interfaces named eth0 (our public network of the provider) and vmbr1 for the eth1 network (a private network for interacting with other containers).
This virtual machine will require no more than 128 MB of RAM.

We start to configure the network in the container gw.local
Network inside the container:
vi /etc/sysconfig/network-scripts/ifcfg-eth0 DEVICE=eth0 BOOTPROTO=static ONBOOT=yes IPADDR=xxx237 NETMASK=255.255.255.0 GATEWAY=xxx1 vi /etc/sysconfig/network-scripts/ifcfg-eth1 DEVICE=eth1 BOOTPROTO=static ONBOOT=yes IPADDR=192.168.8.1 NETWORK=192.168.8.0 # Save current iptables rules
/etc/init.d/iptables save # Add rules to the * nat section for our external business address
vi /etc/sysconfig/iptables -A PREROUTING -d *.*.*.237/32 -p tcp -m tcp --dport 80 -j DNAT --to-destination 192.168.8.2:80 -A PREROUTING -d *.*.*.237/32 -p tcp -m tcp --dport 443 -j DNAT --to-destination 192.168.8.2:443 -A PREROUTING -d *.*.*.237/32 -p tcp -m tcp --dport 25 -j DNAT --to-destination 192.168.8.5:25 -A PREROUTING -d *.*.*.237/32 -p tcp -m tcp --dport 110 -j DNAT --to-destination 192.168.8.5:110 -A PREROUTING -d *.*.*.237/32 -p tcp -m tcp --dport 145 -j DNAT --to-destination 192.168.8.5:145 -A PREROUTING -d *.*.*.237/32 -p tcp -m tcp --dport 995 -j DNAT --to-destination 192.168.8.5:995 -A PREROUTING -d *.*.*.237/32 -p tcp -m tcp --dport 465 -j DNAT --to-destination 192.168.8.5:465 -A PREROUTING -d *.*.*.237/32 -p tcp -m tcp --dport 587 -j DNAT --to-destination 192.168.8.5:587 -A PREROUTING -d *.*.*.237/32 -p tcp -m tcp --dport 143 -j DNAT --to-destination 192.168.8.5:143 -A PREROUTING -d *.*.*.237/32 -p tcp -m tcp --dport 993 -j DNAT --to-destination 192.168.8.5:993 -A POSTROUTING -o eth0 -j MASQUERADE # We allow traffic forwarding
echo "net.ipv4.ip_forward = 1" >> /etc/sysctl.conf sysctl -p Setting up the front01.local environment
It is necessary to create an OpenVZ (New CT) container with the CentOS 64 environment. This virtual machine will serve ports 80 and 443, thrown from our gw.local. This container has nginx installed, which proxies all requests to our sites on app01.local
The nginx configuration procedure itself is well described in this article “Perfect” www cluster. Part 1. Frontend: NGINX + Keepalived (vrrp) on CentOS
This container will have an address in the private network ( vmbr1 ) 192.168.8.2 , for work, no more than 1024 MB of RAM will be required
This is how the network should look like in the container itself:
vi /etc/sysconfig/network-scripts/ifcfg-eth1 DEVICE=eth1 BOOTPROTO=static ONBOOT=yes IPADDR=192.168.8.2 NETWORK=192.168.8.0 GATEWAY=192.168.8.1 Setting up the isp environment.
You need to create an OpenVZ (New CT) container with the CentOS 64 environment. This virtual machine will serve our ISPConfig control panel. At the beginning of the article we showed that the panel will be served by the service public address and will be available on ports 8080 and 8081.
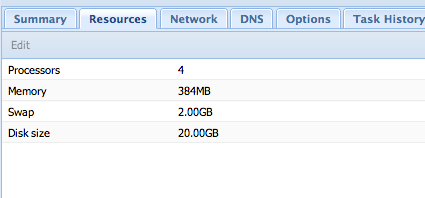
This container will have an address in a private network ( vmbr1 ) 192.168.8.3 , and will need about 384 MB of RAM.
# Network settings for this container:
/etc/sysconfig/network-scripts/ifcfg-eth1 DEVICE=eth1 BOOTPROTO=static ONBOOT=yes IPADDR=192.168.8.3 NETWORK=192.168.8.0 GATEWAY=192.168.8.100 # Install web server components for ISPConfig panel
yum install php-mysql php nginx php-fpm postfix patch -y # Remove configs with standard nginx greeting
rm -f /etc/nginx/conf.d/default.conf rm -f /etc/nginx/conf.d/virtual.conf rm -f /etc/nginx/conf.d/ssl.conf # Add nginx and php-fpm to autoload and run
chkconfig --levels 235 php-fpm on && /etc/init.d/php-fpm start chkconfig --levels 235 nginx on && /etc/init.d/nginx start # Allow ISPConfig agents to connect to the central isp.local database for their parameters
mysql CREATE USER 'root'@'192.168.8.%' IDENTIFIED BY 'c2HZqsMmiBKa'; GRANT ALL PRIVILEGES ON * . * TO 'root'@'192.168.8.%' IDENTIFIED BY 'c2HZqsMmiBKa' WITH GRANT OPTION; flush privileges; # Install phpMyAdmin
yum install phpmyadmin -y # Create a phpMyAdmin simlink on phpmyadmin
ln -s /usr/share/phpMyAdmin/ /usr/share/phpmyadmin nano /etc/phpMyAdmin/config.inc.php $cfg['blowfish_secret'] = '46a30e4ed1cf83.14522379'; /* YOU MUST FILL IN THIS FOR COOKIE AUTH! */ $cfg['Servers'][$i]['host'] = 'db01.local'; // MySQL hostname or IP address $cfg['Servers'][$i]['port'] = '3306'; // MySQL port - leave blank for default port $cfg['Servers'][$i]['auth_type'] = 'cookie'; // Authentication method (config, http or cookie based)? # Install ISPConfig
cd /usr/src/ wget http://www.ispconfig.org/downloads/ISPConfig-3-stable.tar.gz tar xfz ISPConfig-3-stable.tar.gz cd ispconfig3_install/install/ php -q install.php # Answering the questions of the interactive installation wizard
>> Initial configuration
Operating System: Redhat or compatible, unknown version.
If so, be careful.
Default values are in [brackets] and can be accepted with.
Tap in "quit" (without the quotes) to stop the installer.
Select language (en, de) [ en ]:
Installation mode (standard, expert) [standard]: expert
Full qualified hostname (FQDN) of the server, eg server1.domain.tld [ isp.local ]:
MySQL server hostname [ localhost ]:
MySQL root username [ root ]:
MySQL root password []:
MySQL database to create [ dbispconfig ]:
MySQL charset [ utf8 ]:
The next two questions are about the internal ISPConfig database user and password.
It is recommended to accept the defaults which are 'ispconfig' as username and random password.
If you use the password
ISPConfig mysql database username [ ispconfig ]:
ISPConfig mysql database password [ 1850fcffe2fc0b1ca2707c3e27c5eec4 ]:
Shall this server join an existing ISPConfig multiserver setup (y, n) [ n ]:
Apache and nginx detected. Select server to use for ISPConfig: (apache, nginx) [apache]: nginx
Adding ISPConfig server record to database.
Configure Mail (y, n) [y]: n
Configure Jailkit (y, n) [y]: n
Configure FTP Server (y, n) [y]: y
Configuring Pureftpd
Configure DNS Server (y, n) [y]: n
Hint: If this is the ISPConfig interface, select the 'y' in the 'Configure nginx Server' option.
Configure nginx Server (y, n) [y]: y
Configuring nginx
Configuring Apps vhost
Configure Firewall Server (y, n) [y]: y
Configuring Bastille Firewall
Install ISPConfig Web Interface (y, n) [y]: y
Installing ISPConfig
ISPConfig Port [ 8080 ]:
Enable SSL for the ISPConfig web interface (y, n) [y]: y
Generating RSA private key, 4096 bit long modulus
.................................................. .............. ++
.................................................. .................................................. ................... ++
e is 65537 (0x10001)
You are included
into your certificate request.
What is a Distinguished Name or a DN?
You can leave some blank
For some fields there will be a default value,
If you enter '.', The field will be left blank.
- Country Name (2 letter code) [XX]: Ru
State or Province Name (full name) []: Moscow
Locality Name (eg, city) [Default City]: Moscow
Organization Name (eg, company) [Default Company Ltd]: isp.local
Organizational Unit Name (eg, section) []: IT
Common Name (eg, your server or your server’s hostname) []: isp.local
Email Address []:
Please enter the following extra attributes
to be sent with your certificate request
A challenge password []:
An optional company name []:
writing RSA key
Configuring DBServer
Installing ISPConfig crontab
no crontab for root
Reloading php-fpm: [OK]
Reloading nginx: [OK]
Installation completed.
# Our ISPConfig panel is forwarded to port 8080 of the service public interface
https://__ip:8080/ 
Default login and password: admin
# Check for known problems in the installed version of ISPConfig on this site. If there are patches with updates, apply them.
cd /usr/local/ispconfig/server/scripts wget http://www.ispconfig.org/downloads/ispconfig_patch chmod 700 ispconfig_patch chown root:root ispconfig_patch ln -s /usr/local/ispconfig/server/scripts/ispconfig_patch /usr/local/bin/ispconfig_patch # Here is a list of available, at the time of writing, patches
Patches for ISPConfig 3.0.5.3
Patch ID: 3053_langedit
Date: 2013-09-25
Description: This patch solves a UTF-8 encoding issue in the language file editor.
Patch ID: 3053_langimport
Description: This patch adds a language to the language file importer.
Patch ID: 3053_backupdownload
Description: This is a patch backups website.
Patch ID: 3053_apsdelete
Description: deletes APS instances.
Patch ID: 3053_ftpuser
Description: This patch fixes FS # 3089 - FTP User Options - ERROR You have no permission for this domain.
Patch ID: 3053_phpversion
Description for your website. Php select user interface is “default”.
Patch ID: 3053_sysini
Description: This patch fixes FS # 3086 - SQL query warning about sys_ini access in multiserver setups.
Patch ID: 3053_dashboard
Description: This patch fixes on the dashboard.
# Uncomment the section responsible for phpMyAdmin
nano /etc/nginx/sites-enabled/000-ispconfig.vhost location /phpmyadmin { root /usr/share/; index index.php index.html index.htm; location ~ ^/phpmyadmin/(.+\.php)$ { try_files $uri =404; root /usr/share/; include /etc/nginx/fastcgi_params; fastcgi_pass unix:/var/lib/php5-fpm/ispconfig.sock; fastcgi_param HTTPS on; fastcgi_index index.php; fastcgi_param SCRIPT_FILENAME $request_filename; } location ~* ^/phpmyadmin/(.+\.(jpg|jpeg|gif|css|png|js|ico|html|xml|txt))$ { root /usr/share/; } } location /phpMyAdmin { rewrite ^/* /phpmyadmin last; } /etc/init.d/nginx reload Setting app01.local environment (apache2 + php-fpm)
You need to create an OpenVZ (New CT) container with the CentOS 64 environment. This virtual machine will serve our sites written in php. In general, apache2 is much slower than nginx gives static files (graphics, scripts, styles, etc.), and in combination with mod_php it also spends a lot of memory on serving incoming requests. This is due to the apache2 architecture itself. If the problem of memory consumption can be defeated using php-fpm, then with the slow static we can only accept and partially compensate for this with the cache on the nginx side in front.local.
It makes sense to use apache2 only when it is necessary to use .htaccess or modules specific only apache2.
For this virtual machine, the ssh port is forwarded from the service public address, port 80 is proxied from our front.local
This container will have an address in a private network ( vmbr1 ) 192.168.8.4 , saving on RAM for this virtual machine is not worth it, in general, I put from 4 to 20 GB.
# Network settings for this container:
vi /etc/sysconfig/network-scripts/ifcfg-eth1 DEVICE=eth1 BOOTPROTO=static ONBOOT=yes IPADDR=192.168.8.4 NETWORK=192.168.8.0 GATEWAY=192.168.8.100 # Install the web server components
yum install mod_rpaf memcached ntp httpd php php-mysql php-mbstring php-mcrypt rpm-build openssl-devel cyrus-sasl-devel pkgconfig zlib-devel pcre-devel openldap-devel postgresql-devel expect libtool-ltdl-devel openldap-servers libtool gdbm-devel pam-devel gamin-devel mod_ssl php-fpm php-cli php-gd php-imap php-ldap php-odbc php-pear php-xml php-xmlrpc php-pecl-apc php-magpierss php-snmp php-tidy spawn-fcgi openssl perl-TimeDate httpd-devel ruby ruby-devel webalizer perl-DateTime-Format-HTTP perl-DateTime-Format-Builder perl-TimeDate libevent-devel php-pecl-memcache mod_fcgid subversion git php-soap -y yum install --enablerepo=rpmforge mod_fastcgi mod_suphp -y # Add services to autoload and run them
chkconfig --levels 235 php-fpm on && /etc/init.d/php-fpm start chkconfig --levels 235 httpd on && /etc/init.d/httpd start chkconfig --levels 235 memcached on && /etc/init.d/memcached start # To manually build php modules, install the developer components
yum groupinstall 'Development Tools' -y # Minimal changes in php.ini
sed -i "s/^error_reporting =.*/error_reporting = E_ALL \& \~E_NOTICE/g" /etc/php.ini sed -i "s/^;cgi.fix_pathinfo =.*/cgi.fix_pathinfo = 1/g" /etc/php.ini sed -i "s/^;date.timezone =.*/date.timezone = Europe\/Moscow/g" /etc/php.ini sed -i "s/^max_execution_time =.*/max_execution_time = 600/g" /etc/php.ini sed -i "s/^max_input_time =.*/max_input_time = 600/g" /etc/php.ini sed -i "s/^memory_limit =.*/memory_limit = 512M/g" /etc/php.ini sed -i "s/^post_max_size =.*/post_max_size = 500M/g" /etc/php.ini sed -i "s/^upload_max_filesize =.*/upload_max_filesize = 2000M/g" /etc/php.ini sed -i "s/^max_file_uploads =.*/max_file_uploads = 200/g" /etc/php.ini sed -i "s/^short_open_tag =.*/short_open_tag = On/g" /etc/php.ini sed -i "s/^upload_max_filesize =.*/upload_max_filesize = 500M/g" /etc/php.ini sed -i "s/;realpath_cache_size =.*/realpath_cache_size = 4096k/g" /etc/php.ini # Building the xdebug module (useful for debugging code and identifying problems)
yum install php-devel php-pear pecl install Xdebug nano /etc/php.d/xdebug.ini [xdebug] zend_extension="/usr/lib64/php/modules/xdebug.so" xdebug.remote_enable = 1 php -v No log handling enabled - turning on stderr logging Created directory: /var/lib/net-snmp/mib_indexes PHP 5.4.24 (cli) (built: Jan 13 2014 12:36:47) Copyright (c) 1997-2013 The PHP Group Zend Engine v2.4.0, Copyright (c) 1998-2013 Zend Technologies with Xdebug v2.2.3, Copyright (c) 2002-2013, by Derick Retha # Install the php module - Zend Guard
cd /usr/src/ && wget wget http://downloads.zend.com/guard/6.0.0/ZendGuardLoader-70429-PHP-5.4-linux-glibc23-x86_64.tar.gz tar xzvf ZendGuardLoader-7* -C /usr/local/ chmod -R 755 /usr/local/ZendGuardLoader-70429-PHP-5.4-linux-glibc23-x86_64/ mv /usr/local/ZendGuardLoader-70429-PHP-5.4-linux-glibc23-x86_64/ /usr/local/Zend nano /etc/php.d/zend.ini zend_extension=/usr/local/Zend/php-5.4.x/ZendGuardLoader.so php -v PHP 5.4.24 (cli) (built: Jan 13 2014 12:36:47) Copyright (c) 1997-2013 The PHP Group Zend Engine v2.4.0, Copyright (c) 1998-2013 Zend Technologies with Xdebug v2.2.3, Copyright (c) 2002-2013, by Derick Rethans with Zend Guard Loader v3.3, Copyright (c) 1998-2013, by Zend Technologies # Enable the opcode caching module for php - apc
sed -i "s/^apc.enabled=.*/apc.enabled=1/g" /etc/php.d/apc.ini sed -i "s/^apc.shm_size=.*/apc.shm_size=256M/g" /etc/php.d/apc.ini sed -i "s/;apc.num_files_hint=.*/apc.num_files_hint=20000/g" /etc/php.d/apc.ini sed -i "s/;apc.user_entries_hint=.*/apc.user_entries_hint=20000/g" /etc/php.d/apc.ini sed -i "s/;apc.ttl=.*/apc.ttl=86400/g" /etc/php.d/apc.ini sed -i "s/;apc.user_ttl=.*/apc.user_ttl=7200/g" /etc/php.d/apc.ini sed -i "s/;apc.gc_ttl=.*/apc.gc_ttl=86400/g" /etc/php.d/apc.ini sed -i "s/;apc.cache_by_default=.*/apc.cache_by_default=1/g" /etc/php.d/apc.ini sed -i "s/;apc.max_file_size=.*/apc.max_file_size=10M/g" /etc/php.d/apc.ini # Configure the suphp module
mkdir -p /root/backup/etc mv /etc/httpd/conf.d/suphp.conf /root/backup/ && nano /etc/httpd/conf.d/suphp.conf LoadModule suphp_module modules/mod_suphp.so suPHP_Engine on suPHP_ConfigPath /etc/suphp.conf mv /etc/suphp.conf /root/backup/etcsuphp.conf && nano /etc/suphp.conf [global] ;Path to logfile logfile=/var/log/httpd/suphp.log ;Loglevel loglevel=info ;User Apache is running as webserver_user=apache ;Path all scripts have to be in docroot=/ ;Path to chroot() to before executing script ;chroot=/mychroot ; Security options allow_file_group_writeable=true allow_file_others_writeable=false allow_directory_group_writeable=true allow_directory_others_writeable=false ;Check wheter script is within DOCUMENT_ROOT check_vhost_docroot=true ;Send minor error messages to browser errors_to_browser=false ;PATH environment variable env_path=/bin:/usr/bin ;Umask to set, specify in octal notation umask=0077 ; Minimum UID min_uid=100 ; Minimum GID min_gid=100 [handlers] ;Handler for php-scripts x-httpd-suphp="php:/usr/bin/php-cgi" ;Handler for CGI-scripts x-suphp-cgi="execute:!self" # Configure mod_rpaf, the third address is the public web address of our server
nano /etc/httpd/conf.d/mod_rpaf.conf <IfModule mod_rpaf.c> RPAF_Enable On RPAF_ProxyIPs 127.0.0.1 192.168.8.2 *.*.*.237 RPAF_Header X-Forwarded-For RPAF_SetHostName On RPAF_SetHTTPS On RPAF_SetPort On </IfModule> # Turn off FastCgiWrapper
nano /etc/httpd/conf.d/fastcgi.conf sed -i "s/^FastCgiWrapper .*/FastCgiWrapper Off/g" /etc/httpd/conf.d/fastcgi.conf # Install ISPConfig
cd /usr/src/ wget http://www.ispconfig.org/downloads/ISPConfig-3-stable.tar.gz tar xfz ISPConfig-3-stable.tar.gz cd ispconfig3_install/install/ php -q install.php # Answering the questions of the interactive installation wizard
>> Initial configuration
Operating System: Redhat or compatible, unknown version.
If so, be careful.
Default values are in [brackets] and can be accepted with.
Tap in "quit" (without the quotes) to stop the installer.
Select language (en, de) [ en ]:
Installation mode (standard, expert) [standard]: expert
Full qualified hostname (FQDN) of the server, eg server1.domain.tld [ app01.local ]:
MySQL server hostname [ localhost ]:
MySQL root username [ root ]:
MySQL root password []:
MySQL database to create [ dbispconfig ]:
MySQL charset [ utf8 ]:
The next two questions are about the internal ISPConfig database user and password.
It is recommended to accept the defaults which are 'ispconfig' as username and random password.
If you use the password
ISPConfig mysql database username [ ispconfig ]:
ISPConfig mysql database password [ 8b8295ae2a50a39a1a00da65df0bee72 ]:
Shall this server join an existing ISPConfig multiserver setup (y, n) [n]: y
MySQL master server hostname []: isp.local
MySQL master server root username [ root ]:
MySQL master server root password []: c2HZqsMmiBKa
MySQL master server database name [ dbispconfig ]:
Adding ISPConfig server record to database.
Configure Mail (y, n) [y]: n
Configure Jailkit (y, n) [y]: n
Configure FTP Server (y, n) [y]: y
Configuring Pureftpd
Stopping pure-ftpd: [OK]
Starting pure-ftpd: [OK]
Configure DNS Server (y, n) [y]: n
Hint: If this is the ISPConfig interface, select the 'y' in the 'Configure Apache Server' option.
Configure Apache Server (y, n) [y]: y
Configuring apache
Configuring Vlogger
Configuring Apps vhost
Configure Firewall Server (y, n) [y]: y
Configuring Bastille Firewall
Install ISPConfig Web Interface (y, n) [n]: n
Configuring DBServer
Installing ISPConfig crontab
no crontab for root
Stopping httpd: [OK]
[Thu Jan 23 13:46:44 2014] [warn] NameVirtualHost *: 80 has no VirtualHosts
[Thu Jan 23 13:46:44 2014] [warn] NameVirtualHost *: 443 has no VirtualHosts
[Thu Jan 23 13:46:44 2014] [warn] NameVirtualHost *: 80 has no VirtualHosts
Starting httpd: [OK]
Installation completed.
Setting environment db01.
It is necessary to create an OpenVZ (New CT) container with the CentOS 64 environment. This vitrual machine will have mariadb for our sites.
I will only describe the addition of this node to the ISPConfig cluster. I’ll leave MySQL optimization questions for the following articles.
This container will have an address in a private network ( vmbr1 ) 192.168.8.5 , you should not save on the amount of RAM for the database server, in our case it will be 4 GB of RAM, but 20 GB will not be enough for serious tasks.
This is how the network should look like in the container itself:
vi /etc/sysconfig/network-scripts/ifcfg-eth1 DEVICE=eth1 BOOTPROTO=static ONBOOT=yes IPADDR=192.168.8.5 NETWORK=192.168.8.0 GATEWAY=192.168.8.100 # Install php components for ISPConfig panel
yum install php-mysql php -y # Remove from startup and turn off apache2
chkconfig httpd off && /etc/init.d/httpd stop # Install ISPConfig
cd /usr/src/ wget http://www.ispconfig.org/downloads/ISPConfig-3-stable.tar.gz tar xfz ISPConfig-3-stable.tar.gz cd ispconfig3_install/install/ php -q install.php # Answering the questions of the interactive installation wizard
>> Initial configuration
Operating System: Redhat or compatible, unknown version.
If so, be careful.
Default values are in [brackets] and can be accepted with.
Tap in "quit" (without the quotes) to stop the installer.
Select language (en, de) [en]: en
Installation mode (standard, expert) [standard]: expert
Full qualified hostname (FQDN) of the server, eg server1.domain.tld [ db01.local ]:
MySQL server hostname [ localhost ]:
MySQL root username [ root ]:
MySQL root password []:
MySQL database to create [ dbispconfig ]:
MySQL charset [ utf8 ]:
The next two questions are about the internal ISPConfig database user and password.
It is recommended to accept the defaults which are 'ispconfig' as username and random password.
If you use the password
ISPConfig mysql database username [ ispconfig ]:
ISPConfig mysql database password [ 06cd6c11370b50a83eb0a3d3907a3581 ]:
Shall this server join an existing ISPConfig multiserver setup (y, n) [n]: y
MySQL master server hostname []: isp.local
MySQL master server root username [ root ]:
MySQL master server root password []: c2HZqsMmiBKa
MySQL master server database name [ dbispconfig ]:
Adding ISPConfig server record to database.
Configure Mail (y, n) [y]: n
Configure Jailkit (y, n) [y]: n
Configure FTP Server (y, n) [y]: n
Configure DNS Server (y, n) [y]: n
Hint: If this is the ISPConfig interface, select the 'y' in the 'Configure Apache Server' option.
Configure Apache Server (y, n) [y]: n
Configure Firewall Server (y, n) [y]: y
Configuring Bastille Firewall
Install ISPConfig Web Interface (y, n) [n]: n
Configuring DBServer
Installing ISPConfig crontab
no crontab for root
Stopping httpd: [FAILED]
Starting httpd: [OK]
Installation completed.
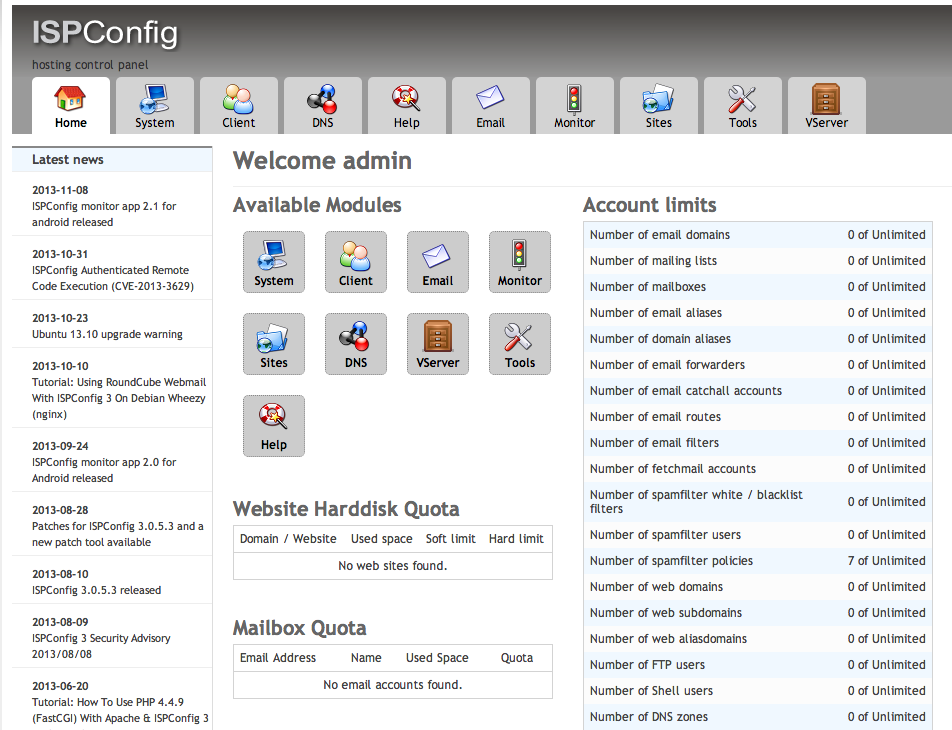
Introduction to ISPConfig:
After logging in to the ISPConfig web panel, you are taken to the start page:
Tools - Password and Language , change the language and create a strong password to access the control panel.
System - Server services , remove extra roles for servers.
I want to draw your attention to the fact that ISPConfig can make a separate node a mirror of another. Those. You will have the same configuration of services and users on multiple servers simultaneously. You need to choose which of the nodes is a mirror in the Server Mirror
Server configuration - in each server in the server section we set Loglevel to Debug. Now we can view all the actions that ISPConfig performs on the nodes of our cluster
tail -f -n 1000 /var/log/ispconfig/ispconfig.log There is also a Web section in the Server Configuration, there are Permissions in it, if you have several web server mirrors on the same file storage (ceph, ocfs2, etc.), you need to check the Set folder permissions on update checkbox and Connect Linux userid to webid . This will avoid problems with the distinction of guid / uid and users and groups and their names / groups on different mirrors. If you want to change the folder structure of your users, then uncheck the Make web folders immutable (extended attributes) box. If you forget to do this, the chattr -i command will come to your rescue. The next important section: Rescue , enable the automatic launch of important services if they fail, but do not forget to disable the restart of those services that should not be restarted.
Let's create a test user: Client - Add Client , Address , Be sure to fill in the Contact Person , Login and Password (there is a convenient password generator right there). Next in Limits : select the default Web-server and allowed modes of the web-server:
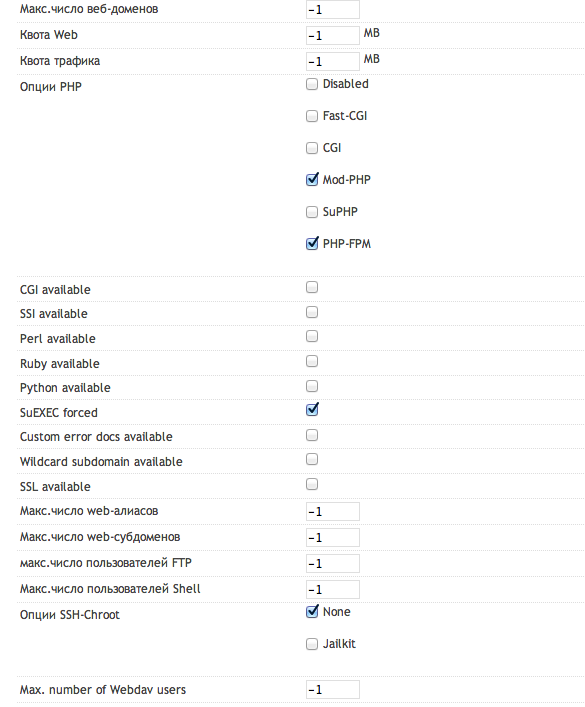
We configured app01.local to support php-fpm and mod_php at the same time. We return to the list of clients and enter the newly created:
Sites - Add a new website

Specify the site name and the required php backend.
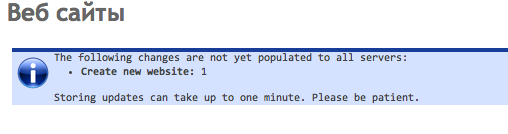
Note that ISPConfig in a cluster configuration takes time to propagate all changes.
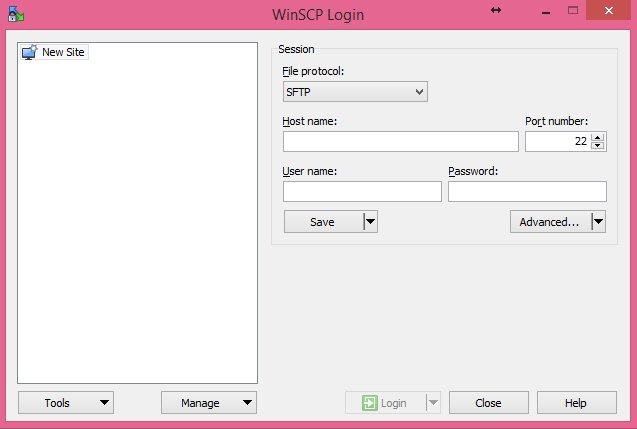
As a means of accessing the files of our sites, we will use ssh , under windows it is convenient to use WinSCP . This method is much safer than traditional FTP.
To access, we need to create an SSH user, in the User Shell section.
You need to specify a username, password and, if necessary, a key. Please note that your account is prefixed with your account in your personal account of ISPConfig.
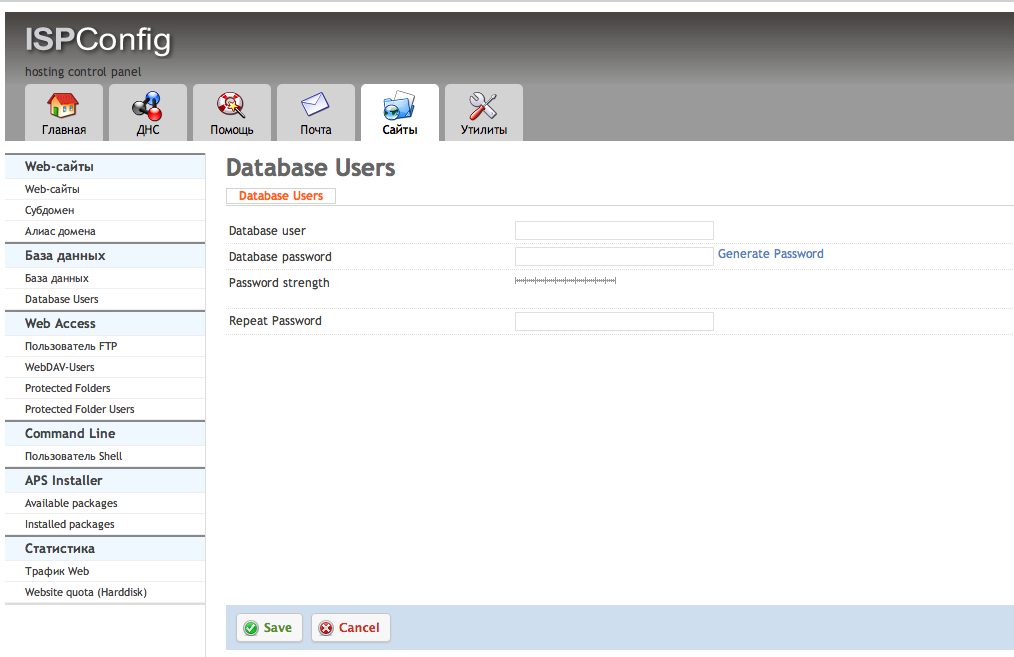
To work with MySQL, you need to create its user in the Database users section, your ID is added to the login in the ISPConfig system.
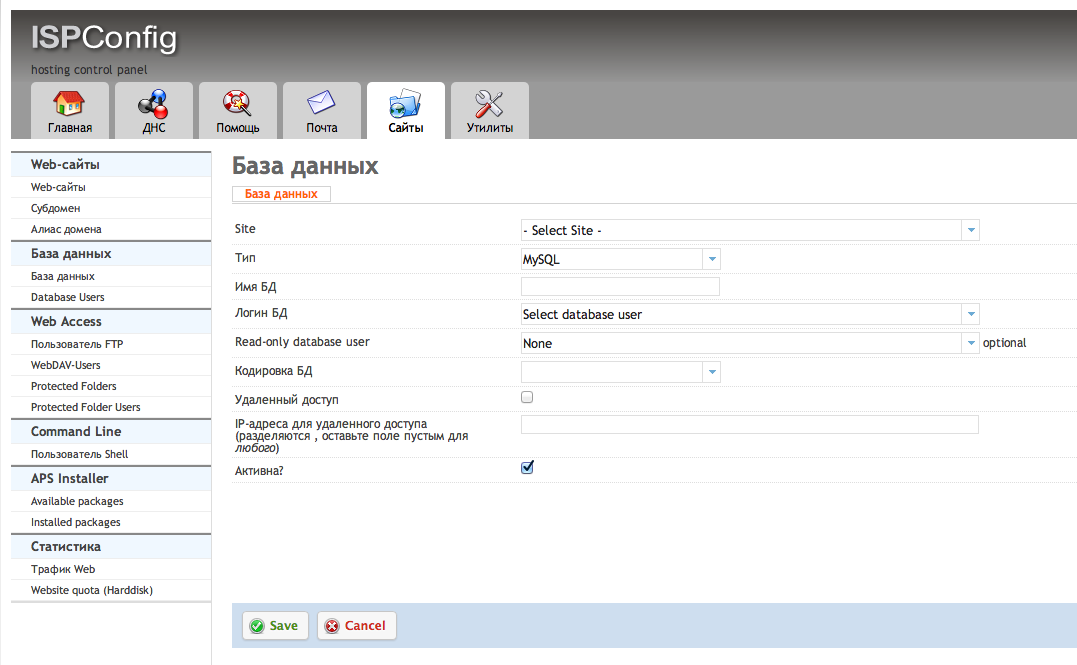
Create a database for one of our sites in the Database section, you must specify the name of the new database, do not forget to specify the site to which this database belongs, select the newly created user and put a tick Remote access (our database server is a remote server in relation to the application server). Do not forget that the prefix is added to the name.
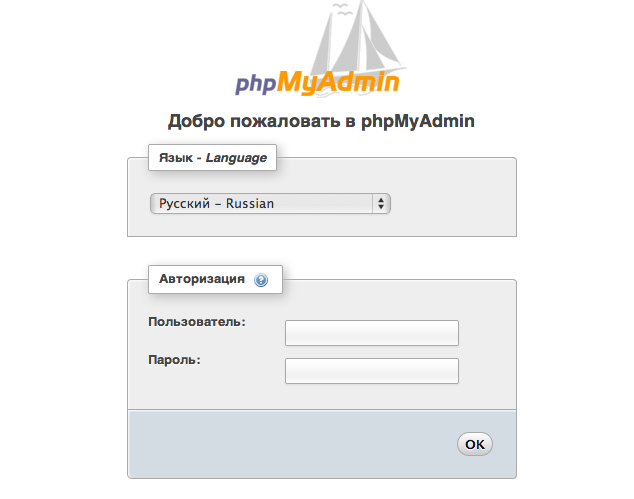
To access phpMyAdmin, you can click on the corresponding icon next to any database in the Database section .
and find ourselves in phpMyAdmin
The final
app01.local where our sites live are available in the public service network on port 22 . WinSCP , :
, web

index.html index.php
<?php // , INFO_ALL phpinfo(); // . // phpinfo(8) . phpinfo(INFO_MODULES); ?> , php-fpm/mod_php
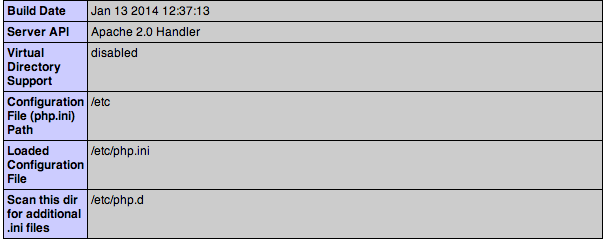
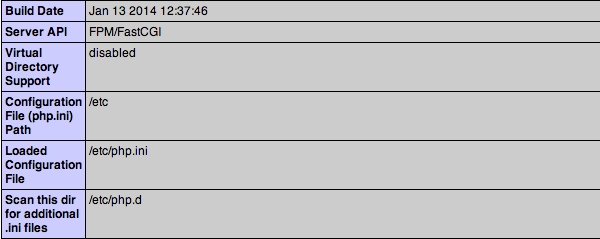
, :
Source: https://habr.com/ru/post/209934/
All Articles