Mail Encryption in Outlook 2010
The post is addressed to anyone who would be interested in setting up encrypted message exchange between two or more users using the Outlook 2010 email client. As you know, email encryption in the outlook is based on certificates and public key infrastructure. During the exchange of encrypted messages, certificates of two PKCS # 12 and X.509 formats will be used.
X.509 (file with * .cer extension) - a certificate format that, in addition to general information (version, serial number, signature algorithm, publisher information, expiration date, owner information, electronic fingerprint) contains your public key. We send it to other users with whom we want to exchange encrypted messages.
PKCS # 12 (file with * .pfx extension) is the only certificate format that, in addition to general information, can contain not only a public but also a private key. With it, we will decrypt messages encrypted by other users with our public key, as well as put our digital signature.
')
We will create certificates using CyberSafe encryption software , which can work as a Certification Authority . The root certificate of the CyberSafe Certification Authority is automatically added to the Trusted Windows store, the PKCS # 12 certificate will be stored in the Personal section, and X.509 in the Other users section.
First, create a personal certificate containing the above certificates, public and private keys, as well as other information. Run the program, go to the Keys and Certificates tab, select Create , fill in the required fields and click Next :
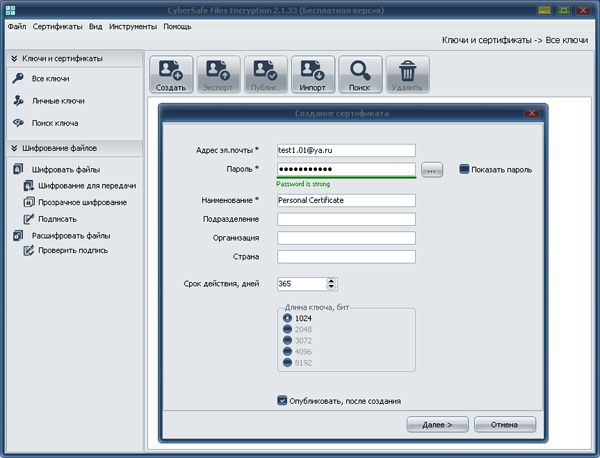
The keys will be generated, certificates will be created and they will be written to the program database If the option Publish after creation has been selected, the certificate will be published on the CyberSafe server, where your public key will be available for downloading to other users.
Now we export the certificates we need to work with Outook into separate files:

Certificates in CyberSafe are created based on the OpenSSL library, the certificate creation code is shown below:
Install the exported certificate in the PKCS # 12 format in the Windows store. To do this, double click on the pfx file and follow the instructions of the Certificate Import Wizard. Since this certificate contains your private key, during the import process you will need to enter the password that was specified when it was created.
Next, open Outlook and go: File> Settings> Security Control Center> Security Control Center Settings> Email Protection . In the Encrypted e-mail section, check the items:
Now, from the list of certificates installed in the store, you need to select the one that will be used for encryption and creating a digital signature. To do this, click here Options ...> Select and select your certificate:
On this, in principle, everything :). However, let's make sure that everything works correctly with us and perform the encryption check “for ourselves”.
Create a new contact. Go Home> Contacts> Create a contact . On the General tab, just fill in the fields Full Name and Email. mail , then go to the Certificates tab, where we click Import :
In Windows Explorer, we find our certificate in * .cer format

Make sure that the certificate has been imported and displayed in the Certificates (digital signatures) window. Click Save and Close . Now we can send an encrypted message to ourselves. To do this, go to Mail> Home> Create a message . In the To field, add your contact by selecting it from the Address Book:
We send the letter. Go to the Inbox and find the message we sent there. It is encrypted, as evidenced by the icon with the blue lock in the upper left corner. Click on it with the mouse to automatically decrypt and open.
If the sent email does not appear in your inbox, go to the Send & Receive tab and click Refresh Folder .

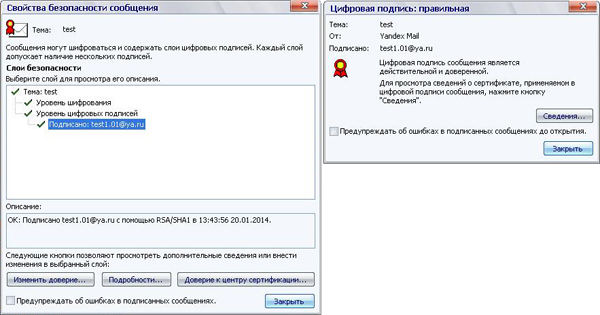
To view the security properties of a message or digital signature information, click on the corresponding icons in the field with general information about the message:
Verification of the encryption function “for yourself” is performed.
Now we send the message certified by the digital signature to other users and we receive their signed messages. This will allow us to exchange public keys with each other, since the signed letter contains the public key.
Having received such a letter from another user, we add it to Contacts (Address Book). Next, you need to export the X.509 user certificate to a file and install it in the Windows storage. To do this, in the field with general information about the letter, click on the digital signature icon and select Details> Details> View Certificate> Composition> Copy to File and follow the instructions of the Certificate Export Wizard. The exported certificate is added to the user's contact in the same way as we did when checking the encryption function “for ourselves”.
If you do not have a certificate (and the public key of the correspondent), you should disable the encryption function when sending it the first message, otherwise the outlook cannot encrypt it and will generate an error. You can disable the encryption function, leaving the digital signature function enabled on the Settings tab:
In conclusion, I would like to add that you can make your public key available to other users by publishing it on public key servers, such as the CyberSafe server. Naturally, there you can also try to find the public keys of the users you are interested in, without waiting for them to send them to you.
If the public key is downloaded from a non-trusted server, or you receive it by e-mail, you cannot be exactly sure of the authenticity of such a key. It may be that this attacker sent you his “fake” key instead of your friend's key. Then he will be able to read all the encrypted messages that you send to your friend, but your friend will not be able to do this.
Therefore, in this case, the authenticity of the public key should be verified by its electronic fingerprint. One of the easiest ways to verify an imprint is to contact the owner of a public key on Skype or by phone.
X.509 (file with * .cer extension) - a certificate format that, in addition to general information (version, serial number, signature algorithm, publisher information, expiration date, owner information, electronic fingerprint) contains your public key. We send it to other users with whom we want to exchange encrypted messages.
PKCS # 12 (file with * .pfx extension) is the only certificate format that, in addition to general information, can contain not only a public but also a private key. With it, we will decrypt messages encrypted by other users with our public key, as well as put our digital signature.
')
We will create certificates using CyberSafe encryption software , which can work as a Certification Authority . The root certificate of the CyberSafe Certification Authority is automatically added to the Trusted Windows store, the PKCS # 12 certificate will be stored in the Personal section, and X.509 in the Other users section.
First, create a personal certificate containing the above certificates, public and private keys, as well as other information. Run the program, go to the Keys and Certificates tab, select Create , fill in the required fields and click Next :
The keys will be generated, certificates will be created and they will be written to the program database If the option Publish after creation has been selected, the certificate will be published on the CyberSafe server, where your public key will be available for downloading to other users.
Now we export the certificates we need to work with Outook into separate files:
Certificates in CyberSafe are created based on the OpenSSL library, the certificate creation code is shown below:
View code
procedure TOpenSSL.CreateSignedCert (const FileName: String; OutFiles: TStringList;
const Password: String;
ValidDays: Integer; KeySize: Integer; const ExtendedKeyUsage: String;
const CommonName, Email, Organization, OrganizationalUnit, Country: String;
const CAFileSpec, CAPFXFileSpec, CAPrivateKeyPassword: String;
ARandomFileSpec: String = '';
ProgressProc: TProgressProc = nil; LogMsgProc: TLogMsgProc = nil);
var
TmpPrivateKeyFileSpec, TmpPublicKeyFileSpec: String;
TmpCerFileSpec, TmpPfxFileSpec, TmpCsrFileSpec, TmpCASerialFileSpec, TmpExtFileSpec, TmpPemFileSpec: String;
TmpCAPrivateKeyFileSpec: String;
Subj: String;
TempDir: String;
Aborted: Boolean;
WasError: Boolean;
OutPublicKeyFileSpec: String;
begin
WasError: = True;
TempDir: = GetTempDir;
try
CheckIsFileExists (CAFileSpec);
// Retrieve the private key from the root certificate
TmpCAPrivateKeyFileSpec: = TempDir + ChangeFileExt (ExtractFileName (CAPFXFileSpec), '') + '.privateKey.pem';
ExportPrivateKeyFromPfx (CAPFXFileSpec, TmpCAPrivateKeyFileSpec, CAPrivateKeyPassword);
// All files are created in a temporary directory, and only after successful creation of all - // we transfer to the place of permanent storage
TmpPrivateKeyFileSpec: = TempDir + FileName + '.privateKey.pem';
TmpPublicKeyFileSpec: = TempDir + FileName + '.publicKey.pem';
TmpCerFileSpec: = TempDir + FileName + '.cer';
TmpPemFileSpec: = TempDir + FileName + '.pem';
TmpPfxFileSpec: = TempDir + FileName + '.pfx';
TmpCsrFileSpec: = TempDir + FileName + '.csr';
TmpCASerialFileSpec: = TempDir + FileName + '.srl';
Subj: = GetSubj (CommonName, Email, Organization, OrganizationalUnit, Country);
Aborted: = False;
if Assigned (ProgressProc) then
ProgressProc (13, 4, Aborted, Format ('% s (% d% s) ...' {'Generate Keys (% d bits) ...'}, [StKeysGenerate, KeySize, StBit]));
if aborted then
Exit;
CreatePrivateKey (TmpPrivateKeyFileSpec, TmpPublicKeyFileSpec, KeySize, ARandomFileSpec);
if Assigned (ProgressProc) then
ProgressProc (13, 5, Aborted, Format ('% s ...', [StGenerateCertificate]) {'Generate certificate ...'});
if aborted then
Exit;
if Assigned (ProgressProc) then
ProgressProc (13, 6, Aborted, Format ('% s ...', [StCreateCertificateRequest]) {'Create the certificate request ...'});
// Create a query - .csr
RunOpenSSLConsole (Format (
'req -new -key "% s" -out "% s" -days% d -subj% s',
[TmpPrivateKeyFileSpec, TmpCsrFileSpec, ValidDays, Subj]
), True, nil, nil);
if Assigned (ProgressProc) then
ProgressProc (13, 7, Aborted, Format ('% s ...', [StCreateExtensionsFile]) {'Create the extensions file ...'});
// www.openssl.org/docs/apps/x509v3_config.html
TmpExtFileSpec: = StrToFile (
// 'keyUsage = digitalSignature, nonRepudiation, keyEncipherment, dataEncipherment, keyCertSign' +
'keyUsage = digitalSignature, keyEncipherment' +
iif (ExtendedKeyUsage <> '', # 13 # 10'extendedKeyUsage = '+ ExtendedKeyUsage,' '),
TempDir + FileName + '.extensions.cfg'
);
if Assigned (ProgressProc) then
ProgressProc (13, 8, Aborted, Format ('% s ...', [StCreateSignedCertificate]) {'Create the signed certificate ...'});
// Based on the request, create a certificate signed by the root certificate
RunOpenSSLConsole (Format (
'x509 -req -days% d -passin pass:% s -in "% s" -CAform DER -CA "% s" -CAkey "% s" -Cserial "% s" -CAcreateserial -out "% s" - outform DER -extfile "% s" ',
[ValidDays, Password, TmpCsrFileSpec, CAFileSpec, TmpCAPrivateKeyFileSpec, TmpCASerialFileSpec, TmpCerFileSpec, TmpExtFileSpec]
), False, nil, nil);
if Assigned (ProgressProc) then
ProgressProc (13, 9, Aborted, Format ('% s ...', [StConvertCertificate]) {'Convert the certificate from the CER to the PEM format ...'});
// Convert cer => pem for the next export to pfx
RunOpenSSLConsole (Format (
'x509 -in "% s" -inform DER -out "% s" -outform PEM',
[TmpCerFileSpec, TmpPemFileSpec]
), False, nil, nil);
if Assigned (ProgressProc) then
ProgressProc (13, 10, Aborted, Format ('% s ...', [StCreatePFX]) {'Create the PFX certificate file ...'});
// Make pfx from pem and keys
RunOpenSSLConsole (Format (
'pkcs12 -password pass:% s -export -in "% s" -inkey "% s" -name "% s" -out "% s"',
[Password, TmpPemFileSpec, TmpPrivateKeyFileSpec, FileName, TmpPfxFileSpec]
), False, nil, nil);
OutPublicKeyFileSpec: = TmpPublicKeyFileSpec + '.signed';
if Assigned (ProgressProc) then
ProgressProc (13, 11, Aborted, Format ('% s ...', [StExportPublicKey]) {'Export public keys from the PFX certificate file ...'});
ExportPublicKeyFromPfx (TmpPfxFileSpec, OutPublicKeyFileSpec, Password);
// And the result is added to the file list
OutFiles.Add (TmpCerFileSpec);
OutFiles.Add (TmpPfxFileSpec);
OutFiles.Add (TmpPrivateKeyFileSpec);
OutFiles.Add (TmpPublicKeyFileSpec);
OutFiles.Add (OutPublicKeyFileSpec);
WasError: = False;
finally
// Delete temporary files
if WasError then
begin
CheckDeleteFile (TmpCerFileSpec);
CheckDeleteFile (TmpPfxFileSpec);
CheckDeleteFile (TmpPrivateKeyFileSpec);
CheckDeleteFile (TmpPublicKeyFileSpec);
CheckDeleteFile (OutPublicKeyFileSpec);
end;
CheckDeleteFile (TmpCsrFileSpec);
CheckDeleteFile (TmpCASerialFileSpec);
CheckDeleteFile (TmpExtFileSpec);
CheckDeleteFile (TmpPemFileSpec);
CheckDeleteFile (TmpCAPrivateKeyFileSpec);
end;
end;
Install the exported certificate in the PKCS # 12 format in the Windows store. To do this, double click on the pfx file and follow the instructions of the Certificate Import Wizard. Since this certificate contains your private key, during the import process you will need to enter the password that was specified when it was created.
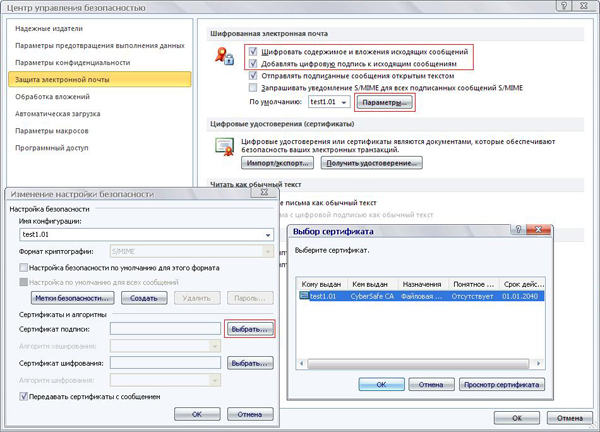
Next, open Outlook and go: File> Settings> Security Control Center> Security Control Center Settings> Email Protection . In the Encrypted e-mail section, check the items:
- Encrypt the contents and attachments of outgoing messages
- Add digital signature to outgoing messages
Now, from the list of certificates installed in the store, you need to select the one that will be used for encryption and creating a digital signature. To do this, click here Options ...> Select and select your certificate:
On this, in principle, everything :). However, let's make sure that everything works correctly with us and perform the encryption check “for ourselves”.
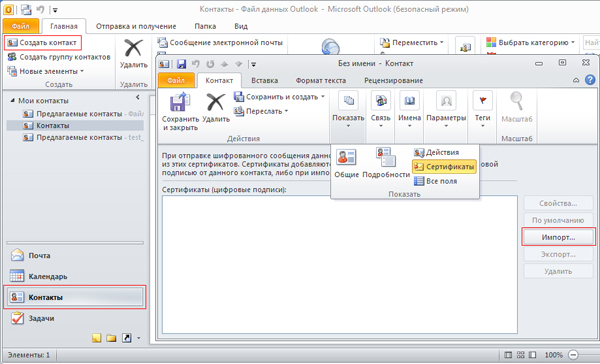
Create a new contact. Go Home> Contacts> Create a contact . On the General tab, just fill in the fields Full Name and Email. mail , then go to the Certificates tab, where we click Import :
In Windows Explorer, we find our certificate in * .cer format
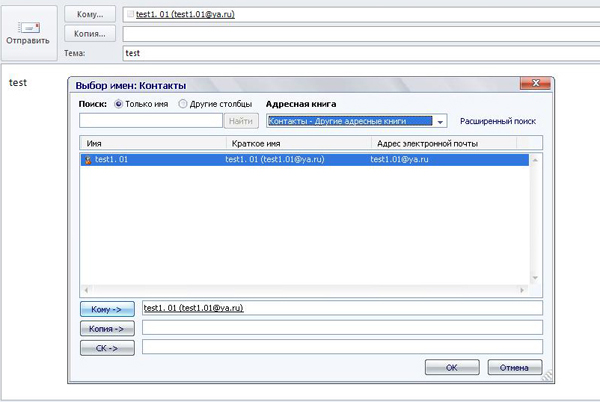
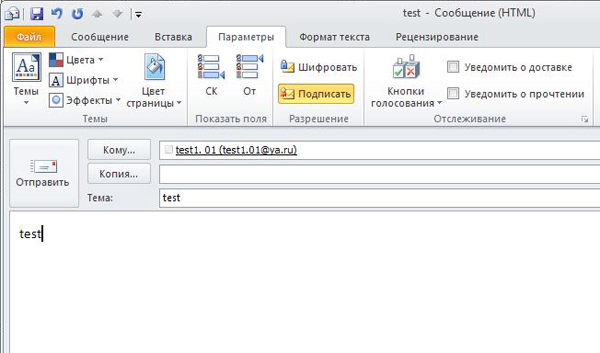
Make sure that the certificate has been imported and displayed in the Certificates (digital signatures) window. Click Save and Close . Now we can send an encrypted message to ourselves. To do this, go to Mail> Home> Create a message . In the To field, add your contact by selecting it from the Address Book:
We send the letter. Go to the Inbox and find the message we sent there. It is encrypted, as evidenced by the icon with the blue lock in the upper left corner. Click on it with the mouse to automatically decrypt and open.
If the sent email does not appear in your inbox, go to the Send & Receive tab and click Refresh Folder .
To view the security properties of a message or digital signature information, click on the corresponding icons in the field with general information about the message:
Verification of the encryption function “for yourself” is performed.
Now we send the message certified by the digital signature to other users and we receive their signed messages. This will allow us to exchange public keys with each other, since the signed letter contains the public key.
Having received such a letter from another user, we add it to Contacts (Address Book). Next, you need to export the X.509 user certificate to a file and install it in the Windows storage. To do this, in the field with general information about the letter, click on the digital signature icon
and select Details> Details> View Certificate> Composition> Copy to File and follow the instructions of the Certificate Export Wizard. The exported certificate is added to the user's contact in the same way as we did when checking the encryption function “for ourselves”.If you do not have a certificate (and the public key of the correspondent), you should disable the encryption function when sending it the first message, otherwise the outlook cannot encrypt it and will generate an error. You can disable the encryption function, leaving the digital signature function enabled on the Settings tab:
In conclusion, I would like to add that you can make your public key available to other users by publishing it on public key servers, such as the CyberSafe server. Naturally, there you can also try to find the public keys of the users you are interested in, without waiting for them to send them to you.
If the public key is downloaded from a non-trusted server, or you receive it by e-mail, you cannot be exactly sure of the authenticity of such a key. It may be that this attacker sent you his “fake” key instead of your friend's key. Then he will be able to read all the encrypted messages that you send to your friend, but your friend will not be able to do this.
Therefore, in this case, the authenticity of the public key should be verified by its electronic fingerprint. One of the easiest ways to verify an imprint is to contact the owner of a public key on Skype or by phone.
Source: https://habr.com/ru/post/209642/
All Articles