Translation of Henrik Knberg's article “ATDD from Trenches” (ATDD with advanced)
Original: www.infoq.com/articles/atdd-from-the-trenches
If you have ever been in such a situation:
Then this article is for you - a concrete example of how to start development through acceptance tests (Acceptance-test driven development) in existing projects with legacy code. It describes one of the ways to solve the technical debt problem .
This is an example from a real project, with all the flaws and flaws, and not a polished exercise from the book. So wear your berets. I will use Java and JUnit, without any fashionable third-party libraries (which, as a rule, are abused).
Warning: I am not claiming that this is the only Right Path, there are many other ATDD “styles”. Also in this article there is not much of something new and innovative; here, well-proven approaches and first-hand experience are described well.
A few days ago I started doing password protection for webwhiteboard.com (my project is a hobby). Users have long been asking to add the ability to password protect virtual whiteboards, so it's time to do it.
It sounds simple in words, but in fact there are quite a few design changes to be made. So far, it was assumed that webwhiteboards.com is used by anonymous users, without any logins and passwords. Who should be able to protect the board with a password? Who can access it? What if I forget my password? How to implement it in a simple, but at the same time reliable enough way?
The webwhiteboard code is well covered by unit tests and integration tests.
But acceptance tests, that is, tests that pass through all layers from the end user's point of view, are completely absent.
')
The main purpose of webwhiteboard design is simplicity: minimize the need to enter a password, not create accounts, fewer other stimuli. So I set two limits on a password-protected board:
There is a lot of uncertainty. I did not know how this should work, let alone how to implement it. Here is what I decided to do (actually ATDD):
These steps are repeated many times. At each step, I may need to go back and correct the previous step (which I did quite often).
Imagine that the functionality is Ready. Like an angel came down from heaven and did everything while I slept. Sounds too good to be true! How can I check that the work has been done? Which script to check first? Let's get this one:
Having written this small test script, I realized that there are still many alternative scenarios that need to be taken into account. But this is the main scenario and if I get it to work, I will take a big step forward.
It is not so easy. There are no other acceptance tests, so where should I start? The new functionality will interact with some external component responsible for authentication (I first decided to use Janrain). There will also be a database and a bunch of complicated web stuff with pop-up dialog boxes, tokens, transitions between pages and all that. Uff.
It's time to take a step back. Before solving the problem “how do I write an acceptance test”, I need to solve a simpler problem “how do I write acceptance tests with existing code”?
To answer this question, I will first write a test for the “simplest scenario” of those that are already in the system.
Here is the script I started with:
How to write such a test? With what framework? What kind of tools? Should I test through the user interface or not? Should I include client code in testing or directly call the service?
A bunch of questions. Trick: do not answer them! Just pretend that everything is already magically done and just write a test on pseudocode. For example:
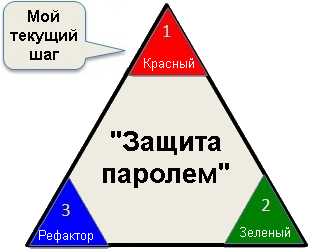
I launched it and it passed! Hooray! Um, but wait, this is wrong! The first step in the TDD triangle (“Red - Green - Refactoring”) is Red. So I need to first make the test fall, to prove that this requirement has not yet been implemented.
Perhaps I'll start by writing some real code. But nevertheless, pseudocode helped me take a step in the right direction.
To do this, I invented the AcceptanceTestClient class and pretended that it magically solved all the problems and provides me with an excellent high-level interface for running my acceptance tests. How easy it is to use it:
client.openWhiteboard ("xyz");
assertFalse (client.hasWhiteboard ());
As soon as I wrote this code, I actually came up with the interface that best suits the script of my test. There should be about as many lines of code in the test as there were in the pseudocode.
Next, using the Eclipse hotkeys, I automatically generated an empty AcceptanceTestClient class and the methods I need:
This is how the test class looks like:
The test starts, but crashes (because the client is null). Good!
What have I achieved? Not to say much. But this is the beginning. Now I have an embryo helper class for acceptance tests - AcceptanceTestClient.
The next step is to make the acceptance test green.

Now I need to solve a much simpler problem. I do not need to worry about authentication, nor about several users, about anything like that. I can add tests for these scripts later.
As for AcceptanceTestClient, its implementation was pretty standard - a fake (mock) database (I already had the code for this) and launching a version of the entire webwhiteboard system in memory.
Here is the setting:

(Click on the picture to enlarge)
Technical details: Web Whiteboard uses the GWT (Google Web Toolkit). Everything is written in Java, but GWT automatically translates client code into javascript, and magically inserts RPC (Remote Procedure Calls) calls to hide all the low-level details of the implementation of asynchronous client-server interaction.
Before running the acceptance test, I “close” the system directly and cut out all the frameworks, external components and network interaction.

(Click on the picture to enlarge)
So I create AcceptanceTestClient, which talks to the webwhiteboard service in the same way as real client code would. The differences are hidden behind the curtains:
In addition, AcceptanceTestClient in its configuration replaces the real mongo database (cloud NoSQL database) with a fake that stores data in RAM.
The main reason for replacing all dependencies is to simplify the environment, speed up the execution of tests, and make sure that the tests cover business logic in isolation from all components and network connections.
It may seem that all this configuration is too complicated, but in fact it is just one init method, consisting of only 3 lines of code.
WhiteboardServiceImpl is a real implementation of the webwhiteboard service.
Notice that the AcceptanceTestClient constructor now accepts a WhiteboardService instance (the “dependency injection” design pattern). This gives us an additional side effect: it does not care about the configuration. The same AcceptanceTestClient class can also be used to test this system by simply passing it an instance of the WhiteboardService configured on a real base.
To summarize, AcceptanceTestClient behaves the same as a real webwhiteboard web client, while at the same time providing a high-level interface for acceptance tests.
You may ask “why do we need AcceptanceTestClient if we already have a WhiteboardService that we can call directly?”. There are 2 reasons for this:
I'm not going to bore you with the details of the AcceptanceTestClient implementation, since this article is not about the webwhiteboard device. Suffice it to say that AcceptanceTestClient connects the needs of the acceptance test and low-level details of the implementation of interaction with the service interface. It was easy to write because the real client code serves as a hint how-to-interact-with-service.
In any case, now our Easiest acceptance test passes!
The next step is to tidy up a bit.
In fact, I have not yet written a single line of product code (since this functionality is already present and working), it was only the code of the test framework. Nevertheless, I spent a few minutes to clean it up, remove duplication, give the methods more understandable names, etc.
Finally, I added another test, just for the sake of completeness, and also because it was easy: o)
Hurray, we have a test framework! And without any fashionable third-party libraries. Only Java and Junit.
Now it's time to add a password protection test.
I begin by describing the “specification” of my pseudo-code test:
And now, as before, I am writing a test code, pretending that the AcceptanceTestClient class already has everything I need. This technique is extremely useful.
I only spent a few minutes writing this code, because I was just inventing what I needed as I was writing. Almost none of these methods are in the AcceptanceTestClient class (yet).
While I was writing the code, I already had to make several decisions. No need to think too hard, just do what the first thing comes to mind. The best is the enemy of the good, and now all I want is to get a fairly good result, that is, a test that can be run and that will fall. Later, when the test turns green, I’ll refactor my code and think more carefully about how to improve its design.
There is a big temptation to start brushing code right now, especially refactoring these terrible try / catch statements. But one of the laws of TDD is to make the test green before refactoring starts, tests will protect you when you refactor. So I decided to wait a little with combing the code.
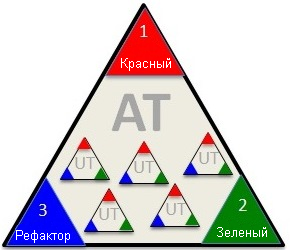
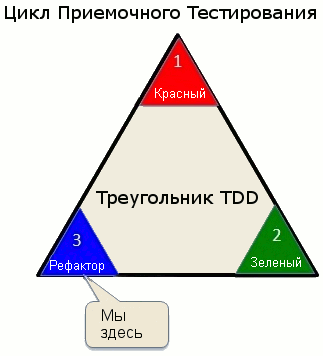
Following the testing triangle, my next step is to make my test run and crash.
I use the Eclipse hotkeys again to create empty methods. Fine. We start the test and voila, it is Red!
Now I have to write a grocery code. I add several new entities to the system. Sometimes the code I added was rather nontrivial, so it needed to be covered with unit tests. I did this with TDD. This is the same as ATDD, but on a smaller scale.
This is how ATDD and TDD work together. Consider ATDD to be an outer loop:

For each cycle of writing an acceptance test (at the level of new functionality), we do several cycles of writing unit tests (at the level of classes and methods).

So, although at a high level I’m focused on making my acceptance test Green (which may take a few hours), on a low level I’m busy doing, for example, making my next unit test Red (which usually takes a few minutes).
This is not really hardcore “TDD with a leather whip”. This is more like “at least make sure that the unit tests and the production code are checked together”. And such a check occurs several times per hour. Call it “TDD like”: o).
As usual, as soon as the acceptance test turned green, it’s time to clean up. Never save on it! This is about washing dishes after a meal - it is better to do it right away.
I clean not only the production code, but also the test code. For example, I selected dirty try-catch as an auxiliary method, and I got a clean and tidy test method:
My goal is to make the acceptance test so short, clean and readable that comments become superfluous. The initial pseudocode and comments perform only the role of a template - “that's how clean the code should be!”. Removing comments gives the feeling of victory, and as a bonus, makes the method even shorter!
Repeat. As soon as I received the first working test, I thought about what else is missing. For example, at the beginning I said that only a logged in user can protect the board with a password. So I added a test for it, made it red, then green, and then cleaned the code. And so on.
Here is a complete list of tests that I did for this functionality (for now):
Surely I will add a few more tests later if I find bugs or invent new usage scenarios.
All in all, it took about 2 days of coding. Most of the time I spent, returning to the previously written code and design, and not at all as linear as it may seem, reading this article.
Of course, I did a lot of manual testing after I received the green acceptance tests. But since automatic acceptance tests cover both the core functionality and many special cases, I could focus on more subjective and exploratory testing. How about a general user experience? Does this sequence of actions make sense? Is it easy to understand? Where better to add explanatory text? Is the design aesthetically good? I'm not going to win any design awards, but I don’t want something monumental and ugly.
A powerful set of automated acceptance tests eliminates the boring monotonous manual testing (known as “monkey testing”), and frees up time for a more interesting and meaningful type of manual testing.
Ideally, I should start with automatic acceptance tests from the very beginning, so in part I returned some technical debt.
I hope this example was useful to you! He demonstrates a rather typical situation - “I want to add a new feature, and it would be cool to write an automatic acceptance test on it, but there is not a single acceptance test in the project, and I don’t know which framework to use and where to start.”
I really love this template, it allowed me to get off the ground many times. Eventually:
Once you have done this, you have overcome the most difficult barrier. You started using ATDD!

Henrik Kniberg is an Agile / Lean consultant from Crisp in Stockholm, mainly working for Spotify . He enjoys helping companies achieve success in both the technical and human aspects of software development, as described in his popular books “ Scrum and XP from the Trenches ”, “ Kanban and Scrum, making the most of both ” and “ Lean from the Trenches “.
Alexander Andronov (@ alex4Zero), Anton Bevzyuk (@bevzuk) and Dmitry Pavlov translated
Smart Step Group .
ATDD with advanced
Development through acceptance testing for beginners
If you have ever been in such a situation:
Then this article is for you - a concrete example of how to start development through acceptance tests (Acceptance-test driven development) in existing projects with legacy code. It describes one of the ways to solve the technical debt problem .
This is an example from a real project, with all the flaws and flaws, and not a polished exercise from the book. So wear your berets. I will use Java and JUnit, without any fashionable third-party libraries (which, as a rule, are abused).
Warning: I am not claiming that this is the only Right Path, there are many other ATDD “styles”. Also in this article there is not much of something new and innovative; here, well-proven approaches and first-hand experience are described well.
What i wanted to do
A few days ago I started doing password protection for webwhiteboard.com (my project is a hobby). Users have long been asking to add the ability to password protect virtual whiteboards, so it's time to do it.
It sounds simple in words, but in fact there are quite a few design changes to be made. So far, it was assumed that webwhiteboards.com is used by anonymous users, without any logins and passwords. Who should be able to protect the board with a password? Who can access it? What if I forget my password? How to implement it in a simple, but at the same time reliable enough way?
The webwhiteboard code is well covered by unit tests and integration tests.
But acceptance tests, that is, tests that pass through all layers from the end user's point of view, are completely absent.
')
Consider the design
The main purpose of webwhiteboard design is simplicity: minimize the need to enter a password, not create accounts, fewer other stimuli. So I set two limits on a password-protected board:
- An anonymous user cannot protect the board with a password. But he can open an already protected board. He will not need to log into the system, but only need to enter the password of the protected board.
- Manage logins and passwords will be the external OpenId / Oauth component, originally intended by Google. Thus, the user does not have to create another account.
Implementation approach
There is a lot of uncertainty. I did not know how this should work, let alone how to implement it. Here is what I decided to do (actually ATDD):
- Step 1. Document the expected process.
- Step 2. Turn it into a run acceptance test
- Step 3. Run the acceptance test, make sure that it fell
- Step 4. Repair the acceptance test
- Step 5. Clean the code
These steps are repeated many times. At each step, I may need to go back and correct the previous step (which I did quite often).
Step 1: Document the Expected Process
Imagine that the functionality is Ready. Like an angel came down from heaven and did everything while I slept. Sounds too good to be true! How can I check that the work has been done? Which script to check first? Let's get this one:
- I create a new board
- I set a password on it
- Joe is trying to open my board, the system asks for a password.
- Joe enters the wrong password, access denied
- Joe tries again, enters the correct password and gains access. (You have to understand that “Joe” is me, just from another browser).
Having written this small test script, I realized that there are still many alternative scenarios that need to be taken into account. But this is the main scenario and if I get it to work, I will take a big step forward.
Step 2: Turn it into a run acceptance test
It is not so easy. There are no other acceptance tests, so where should I start? The new functionality will interact with some external component responsible for authentication (I first decided to use Janrain). There will also be a database and a bunch of complicated web stuff with pop-up dialog boxes, tokens, transitions between pages and all that. Uff.
It's time to take a step back. Before solving the problem “how do I write an acceptance test”, I need to solve a simpler problem “how do I write acceptance tests with existing code”?
To answer this question, I will first write a test for the “simplest scenario” of those that are already in the system.
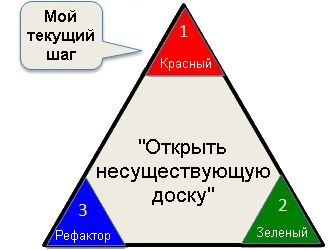
Step 2.1 Write the easiest automatic acceptance test
Here is the script I started with:
- Try to open a non-existent board
- Check that I can't see her
How to write such a test? With what framework? What kind of tools? Should I test through the user interface or not? Should I include client code in testing or directly call the service?
A bunch of questions. Trick: do not answer them! Just pretend that everything is already magically done and just write a test on pseudocode. For example:
public class AcceptanceTest { @Test public void openWhiteboardThatDoesntExist() { //1. //2. , } } I launched it and it passed! Hooray! Um, but wait, this is wrong! The first step in the TDD triangle (“Red - Green - Refactoring”) is Red. So I need to first make the test fall, to prove that this requirement has not yet been implemented.
Perhaps I'll start by writing some real code. But nevertheless, pseudocode helped me take a step in the right direction.
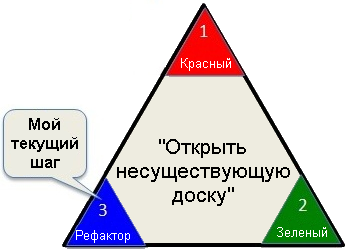
Step 2.2 Make the simplest automatic acceptance test Red
To do this, I invented the AcceptanceTestClient class and pretended that it magically solved all the problems and provides me with an excellent high-level interface for running my acceptance tests. How easy it is to use it:
client.openWhiteboard ("xyz");
assertFalse (client.hasWhiteboard ());
As soon as I wrote this code, I actually came up with the interface that best suits the script of my test. There should be about as many lines of code in the test as there were in the pseudocode.
Next, using the Eclipse hotkeys, I automatically generated an empty AcceptanceTestClient class and the methods I need:
public class AcceptanceTestClient { public void openWhiteboard(String string) { // TODO Auto-generated method stub } public boolean hasWhiteboard() { // TODO Auto-generated method stub return false; } } This is how the test class looks like:
public class AcceptanceTest { AcceptanceTestClient client; @Test public void openWhiteboardThatDoesntExist() { //1. client.openWhiteboard("xyz"); //2. , assertFalse(client.hasWhiteboard()); } } The test starts, but crashes (because the client is null). Good!
What have I achieved? Not to say much. But this is the beginning. Now I have an embryo helper class for acceptance tests - AcceptanceTestClient.
Step 2.3. Make the simplest automatic acceptance test green
The next step is to make the acceptance test green.
Now I need to solve a much simpler problem. I do not need to worry about authentication, nor about several users, about anything like that. I can add tests for these scripts later.
As for AcceptanceTestClient, its implementation was pretty standard - a fake (mock) database (I already had the code for this) and launching a version of the entire webwhiteboard system in memory.
Here is the setting:
(Click on the picture to enlarge)
Technical details: Web Whiteboard uses the GWT (Google Web Toolkit). Everything is written in Java, but GWT automatically translates client code into javascript, and magically inserts RPC (Remote Procedure Calls) calls to hide all the low-level details of the implementation of asynchronous client-server interaction.
Before running the acceptance test, I “close” the system directly and cut out all the frameworks, external components and network interaction.
(Click on the picture to enlarge)
So I create AcceptanceTestClient, which talks to the webwhiteboard service in the same way as real client code would. The differences are hidden behind the curtains:
- The real client communicates with the web whiteboard service interface, which runs in the GWT environment, which automatically turns calls into RPC and sends them to the server.
- The acceptance test also communicates with the web interface of the web whiteboard service, but it directly calls the service implementation, without RPC and, therefore, GWT is not used during the test run.
In addition, AcceptanceTestClient in its configuration replaces the real mongo database (cloud NoSQL database) with a fake that stores data in RAM.
The main reason for replacing all dependencies is to simplify the environment, speed up the execution of tests, and make sure that the tests cover business logic in isolation from all components and network connections.
It may seem that all this configuration is too complicated, but in fact it is just one init method, consisting of only 3 lines of code.
public class AcceptanceTest { AcceptanceTestClient client; @Before public void initClient() { WhiteboardStorage fakeStorage = new FakeWhiteboardStorage(); WhiteboardService service = new WhiteboardServiceImpl(fakeStorage); client = new AcceptanceTestClient(service); } @Test public void openWhiteboardThatDoesntExist() { client.openWhiteboard("xyz"); assertFalse(client.hasWhiteboard()); } } WhiteboardServiceImpl is a real implementation of the webwhiteboard service.
Notice that the AcceptanceTestClient constructor now accepts a WhiteboardService instance (the “dependency injection” design pattern). This gives us an additional side effect: it does not care about the configuration. The same AcceptanceTestClient class can also be used to test this system by simply passing it an instance of the WhiteboardService configured on a real base.
public class AcceptanceTestClient { private final WhiteboardService service; private WhiteboardEnvelope envelope; public AcceptanceTestClient(WhiteboardService service) { this.service = service; } public void openWhiteboard(String whiteboardId) { boolean createIfMissing = false; this.envelope = service.getWhiteboard(whiteboardId, createIfMissing); } public boolean hasWhiteboard() { return envelope != null; } } To summarize, AcceptanceTestClient behaves the same as a real webwhiteboard web client, while at the same time providing a high-level interface for acceptance tests.
You may ask “why do we need AcceptanceTestClient if we already have a WhiteboardService that we can call directly?”. There are 2 reasons for this:
- The interface of the WhiteboardService service is lower. AcceptanceTestClient provides exactly those methods that are needed for acceptance tests, and it is in the form that will make the tests as clear as possible.
- AcceptanceTestClient hides all sorts of little things that are not important to the test - for example, the concept of WhiteboardEnvelope, boolean createIfMissing, and other low-level details. In fact, other services are used in our script, such as UserService and WhiteboardSyncService.
I'm not going to bore you with the details of the AcceptanceTestClient implementation, since this article is not about the webwhiteboard device. Suffice it to say that AcceptanceTestClient connects the needs of the acceptance test and low-level details of the implementation of interaction with the service interface. It was easy to write because the real client code serves as a hint how-to-interact-with-service.
In any case, now our Easiest acceptance test passes!
@Test public void openWhiteboardThatDoesntExist() { myClient.openWhiteboard("xyz"); assertFalse(myClient.hasWhiteboard()); } The next step is to tidy up a bit.
In fact, I have not yet written a single line of product code (since this functionality is already present and working), it was only the code of the test framework. Nevertheless, I spent a few minutes to clean it up, remove duplication, give the methods more understandable names, etc.
Finally, I added another test, just for the sake of completeness, and also because it was easy: o)
@Test public void createNewWhiteboard() { client.createNewWhiteboard(); assertTrue(client.hasWhiteboard()); } Hurray, we have a test framework! And without any fashionable third-party libraries. Only Java and Junit.
Step 2.4 Write an Acceptance Test for Password Protection
Now it's time to add a password protection test.
I begin by describing the “specification” of my pseudo-code test:
@Test public void passwordProtect() { //1. //2. //3. , //4. //5. , } And now, as before, I am writing a test code, pretending that the AcceptanceTestClient class already has everything I need. This technique is extremely useful.
@Test public void passwordProtect() { //1. myClient.createNewWhiteboard(); String whiteboardId = myClient.getCurrentWhiteboardId(); //2. myClient.protectWhiteboard("bigsecret"); //3. , try { joesClient.openWhiteboard(whiteboardId); fail("Expected WhiteboardProtectedException"); } catch (WhiteboardProtectedException err) { // } assertFalse(joesClient.hasWhiteboard()); //4. try { joesClient.openProtectedWhiteboard(whiteboardId, "wildguess"); fail("Expected WhiteboardProtectedException"); } catch (WhiteboardProtectedException err) { // } assertFalse(joesClient.hasWhiteboard()); //5. , joesClient.openProtectedWhiteboard(whiteboardId, "bigsecret"); assertTrue(joesClient.hasWhiteboard()); } I only spent a few minutes writing this code, because I was just inventing what I needed as I was writing. Almost none of these methods are in the AcceptanceTestClient class (yet).
While I was writing the code, I already had to make several decisions. No need to think too hard, just do what the first thing comes to mind. The best is the enemy of the good, and now all I want is to get a fairly good result, that is, a test that can be run and that will fall. Later, when the test turns green, I’ll refactor my code and think more carefully about how to improve its design.
There is a big temptation to start brushing code right now, especially refactoring these terrible try / catch statements. But one of the laws of TDD is to make the test green before refactoring starts, tests will protect you when you refactor. So I decided to wait a little with combing the code.
Step 3 - Ensure that the acceptance test starts and falls
Following the testing triangle, my next step is to make my test run and crash.
I use the Eclipse hotkeys again to create empty methods. Fine. We start the test and voila, it is Red!
Step 4: Make the acceptance test green
Now I have to write a grocery code. I add several new entities to the system. Sometimes the code I added was rather nontrivial, so it needed to be covered with unit tests. I did this with TDD. This is the same as ATDD, but on a smaller scale.
This is how ATDD and TDD work together. Consider ATDD to be an outer loop:
For each cycle of writing an acceptance test (at the level of new functionality), we do several cycles of writing unit tests (at the level of classes and methods).
So, although at a high level I’m focused on making my acceptance test Green (which may take a few hours), on a low level I’m busy doing, for example, making my next unit test Red (which usually takes a few minutes).
This is not really hardcore “TDD with a leather whip”. This is more like “at least make sure that the unit tests and the production code are checked together”. And such a check occurs several times per hour. Call it “TDD like”: o).
Step 5 Clean the code
As usual, as soon as the acceptance test turned green, it’s time to clean up. Never save on it! This is about washing dishes after a meal - it is better to do it right away.
I clean not only the production code, but also the test code. For example, I selected dirty try-catch as an auxiliary method, and I got a clean and tidy test method:
@Test public void passwordProtect() { myClient.createNewWhiteboard(); String whiteboardId = myClient.getCurrentWhiteboardId(); myClient.protectWhiteboard("bigsecret"); assertCantOpenWhiteboard(joesClient, whiteboardId); assertCantOpenWhiteboard(joesClient, whiteboardId, "wildguess"); joesClient.openProtectedWhiteboard(whiteboardId, "bigsecret"); assertTrue(joesClient.hasWhiteboard()); } My goal is to make the acceptance test so short, clean and readable that comments become superfluous. The initial pseudocode and comments perform only the role of a template - “that's how clean the code should be!”. Removing comments gives the feeling of victory, and as a bonus, makes the method even shorter!
What's next?
Repeat. As soon as I received the first working test, I thought about what else is missing. For example, at the beginning I said that only a logged in user can protect the board with a password. So I added a test for it, made it red, then green, and then cleaned the code. And so on.
Here is a complete list of tests that I did for this functionality (for now):
- passwordProtectionRequiresAuthentication
- protectWhiteboard
- passwordOwnerDoesntHaveToKnowThePassword
- changePassword
- removePassword
- whiteboardPasswordCanOnlyBeChangedByThePersonWhoSetIt
Surely I will add a few more tests later if I find bugs or invent new usage scenarios.
All in all, it took about 2 days of coding. Most of the time I spent, returning to the previously written code and design, and not at all as linear as it may seem, reading this article.
How about manual testing?
Of course, I did a lot of manual testing after I received the green acceptance tests. But since automatic acceptance tests cover both the core functionality and many special cases, I could focus on more subjective and exploratory testing. How about a general user experience? Does this sequence of actions make sense? Is it easy to understand? Where better to add explanatory text? Is the design aesthetically good? I'm not going to win any design awards, but I don’t want something monumental and ugly.
A powerful set of automated acceptance tests eliminates the boring monotonous manual testing (known as “monkey testing”), and frees up time for a more interesting and meaningful type of manual testing.
Ideally, I should start with automatic acceptance tests from the very beginning, so in part I returned some technical debt.
Key points
I hope this example was useful to you! He demonstrates a rather typical situation - “I want to add a new feature, and it would be cool to write an automatic acceptance test on it, but there is not a single acceptance test in the project, and I don’t know which framework to use and where to start.”
I really love this template, it allowed me to get off the ground many times. Eventually:
- Pretend that you already have an excellent framework encapsulated in a really convenient helper class (in my case AcceptanceTestClient).
- Write a very simple acceptance test for what is already working today (for example, simply opening your application). Use this test to write classes like AcceptanceTestClient and the associated test binding (such as replacing a real database or other external services).
- Write an acceptance test for your new functionality. Get it to run, but fall.
- Make the test green. As you write code, write unit tests for any more or less complex code.
- Refactor. And, maybe, write a few more unit tests in order to improve the metric, or vice versa - remove unnecessary tests or code. Keep the code clean like a cat's eggs!
Once you have done this, you have overcome the most difficult barrier. You started using ATDD!
about the author
Henrik Kniberg is an Agile / Lean consultant from Crisp in Stockholm, mainly working for Spotify . He enjoys helping companies achieve success in both the technical and human aspects of software development, as described in his popular books “ Scrum and XP from the Trenches ”, “ Kanban and Scrum, making the most of both ” and “ Lean from the Trenches “.
Alexander Andronov (@ alex4Zero), Anton Bevzyuk (@bevzuk) and Dmitry Pavlov translated
Smart Step Group .
Source: https://habr.com/ru/post/209576/
All Articles