Cloud.Mail.Ru + EncFS for backing up your home photo archive
 In late December, Mail.Ru again (for the first time since 1997;) released a revolutionary product - cloud storage, the first active users of which are given out one terabyte for free. 1 TB - by the standards of the beginning of 2014, this is a completely epic volume, at least in the scale of the national IT industry. For the sake of justice, it can be noted that some Chinese companies give more , but the practical applicability of such proposals for most Habrakhabr readers looks doubtful.
A small flaw in the current version of Cloud, according to many of my friends and colleagues, is that the Cloud (at least officially) does not support WebDAV. This does not allow out-of-the-box encryption with simple and popular tools like Boxcryptor. Since Boxcryptor itself is just a convenient graphical add-on over encfs + fuse , I decided for myself and my friends to make a short and simple instruction how to effectively encrypt backup data in the Cloud.Mail.Ru
Formulation of the problem
I am an advanced amateur photographer. My photo archive has approximately 600 GB of data, and about half of them are high-resolution scans of parental slides since 1957. Almost everything is stored in NEF + CR2 (these are Canon and Nikon raw formats), each photo card takes from 15 to 60 MB. In other words, the free terabyte from Flickr did not suit me at all, in particular, because of the impossibility of storing raw photo sources. Starting from 2008, the backup of the archive looks like this: once a year I buy a modern hard disk worth 100 euros and copy all the contents of the previous disk onto it, and the old HDD is sent to retire to a media server, which turns on 3-4 times a year. This approach has many advantages (despite the hard drive mortality, the data has never disappeared), but there is a huge drawback - the physical location of the storage.
')
I travel a lot around the world, and over the past 10 years I have spent in total in Russia (where the media server and a stack of "retired" HDDs are) not more than 4 years. Sometimes there are incidents associated with the loss of external hard drives - so I lost a significant part of the archive of photographs of 2012, which were trivially not brought to my home country. In words, the solution is simple - “go cloud”, but in reality, the tariffs of all the more or less convenient services that allowed archiving 1TB of originals of photographic images were for a long time absolutely transcendental .
And on December 20, 2013, it was announced to us that everyone who wants to have a mailbox on mail.ru can receive 1 terabyte as a gift. Is free. For any files. But only many have questions how to store their data in the cloud in encrypted form.
Step by step solution
Step 1
Register a new mailbox on mail.ru, if you do not have the old one. Difficulties should not occur to anyone.Step 2
Install the native client cloud.mail.ru on the computer, on the phone or on the tablet and log in by accepting the offer. Until the January 20, the action is valid, instead of the default 100 GB (which is also a lot), you will be given immediately 1024 GB. Profit.Note for owners of * nix systems. The Mail.Ru cloud compared to other cloud hosting is perfect because it allows you to specify an arbitrary name for the folder in which the files synchronizing with the cloud will be stored. I recommend to use this and name the folder not by default, but approximately like this:
$ mkdir ~/.Encrypted For newbies, I’ll mention a separate line, in the nix, if you put a dot before the file name, it will be hidden - accordingly, this will allow you not to litter the user directory with visual garbage.
Further, it all depends on the operating system used. I personally use Mac OS X version 10.9.x Mavericks, but you can do the same thing in Linux or Windows. Unfortunately, in the early morning of Saturday I didn’t have an extra Windows PC on hand, but in the evening I would try to call on my parents and supplement this instruction, having considered the case of Windows 8.1. For impatient, I note that the key components are called fuse4win and encfs4win - with their installation, theoretically there should not be any pitfalls.
Step 3
If you do not have a port manager or packages - set it. At this step, I was waiting for some disappointment, because I used MacPorts the old-fashioned way, and after upgrading to 10.9, the encfs port broke down completely. Therefore, I decided to radically update the package manager, and instead of the outdated MacPorts, I set myself a somewhat more fashionable and popular Homebrew. For this purpose, the official Homebrew page instructs the following command to be executed in the Terminal: $ ruby -e "$(curl -fsSL https://raw.github.com/Homebrew/homebrew/go/install)" After that, the Homebrew package manager appears in the system, through which we can install on the Mac many useful utilities inherent in more hardcore * nix systems.
Windows users can skip this step with a pure soul.
Step 4
Install OSXFUSE with the command $ brew install osxfuse In English-language forums, they write that the previous implementation of fuse for Mac - MacFuse has long been unsupported. In principle, it is theoretically possible to install OPENFUSE from here as a regular graphic package with a step-by-step wizard, but since we need Homebrew to install encfs, we will act ideologically correctly. I hope that this circumstance will not scare away novices and dummies.
Windows users in this step set themselves a Dokan and fuse4win library . If nothing works, but you want an experiment - look here . Attention. The performance of fuse4win has not been checked by me yet - darii .
Step 5
Install encfs. Unfortunately, by analogy with the previous paragraph, we will not be able to do this (as I mentioned above, the encfs package is not yet finished for Maverics, and the brew install encfs command will not work. In forums and blogs I found something clumsy, in my opinion , solution : $ brew install https://gist.github.com/defunctzombie/7324625/raw/8c791a397767b7f9e7f725e49a45151885e3c1cb/encfs.rb I am not familiar with the author of the patch (defunctzombie aka Roman Shtylman ), but in a brief analysis of the above file, this is really the official patch that fixes the error related to sys / endian.h in encfs 1.7.x. Why the manteyner did not include it in the port is unknown.
Step 6 (optional)
In principle, everything can already work, but for beauty, you can put the apg password generator into the system and generate a beautiful 34-character password for the encrypted partition. $ brew install apg $ apg -M SNcL -m 34 Step 7
The first run of an encrypted file system. Make sure there are no files in the Cloud directory (and delete them if they exist): $ rm -rfv ~/.Encrypted/* Then create a file system:
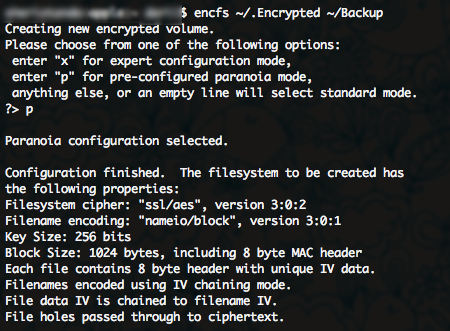
$ encfs ~/.Encrypted ~/Backup Select “pre-configured paranoia mode” (recommended basic settings for paranoids) by pressing the Latin letter “p” on the keyboard. Enter the password - and everything is ready.
Now you have a Backup folder in your user directory where you can literally drop anything you want - and it will appear in encrypted form in the Mail.Ru Cloud. You can easily verify this by copying any file into the Backup folder.

Addition
In principle, if you are inconvenient to store a terabyte of backups to your home folder, no one bothers to create an .Encrypted folder, for example, on an external drive. On the other hand, the case specifically described is optimal for regular but infrequent backups. As soon as the next 50GB for the next year is safely deposited in the depths of mail.ru, I go to the folder selection menu for synchronization and remove the checkbox. The only drawback of this method is the need to store somewhere the table of correspondences of the encrypted and normal names of these folders (for example, 1Gdea8rfaYDzyVjj4PJHo0a2 = 1999PHOTO). Weak- hearted non-lovers of individual notebooks can read man encfs in step 7 and disable encryption of file names (as is done in the free version of boxcryptor). I prefer old school | -)

What can be done next?
In principle, the above actions are already sufficient to back up photos every few months, starting the synchronization manually and mounting the encrypted file system with the command in the console. However, there are a number of graphical (and not only) utilities for Linux and for Mac, which allows you to perform all sorts of more advanced things like automatic mounting of an encrypted partition, working on a schedule, and so on. It seems to me that I already wrote a lot of text, and therefore I ask everyone to follow the recipes to your favorite search engine or in a comment. I would also be grateful if someone tries to reproduce the voiced steps on a windows-machine and write in the comments.
And last
About security. This solution represents only “protection from prying eyes” and is enough to archive a home or even a commercial photo archive. However, in my opinion, it would be a mistake to use it for backing up any really important business data that is a commercial secret. Judging by the official site , the algorithm itself has not changed EncFS since 2005, and the latest actual version was released in the fall of 2010. A recent (13th of January 2014) external independent audit of the EncFS solution showed the inconsistency of this technology with a number of modern requirements for confidential data protection tools. Use EncFS wisely.
Source: https://habr.com/ru/post/209500/
All Articles