The best time to learn microcontrollers
Admit, how often did you think about learning the basics of microcontroller programming? Surely you have a few ideas of potential projects in your head, but you never came to realize them. So: better time to start than it is now just not to find.
Why did I decide that this question is interesting for the Habr audience? It is enough to analyze the number of additions to the favorites of some posts and the conclusions suggest themselves.
On the other hand, in my current environment there are a lot of programmers, but almost no imbeders. When I talk to them on the topic of microcontrollers, I get the impression that many have left their opinion about 10 years ago.
Despite the fact that writing on asm for microcontrollers is easier than for x86 architecture, many people are afraid of it and this serves as an obstacle for them to embedded systems. Friends, in order to start the microcontroller now, it is not necessary, even, to read the datasheets thoroughly, not to mention knowing its instructions. Of course, if this is your profession, then the level of immersion is much higher, but tell me how often you, regardless of what professional you are in, do not try to violate the principle of encapsulation until the last and no no yes when creating products. and look at the source of the libraries used? Now you understand what I mean.
')
I vaguely remember those times when I did not program microcontrollers. I started writing on asm, not only because everyone did it, but also because there were practically no normal tools. I explain the popularity of 8-bit controllers from AVR by the fact that they created very easy-to-use libraries that allow you to create a new project, write a dozen lines of code and get quite a working program (addresses of peripheral devices and interrupt vectors are kindly filled with library creators). I did not conduct research, it is from my personal memories - I am sure that more intelligent libraries for other controllers existed even earlier, but then we did not know about it.
The first really massive 32-bit microcontroller was created by the French office STM. It was at that moment that many fans got acquainted with the architecture of Cortex-M3 and began to use it widely. I remember, I simultaneously got 2 controllers in my hands - STM32F103 and LPC1768. I had to make a device prototype on one of them as quickly as possible. Naturally, my choice fell on the first: the French released a library for the periphery called the Standard Peripherals Library and all I had to do was launch FreeRTOS , connect the necessary peripherals and build the project on the next level of abstraction, without distracting more work with registers. I also used the skeleton in the future, often bending and pushing the 32-bit Cortex to where the smallest ATtiny would have been, but most often the price allowed (and where it didn’t allow, or low power consumption was needed, you could use cheap MSP430 and STM8, but it rarely happened).
Of course, I’m misleading if I say that I didn’t have to fully learn the architecture of the Cortex-M3 and smoke the F103 datasheet - of course, I also had my passion for the CMSIS and StdPeriph_Lib library to prevent rather than help, but the speed of entering new I was struck by a family and even then I realized that the world of controllers was changing and becoming both simpler and more complicated.
And so we smoothly got to what I wanted to tell you. The fact is that the popularity of any Arduino assemblies for a long time did not give rest to the guys from Texas Instruments. They released MSP430-based launchpads and sold them at lower cost and free shipping, they started a community in which they could upload their projects, they created Energia - fork Arduino, they released Stellaris launchpads, and then renamed them to Tiva C (although here It is about a more global rebranding and adding some new features, the essence has not changed). I want to talk about the latter.
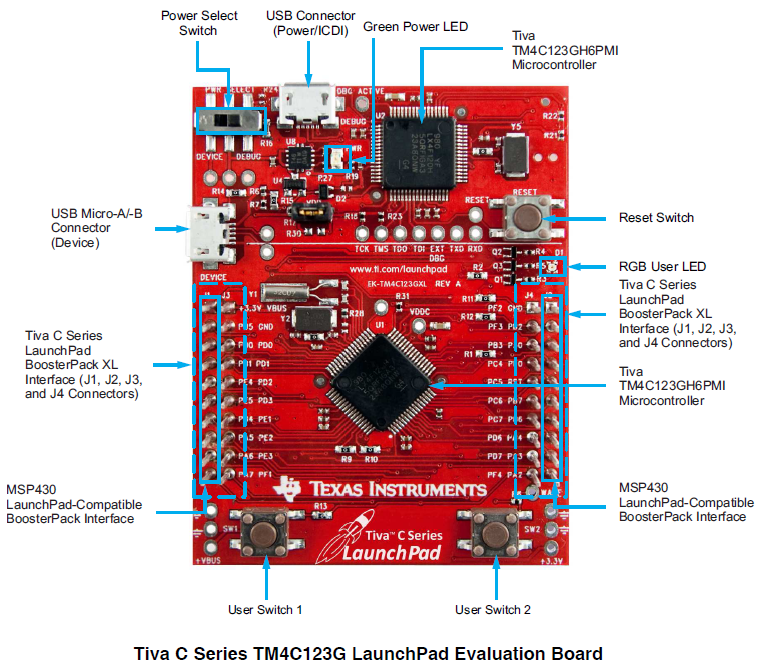
You can buy the EK-TM4C123GXL loungepad for $ 12.99 with FedEx delivery (that is, you will get it soon enough). The board is not replete with various electronics, such as Discovery F4 (which has an accelerometer, a sound sensor, a DAC, a bunch of LEDs on board) - everything you find on Tiva C Launchpad is an RGB diode and 2 buttons, but its strength is not in additional devices on the board.
The power of EK-TM4C123GXL in libraries available for download from the TI website called TivaWare. The fact is that the libraries for their controllers are now being written by everyone, but many of them, unfortunately, are not very different in quality and are more traditional examples than full-fledged libraries that are not ashamed to use in their projects (for the above mentioned LPC1768, NXP they wrote their library almost at the same time as STM, but at that time it was not particularly different in quality). The library for Tiva C surprises with its standardization, documentation and diversity.
A little later, I will offer you to download TivaWare and, if you are not too lazy, after installation you will be able to watch the following directories:
- Driverlib - drivers for peripheral devices such as adc, gpio and so on are located here (including the header file with macros for calling functions from rom - more on that later)
- Examples - well here, it is clear, examples. They are divided into boards, peripherals and project. In the first, of course, projects for specific debug boards, in the second examples of using peripheral devices and in the third example of a clean project for various development environments (IAR, Keil, CCS) - files are available under the BSD license.
- Inc - various header files with macros, including the tm4c123gh6pm file, which will be useful to us for creating the simplest project
- Docs - this is a distinctive feature of TI - simple and clear documentation. Inside there are several User Guide related to the components described here - DriverLib, Examples, Bootloader, IQmath and so on, as well as user directly to the pad used by us.
- Sensorlib is what really surprised me: there are drivers for various third-party sensors, such as sht21, lsm303d, MPU6050, and so on. I like to use the last one (this is such a MEMS assembly from accelerometers and gyroscopes on the same crystal), and I used to connect the library torn from the Invensense examples, so I wrote the source code from TI to me very carefully (besides, I immediately found raw materials with quanterions).
- IQmath is a library of algorithms optimized for working with floating point numbers on Stellaris (Tiva C) devices.
- Utils - frequently used utilities for working with the command line, serial port, scheduler, and more.
- The remaining directories contain a bootloader, raw materials from third-party manufacturers (FreeRTOS, for example), a library for working with USB, drivers for Windows, and so on.
In order to run any example on your launch pad, just open the project from the examples / boards / ek-tm4c123gxl folder in your favorite IDE - everything is ready there (I use IAR, so I opened ek-tm4c123gxl.eww and it downloaded to me already configured workspace). But, you know, almost every microcontroller has such customized examples now, and the real difficulties begin when we try to create something of our own.
Ok, let's give up not only the examples but also the customized skeleton of the project - we will start everything from scratch (of course using the file from the libraries). Immediately a disclaimer: I started working with the pad only today, so I don’t know almost anything about him or the source code I’m going to work with. This is the main leitmotif of the whole article - a person sees Tiva C for the first time and immediately tries to work with it.
I wanted to write some complicated and interesting application right away, but then I realized that it would take some time, and I had to urgently publish the article, and so I decided to make a simple example, and then, if you wish, we will do something more interesting.
So, the first thing we need is to download and install the library (if you haven't done it yet). In addition, you need to install an IDE and a flasher.
Where to download?
You can download this link . If the traffic allows - download the DK-TM4C123G Kit Full Installer - it contains the TivaWare library, documentation and IDE installers (about 3.5Gb).
IDE and Flash Programmer are in the Tools folder.
If not, you can download TivaWare for Tiva C Series, LM Flash Programmer and IDE separately.
IDE and Flash Programmer are in the Tools folder.
If not, you can download TivaWare for Tiva C Series, LM Flash Programmer and IDE separately.
As an IDE, I will use IAR (hence the examples will be with it), but you can use any of the supported ones.
Who does not know, IAR has 2 options for free use - with a time limit and a code size limit. And, of course, there are other options if these 2 do not suit you (you yourself know which ones). I will not describe the procedure for installing and registering IAR - everything is simple there, but if you have any difficulties, feel free to ask questions in the comments.
So, first of all create a new project. In the project properties, we will change some settings.
Project Settings
Settings, in fact, not so much. Open the project options and select the correct stone. On the tab General Options -> Target.
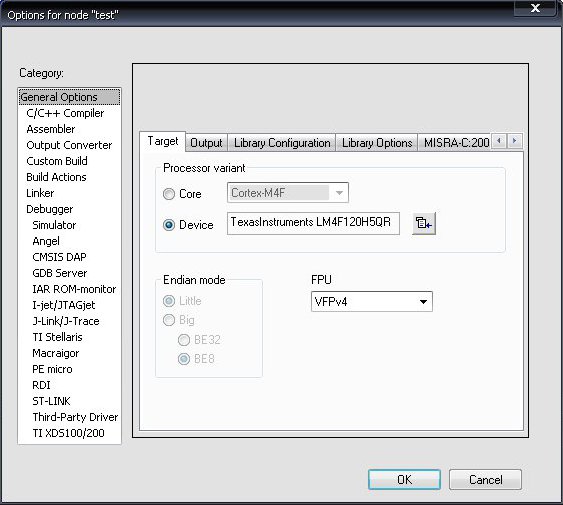
In the C / C ++ Compiler, on the Preprocessor tab, specify the path to the TivaWare folder. On the same tab, we will add some constants later.

In Debugger, choose TI Stellaris.
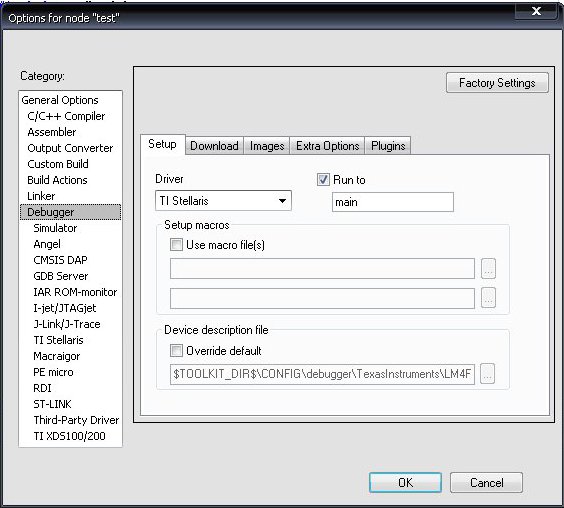
More detailed settings (if needed) can be seen in the examples (for example, another linker configuration file is used there, not the one suggested by IAR).
In the C / C ++ Compiler, on the Preprocessor tab, specify the path to the TivaWare folder. On the same tab, we will add some constants later.
In Debugger, choose TI Stellaris.
More detailed settings (if needed) can be seen in the examples (for example, another linker configuration file is used there, not the one suggested by IAR).
Now we need to customize the project structure. I propose to adhere to the structure proposed by TI (as in the examples), but with some differences.
In the folder (actually “in the group”, but the folders are somehow familiar) Src we have our source codes. In the examples, the source files of the library files are also added there, but I believe that this will only confuse the project.
The Library folder stores files from the DriverLib. TI adds there an already compiled file (in the case of IAR, this is driverlib / ewarm / Exe / driverlib.a), you can do the same, but I would suggest adding source instead, and only if necessary - it’s easier to remember where is found, and the source code is useful. If you plan to add files from other libraries to the same folder (Utils, for example), then it is better to create another level of hierarchy.
The examples are missing, and I didn’t do it either, but if you write your header files, create an Inc folder.
The main thing to remember is that these folders are only for the convenience of the user, they have nothing to do with the placement of files on the disk and have no effect on the compilation.
So, in the Src folder, create the file main.c
In the Library folder, add startup_ewarm.c - it is needed to properly initialize the interrupt vector. You can take it from the project_0 (this is in the examples) of the project, for example.
Let's start our program with the function main. Since the RGB LED is connected to port F of our launcher, we blink them.
void main(void) { volatile uint32_t ui32Counter; // while(1) { // for(ui32Counter = 0; ui32Counter < 1000000; ui32Counter++) { } // for(ui32Counter = 0; ui32Counter < 1000000; ui32Counter++) { } } } I think everything is clear: to use types like uint32_t is a good habit, it helps to solve ambiguity with the sizes of variables on different controllers (besides, it conforms to MISRA-C standards); volatile - tells the compiler that this variable should not be optimized (because we will use it for, in general, a useless operation). Next is the back-end cycle (as students teach, the program on microcontrollers should never end) and 2 counters for delays.
To compile this code, add to the beginning of the file.
#include <stdint.h> Now we will proceed directly to the flashing of the LEDs.
We download the Tiva C Series TM4C123G LaunchPad Evaluation Kit User's Manual file from the launchpad page and read in the User Switches and RGB User LED section that the diode is connected to the PF1 (red), PF2 (blue) and PF3 (green) pins.
Now open SW-TM4C-DRL-UG (in the TivaWare docs folder) and view the GPIO section. From the introduction, we understand that the pins must first be configured (configurations, of course, many) to the output. Here we read that some of the most useful functions are GPIOPinRead () and GPIOPinWrite (). What they do is clear, it remains to look in their description to clarify the list of parameters. Immediately we find that the function GPIOPinTypeGPIOOututput () is used to register pins for output. So, we change comments, in our code on:
GPIOPinTypeGPIOOutput(GPIO_PORTF_BASE, GPIO_PIN_1|GPIO_PIN_2); // // GPIOPinWrite(GPIO_PORTF_BASE, GPIO_PIN_1, 0xFF); GPIOPinWrite(GPIO_PORTF_BASE, GPIO_PIN_2, 0); // GPIOPinWrite(GPIO_PORTF_BASE, GPIO_PIN_1, 0); GPIOPinWrite(GPIO_PORTF_BASE, GPIO_PIN_2, 0xFF); To turn on and off the diodes.
Naturally, do not forget to add the driverlib / gpio.c file to the Library folder, as well as
#include "driverlib/gpio.h" in headlines.
In addition, already in the compilation process we notice that it is necessary to add 2 more header files:
#include <stdbool.h> // bool, gpio #include "inc/hw_memmap.h" // . Now our program looks like this:
#include <stdint.h> #include <stdbool.h> #include "driverlib/gpio.h" #include "inc/hw_memmap.h" void main(void) { volatile uint32_t ui32Counter; GPIOPinTypeGPIOOutput(GPIO_PORTF_BASE, GPIO_PIN_1); while(1) { GPIOPinWrite(GPIO_PORTF_BASE, GPIO_PIN_1, 0xFF); GPIOPinWrite(GPIO_PORTF_BASE, GPIO_PIN_2, 0); for(ui32Counter = 0; ui32Counter < 2000000; ui32Counter++) { } GPIOPinWrite(GPIO_PORTF_BASE, GPIO_PIN_1, 0); GPIOPinWrite(GPIO_PORTF_BASE, GPIO_PIN_2, 0xFF); for(ui32Counter = 0; ui32Counter < 2000000; ui32Counter++) { } } } And, if you compile it and run it, you will be able to observe the alternating color change of the diode.
But blinking the LED is too easy for us. Let's go a little further and add support for an I / O port.
Actions are the same. We find which ports are connected to the UART, read about the configuration of the module in UserGuide, configure it, use the functions for writing to and reading from uart.
My uart initialization function was similar to the function from the example, but with one interesting difference. Here is the initialization from the example:
void ConfigureUART(void) { // // Enable the GPIO Peripheral used by the UART. // ROM_SysCtlPeripheralEnable(SYSCTL_PERIPH_GPIOA); // // Enable UART0 // ROM_SysCtlPeripheralEnable(SYSCTL_PERIPH_UART0); // // Configure GPIO Pins for UART mode. // ROM_GPIOPinConfigure(GPIO_PA0_U0RX); ROM_GPIOPinConfigure(GPIO_PA1_U0TX); ROM_GPIOPinTypeUART(GPIO_PORTA_BASE, GPIO_PIN_0 | GPIO_PIN_1); // // Use the internal 16MHz oscillator as the UART clock source. // UARTClockSourceSet(UART0_BASE, UART_CLOCK_PIOSC); // // Initialize the UART for console I/O. // UARTStdioConfig(0, 115200, 16000000); } As you can see, strange functions with the ROM_ prefix are used here - these are special functions that are already stored in the ROM of the launcher microcontroller. You can read about them in the same UserGuide for DRL. They are created in order to reduce the size of the code in Flash memory. Whether you need it or not - you decide, I liked the idea (since I still use the Peripheral Driver Library). By the way, if you do not know whether the code will be used on the device with pieces of the library in ROM or not - you can use Mapped ROM Calls. Then the code from ROM will be used if it is there and compiled if it is not.
To work with ROM, you need to set up several constants: in the project options, in the C / C ++ Compiler, on the Preprocessor tab, add the TARGET_IS_BLIZZARD_RB1 constant to the Defined Symbols field. There immediately add PART_TM4C123GH6PM and ewarm - they are needed for successful compilation of library files.
Screen
In addition, you need to add the missing files to the project tree:

So, all we have left is to bring something to the port (you can use any terminal emulator for reading. For example, for Windows I used Real Term). Then, I suggest counting the letter from the port, check whether it belongs to one of the colors (r, g, b) and change the state of the corresponding pin.
You already have the function to initialize the UART. We change the initialization of the ports to add the third pin (earlier we configured only 2 on the output). You can output a string to the terminal using the UARTprintf () function; from the utils / uartstdio.c library (of course, you need to add this to the project and connect the header file).
Read the symbol with the function UARTCharGet (). It enters the cycle until the symbol comes to Uart. After this, we perform actions on the pins and return to the beginning of the cycle.
#include <stdint.h> #include <stdbool.h> #include "inc/hw_memmap.h" #include "inc/hw_types.h" #include "driverlib/gpio.h" #include "driverlib/rom.h" #include "driverlib/sysctl.h" #include "driverlib/uart.h" #include "driverlib/pin_map.h" #include "utils/uartstdio.h" void ConfigureUART(void) { ROM_SysCtlPeripheralEnable(SYSCTL_PERIPH_GPIOA); ROM_SysCtlPeripheralEnable(SYSCTL_PERIPH_UART0); ROM_GPIOPinConfigure(GPIO_PA0_U0RX); ROM_GPIOPinConfigure(GPIO_PA1_U0TX); ROM_GPIOPinTypeUART(GPIO_PORTA_BASE, GPIO_PIN_0 | GPIO_PIN_1); UARTClockSourceSet(UART0_BASE, UART_CLOCK_PIOSC); UARTStdioConfig(0, 115200, 16000000); } void main(void) { volatile uint32_t ui32Loop; uint32_t ui32Color; uint8_t ui8Red = 0xFF; uint8_t ui8Green = 0xFF; uint8_t ui8Blue = 0xFF; GPIOPinTypeGPIOOutput(GPIO_PORTF_BASE, GPIO_PIN_1|GPIO_PIN_2|GPIO_PIN_3); ConfigureUART(); UARTprintf("Hello HabraHabr!\n"); while (1) { UARTprintf("Please, enter color(r,g,b) \n"); ui32Color = UARTCharGet(UART0_BASE); switch (ui32Color) { case 'r': GPIOPinWrite(GPIO_PORTF_BASE, GPIO_PIN_1, ui8Red); ui8Red = ~ui8Red; break; case 'b': GPIOPinWrite(GPIO_PORTF_BASE, GPIO_PIN_2, ui8Blue); ui8Blue = ~ui8Blue; break; case 'g': GPIOPinWrite(GPIO_PORTF_BASE, GPIO_PIN_3, ui8Green); ui8Green = ~ui8Green; break; default: UARTprintf("Incorrect color! \n"); break; } } } I found an interesting lib in TivaWare - utils / cmdline. It allows you to create and process commands entered from the command line. I wanted to make an interesting project using it and several other interesting libraries, but time is running out, so I can write about it later if there is interest (as well as interrupts that are not even mentioned here about FreeRTOS).
Well, now about why I wrote several times about what time is running out and why of all the favorable times for starting controllers now the most favorable: January 22, the Embedded Systems - Shape The World courses start at edX.
Registration is free, but if you want to get a standard, you must pay a fee (minimum $ 50). Personally, I paid $ 50 - not because of the certificate, but simply because of the love for such courses and in their support.
To participate, you need to buy a Tiva C lounge pad and a different distribution. You can buy the latter at any radio market, but you have to hurry with the pad: TI is usually sent via FedEx, but this can take up to 10 days, while a week is left before the course starts.
But you should not worry: I do not think that in the first lesson you will immediately need to work with iron, perhaps you can simulate your program.
So, a few conclusions. Using such libraries is a double-edged sword. On the one hand, it simplifies development, lowers the entry threshold, on the other hand creates an abstraction level that complicates understanding of the basics (there is not a single reference to datasheet throughout the article, and this is wrong: you should always look at datasheets and this is a must for amateur artist in a professional). But such libraries, unlike Arduino (by the way, Energia supports the described padpad), have one advantage: they do not give you a false understanding of reality. If you use the library, you understand that a very real device is hidden behind the abstraction and it is not difficult to trace the parallels between functions and real registers.
I hope that this material will encourage you to purchase and study (albeit so superficially) this wonderful device. If you have ideas for projects that you could implement on TM4C123G, but there were difficulties in implementation - feel free to write about it in the comments: we will understand together.
Source: https://habr.com/ru/post/209218/
All Articles