Windows Azure Media Services vs. Amazon Elastic Transcoder. Part 2: Amazon Elastic Transcoder
Greetings to all readers of Habr! I hope everyone has already moved away from the New Year holidays and are ready to begin productive work in the new year. I can only wish you success in this matter.
Let me remind you that last year I set the task to compare the services for video processing of cloud providers from Microsoft and Amazon. Well, today is the time to describe work with Amazon Elastic Transcoder. So let's go!
Despite the fact that with version 2.0, the SDK for working with Amazon services on the .NET platform has moved to the General Availability state, it still has some annoying bugs. I will tell about them when we are faced with the implementation of the corresponding functional. To get around them we need to do a few operations via the UI or command line utilities. But first things first.
')
So the first thing we need to do before using Amazon Elastic Transcoder is to create a storage account. Files uploaded for conversion will be stored in it. Similar to Windows Azure, where files are stored in blobs, in Amazon files are stored in baskets (bucket). We need to create one.
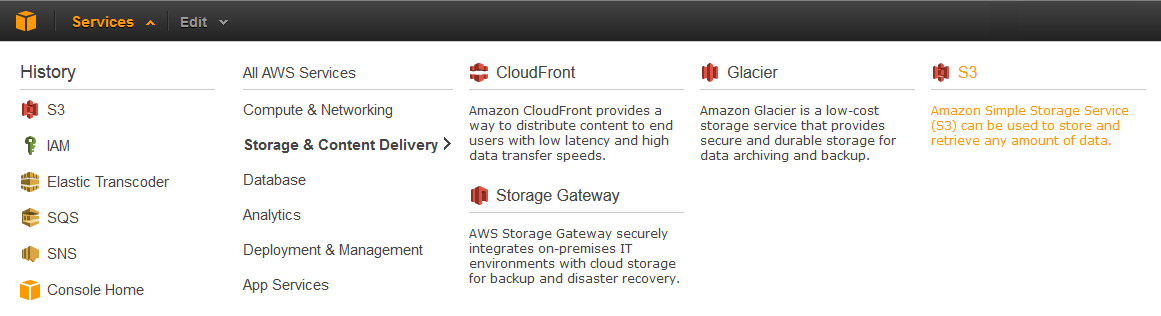
In order to create a shopping cart, go to the Amazon Management Console and go to Services -> Storage & Content Delivery -> S3.
Next, create a new basket by clicking the Create Bucket button. In the window that appears, we need to specify the name of the new basket (Bucket Name) and select the data center in which the capacities for our storage will be allocated. Complete the basket by clicking the Create button.

Also, as well as when working with Windows Azure, to work with Amazon services, we need account information that has the rights to work with these services. Let's create a new user who will have access to work with the Amazon Elastic Transcoder service.
To do this, go to Services -> Deployment & Management -> IAM.

Next, go to the item Users -> Create New Users.

In the resulting window we will be asked to specify the name of the new user You can create multiple users at once. You also need to make sure that the Generate an access key for each user is checked. We proceed further by clicking the Create button.

After that, in the window that appears, we need to copy the Access Key ID and Secret Access Key values.

We define the copied values in the constants of our class that works with Amazon Elastic Transcoder, just as we did with Windows Azure Media Services:
public class ElasticTranscoderClient: IVideoConverter
So, before proceeding directly to writing the code of the corresponding class, we need to connect the Amazon SDK assembly. To do this, use the package manager NuGet. In the context menu of our project, select the item “Manage NuGet Packages ...”. We are looking for and install the appropriate package:

To work with each Amazon service, we need an appropriate client. Let's declare the creation of the corresponding objects in the constructor of the ElasticTranscoderClient class.
Let's list the clients which Amazon services we need.
Please also note that in the constructors of all services we specify the region with which they will work. In our case, this is USWest2 - aka Oregon.
First of all, let's create a message queue that our client application will listen to for the presence of coding status messages. To do this, declare the appropriate method:
This code searches the list of existing queues for the necessary queue, if there is no queue, it creates it. Please note that when creating a queue, we indicate permission to access it and perform any operations with all Amazon services.
Here we come across the first bug in the Amazon SDK. At least installed at me, at the time of this writing, version 2.0.5.0, it had. The thing is that the rights for the queue created via the SDK will not be taken into account by the SNS. That is, the SNS service will not be able to send messages to the queue. Although if you go to the Management Console and look at the established access rights, then everything will look right.
To get around this bug, we need to go to the Management Console. Select the item Services -> App Services -> SQS.

Select the created queue and go to the Permissions tab. You need to remove the access rights created via the SDK (in fact, not necessarily) and manually add the exact same ones via the Add a Permission button.


Let's return to our code. The CreateQueue method will return the URL of the created queue. Therefore, in the constructor of the ElasticTranscoderClient class, we add initialization of the corresponding field:
Now we will create a role under which our Elastic Transcoder will be executed. To do this, also create the appropriate method:
Here the principle is exactly the same as when creating a queue. Create a role if it does not already exist. And we add the right to access all the services of Amazon. You can specify specific services. When creating the IAM role, no bugs in the SDK were noticed by me (perhaps I am mistaken).
The created method returns an instance of the Role object.
As I said above, Elastic Transcoder uses the SNS service for notification of coding status. Further messages can be forwarded to other services. SQS is just one of them. A description of all possible options can be found here .
All messages Elastic Transcoder sends in the appropriate Topic. Subscribe to which may be several listeners. We need to tell the listener the SQS message queue.
Here we can note the peculiarity of the SNS operation not with the URL, but with the so-called Amazon Resource Names (ARN). That is, in order to sign a queue to listen to messages from the SNS, we need its ARN, and not the URL. Therefore, using the URL of the previously created queue, we get the corresponding ARN.
The method returns the ARN of the created Topic.
All job processing for video files (Job) are performed within a specific Pipeline. Tasks from this pipeline are taken to run Amazon Elastic Transcoder and can be parallelized.
We declare a method to create a Pipeline.
As elsewhere, we create a pipeline only if it has not been previously created. As input parameters, you must specify the basket with which the Elastic Transcoder will work, that is, where to get input data (InputBucket), IAM role (Role), name of pipeline (Name), ARN of the corresponding Topic (Notifications) and access rights to output files in the basket (Permissions).
The method returns an object of the Pipeline type, which we will use to create new tasks for processing video files. Therefore, we add initialization of the corresponding field to the ElasticTranscoderClient constructor:
And finally, the last thing we need to write is a task creation method (Job) for video processing.
As in the case of Windows Azure, we assume that the video files for processing are in the root of our bucket, so the key to access the file is the file name.
We leave the input parameters of the video file as source (auto), and as the output format we set the ID of the desired preset for 480p encoding. A list of all the presets can be obtained here , either by going to the Management Console -> Services -> App Services -> Elastic Transcoder -> Presets.

Now we implement the methods described in the IVideoConverter interface: WaitForConversionToComplete, UploadFile, DownloadFile, Convert.
Implementation of UploadFile and DownloadFile is quite simple. We need to use the client to work with S3 to upload / download video files to / from the storage.
Next, we implement the WaitForConversionToComplete method. Here it is necessary to stay in more detail. The fact is that Amazon Elastic Transcoder can only work in asynchronous mode, unlike Windows Azure Media Services. That is, we do not have a message handler to which we could subscribe in anticipation of the message that the processing is complete.
Since the status messages of the Elastic Transcoder are sent using SNS, passing them to the SQS, we need to implement the method so that it listens to the queue for the presence of messages in it.
Let's look at this piece of code in more detail. Using the SQS client, we receive a message from the queue. The maximum possible message waiting time is 20 seconds, after which the SQS client will return control.
Amazon Elastic Transcoder sends 4 types of messages reflecting the processing status: Progressing, Completed, Warning and Error. We need to wait for the message type Completed. All other messages are deleted from the queue.
All messages from SNS or SQS come in JSON format. Since the Amazon SDK for .NET does not have ready classes for parsing JSON objects into .NET objects, we need to parse the received message on our own. To do this, you can use the service json2charp .
However, when I tried parsing the finished message from SQS, here I came across another problem. The JSON object that comes from Amazon contains characters that must be removed for normal transformation to a .NET object. As a result, the construction of receiving messages began to contain calls to the Replace method for typing such characters. Pay attention to this in the code!
Well, actually, all we have to do is implement the classes of the corresponding objects.
Thus, the only method that remains unrealized is Convert. This method will essentially simply call previously implemented methods in the appropriate order. Its implementation:
As we can see, everything is quite simple:
As a result, calling the Convert method is allowed in the console application, we get the following result:

And of course we compare the received files.

This is where the client implementation for working with Amazon Elastic Transcoder is complete. The next time we have the most interesting, namely - to compare the two providers. Do not switch!
Continued ...
Let me remind you that last year I set the task to compare the services for video processing of cloud providers from Microsoft and Amazon. Well, today is the time to describe work with Amazon Elastic Transcoder. So let's go!
Despite the fact that with version 2.0, the SDK for working with Amazon services on the .NET platform has moved to the General Availability state, it still has some annoying bugs. I will tell about them when we are faced with the implementation of the corresponding functional. To get around them we need to do a few operations via the UI or command line utilities. But first things first.
')
Amazon Web Services
So the first thing we need to do before using Amazon Elastic Transcoder is to create a storage account. Files uploaded for conversion will be stored in it. Similar to Windows Azure, where files are stored in blobs, in Amazon files are stored in baskets (bucket). We need to create one.
In order to create a shopping cart, go to the Amazon Management Console and go to Services -> Storage & Content Delivery -> S3.
Next, create a new basket by clicking the Create Bucket button. In the window that appears, we need to specify the name of the new basket (Bucket Name) and select the data center in which the capacities for our storage will be allocated. Complete the basket by clicking the Create button.
Also, as well as when working with Windows Azure, to work with Amazon services, we need account information that has the rights to work with these services. Let's create a new user who will have access to work with the Amazon Elastic Transcoder service.
To do this, go to Services -> Deployment & Management -> IAM.
Next, go to the item Users -> Create New Users.
In the resulting window we will be asked to specify the name of the new user You can create multiple users at once. You also need to make sure that the Generate an access key for each user is checked. We proceed further by clicking the Create button.
After that, in the window that appears, we need to copy the Access Key ID and Secret Access Key values.
We define the copied values in the constants of our class that works with Amazon Elastic Transcoder, just as we did with Windows Azure Media Services:
public class ElasticTranscoderClient: IVideoConverter
{ private const string AccessKey = "ACCESS_KEY_ID"; private const string SecretKey = "SECRET_KEY"; } Amazon Elastic Transcoder
So, before proceeding directly to writing the code of the corresponding class, we need to connect the Amazon SDK assembly. To do this, use the package manager NuGet. In the context menu of our project, select the item “Manage NuGet Packages ...”. We are looking for and install the appropriate package:
To work with each Amazon service, we need an appropriate client. Let's declare the creation of the corresponding objects in the constructor of the ElasticTranscoderClient class.
private readonly AmazonElasticTranscoderClient _elasticTranscoder; private readonly AmazonS3Client _s3Client; private readonly AmazonSQSClient _sqsClient; private readonly AmazonIdentityManagementServiceClient _iamClient; private readonly AmazonSimpleNotificationServiceClient _snsClient; public ElasticTranscoderClient() { var amazonRegion = RegionEndpoint.USWest2; _elasticTranscoder = new AmazonElasticTranscoderClient(AccessKey, SecretKey, amazonRegion); _s3Client = new AmazonS3Client(AccessKey, SecretKey, amazonRegion); _sqsClient = new AmazonSQSClient(AccessKey, SecretKey, amazonRegion); _iamClient = new AmazonIdentityManagementServiceClient(AccessKey, SecretKey, amazonRegion); _snsClient = new AmazonSimpleNotificationServiceClient(AccessKey, SecretKey, amazonRegion); ... } Let's list the clients which Amazon services we need.
- Elastic Transcoder - encode the input video file to the output.
- Simple Storage Service (S3) - work with storage. Upload / download source / received video file.
- Simple Queue Service (SQS) - message queue. Forward messages received from SNS.
- Identity and Access Management (IAM) - Elastic Transcoder uses a specific role for its work. That is, in fact, uses the account to work with the necessary services of Amazon. You must create such an account with the appropriate rights.
- Simple Notification Service (SNS) - Elastic Transcoder uses this service to notify the coding state. Messages sent to SNS must be forwarded to SQS for processing using the Amazon SDK.
Please also note that in the constructors of all services we specify the region with which they will work. In our case, this is USWest2 - aka Oregon.
SQS: Simple Queue Service
First of all, let's create a message queue that our client application will listen to for the presence of coding status messages. To do this, declare the appropriate method:
private const string QueueName = "QUEUE_NAME"; private readonly string _queueUrl; private string CreateQueue() { // Check if queue already exists string queueUrl; try { queueUrl = _sqsClient.GetQueueUrl(new GetQueueUrlRequest { QueueName = QueueName }).QueueUrl; } // Create if necessary catch (AmazonSQSException) { queueUrl = _sqsClient.CreateQueue( new CreateQueueRequest { QueueName = QueueName, Attributes = { { "Policy", new Policy { Statements = { new Statement(Statement.StatementEffect.Allow) { Actions = {SQSActionIdentifiers.AllSQSActions}, Principals = {new Principal("*")} } } }.ToJson() } } }).QueueUrl; } return queueUrl; } This code searches the list of existing queues for the necessary queue, if there is no queue, it creates it. Please note that when creating a queue, we indicate permission to access it and perform any operations with all Amazon services.
Here we come across the first bug in the Amazon SDK. At least installed at me, at the time of this writing, version 2.0.5.0, it had. The thing is that the rights for the queue created via the SDK will not be taken into account by the SNS. That is, the SNS service will not be able to send messages to the queue. Although if you go to the Management Console and look at the established access rights, then everything will look right.
To get around this bug, we need to go to the Management Console. Select the item Services -> App Services -> SQS.
Select the created queue and go to the Permissions tab. You need to remove the access rights created via the SDK (in fact, not necessarily) and manually add the exact same ones via the Add a Permission button.
Let's return to our code. The CreateQueue method will return the URL of the created queue. Therefore, in the constructor of the ElasticTranscoderClient class, we add initialization of the corresponding field:
public ElasticTranscoderClient() { ... _queueUrl = CreateQueue(); ... } IAM: Identity and Access Management
Now we will create a role under which our Elastic Transcoder will be executed. To do this, also create the appropriate method:
private const string IamRoleName = "IAM_ROLE_NAME"; private Role CreateIamRole() { foreach (var role in _iamClient.ListRoles().Roles) { if (role.RoleName == IamRoleName) { return role; } } var trustRelationships = new Policy { Statements = { new Statement(Statement.StatementEffect.Allow) { Actions = { SecurityTokenServiceActionIdentifiers.AssumeRole }, Principals = { Principal.AllUsers } } } }.ToJson(); var permissions = new Policy { Statements = { new Statement(Statement.StatementEffect.Allow) { Actions = { new ActionIdentifier("*") }, Resources = { new Resource("*") } } } }.ToJson(); var newRole = _iamClient.CreateRole( new CreateRoleRequest { RoleName = IamRoleName, AssumeRolePolicyDocument = trustRelationships } ).Role; _iamClient.PutRolePolicy( new PutRolePolicyRequest { PolicyName = "Default", RoleName = IamRoleName, PolicyDocument = permissions } ); return newRole; } Here the principle is exactly the same as when creating a queue. Create a role if it does not already exist. And we add the right to access all the services of Amazon. You can specify specific services. When creating the IAM role, no bugs in the SDK were noticed by me (perhaps I am mistaken).
The created method returns an instance of the Role object.
SNS: Simple Notification Service
As I said above, Elastic Transcoder uses the SNS service for notification of coding status. Further messages can be forwarded to other services. SQS is just one of them. A description of all possible options can be found here .
All messages Elastic Transcoder sends in the appropriate Topic. Subscribe to which may be several listeners. We need to tell the listener the SQS message queue.
private const string TopicName = "TOPIC_NAME"; private string CreateTopic() { var topicArn = _snsClient.CreateTopic(new CreateTopicRequest(TopicName)).TopicArn; // Get queue ARN (required for SNS subscription) var queueArn = _sqsClient.GetQueueAttributes( new GetQueueAttributesRequest { AttributeNames = {"QueueArn"}, QueueUrl = _queueUrl }).QueueARN; // Subscribe SNS to SQS _snsClient.Subscribe( new SubscribeRequest { TopicArn = topicArn, Protocol = "sqs", Endpoint = queueArn } ); return topicArn; } Here we can note the peculiarity of the SNS operation not with the URL, but with the so-called Amazon Resource Names (ARN). That is, in order to sign a queue to listen to messages from the SNS, we need its ARN, and not the URL. Therefore, using the URL of the previously created queue, we get the corresponding ARN.
The method returns the ARN of the created Topic.
Coding
All job processing for video files (Job) are performed within a specific Pipeline. Tasks from this pipeline are taken to run Amazon Elastic Transcoder and can be parallelized.
We declare a method to create a Pipeline.
private const string PipelineName = "PIPELINE_NAME"; private Pipeline CreatePipeline(Role iamRole, string topicArn) { foreach (var pipeline in _elasticTranscoder.ListPipelines().Pipelines) { if (pipeline.Name == PipelineName) { return pipeline; } } var pipelineResponse = _elasticTranscoder.CreatePipeline( new CreatePipelineRequest { Name = PipelineName, InputBucket = BucketName, Role = iamRole.Arn, Notifications = new Notifications { Completed = topicArn, Error = topicArn, Progressing = topicArn, Warning = topicArn }, ContentConfig = new PipelineOutputConfig { Bucket = BucketName, Permissions = { new Permission { GranteeType = "Group", Grantee = "AllUsers", Access = {"Read"} } } }, ThumbnailConfig = new PipelineOutputConfig { Bucket = BucketName } } ); return pipelineResponse.Pipeline; } As elsewhere, we create a pipeline only if it has not been previously created. As input parameters, you must specify the basket with which the Elastic Transcoder will work, that is, where to get input data (InputBucket), IAM role (Role), name of pipeline (Name), ARN of the corresponding Topic (Notifications) and access rights to output files in the basket (Permissions).
The method returns an object of the Pipeline type, which we will use to create new tasks for processing video files. Therefore, we add initialization of the corresponding field to the ElasticTranscoderClient constructor:
private readonly Pipeline _pipeline; public ElasticTranscoderClient() { ... _pipeline = CreatePipeline(iamRole, topicArn); } And finally, the last thing we need to write is a task creation method (Job) for video processing.
private void CreateJob(string inputFile, string outputFile) { var inputKey = Path.GetFileName(inputFile); var outputKey = Path.GetFileName(outputFile); _elasticTranscoder.CreateJob( new CreateJobRequest { PipelineId = _pipeline.Id, Input = new JobInput { AspectRatio = "auto", Container = "auto", FrameRate = "auto", Interlaced = "auto", Resolution = "auto", Key = inputKey }, Outputs = { new CreateJobOutput { ThumbnailPattern = "", Rotate = "0", PresetId = PresetId, Key = outputKey } } }); } As in the case of Windows Azure, we assume that the video files for processing are in the root of our bucket, so the key to access the file is the file name.
We leave the input parameters of the video file as source (auto), and as the output format we set the ID of the desired preset for 480p encoding. A list of all the presets can be obtained here , either by going to the Management Console -> Services -> App Services -> Elastic Transcoder -> Presets.
Now we implement the methods described in the IVideoConverter interface: WaitForConversionToComplete, UploadFile, DownloadFile, Convert.
Implementation of UploadFile and DownloadFile is quite simple. We need to use the client to work with S3 to upload / download video files to / from the storage.
public void UploadFile(string localFile) { _s3Client.PutObject( new PutObjectRequest { FilePath = localFile, BucketName = BucketName } ); } public void DownloadFile(string localFile) { var objectKey = Path.GetFileName(localFile); var response = _s3Client.GetObject( new GetObjectRequest { Key = objectKey, BucketName = BucketName, } ); response.WriteResponseStreamToFile(localFile); } Next, we implement the WaitForConversionToComplete method. Here it is necessary to stay in more detail. The fact is that Amazon Elastic Transcoder can only work in asynchronous mode, unlike Windows Azure Media Services. That is, we do not have a message handler to which we could subscribe in anticipation of the message that the processing is complete.
Since the status messages of the Elastic Transcoder are sent using SNS, passing them to the SQS, we need to implement the method so that it listens to the queue for the presence of messages in it.
public void WaitForConversionToComplete() { while (true) { var message = _sqsClient.ReceiveMessage( new ReceiveMessageRequest { QueueUrl = _queueUrl, MaxNumberOfMessages = 1, WaitTimeSeconds = 20 } ).Messages.FirstOrDefault(); if (message != null) { var jsonSerializer = new DataContractJsonSerializer(typeof(TranscodingNotificationEvent)); var sqsEvent = (TranscodingNotificationEvent) jsonSerializer.ReadObject( new MemoryStream( Encoding.Unicode.GetBytes( message.Body .Replace("\n", "") .Replace("\\n", "") .Replace("\\", "") .Replace("\"{", "{") .Replace("}\"", "}")) ) ); _sqsClient.DeleteMessage( new DeleteMessageRequest { QueueUrl = _queueUrl, ReceiptHandle = message.ReceiptHandle }); if (string.Compare(sqsEvent.Message.State, "COMPLETED", true, CultureInfo.InvariantCulture) == 0) break; } Thread.Sleep(2000); } } Let's look at this piece of code in more detail. Using the SQS client, we receive a message from the queue. The maximum possible message waiting time is 20 seconds, after which the SQS client will return control.
Amazon Elastic Transcoder sends 4 types of messages reflecting the processing status: Progressing, Completed, Warning and Error. We need to wait for the message type Completed. All other messages are deleted from the queue.
All messages from SNS or SQS come in JSON format. Since the Amazon SDK for .NET does not have ready classes for parsing JSON objects into .NET objects, we need to parse the received message on our own. To do this, you can use the service json2charp .
However, when I tried parsing the finished message from SQS, here I came across another problem. The JSON object that comes from Amazon contains characters that must be removed for normal transformation to a .NET object. As a result, the construction of receiving messages began to contain calls to the Replace method for typing such characters. Pay attention to this in the code!
Well, actually, all we have to do is implement the classes of the corresponding objects.
[DataContract] public class TranscodingNotificationEvent { [DataMember] public string Type { get; set; } [DataMember] public string MessageId { get; set; } [DataMember] public string TopicArn { get; set; } [DataMember] public string Subject { get; set; } [DataMember] public TranscodingMessage Message { get; set; } [DataMember] public string Timestamp { get; set; } [DataMember] public string SignatureVersion { get; set; } [DataMember] public string Signature { get; set; } [DataMember] public string SigningCertUrl { get; set; } [DataMember] public string UnsubscribeUrl { get; set; } } [DataContract] public class TranscodingMessage { [DataMember(Name = "state")] public string State { get; set; } [DataMember(Name = "version")] public string Version { get; set; } [DataMember(Name = "jobId")] public string JobId { get; set; } [DataMember(Name = "pipelineId")] public string PipelineId { get; set; } [DataMember(Name = "input")] public TranscodingInput Input { get; set; } [DataMember(Name = "outputs")] public List<TranscodingOutput> Outputs { get; set; } } [DataContract] public class TranscodingInput { [DataMember(Name = "key")] public string Key { get; set; } [DataMember(Name = "frameRate")] public string FrameRate { get; set; } [DataMember(Name = "resolution")] public string Resolution { get; set; } [DataMember(Name = "aspectRatio")] public string AspectRatio { get; set; } [DataMember(Name = "interlaced")] public string Interlaced { get; set; } [DataMember(Name = "container")] public string Container { get; set; } } [DataContract] public class TranscodingOutput { [DataMember(Name = "id")] public string Id { get; set; } [DataMember(Name = "presetId")] public string PresetId { get; set; } [DataMember(Name = "key")] public string Key { get; set; } [DataMember(Name = "thumbnailPattern")] public string ThumbnailPattern { get; set; } [DataMember(Name = "rotate")] public string Rotate { get; set; } [DataMember(Name = "status")] public string Status { get; set; } } Thus, the only method that remains unrealized is Convert. This method will essentially simply call previously implemented methods in the appropriate order. Its implementation:
public void Convert(string sourceFile, string destinationFile) { Console.WriteLine("Uploading the source file..."); UploadFile(sourceFile); Console.WriteLine("Creating processing job..."); CreateJob(sourceFile, destinationFile); Console.WriteLine("Waiting for conversion results..."); WaitForConversionToComplete(); Console.WriteLine("Downloading converted file..."); DownloadFile(destinationFile); } As we can see, everything is quite simple:
- Uploaded file;
- Created a coding task;
- Waited for the results of coding;
- Download the file.
As a result, calling the Convert method is allowed in the console application, we get the following result:
And of course we compare the received files.
This is where the client implementation for working with Amazon Elastic Transcoder is complete. The next time we have the most interesting, namely - to compare the two providers. Do not switch!
Continued ...
Source: https://habr.com/ru/post/209012/
All Articles