Chef for beginners
 On the topic of centralized configuration management systems, many articles have been written on Habré and, in particular, there are several good articles about Chef. However, the number of releases of Chef is growing, and I decided to refresh its description for Habr's readers a little. The article is intended both for beginners and for those who have already become acquainted with the system, but for some reason postponed the study and still want to continue. And it is worth continuing! Because, Chef is useful for administering multiple VPS, and for managing a large fleet of servers. Especially if you often have to configure servers from scratch, connect additional nodes to the cluster, etc.
Theory
Without theoretical foundations anywhere. First of all, Chef, like Puppet, was originally written in Ruby, and it will be a plus if you already own this language. If not, then it is worth studying at least the basics. You can start with the article “Just Enough Ruby for Chef” . It really will be quite enough to understand the basics of the language.
In the official wiki, you can find all the necessary information to start studying Chef (the documentation focuses on the description of the company's paid products - Enterprise Chef and Hosted Chef, I will talk about Open Source Chef).
First of all, you should look at an overview of the architecture and understand the basic concepts. I will try to describe them briefly.
Infrastructure
- Nodes are any, your server, physical or virtual, that you will configure using Chef.
- The Server (Chef-server) - the Chef-server itself is directly accessed by clients (Nodes), the server consists of several components:
- Web-UI - an application on RoR representing the web interface for the server;
- Erchef - the server core, since Chef 11.x is written, Erlang, fully compatible with the previous version in Ruby;
- Bookshelf - storage for “cookbooks”;
- Nginx - comes bundled, all API requests pass through it;
- PostgreSQL - also included in the Chef-server, obviously acts as a repository of information.
- Workstations (workstation) - Chef administrator workstation, i.e. your PC on which you will prepare recipes, cookbooks and manage the entire kitchen with the help of knife.
- Knife - which chef without a knife? Knife is the main tool for working with Chef from the console. It is with the help of the “knife” that you will manage the nodes and the Chef server.
Recipe preparation
- To confidently start cooking recipes, you must clearly understand all the terms and definitions:
- A cookbook (cookbook) is a repository of attributes, recipes, templates, and files.
- Attribute (attributes) - some configuration parameters that you can set for the nodes both through the recipes and through the roles, I recommend to get acquainted with the order of applying the attributes here .
- Templates (configs templates) - you can distribute configurations like regular files with parameterized erb templates. The values of the template parameters in a certain order are substituted from the attributes of cookbooks or from roles.
- Files - any files that you can distribute using recipes after describing their destination and rights.
- Definitions (definitions) - are used to describe new or existing resources (eg service, or apache virtual host) and / or actions on them.
- Libraries (libraries) - nothing more than the insertion of code in Ruby, as extensions for recipes.
- Resources - a resource is any object in the system - a file, a user, a group, a service, etc.
If the theory is more or less clear, then you can begin to practice.
Practice
Install Chef Server
On the site Get Chef choose the current version of Chef Server for your distribution.
I will install the server on CentOS 6.5, and I will configure the administrator’s workstation using the example of Ubuntu 12.04:
The server must have a “fully qualified domain name” (FQDN):
those. in / etc / hostname should be a record like: chef.example.ru
We make installation from the user with the rights of root.
rpm -Uvh https://opscode-omnibus-packages.s3.amazonaws.com/el/6/x86_64/chef-server-11.0.10-1.el6.x86_64.rpm chef-server-ctl reconfigure This command will set all the necessary components to operate the Chef server (Erchef, RabbitMQ, nginx, PostgreSQL)After everything is set up, you can go to the Chef Server web interface page.
In the right column you will see the default username and password: admin: p @ ssw0rd1.
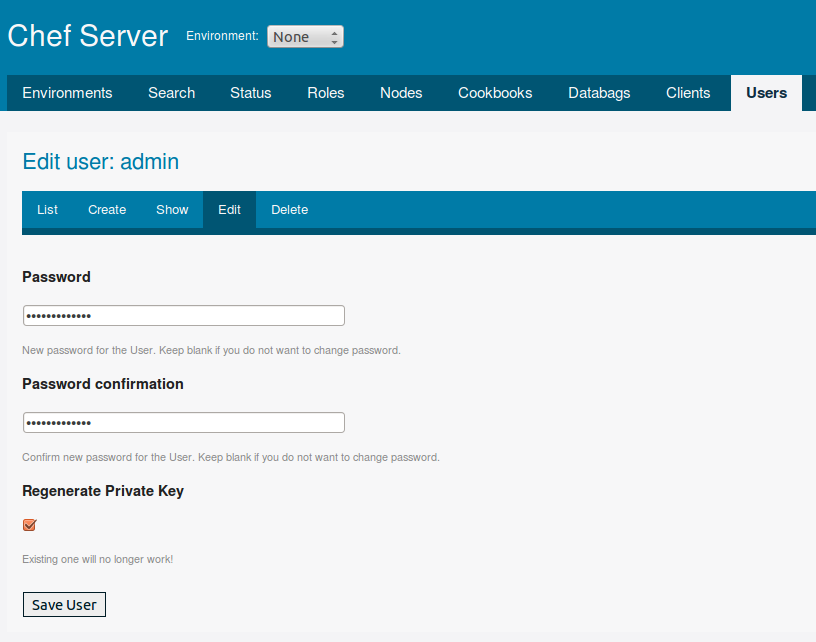
We change the password in the “Users” tab, also we will regenerate the private key (the key must be saved to ourselves and then not saved to the default server):
Next, go to the “Clients” tab, here you need to rewrite the key for the chef-validator (it is also necessary to save it to yourself and to the server, it will be needed later)
')
Installing Chef Client (Knife) on the administrator's workstation
Installation can be done in one command:
curl -L https://www.opscode.com/chef/install.sh | sudo bash Either download the deb or rpm package and install it manually.To work with “cookbooks,” we need a git console client:
apt-get install git You also need to have Ruby versions => 1.9.1. For Ubuntu 12.04 put like this: apt-get install ruby1.9.1 Clone your Chef repository markup into your home directory: git clone git://github.com/opscode/chef-repo.git To be able to manage nodes by roles, etc., with the help of knife from your desk, you need two keys:- chef-validator.pem server's private chef key (used by clients to authorize API requests to the server)
- user.pem is your private key for authorization on the server.
~/chef-repo/.chef/Setting up knife is done with the command:
knife configure -i here, you will need to specify the path to private keys, as well as the path to the directory with kukbukami. The knife configuration file will also be located in the ~ / chef-repo / .chef / directory and will look something like this: cat /home/it/chef-repo/.chef/knife.rb log_level :info log_location STDOUT node_name 'it' client_key '/root/Chef/chef-repo/.chef/it.pem' validation_client_name 'chef-validator' validation_key '/home/it/chef-repo/.chef/chef-validator.pem' chef_server_url 'https://chef.example.ru:443' syntax_check_cache_path '/home/it/chef-repo/.chef/syntax_check_cache' cookbook_path [ '/home/it/chef-repo/cookbooks', '/home/it/chef-repo/example' ] # knife[:editor] = 'vim' # knife Check the performance of the knife: knife client list All commands must be executed from the directory or subdirectory of your local Chef repository.Connect the first server using knife
To do this, use the knife bootstrap command, which installs a chef client, creates a new user on the server, and generates keys:
knife bootstrap test.example.ru In the general case, connecting to the host via ssh as root takes place, but if root access is restricted, then you need to specify a user with admin (sudo) rights: knife bootstrap test.example.ru --sudo -x admin -P Password Check that the server is in the list of nodes: knife node list test.example.ru Let's apply the first cookbook
So, we have the first node connected. Now we can install software on it and change its configuration using Chef. But first we need to write our first cookbook, or take it ready from the Opscode repo on github. The second option to start will be enough.
Go to the directory where we must lay Kukbuk
cd ~/chef-repo/cookbooks and we will incline here the first cookbook, for example, for chef-client: git clone https://github.com/opscode-cookbooks/chef-client.git If we look at metadata.rb, we will see a list of dependencies for this cookbook: suggests 'bluepill' suggests 'daemontools' suggests 'runit' depends 'cron', '>= 1.2.0' depends 'logrotate', '>= 1.2.0' they too will have to be cloned themselves, and then to the server.To apply recipes from this cookbook, you must first download its server along with all dependencies:
knife cookbook upload bluepill daemontools runit cron logrotate chef-client Now we can add the chef-client recipe for our test node and change the client's request to the server: knife node edit test.example.ru The node configuration is presented in json-format. Let's write the node circulation period to the server and add the chef-client recipe to the run list: { "name": "test.example.ru", "chef_environment": "_default", "normal": { "chef_client": { "interval": "300" }, "tags": [ ] }, "run_list": [ "recipe[chef-client]" ] } Let's write your first kukbuk
Let's make your own kukbook for test recipes:
knife cookbook create test Add a directive to the “default” recipe to install a list of packages that we will distribute to all of our servers: vim ~/chef-repo/cookbooks/test/recipes/default.rb %w{ntp mc htop iotop iftop atop vim-common wget curl rkhunter git awstats postfix}.each do |packages| package packages do action :install end end It remains only to upload the kookbook to the server and register it in the run-list (list of executable recipes) of the node, but it is better to make a role and include this recipe there. But bad luck, we still need the epel repository, at least. You can put the config file in the cookbook and add the copy of the config file to yum.repos.d in the recipe, or use the yum cookbook from opscode: git clone https://github.com/opscode-cookbooks/yum.git Also, let's download the yum-epel Kukbook (for some reason, in the last release we decided to highlight recipes with main turnips into separate Kukbooks): git clone https://github.com/opscode-cookbooks/yum-epel.git Upload books to the server: knife cookbook upload yum yum-epel Now we can include the yum-epel recipe in our test recipe: vim ~/chef-repo/cookbooks/test/recipes/default.rb include_recipe “yum-epel” %w{ntp mc htop iotop iftop atop vim nano wget curl rkhunter git awstats postfix}.each do |packages| package packages do action :install end end We can also register package exclusions for epel-repo in the attributes of our cookbook: vim ~/chef-repo/cookbooks/test/attributes/default.rb default['yum']['epel']['exclude'] = “test*” Upload the kookbook to the server and apply the recipe on the node: knife cookbook upload test knife node edit test.example.ru { "name": "test.example.ru", "chef_environment": "_default", "normal": { "chef_client": { "interval": "300" }, "tags": [ ] }, "run_list": [ "recipe[chef-client]", “recipe[test]” ] } knife ssh name:test.example.ru "chef-client" -P r00tPassworD So, you got the first experience of using Chef. Now, I think it became clear that everything is not so difficult as it seemed. The main thing is not to dwell on this. Read some more articles, try applying recipes from the Opscode repository. Write a couple of your recipes, apply them. Translate the description of your server infrastructure into the Chef language. Let it take you a few days or nights, for then the speed of server deployment will be much higher, and the number of annoying errors will be less. And remember, the best way to learn Chef is to start using it.
Useful articles:
Official Chef Wiki
Collection of "cookbooks" from Opscode
Arrays and Chef Attributes
Chef 11 In-Depth: Attributes Changes
Breaking Changes in Chef 11
First experience as a chef, or configuration management
Chef or how to manage thousands of servers
Portion of servers please, or how to start Depot with Opscode Chef
A whole site for beginners: Getting started with Chef
A series of articles from Alexey Vasiliev (unfortunately only in English): Getting Started with Chef Solo
Source: https://habr.com/ru/post/208858/
All Articles