Packet crafting as it is

Packetting or packet crafting is a technique that allows network engineers or pentesters to explore networks, check firewall rules and find vulnerabilities.
This is usually done manually by sending packets to various devices on the network.
The target could be a firewall, intrusion detection system (IDS), routers, and any other network members.
Creating packages manually does not mean that you need to write code in any high-level programming language, you can use a ready-made tool, for example, Scapy.
Scapy is one of the best, if not the best, tool for creating packages manually.
The utility is written using the Python language, the author is Philippe Biondi.
The utility of the utility is almost endless - it’s building packages, then sending them to the network, capturing packages, reading them from a previously saved dump, and exploring the network, and much more.
All this can be done both online and by creating scripts.
With Scapy, you can scan, trace, research, attack, and discover hosts on a network.
Scapy provides an environment or even a framework similar to Wireshark, only without a nice graphical shell.
The utility is developed for UNIX-like operating systems, but nevertheless, some manage to run it in the Windows environment.
This utility can also interact with other programs: for visual decoding of packets, you can connect the same Wireshark, for drawing graphs - GnuPlot and Vpython.
To work, you need superuser rights (root, UID 0), since this is a fairly low-level utility and works directly with the network card.
And what is important, to work with this utility will not require deep knowledge of programming in Python.
Getting started
Official site of the project - www.secdev.org/projects/scapy
The installation can be done in various ways, for example apt-get install python-scapy , in the case of Debian-based distributions.
You can also just download the latest version from the developers site:
# cd /tmp
# wget scapy.net
# unzip scapy-latest.zip
# cd scapy-2.*
# sudo python setup.py install
After that, the launch takes place directly with the scapy command.
The screen will display something like this:
')

We see a standard prompt for input, all actions will be performed online.
The output is a combination of Ctrl + D , or by typing the function exit () .
We study the tool
In fact, Scapy is very different from the usual utilities. It works in text mode, but any interaction is carried out not through the usual keys and command line parameters, but through the Python interpreter.
Such an approach may initially seem somewhat inconvenient and unusual, but with time and with practice comes the understanding that this was the right decision and that it is really convenient.
First, we will look at the supported protocols, for this we call the ls () function.
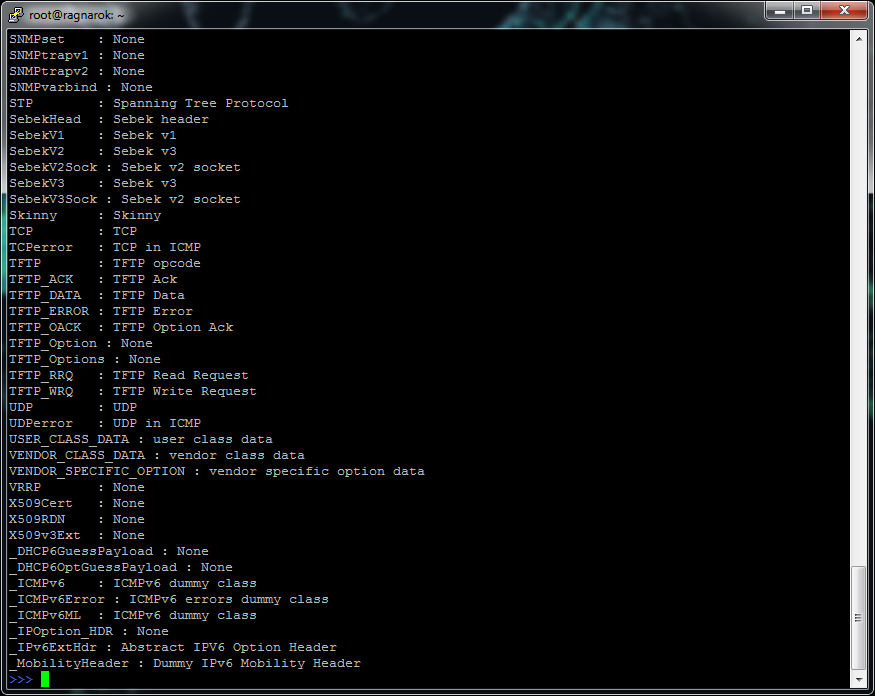
More than 300 various protocols with which it is possible to work, including application like HTTP, transport TCP and UDP, network layer IPv4 and IPv6 and data link layer Ether (Ethernet), will fall out.
It is important to pay attention to the register: most protocols are written in Scapy with capital letters.
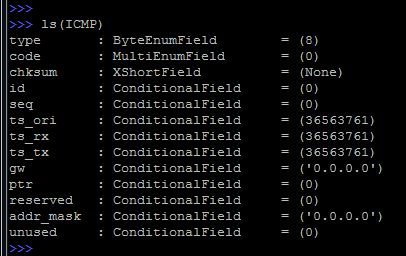
In order to examine in detail the fields of a specific protocol, you can call the ls () function with the protocol specified: ls (TCP)
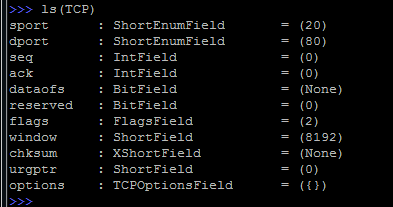
As a result, all fields that can be modified in the process of creating packages will be displayed. The parentheses show the values that are used by default, you can see that the port of the sender is 20 (this is ftp-data) and the port of the receiver is 80 (this is naturally HTTP), the SYN flag is also set (flags = 2).
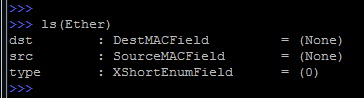
For example, if we consider the data link layer (Ethernet), then there will be fewer opportunities:
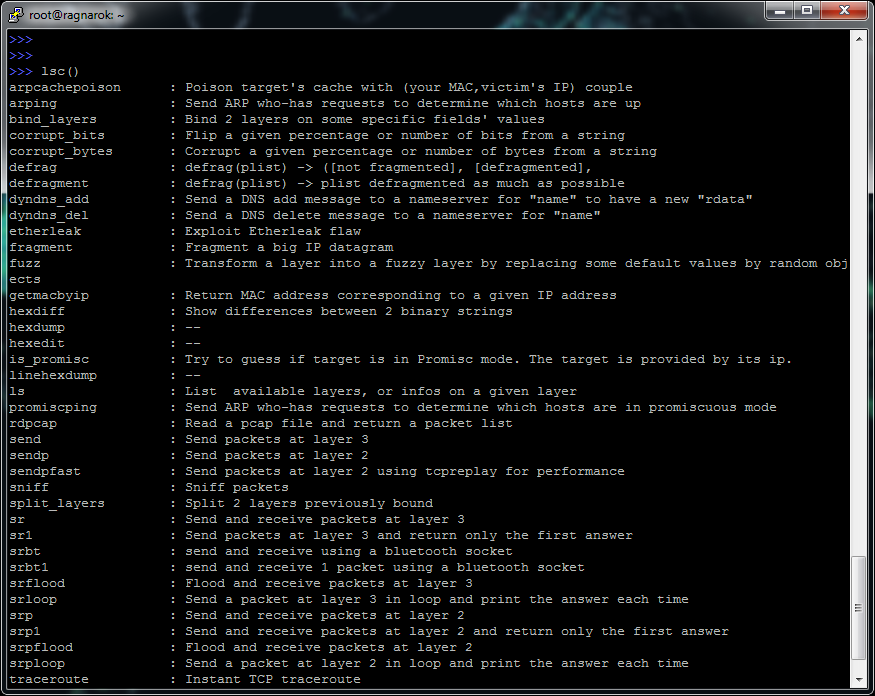
In addition to the ls () function, there is a useful lsc () function that will output almost all the main Scapy functionality:
In order to get more detailed information about each function, you can use help ( function_name ) , for example:
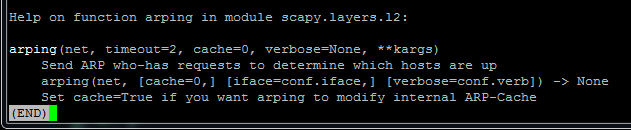
We see something similar to the MAN page in Unix systems.
To exit, you can use again the usual Q key in Linux.
We looked at the protocols and functions, now you can get down to business - to the creation of packages.
Kraftim
You can create high-level packets at once (network and application), and Scapy will automatically add to the lower levels, or you can manually assemble them starting from the data link layer.
Levels of the OSI model are separated by a forward slash (/).
You need to pay attention to the fact that Scapy reads the package from the lower level on the left, to the higher one on the right. At first, this may be a bit confusing, but after a little practice, everything will become quite familiar.
By the way, in the terminology of Scapy, a network packet is divided into layers, and each layer is represented as an instance of an object.
The assembled package in a simplified form may look like:
Ether()/IP()/TCP()/”App Data”In most cases, only the L3 level is used, giving Scapy the ability to independently fill the channel level, based on information from the OS.
Changing the values of the fields of each protocol, we change the standard values (they are output by the ls () function).
Now create some simple package.

It's very simple: we specified the destination address, port, and in general, the load in the form of the word "TEST".
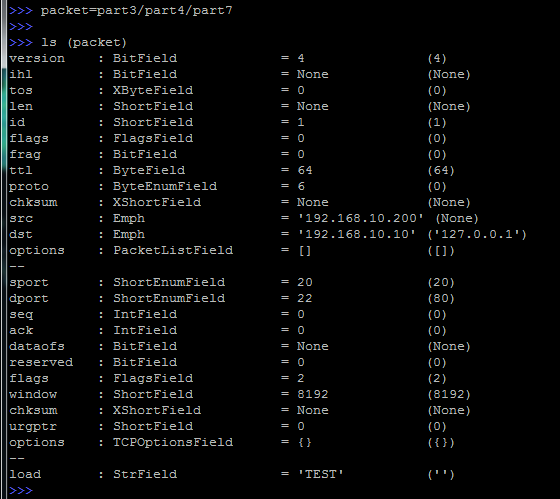
The package itself was simply called a packet , we will see in great detail and deployed our newly created package:
And now, having performed the familiar ls (packet) function:

The levels in it are separated by the characters "-".
Instead of creating a package at once, you can create it in parts:

In this example, we created variables for each level of the OSI model.
Letters and numbers can be used as variable names, while not forgetting the case.
And now we collect everything in one package:
It is seen that the result will be similar.
Dive into the packages
We have already looked at the output of the ls () function, but such detailed information about the package is not always needed.
Simply enter the name of the variable and immediately see a brief summary:

You can also use the summary () method:

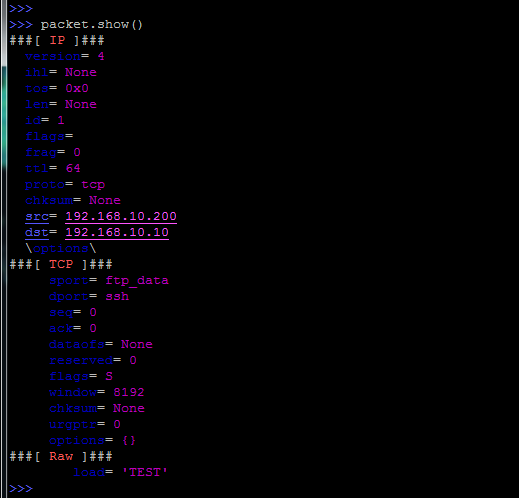
If you need a little more information, then there is a show () method:
In addition, you can view any field by simply specifying it:
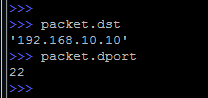
Of course, this only works if such fields are unique within the package.
If, for example, we take the flags field, which is present in both TCP and IP, then we need to specify what we want to see. Otherwise, Scapy will display the value of the first field found (IP flags in our example).
Concretization occurs by specifying the protocol in square brackets:
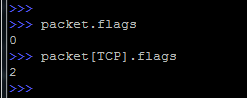
By the way, by default, the set flags are displayed in digital format.
If all control bits are included (set to 1), then we get a value of 255. In our case, the value 2 indicates that the SYN bit is set.
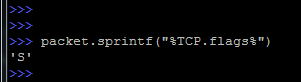
But it is possible to display control bits in a symbolic display:
As already mentioned, at any time you can simply change the value of any field:

And if the field is not unique, then you need to specify the protocol:

The second way is to use the payload construction, which allows you to jump over one level (via L3 in our case):

Here we first look at the output of the layers above L3, then look at the value of the TCP flags and set a new value for them.
By the way, you can even call payload several times, while climbing higher and higher:

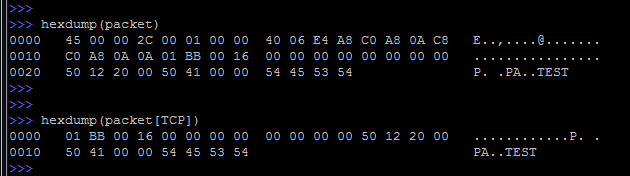
You can also look at the contents of the package in hexadecimal, for this there is a function hexdump () :
We deal with addressing
Scapy also shows great flexibility in specifying the recipient's address.
A lot of options - here the usual decimal form, and the domain name and CIDR notation:
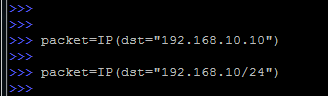
In the latter case, the packet will be sent to each address in the subnet.
A set of addresses can be set just by separating them with a comma, without forgetting the square brackets:

At this stage, the thought may arise: “What if you need to specify multiple ports?”.
And here Scapy provides ample opportunities, you can specify both a range and just list a lot:
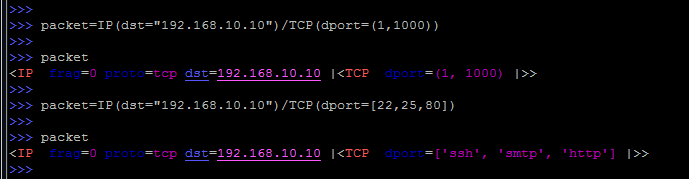
I draw attention to the difference in brackets, in the case of a range they are round, and in the case of a set - square.
And completing the conversation about specifying goals, consider the situation when you need to send multiple packets to multiple ports.
In order to see which packages will be sent will have to use the for loop, do not forget that our programming language is Python.
In fact, nothing complicated, everything is very logical:

First, we are already familiar with the creation of a package in which we specify the subnet and range of ports.
Then, using a loop, we create a list where each element of the package structure is assigned to the variable “ a ”. In Python, there are no arrays in the usual sense. Instead, lists are used to store objects.
We use the for loop to “unpack” the entire structure and display it in such a visual form.
We send packages in a way
With the same scope and breadth, and sending packets:
- send () function - sends packets using the network (L3) level, without processing the responses in any way. The principle is used - sent and forgotten;
- sendp () function - sends packets using the channel (L2) layer, the specified parameters and Ethernet frame headers are taken into account. The answers are still not expected and not processed;
- the sr () function is similar to send (), the exception being that it is already waiting for response packets;
- srp () function - sends and receives packets, L2 level
- sr1 () function - sends the packet of the third level and takes only the first answer, many answers are not provided;
- The srp1 () function is similar to sr1 (), only the channel level is already.
Each of these functions can be called without any additional parameters, simply by specifying the name of the variable containing the package.

But at the same time there are many additional options that can sometimes be useful.
For example, timeout - indicates how long (in seconds) you need to wait before receiving a reply packet, retry — how many times you need to resend the packet if no response was received and one of the most useful options is filter , whose syntax is very similar to tcpdump.
As a visual example, send a packet to the network:

Here we use the function that, after sending, waits for a response, set a timeout of 0.1 seconds and filter the responses that fall under the specified rule.
How to deal with response packets?
You can take and assign a variable, which will contain the answer:
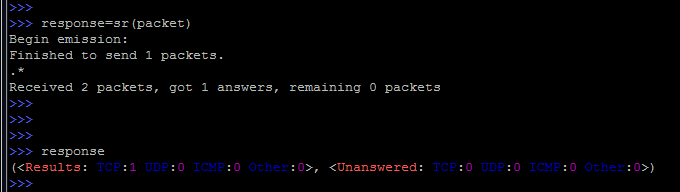
And to look already in a usual way, simply causing a response variable.
It can be seen that the answer is preserved in two versions - Results and Unanswered, results and no answer, respectively.
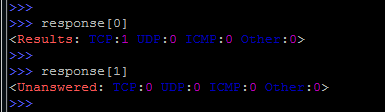
By specifying the offset, only the necessary part of the response can be output:
Or detailed information:

If the packet was sent to the network without specifying a variable (for example, simply by the sr () function), then by default the packet will be listed as the variable "_" (underscore).
To get these packages from there, you can use the construction:

At the same time, different results will be saved in two different variables ( res and unans ).
More detailed output is achieved again by specifying the offset:

We catch return packets
Now consider the situation if there are a lot of packets in response.

What we saw was, in fact, the most port scanning.
Open ports will be with SA (SYN / ACK) flags, for example:

We look exactly at the package by number, the account traditionally starts from scratch.
You can go ahead and unpack this result:

Here we retrieved the sent packet (at number 21) and the response to it from the result.
But this is only one package, but what if you need to process all the packages?
In this case, you will have to re-access the for loop:

We take and break each element of the res list into parts a and b . Then we cut off part “a” , filling it all into the “allsent” list.
Similarly, create a list allrec , just leave another part.
All this, of course, is good, but I would like to get a list of open and closed ports in a more convenient way.
Once again, we look at the list of res , and more precisely at the res [0] element, which consists of two parts: the packet that we sent res [0] [0], and the answer, which was received by res [0] [1].
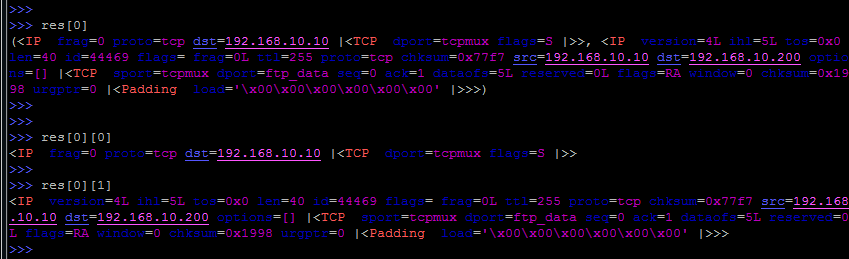
In response, you can find three parts - the IP header (res [0] [1] [0]), the TCP header (res [0] [1] [1]) and the data itself (res [0] [1] [2 ]).
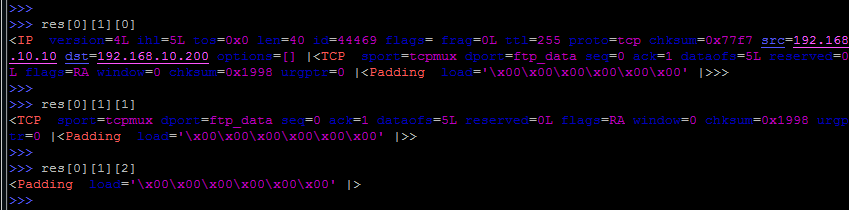
We use the for loop to extract each element res [N] into the variable "a" .

Now the variable "a" contains the result for each package. In other words, "a" is ans [N].
It only remains for us to check the values of a [1] [1], which will mean res [N] [1] [1] in the TCP header.
To be even more precise, a value of 18 is required, which means the SYN-ACK flags are set.

In cases where this condition works, we will also deduce the port of the sender from the TCP header:

As a result, we get the result in the form of a list of open ports.
All of the above constructions are recruited at once, it is also important to pay attention to the indents (usually 4 spaces).
We just manually wrote a simple port scanner, no more and no less.
Listing 1 Port scanner
>>> packet = IP (dst = "192.168.10.10") / TCP (dport = (1,100), flags = "S"))
>>> res, unans = sr (packet, timeout = 10)
>>> for a in res:
... if a [1] [1] .flags == 18:
... print a [1] .sport
Sniffer and vice versa
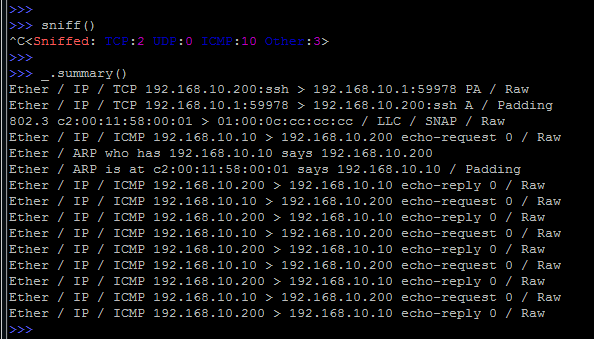
Scapy also includes a small sniffer, for which the sniff () function is responsible.
Naturally, you can use filters with it (similar to tcpdump filters), the filter parameter is responsible for this, you can also limit the number of packets using the count parameter.
As always, the call help (sniff) will display quite detailed information on this function.
We should not forget that this is a greatly simplified sniffer, and one should not expect a good speed from it.
The standard combination of Ctrl + C interrupts the process of capturing traffic and displays the result.
Like any undefined variable, the result will fall into "_" .
Having executed the summary () method, you can see the statistics on captured packets:
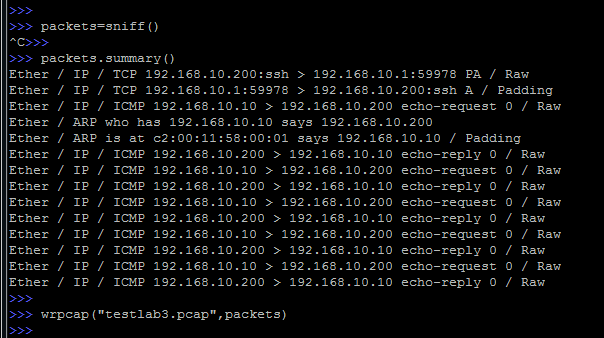
Instead of capturing traffic from the network, you can read it from a previously saved dump (pcap file).

In addition, you can, and vice versa, write captured packets to a file using the wrpcap () function:
And completing the sniffing theme, you can call Wireshark directly from the Scapy interface, for this you can use the wireshark () function of the same name.
Details about Wireshark can be in my previous article at http://linkmeup.ru/blog/115.html .
Automation
Everything that we considered happened directly online.
But, naturally, many things can be automated by writing scripts.
To do this, at the beginning of the script you will need to specify:
#!/usr/bin/pythonFamiliar for Linux users, shebang. (http://en.wikipedia.org/wiki/Shebang_(Unix))
from scapy.all import *Import all Scapy functionality.
After that, you can write the necessary functions.
It is important to indent when writing loops in scripts, otherwise error messages will appear and the script will not work.
We will also consider connecting additional modules to Scapy using the example of OSPF.
Initially, Scapy does not know how to work with the OSPF protocol.
If you execute load_contrib ('ospf') , then there will be an error message: "ERROR: No module named contrib.ospf" .
First, download the module, you can take it here .
Then you need to create a contrib directory:
# mkdir /usr/lib/python2.7/dist-packages/scapy/contribAnd move the module to the newly created directory:
# cp ospf.py /usr/lib/python2.7/dist-packages/scapy/contrib/Now, if you go into Scapy and view the list of connected third-party modules (for this, you guessed it, the list_contrib () function answers ):
>>> list_contrib ()
ospf: OSPF status = loads
>>>
It would seem that everything is ready, but it was not there.
On another attempt to load the ospf module:
>>> load_contrib ('ospf') , we get the same error “ERROR: No module named contrib.ospf”
In order for the module to work finally, it remains to create an initialization script (empty file):
touch /usr/lib/python2.7/dist-packages/scapy/contrib/__init__.pyAfter that, you can already create packages for OSPF.
Create a three-step TCP connection
To do this, you will need to catch the SYN / ACK response, extract the TCP sequence number from it, increment the value by one and, in fact, put the resulting value in the acknowledgment number field.
Not an easy task at first glance, but Scapy can handle it too.
First, consider what we need in order for everything to be successful.
1) Send the SYN to the receiving party:
- collect IP header, do not forget about the address of the sender and recipient;
- collect a TCP header in which you will need to specify the TCP ports of the sender and destination, set TCP flags (SYN bits) and generate ISN (Initial Sequence Number).
2) Catch the return packet:
- save the answer;
- extract TCP sequence number from it and increase this value by one.
3) Create an acknowledgment (ACK) to the received response packet:
- collect an IP header containing the same sender and recipient addresses as in the case of a SYN packet;
- collect the TCP header with the same port numbers as in the SYN segment, but set the ACK flag, increase the ISN value by one and set the acknowledgment to the extracted and enlarged, in the second step, sequence number.
In order to make it even clearer, let us consider in more detail, using arbitrarily taken values.
For example, the connection went like this:
192.168.10.200 1024> 192.168.10.50 80 flags = SYN seq = 12345
192.168.10.50 80> 192.168.10.200 1024 flags = SYN, ACK seq = 9998 ack = 12346
192.168.10.200 1024> 192.168.10.50 80 flags = ACK seq = 12346 ack = 9999
What ultimately needed to be done.
1) Send the SYN to the receiving party:
- collect the IP header in which you specify 192.168.10.200 and 192.168.10.50 as the sender as the sender;
- collect TCP header with source port (source) 1024 and destination port (destination) 80. Also set the SYN flag and generate an ISN equal to 12345.
2) Catch the return packet:
- save the answer;
- extract TCP sequence number (9998) from it and increase this value by one, we get 9999.
3) Create an acknowledgment (ACK) to the received response packet:
- collect the IP header in which you specify 192.168.10.200 and 192.168.10.50 as the sender as the sender;
- collect a TCP header with the same source and destination ports (1024 and 80, respectively), set the ACK flag, increase the ISN by one (12346) and set the acknowledgment to the increased value of the caught seq number (9999).
Let's start collecting the package:
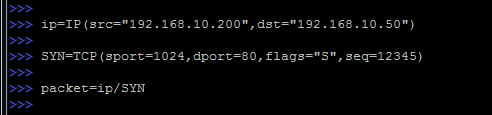
Everything should be familiar here: the package is assembled in two parts, encapsulating TCP into IP.
Now, remembering that we will need to intercept the answer, extract the sequence number from there and increment by one, we do:
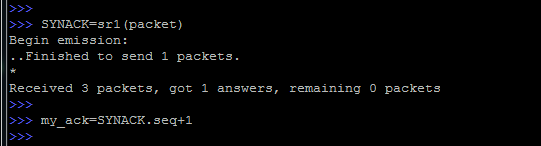
The following happens - the function sr1 sends the previously created packet to the network, and the first response received is placed in the SYNACK variable.
And then, using the SYNACK.seq construction, we retrieve the TCP sequence number, increment it by one and save it in the variable my_ack .
Moving on:
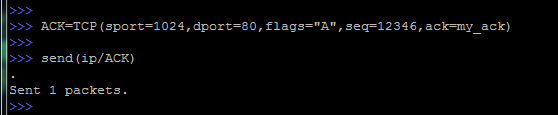
Create a new TCP header and call it ACK. It sets another flag (A - ACK) and increases the value of the sequence number.
In addition, the my_ack variable is specified as an acknowledgment.
Then the assembled packet is thrown onto the network with the send command (remember that this is an L3 command that does not even listen to what will come in response).
If everything was done correctly, then the classic TCP connection took place.
It remains only to create a TCP segment without any flags and also send it to the network.
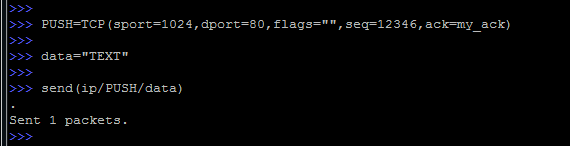
As you can see, we once again created an instance of the TCP header (this time, calling it PUSH), without flags and with all the other familiar values.
After that, we added some data using the data variable, and sent it to the network using the same send function.
And accordingly, the recipient will have to receive a confirmation of this segment.
Listing 2 TCP connection
>>> ip = IP (src = "192.168.10.200", dst = "192.168.10.50")
>>> SYN = TCP (sport = 1024, dport = 80, flags = "S", seq = 12345)
>>> packet = ip / SYN
>>> SYNACK = sr1 (packet)
>>> my_ack = SYNACK.seq + 1
>>> ACK = TCP (sport = 1024, dport = 80, flags = "A", seq = 12346, ack = my + ack)
>>> send (ip / ACK)
But there are several pitfalls.
If you look at this exchange in Wireshark, you can see that before our ACK packet left, an RST was suddenly sent:

The fact is that Scapy runs past the OS TCP / IP stack. This means that the OS is not aware that Scapy sends any packets.
Accordingly, the OS will not expect the appearance of SYN / ACK packets. And, therefore, the connection will be immediately reset.
Obviously, this is not the result that we need.
One solution to this problem will be to use the packet filter functionality, in particular iptables, which will be able to block outgoing RST packets.
For example, as follows:
# iptables -A OUTPUT -p tcp -d 192.168.10.50 -s 192.168.10.200 --dport 80 --tcp-flags RST RST -j DROPExecution of this design will lead to the fact that all outgoing packets with a destination address 192.168.10.50 and the sender address 192.168.10.200 on port 80, with the RST flag set will be discarded.
Packages will still be generated by the OS, but they just will not fly out of its limits.
As a result, nothing will stop Scapy from doing a full TCP session:

We continue research
Using Scapy, you can find hosts on the network, among the specified set of addresses:
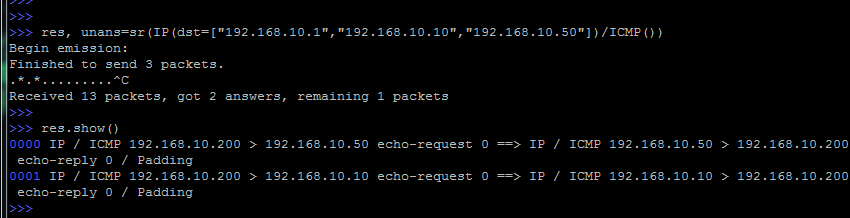
In this case, we use the ICMP protocol and use the familiar trick to divide the received responses.
By default, the 8th type for ICMP is set, this is the classic ping request.
Delving into the subject of information security, we will try to determine the OS version using Scapy and nmap.
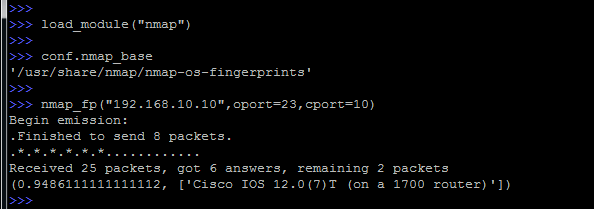
So, consider what has been done.
Initially, an external module was connected, in this case nmap.
Then we check that we have a file (nmap-os-fingerprints) with fingerprints of various operating systems.
And we run the definition of the remote operating system directly, the nmap_fp function is responsible for this .where as parameters besides the target itself, you can also specify open (oport) and closed (cport) ports.
Correctly specified ports will help greatly improve the accuracy of the OS definition.
Visualize the packages
All the time we looked at the textual output, in some places there was a pseudo-graphic, but Scapy can also display some of the results graphically.
Let's see what is offered to us.
The simplest is the method of conversations () :
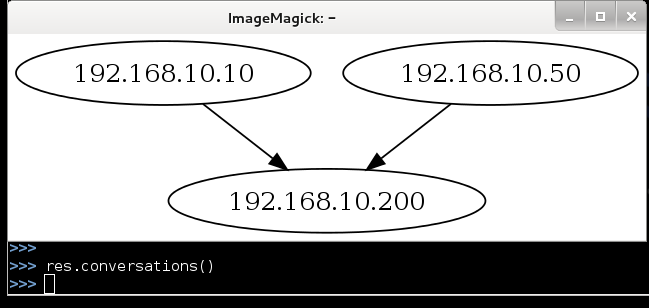
When it is executed, the ImageMagick window will start, which will show the scheme of our exchange of packages, not so hot, but quite clearly.
This method is probably best suited for visualizing traffic dumps.
The second way is to build 2D graphs, and then export them to a pdf-file.

The pdfdump () function is already responsible for this .
The results look like this:
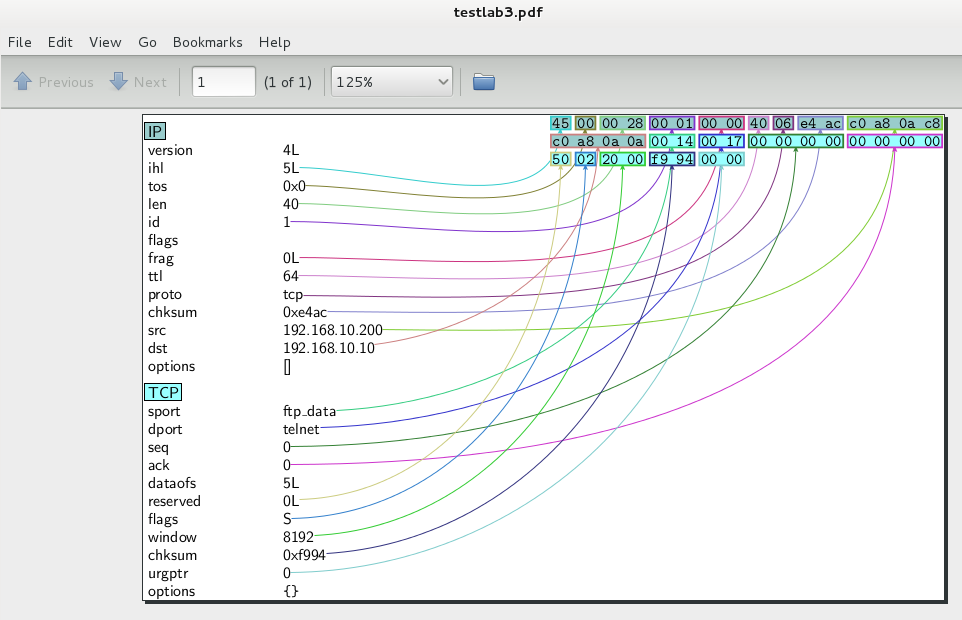
In this case, quite well.
In addition, the functiongraph () again opens the ImageMagick window, but with a detailed drawing:

Here we see the result of the trace, with a detailed display of autonomous systems and other visualization.
And, completing the topic of visualization, and with it the article, let's look at the 3D display of the track.
This will require VPython and the trace3D () command .

Here is the track from the previous graph.
But sometimes there are such options:

In this example, several targets were traced at once, using several (80, 443) tcp ports.
Left-clicking on any object will result in the appearance of an IP address above it, and left-click while holding the CTRL key will display more detailed information — ports, as in this case.
Epilogue
So, we have considered only a small part of the Scapy utility, but this is already impressive.
The possibilities that are provided are really very big.
The article is intended to arouse interest in the reader in the study of network protocols, and is not an exhaustive guide to the tool Scapy.
The author does not bear responsibility for the use of this utility for any illegal purposes.

In the process of writing this article, materials from the SANS Institute and official project documentation were used .
Source: https://habr.com/ru/post/208786/
All Articles