ROBOT based on: android, arduino, bluetooth. Start
Creating a robot, even a simple one with limited functionality, is quite an interesting and fascinating task. Recently, amateur robotics is experiencing a real boom, even those people who are very far from electronics (I belong to them) have begun to get involved in it. The time has passed when it was necessary to sit at night with a soldering iron, or poison boards. Everything has become much easier, you just need to buy an Arduino, a set of wiring, sensors, sensors, motors, and forth to build your first robot. Thus, the focus of developers - amateurs has shifted from electronics and mechanical parts to programming.
This series of articles will contain information for a quick start on creating your first robot, from purchasing the necessary parts to launching it into our world.
I note that I write articles in the course of independent study of the material and the creation of my first robot.
It is assumed that the person reading the article already has experience in:
BT - Bluetooth;
Android - device with Android OS, for example, a smartphone;
Sketch - an application for Arduino;
Arduino - Arduino Nano.
')
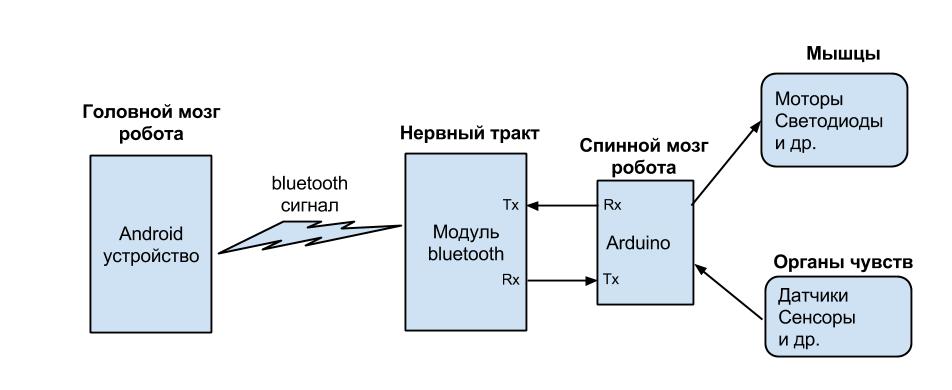
Let the robot has the following general scheme (Fig. 1). Android is the “brain” in which all data are processed and calculations are performed. Based on the results of the calculation, the commands received by the BT module and subsequently received via the serial port in the Arduino are transmitted via the BT channel. Arduino processes incoming commands and executes them with the help of "muscles" (Motors LEDs, etc.). In addition, the Arduino receives data from the "sense organs" (sensors, sensors, etc.), which it brings into a convenient form and sends it via the BT module to the "brain". And so it repeats to infinity.
Picture 1
The rationale for just such a robot scheme is as follows:
-BT module and Arduino Nano have low cost, as well as small volume and weight.
-Android, not expensive and affordable device, already has a huge number of people, including me.
-Android has its sensors, sensors and a screen for displaying information
-Easy to write code for applications for both Android and Arduino.
To simplify the task of building a robot, I suggest using the “from simple to complex” method, i.e. as in the study of the programming language, create the first program “Hello word”. Of course, this will not be one program, but at least two (for arduino and android). In each subsequent article, the functionality of the robot will increase.
Assemble a simple device that has:
-2 buttons (b1, b2).
-1 LED (Led).
And the functional is executed:
- the main activity contains 2 buttons “Unpair 0” and “Send 1”, when clicked, data is transmitted from the Android to the Arduino via the BT channel, corresponding to “0” and “1”, the Arduino processes them and lights or extinguishes the LED.
-data about pressing or releasing buttons from arduino is transferred to android, information about this is displayed on the main activity screen.
1) Android device - LG P500 smartphone (version Android 2.3.3), or any other device based on Android version 2.3.3 and higher. I do not indicate the price, because I did not buy it separately, but I use my smartphone.
2) Arduino NanoV3.0 ( dx.com/en/p/nano-v3-0-avr-atmega328-p-20au-module-board-usb-cable-for-arduino-118037 ) - $ 11.32
3) Bluetooth Module ( dx.com/ru/p/bluetooth-board-module-4-pin-121326 ) - $ 10.57
4) Dummy wires ( dx.com/ru/p/30cm-breadboard-wires-for-electronic-diy-40-cable-pack-80207 ) - $ 2.51
5) Buttons - 2 pcs., LED - 1 pc. - 50 rubles
Total: 855.20 rubles.
Let's collect from the available details the scheme (fig. 2)
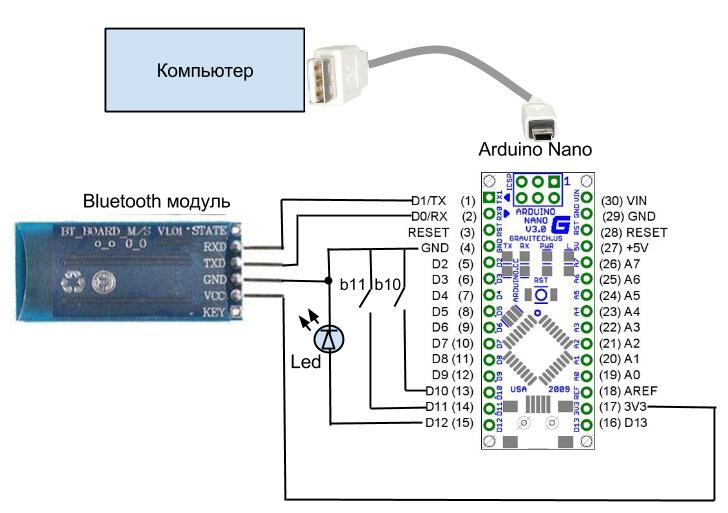
Figure 2
Power is supplied to the arduino via a USB cable that connects to the computer, and the software (sketch) running on it is also loaded via it. It should be noted that you can load the sketch into the arduino only when the power is disconnected from the Bluetooth module (Pin (17) 3V3), otherwise an error occurs.
Details of the installation of the Arduino development environment and drivers can be found on the official website: arduino.ru/Guide/Windows
Below is the sketch that needs to be loaded into arduino:
We declare variables, in front of each is a comment.
We initiate a serial connection and set the data transfer rate in bits per second (baud). My BT module is running at 38400 speed, but it can be 9600 speed (the speed of the BT module can be set using AT commands). Set the operation mode of the specified input / output (pin) as an input or as an output. We give HIGH value to the inputs and outputs.
The void contact_bounce (int buttton) function handles button presses and allows you to eliminate contact bounce, which occurs when contacts or a divergence of contacts in mechanical switching devices, such as a button, occurs multiple closure and opening.
In the main Loop loop, we listen to the serial port, and if we receive data on it, we process them. In addition, we call the function of processing the pressing of buttons and eliminating the chattering of contacts.
Having loaded the sketch into arduino, we can test its performance by running the port monitor. Pressing the buttons in the monitor window will display “Press button b”. Check the work of the LED will be possible only after writing an application for android.
In this article for Arduino only this sketch will be used. Let's proceed to developing an application for android.
For easy debugging of the android application, I recommend using not “Android virtual device”, but a real smartphone with Android OS version 2.3.3 and connected via USB cable to computer in “Debug” mode. There is a huge amount of articles on how to do this.
Create a new project “Android application project”
To work with BT, you must set the rights to use it with our application. To do this, go to the manifest, select the Permissions tab, click add, then Uses permission, and set the following rights: android.permission.BLUETOOTH, android.permission.BLUETOOTH_ADMIN
Now let's create the main activity, in res / layout / activity_main.xml we place the code:
Thus, the main activity will take the form:

Figure 3
The txtrobot text box will display all the information we need. The b1 and b2 buttons will send commands to the arduino.
Now go to src /../ MainActivity.java here and our main code will be located. Connect the package Api for Bluetooth:
Before using BT it is necessary to make sure that it is present in our android. Let's create an instance of the BluetoothAdapter class (responsible for working with the BT module installed in android):
If the android does not have BT, then null will be returned:
In this form, the program can already be run. On the android screen, you should see the inscription: "Bluetooth is present."
Now you need to make sure that BT is on, or suggest to enable it. Add a constant:
and code:
By running the modified application on the android, you will be given a "Request for permission to turn on Bluetooth", confirming it, thereby activating BT.
Full application code:
For further experiments, it is necessary to “pair” our android and BT module, for this purpose on the android in the BT settings, perform a search and connect to the BT module, the password is “1234”.
If the remote BT module doesn’t work normally, just disconnect all the wires from it (VCC, GND, RX, TX), thereby making a hard reset, and reconnect them - this should help.
Now we will try to programmatically connect to a remote BT module: we will place the main connection code in onResume. onResume is one of the states of our Activity, namely, Activity is visible on the screen, it is in focus, the user can interact with it. The following is the main Activity code:
Access to the remote BT module is obtained by its MAC address btAdapter.getRemoteDevice (MacAdress). Learn the MAC address of the BT module, you can use the program for android: Bluetooth Terminal.
To make sure that access to the BT module is obtained, use the getName () method, which allows you to get the name of the remote BT module, and display the result on the android screen.
Also in this example, the possibility of logging was added, which you can view during the program execution and detect existing errors. In addition, the MyError function has been created, which is called if you need to crash the application.
Having launched the application, the name of the remote BT module will be displayed on the android screen in the “txtrobot” text box.
Access to the remote BT module is obtained, our next step is to transfer data from the android to it. To do this in onResume (), create a socket:
where UUID (Universally Unique Identifier) is an identification standard used in software creation. Add the UUID constant to the definition:
In order not to slow down the connection, we will cancel the search for other BT devices:
Try to connect:
If not successful, close the socket:
Since the methods of sending and receiving data are blocking, they should be performed in a separate thread to prevent the main application from hanging. To do this, create a class:
In the constructor public ConnectedThred (BluetoothSocket socket) an object is created that controls the transmission of data through a socket:
To send data from the main activity, the sendData (String message) method is called with the text message parameter, which is converted to the type byte. The cancel () method allows you to close the socket.
Let us write, handlers for pressing buttons b1 and b2, containing the call to the function sendData (String message) and make a record of this in the log. The full application code is shown below:
The application we wrote allows us to transfer data from “Android” to Arduino - “0” and “1”, which in turn for Arduino are commands “1” - light the LED, and “0” - put it out. Thus, taking into account the general scheme of the robot, we have learned to give commands from the “brain” to the “muscles”. It remains the case for small, to teach the android to take data from the "sense organs".
Receiving data as well as sending, must be performed in a separate thread to avoid freezing of the main activity. We will display the received data from the BT module on the screen of the main activity in the text field - MyText. But there is a difficulty - working with view components is available only from the main stream. And the new threads that we create do not have access to the elements of the screen. To solve this problem, we use the mechanism Handler.
Handler is a mechanism that allows you to work with a message queue. It is bound to a specific thread (thread) and works with its queue. Handler can put messages in a queue. At the same time, he sets himself as the recipient of this message. And when the time comes, the system takes the message out of the queue and sends it to the addressee (ie, in the Handler) for processing.
Declare a handler:
Create your Handler:
in it we implement the handleMessage message handling method. We extract the what, obj and int attributes from the message. Let's transform the received message into a string and put it into the text field of the main activity: mytext.setText (“Data from Arduino:” + strIncom);
In the stream for data transfer, we add a function to start this stream, and place a loop with the function of reading data there:
The full application code is shown below:
In step 4, an application is presented that allows both transmitting BT from android to arduino commands and receiving data from arduino. Thus, we learned to give commands and accept data, and therefore completed the task.
In addition, this application is a template, at its base you can create more complex applications, which in turn will be able to process data, for example, from an ultrasonic sensor, as well as to give commands to the motors, to move the robot.
For the next article I ordered new parts and modules. Below is a list and prices:
RESULT: 1933.8
This series of articles will contain information for a quick start on creating your first robot, from purchasing the necessary parts to launching it into our world.
I note that I write articles in the course of independent study of the material and the creation of my first robot.
It is assumed that the person reading the article already has experience in:
- Install and configure the development environment for android devices.
- Writing the first Hello World program for android devices.
- Installing drivers and development environment for Arduino.
- Writing the first program (turn on, turn off) LEDs on the Arduino.
Abbreviations
BT - Bluetooth;
Android - device with Android OS, for example, a smartphone;
Sketch - an application for Arduino;
Arduino - Arduino Nano.
')
General scheme of the robot
Let the robot has the following general scheme (Fig. 1). Android is the “brain” in which all data are processed and calculations are performed. Based on the results of the calculation, the commands received by the BT module and subsequently received via the serial port in the Arduino are transmitted via the BT channel. Arduino processes incoming commands and executes them with the help of "muscles" (Motors LEDs, etc.). In addition, the Arduino receives data from the "sense organs" (sensors, sensors, etc.), which it brings into a convenient form and sends it via the BT module to the "brain". And so it repeats to infinity.
Picture 1
The rationale for just such a robot scheme is as follows:
-BT module and Arduino Nano have low cost, as well as small volume and weight.
-Android, not expensive and affordable device, already has a huge number of people, including me.
-Android has its sensors, sensors and a screen for displaying information
-Easy to write code for applications for both Android and Arduino.
To simplify the task of building a robot, I suggest using the “from simple to complex” method, i.e. as in the study of the programming language, create the first program “Hello word”. Of course, this will not be one program, but at least two (for arduino and android). In each subsequent article, the functionality of the robot will increase.
Formulation of the problem
Assemble a simple device that has:
-2 buttons (b1, b2).
-1 LED (Led).
And the functional is executed:
- the main activity contains 2 buttons “Unpair 0” and “Send 1”, when clicked, data is transmitted from the Android to the Arduino via the BT channel, corresponding to “0” and “1”, the Arduino processes them and lights or extinguishes the LED.
-data about pressing or releasing buttons from arduino is transferred to android, information about this is displayed on the main activity screen.
Purchase of necessary parts and components.
1) Android device - LG P500 smartphone (version Android 2.3.3), or any other device based on Android version 2.3.3 and higher. I do not indicate the price, because I did not buy it separately, but I use my smartphone.
2) Arduino NanoV3.0 ( dx.com/en/p/nano-v3-0-avr-atmega328-p-20au-module-board-usb-cable-for-arduino-118037 ) - $ 11.32
3) Bluetooth Module ( dx.com/ru/p/bluetooth-board-module-4-pin-121326 ) - $ 10.57
4) Dummy wires ( dx.com/ru/p/30cm-breadboard-wires-for-electronic-diy-40-cable-pack-80207 ) - $ 2.51
5) Buttons - 2 pcs., LED - 1 pc. - 50 rubles
Total: 855.20 rubles.
Let's get to work
Arduino
Let's collect from the available details the scheme (fig. 2)
Figure 2
Power is supplied to the arduino via a USB cable that connects to the computer, and the software (sketch) running on it is also loaded via it. It should be noted that you can load the sketch into the arduino only when the power is disconnected from the Bluetooth module (Pin (17) 3V3), otherwise an error occurs.
Details of the installation of the Arduino development environment and drivers can be found on the official website: arduino.ru/Guide/Windows
Below is the sketch that needs to be loaded into arduino:
// int led = 12; // int b1 = 11; // int b2 = 10; // int value_1,value_2 = 0; // char incomingbyte; // // void setup() { Serial.begin(38400); pinMode(led,OUTPUT); digitalWrite(led, HIGH); pinMode(b1,INPUT); digitalWrite(b1, HIGH); pinMode(b2,INPUT); digitalWrite(b2, HIGH); } // void contact_bounce(int buttton){ value_1 = digitalRead(buttton); if (!value_1){ delay(80); value_2 = digitalRead(buttton); if (!value_2){ Serial.print("Press button b"); Serial.println(buttton); } } } // void loop() { if (Serial.available() > 0){ incomingbyte = Serial.read(); if (incomingbyte == '1'){ digitalWrite(led,HIGH); Serial.println("LED ON"); } if (incomingbyte=='0'){ digitalWrite(led,LOW); Serial.println("LED OFF"); } } contact_bounce(b1); contact_bounce(b2); } We declare variables, in front of each is a comment.
We initiate a serial connection and set the data transfer rate in bits per second (baud). My BT module is running at 38400 speed, but it can be 9600 speed (the speed of the BT module can be set using AT commands). Set the operation mode of the specified input / output (pin) as an input or as an output. We give HIGH value to the inputs and outputs.
The void contact_bounce (int buttton) function handles button presses and allows you to eliminate contact bounce, which occurs when contacts or a divergence of contacts in mechanical switching devices, such as a button, occurs multiple closure and opening.
In the main Loop loop, we listen to the serial port, and if we receive data on it, we process them. In addition, we call the function of processing the pressing of buttons and eliminating the chattering of contacts.
Having loaded the sketch into arduino, we can test its performance by running the port monitor. Pressing the buttons in the monitor window will display “Press button b”. Check the work of the LED will be possible only after writing an application for android.
In this article for Arduino only this sketch will be used. Let's proceed to developing an application for android.
Android
For easy debugging of the android application, I recommend using not “Android virtual device”, but a real smartphone with Android OS version 2.3.3 and connected via USB cable to computer in “Debug” mode. There is a huge amount of articles on how to do this.
Android STEP 1
Create a new project “Android application project”
To work with BT, you must set the rights to use it with our application. To do this, go to the manifest, select the Permissions tab, click add, then Uses permission, and set the following rights: android.permission.BLUETOOTH, android.permission.BLUETOOTH_ADMIN
Now let's create the main activity, in res / layout / activity_main.xml we place the code:
<LinearLayout xmlns:android="http://schemas.android.com/apk/res/android" android:layout_width="fill_parent" android:layout_height="fill_parent" android:orientation="vertical" > <LinearLayout android:layout_width="match_parent" android:layout_height="wrap_content" > <Button android:id="@+id/b1" android:layout_width="wrap_content" android:layout_height="wrap_content" android:text=" "0"" /> <Button android:id="@+id/b2" android:layout_width="wrap_content" android:layout_height="wrap_content" android:text=" "1"" /> </LinearLayout> <TextView android:id="@+id/txtrobot" android:layout_width="wrap_content" android:layout_height="wrap_content" android:text=" " /> </LinearLayout> Thus, the main activity will take the form:
Figure 3
The txtrobot text box will display all the information we need. The b1 and b2 buttons will send commands to the arduino.
Now go to src /../ MainActivity.java here and our main code will be located. Connect the package Api for Bluetooth:
import android.bluetooth.*; Before using BT it is necessary to make sure that it is present in our android. Let's create an instance of the BluetoothAdapter class (responsible for working with the BT module installed in android):
btAdapter = BluetoothAdapter.getDefaultAdapter(); If the android does not have BT, then null will be returned:
TextView mytext = (TextView) findViewById(R.id.txtrobot); if (btAdapter != null){ mytext.setText("Bluetooth "); }else { mytext.setText("Bluetooth "); } In this form, the program can already be run. On the android screen, you should see the inscription: "Bluetooth is present."
Now you need to make sure that BT is on, or suggest to enable it. Add a constant:
private static final int REQUEST_ENABLE_BT = 1; and code:
if (btAdapter.isEnabled()){ mytext.setText("Bluetooth . ."); }else { Intent enableBtIntent = new Intent(BluetoothAdapter.ACTION_REQUEST_ENABLE); startActivityForResult(enableBtIntent, REQUEST_ENABLE_BT); } By running the modified application on the android, you will be given a "Request for permission to turn on Bluetooth", confirming it, thereby activating BT.
Full application code:
package com.robot.bluetest; import android.os.Bundle; import android.app.Activity; import android.widget.TextView; import android.bluetooth.*; import android.content.Intent; public class MainActivity extends Activity { private static final int REQUEST_ENABLE_BT = 0; public BluetoothAdapter btAdapter; public TextView mytext; @Override protected void onCreate(Bundle savedInstanceState) { super.onCreate(savedInstanceState); setContentView(R.layout.activity_main); btAdapter = BluetoothAdapter.getDefaultAdapter(); mytext = (TextView) findViewById(R.id.txtrobot); if (btAdapter != null){ if (btAdapter.isEnabled()){ mytext.setText("Bluetooth . ."); }else { Intent enableBtIntent = new Intent(BluetoothAdapter.ACTION_REQUEST_ENABLE); startActivityForResult(enableBtIntent, REQUEST_ENABLE_BT); } }else { mytext.setText("Bluetooth "); } } } Android STEP 2
For further experiments, it is necessary to “pair” our android and BT module, for this purpose on the android in the BT settings, perform a search and connect to the BT module, the password is “1234”.
If the remote BT module doesn’t work normally, just disconnect all the wires from it (VCC, GND, RX, TX), thereby making a hard reset, and reconnect them - this should help.
Now we will try to programmatically connect to a remote BT module: we will place the main connection code in onResume. onResume is one of the states of our Activity, namely, Activity is visible on the screen, it is in focus, the user can interact with it. The following is the main Activity code:
package com.robot.bluetoothrob2; import java.io.IOException; import android.os.Bundle; import android.app.Activity; import android.util.Log; import android.widget.Button; import android.widget.TextView; import android.widget.Toast; import android.bluetooth.*; import android.content.Intent; public class MainActivity extends Activity { private static final int REQUEST_ENABLE_BT = 0; final String LOG_TAG = "myLogs"; public BluetoothAdapter btAdapter; private BluetoothSocket btSocket = null; // MAC- Bluetooth private static String MacAdress = "20:11:02:47:01:60"; public TextView mytext; @Override protected void onCreate(Bundle savedInstanceState) { super.onCreate(savedInstanceState); setContentView(R.layout.activity_main); btAdapter = BluetoothAdapter.getDefaultAdapter(); mytext = (TextView) findViewById(R.id.txtrobot); if (btAdapter != null){ if (btAdapter.isEnabled()){ mytext.setText("Bluetooth . ."); }else { Intent enableBtIntent = new Intent(BluetoothAdapter.ACTION_REQUEST_ENABLE); startActivityForResult(enableBtIntent, REQUEST_ENABLE_BT); } }else { MyError("Fatal Error", "Bluetooth "); } } @Override public void onResume() { super.onResume(); Log.d(LOG_TAG, "*** ***"); // MAC BluetoothDevice device = btAdapter.getRemoteDevice(MacAdress); mytext.setText("*** device = " + device.getName() + "***"); } private void MyError(String title, String message){ Toast.makeText(getBaseContext(), title + " - " + message, Toast.LENGTH_LONG).show(); finish(); } } Access to the remote BT module is obtained by its MAC address btAdapter.getRemoteDevice (MacAdress). Learn the MAC address of the BT module, you can use the program for android: Bluetooth Terminal.
To make sure that access to the BT module is obtained, use the getName () method, which allows you to get the name of the remote BT module, and display the result on the android screen.
Also in this example, the possibility of logging was added, which you can view during the program execution and detect existing errors. In addition, the MyError function has been created, which is called if you need to crash the application.
Having launched the application, the name of the remote BT module will be displayed on the android screen in the “txtrobot” text box.
Android STEP 3
Access to the remote BT module is obtained, our next step is to transfer data from the android to it. To do this in onResume (), create a socket:
btSocket = device.createRfcommSocketToServiceRecord(MY_UUID); where UUID (Universally Unique Identifier) is an identification standard used in software creation. Add the UUID constant to the definition:
private static final UUID MY_UUID = UUID.fromString("00001101-0000-1000-8000-00805F9B34FB"); In order not to slow down the connection, we will cancel the search for other BT devices:
btAdapter.cancelDiscovery(); Try to connect:
btSocket.connect(); If not successful, close the socket:
btSocket.close(); Since the methods of sending and receiving data are blocking, they should be performed in a separate thread to prevent the main application from hanging. To do this, create a class:
// private class ConnectedThred extends Thread{ private final BluetoothSocket copyBtSocket; private final OutputStream OutStrem; public ConnectedThred(BluetoothSocket socket){ copyBtSocket = socket; OutputStream tmpOut = null; try{ tmpOut = socket.getOutputStream(); } catch (IOException e){} OutStrem = tmpOut; } public void sendData(String message) { byte[] msgBuffer = message.getBytes(); Log.d(LOG_TAG, "*** : " + message + "***" ); try { OutStrem.write(msgBuffer); } catch (IOException e) {} } public void cancel(){ try { copyBtSocket.close(); }catch(IOException e){} } public Object status_OutStrem(){ if (OutStrem == null){return null; }else{return OutStrem;} } } In the constructor public ConnectedThred (BluetoothSocket socket) an object is created that controls the transmission of data through a socket:
tmpOut = socket.getOutputStream(); To send data from the main activity, the sendData (String message) method is called with the text message parameter, which is converted to the type byte. The cancel () method allows you to close the socket.
Let us write, handlers for pressing buttons b1 and b2, containing the call to the function sendData (String message) and make a record of this in the log. The full application code is shown below:
package com.robot.bluetoothrob2; import java.io.IOException; import java.io.OutputStream; import java.net.Socket; import java.util.UUID; import com.robot.bluetoothrob2.R; import android.os.Bundle; import android.app.Activity; import android.util.Log; import android.view.View; import android.view.View.OnClickListener; import android.widget.Button; import android.widget.TextView; import android.widget.Toast; import android.bluetooth.*; import android.content.Intent; public class MainActivity extends Activity { private static final int REQUEST_ENABLE_BT = 1; final String LOG_TAG = "myLogs"; private BluetoothAdapter btAdapter = null; private BluetoothSocket btSocket = null; private static String MacAddress = "20:11:02:47:01:60"; // MAC- private static final UUID MY_UUID = UUID.fromString("00001101-0000-1000-8000-00805F9B34FB"); private ConnectedThred MyThred = null; public TextView mytext; Button b1, b2; @Override protected void onCreate(Bundle savedInstanceState) { super.onCreate(savedInstanceState); setContentView(R.layout.activity_main); btAdapter = BluetoothAdapter.getDefaultAdapter(); mytext = (TextView) findViewById(R.id.txtrobot); if (btAdapter != null){ if (btAdapter.isEnabled()){ mytext.setText("Bluetooth . ."); }else { Intent enableBtIntent = new Intent(BluetoothAdapter.ACTION_REQUEST_ENABLE); startActivityForResult(enableBtIntent, REQUEST_ENABLE_BT); } }else { MyError("Fatal Error", "Bluetooth "); } b1 = (Button) findViewById(R.id.b1); b2 = (Button) findViewById(R.id.b2); b1.setOnClickListener(new OnClickListener() { public void onClick(View v) { MyThred.sendData("0"); mytext.setText(" : 0"); } }); b2.setOnClickListener(new OnClickListener() { public void onClick(View v) { MyThred.sendData("1"); mytext.setText(" : 1"); } }); } @Override public void onResume() { super.onResume(); BluetoothDevice device = btAdapter.getRemoteDevice(MacAddress); Log.d(LOG_TAG, "*** Device***"+device.getName()); try { btSocket = device.createRfcommSocketToServiceRecord(MY_UUID); Log.d(LOG_TAG, "... ..."); } catch (IOException e) { MyError("Fatal Error", " onResume() : " + e.getMessage() + "."); } btAdapter.cancelDiscovery(); Log.d(LOG_TAG, "*** ***"); Log.d(LOG_TAG, "***...***"); try { btSocket.connect(); Log.d(LOG_TAG, "*** ***"); } catch (IOException e) { try { btSocket.close(); } catch (IOException e2) { MyError("Fatal Error", " onResume() " + e2.getMessage() + "."); } } MyThred = new ConnectedThred(btSocket); } @Override public void onPause() { super.onPause(); Log.d(LOG_TAG, "...In onPause()..."); if (MyThred.status_OutStrem() != null) { MyThred.cancel(); } try { btSocket.close(); } catch (IOException e2) { MyError("Fatal Error", " onPause() " + e2.getMessage() + "."); } } private void MyError(String title, String message){ Toast.makeText(getBaseContext(), title + " - " + message, Toast.LENGTH_LONG).show(); finish(); } // private class ConnectedThred extends Thread{ private final BluetoothSocket copyBtSocket; private final OutputStream OutStrem; public ConnectedThred(BluetoothSocket socket){ copyBtSocket = socket; OutputStream tmpOut = null; try{ tmpOut = socket.getOutputStream(); } catch (IOException e){} OutStrem = tmpOut; } public void sendData(String message) { byte[] msgBuffer = message.getBytes(); Log.d(LOG_TAG, "*** : " + message + "***" ); try { OutStrem.write(msgBuffer); } catch (IOException e) {} } public void cancel(){ try { copyBtSocket.close(); }catch(IOException e){} } public Object status_OutStrem(){ if (OutStrem == null){return null; }else{return OutStrem;} } } } The application we wrote allows us to transfer data from “Android” to Arduino - “0” and “1”, which in turn for Arduino are commands “1” - light the LED, and “0” - put it out. Thus, taking into account the general scheme of the robot, we have learned to give commands from the “brain” to the “muscles”. It remains the case for small, to teach the android to take data from the "sense organs".
Android STEP 4
Receiving data as well as sending, must be performed in a separate thread to avoid freezing of the main activity. We will display the received data from the BT module on the screen of the main activity in the text field - MyText. But there is a difficulty - working with view components is available only from the main stream. And the new threads that we create do not have access to the elements of the screen. To solve this problem, we use the mechanism Handler.
Handler is a mechanism that allows you to work with a message queue. It is bound to a specific thread (thread) and works with its queue. Handler can put messages in a queue. At the same time, he sets himself as the recipient of this message. And when the time comes, the system takes the message out of the queue and sends it to the addressee (ie, in the Handler) for processing.
Declare a handler:
Handler h; Create your Handler:
h = new Handler() { public void handleMessage(android.os.Message msg) { switch (msg.what) { case ArduinoData: byte[] readBuf = (byte[]) msg.obj; String strIncom = new String(readBuf, 0, msg.arg1); mytext.setText(" Arduino: " + strIncom); break; } }; }; in it we implement the handleMessage message handling method. We extract the what, obj and int attributes from the message. Let's transform the received message into a string and put it into the text field of the main activity: mytext.setText (“Data from Arduino:” + strIncom);
In the stream for data transfer, we add a function to start this stream, and place a loop with the function of reading data there:
public void run() { byte[] buffer = new byte[1024]; int bytes; while(true){ try{ bytes = InStrem.read(buffer); h.obtainMessage(ArduinoData, bytes, -1, buffer).sendToTarget(); }catch(IOException e){break;} } } The full application code is shown below:
package com.robot.bluetoothrob2; import java.io.IOException; import java.io.InputStream; import java.io.OutputStream; import java.net.Socket; import java.util.UUID; import com.robot.bluetoothrob2.R; import android.os.Bundle; import android.os.Handler; import android.app.Activity; import android.util.Log; import android.view.View; import android.view.View.OnClickListener; import android.widget.Button; import android.widget.TextView; import android.widget.Toast; import android.bluetooth.*; import android.content.Intent; public class MainActivity extends Activity { private static final int REQUEST_ENABLE_BT = 1; final int ArduinoData = 1; final String LOG_TAG = "myLogs"; private BluetoothAdapter btAdapter = null; private BluetoothSocket btSocket = null; private static String MacAddress = "20:11:02:47:01:60"; // MAC- private static final UUID MY_UUID = UUID.fromString("00001101-0000-1000-8000-00805F9B34FB"); private ConnectedThred MyThred = null; public TextView mytext; Button b1, b2; Handler h; @Override protected void onCreate(Bundle savedInstanceState) { super.onCreate(savedInstanceState); setContentView(R.layout.activity_main); btAdapter = BluetoothAdapter.getDefaultAdapter(); mytext = (TextView) findViewById(R.id.txtrobot); if (btAdapter != null){ if (btAdapter.isEnabled()){ mytext.setText("Bluetooth . ."); }else { Intent enableBtIntent = new Intent(BluetoothAdapter.ACTION_REQUEST_ENABLE); startActivityForResult(enableBtIntent, REQUEST_ENABLE_BT); } }else { MyError("Fatal Error", "Bluetooth "); } b1 = (Button) findViewById(R.id.b1); b2 = (Button) findViewById(R.id.b2); b1.setOnClickListener(new OnClickListener() { public void onClick(View v) { MyThred.sendData("0"); //mytext.setText(" : 0"); } }); b2.setOnClickListener(new OnClickListener() { public void onClick(View v) { MyThred.sendData("1"); // mytext.setText(" : 1"); } }); h = new Handler() { public void handleMessage(android.os.Message msg) { switch (msg.what) { case ArduinoData: byte[] readBuf = (byte[]) msg.obj; String strIncom = new String(readBuf, 0, msg.arg1); mytext.setText(" Arduino: " + strIncom); break; } }; }; } @Override public void onResume() { super.onResume(); BluetoothDevice device = btAdapter.getRemoteDevice(MacAddress); Log.d(LOG_TAG, "*** Device***"+device.getName()); try { btSocket = device.createRfcommSocketToServiceRecord(MY_UUID); Log.d(LOG_TAG, "... ..."); } catch (IOException e) { MyError("Fatal Error", " onResume() : " + e.getMessage() + "."); } btAdapter.cancelDiscovery(); Log.d(LOG_TAG, "*** ***"); Log.d(LOG_TAG, "***...***"); try { btSocket.connect(); Log.d(LOG_TAG, "*** ***"); } catch (IOException e) { try { btSocket.close(); } catch (IOException e2) { MyError("Fatal Error", " onResume() " + e2.getMessage() + "."); } } MyThred = new ConnectedThred(btSocket); MyThred.start(); } @Override public void onPause() { super.onPause(); Log.d(LOG_TAG, "...In onPause()..."); if (MyThred.status_OutStrem() != null) { MyThred.cancel(); } try { btSocket.close(); } catch (IOException e2) { MyError("Fatal Error", " onPause() " + e2.getMessage() + "."); } } private void MyError(String title, String message){ Toast.makeText(getBaseContext(), title + " - " + message, Toast.LENGTH_LONG).show(); finish(); } // private class ConnectedThred extends Thread{ private final BluetoothSocket copyBtSocket; private final OutputStream OutStrem; private final InputStream InStrem; public ConnectedThred(BluetoothSocket socket){ copyBtSocket = socket; OutputStream tmpOut = null; InputStream tmpIn = null; try{ tmpOut = socket.getOutputStream(); tmpIn = socket.getInputStream(); } catch (IOException e){} OutStrem = tmpOut; InStrem = tmpIn; } public void run() { byte[] buffer = new byte[1024]; int bytes; while(true){ try{ bytes = InStrem.read(buffer); h.obtainMessage(ArduinoData, bytes, -1, buffer).sendToTarget(); }catch(IOException e){break;} } } public void sendData(String message) { byte[] msgBuffer = message.getBytes(); Log.d(LOG_TAG, "*** : " + message + "***" ); try { OutStrem.write(msgBuffer); } catch (IOException e) {} } public void cancel(){ try { copyBtSocket.close(); }catch(IOException e){} } public Object status_OutStrem(){ if (OutStrem == null){return null; }else{return OutStrem;} } } } In step 4, an application is presented that allows both transmitting BT from android to arduino commands and receiving data from arduino. Thus, we learned to give commands and accept data, and therefore completed the task.
In addition, this application is a template, at its base you can create more complex applications, which in turn will be able to process data, for example, from an ultrasonic sensor, as well as to give commands to the motors, to move the robot.
For the next article I ordered new parts and modules. Below is a list and prices:
| Name | Link | Price ye | Price, rub | Qty | Amount |
| Layout | dx.com/p/solderless-breadboard-with-400-tie-point-white-121534 | 3.1 | 102.3 | 2 | 204.6 |
| Ultrasound sensor | dx.com/p/ultrasonic-sensor-distance-measuring-module-138563 | 3.9 | 128.7 | 3 | 386.1 |
| Driver for motor 2 pcs. | dx.com/en/p/hg7881-two-channel-motor-driver-board-blue-green-black-2-5-12v-215795 | 2.8 | 92.4 | 2 | 184.8 |
| Platform | dx.com/ru/p/zl-4-smart-car-chassis-kit-for-arduino-black-yellow-152992 | 28.2 | 930.6 | one | 930.6 |
| Connection wiring | dx.com/p/breadboard-jumper-wire-cord-kit-for-arduino-diy-140-piece-pack-138220 | 6.9 | 227.7 | one | 227.7 |
| Nutrition | dx.com/en/p/dc-power-converter-module-for-electronic-diy-219232 | 2.3 | 75.9 | one | 75.9 |
RESULT: 1933.8
Source: https://habr.com/ru/post/208466/
All Articles