An example of a working application from a web developer: working with a database, layout for Android, publishing to google play
All good!
The article will be useful for pioneers and for web developers, this is a complete guide for developing from scratch and publishing. Understands the real application "Expenses Accounting" hosted in google play. This is my first application, the transfer of knowledge from beginner to the lost.
')
The writing of this application was provoked by the lack of the necessary functionality of the existing analogues.
There are many similar applications, but unfortunately, they are overloaded with unnecessary features.
The requirements for my application were as follows:
Ready to curse forever, the layout of the interface using xml. On html / css, I can impose anything, but when it came to this typesetting, my fighting spirit disappeared. We do not catch introductory material on the network: xml interfaces for those who know html / css. I hope the situation will change soon. The logic of placement of elements is not clear, everything is distorted and does not obey. Kills the inability to set a separate "border" (top, left) for the interface elements.
You installed eclipse, plugins, and did you manage (after 10 minutes of effort on a top PC) to start the emulator? Now you have the opportunity to develop for Android, one of the most popular operating systems in the mobile world.
To begin with, let's create our first activity, which will be the entry point to the activity_main.xml application. We are offered a kind of MVC structure:
com.laguna.sa is the name of my package
The logic is located in: project_name / src / com.laguna.sa / *
Views are located at: res / layout / *
When creating an activity, a file of logic and presentation is formed. When designing we are offered a lot of incomprehensible elements, from which I chose LinearLayout . LinearLayout allows you to stir items. The choice of vertical and horizontal. This is indicated by android: orientation = "vertical". For my needs in this application, this is enough, I even border issued using LinearLayout in height 3dp. Something like a div in html.
activity_main.xml listing part 1:
Now it contains the first parent layer with the android: layout_width and android: layout_height attributes, which are set as fill_parent , which tells the layer to fill everything and everything. We also set the location of the entire contents in the center android: gravity = "center" .
Next, I create a sexy green bar using LinearLayout with 3dp height. Of course, this element was not considered for this, but one time it is possible to sin.
On the screen, it looks like this:

Following the strip, I place two fields for text. Placed in the new LinearLayout , which I do horizontal .
Everything is logically clear, but you should pay attention to filling the text with these elements. In our project there is a values folder in which the strings.xml file is stored . This file contains lines that, thanks to android: text = "@ string / text2", load the above TextView. The text can be specified directly in the code, but in this case, an annoying tablet with an error will interfere.
For the file of lines there is a visual editor that allows you to edit lines without digging through the code. It is permissible to add not only lines but also other resources. But as I understood, strings and styles should be stored separately.
Naturally, interface elements can be controlled programmatically. I will give an example from the project, where the actual date is inserted into the test field.
There are no particularly complex actions that need explanations, the only thing I will focus on is the method of navigation in the application:
The transition from one Activity to another.
In Android, I used the simplest solution for storing local data — SQLite and the SQLiteOpenHelper class helper, which does all the dirty work for me. For those who worked, for example with MySql, there should not be special difficulties in mastering and understanding.
SQLiteOpenHelper also controls the initial creation of the database in the file system, if necessary, makes an "upgrade".
Note that to insert data is used:
Inserting data about the principle of the column -> value.
Data acquisition, the process is not complicated. It is worth reading separately about Cursor . In my case, I feed rawQuery queries and work with Cursor.
Here is an example of data output, a file listing that displays the amounts on a separate screen.
In the cycle we go through all the values and get the necessary ones. In the same place we form the necessary amount of TextView, add styles and is ready.
The program complained about methods not supported by some versions of the OS. I had to resort to version checking to set the Background. I would be grateful if the comments were sent on the true path regarding setBackground.
I liked the publication, it all happened quickly and without unnecessary trouble. Great developer console, intuitive settings. The application posted in the evening was available at night.
Application itself:
What does this article teach?
The article will be useful for pioneers and for web developers, this is a complete guide for developing from scratch and publishing. Understands the real application "Expenses Accounting" hosted in google play. This is my first application, the transfer of knowledge from beginner to the lost.
- We understand the basics
- We work with a database
- Make layout
- We program
')
How did this happen?
The writing of this application was provoked by the lack of the necessary functionality of the existing analogues.
There are many similar applications, but unfortunately, they are overloaded with unnecessary features.
What was required and turned out?
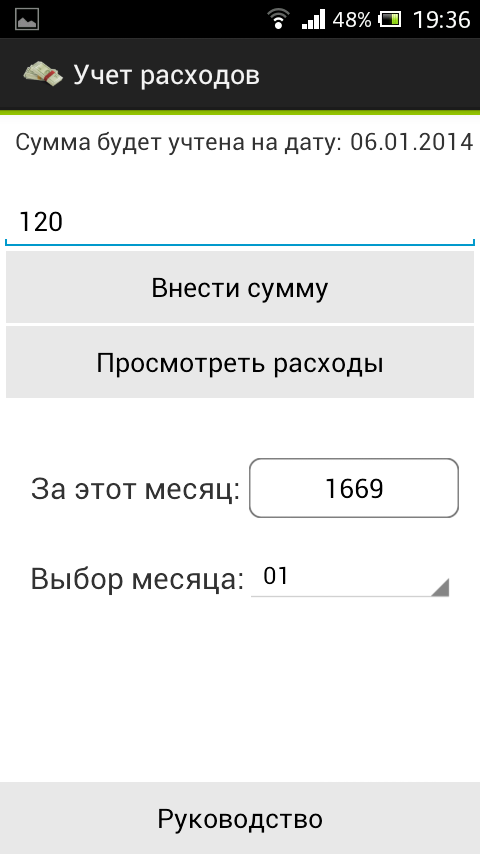
The requirements for my application were as follows:
- Cost accounting for the current month
- Entering an expense using the large “enter expense” key
- Review of this month’s expense amounts
- An overview of the total costs for this month
- Overview of the amount for the selected month
A few words about the workflow
Ready to curse forever, the layout of the interface using xml. On html / css, I can impose anything, but when it came to this typesetting, my fighting spirit disappeared. We do not catch introductory material on the network: xml interfaces for those who know html / css. I hope the situation will change soon. The logic of placement of elements is not clear, everything is distorted and does not obey. Kills the inability to set a separate "border" (top, left) for the interface elements.
Development
You installed eclipse, plugins, and did you manage (after 10 minutes of effort on a top PC) to start the emulator? Now you have the opportunity to develop for Android, one of the most popular operating systems in the mobile world.
To begin with, let's create our first activity, which will be the entry point to the activity_main.xml application. We are offered a kind of MVC structure:
com.laguna.sa is the name of my package
The logic is located in: project_name / src / com.laguna.sa / *
Views are located at: res / layout / *
When creating an activity, a file of logic and presentation is formed. When designing we are offered a lot of incomprehensible elements, from which I chose LinearLayout . LinearLayout allows you to stir items. The choice of vertical and horizontal. This is indicated by android: orientation = "vertical". For my needs in this application, this is enough, I even border issued using LinearLayout in height 3dp. Something like a div in html.
activity_main.xml listing part 1:
<LinearLayout xmlns:android="http://schemas.android.com/apk/res/android" xmlns:tools="http://schemas.android.com/tools" android:layout_width="fill_parent" android:layout_height="fill_parent" android:background="#6c6c75" android:gravity="center" android:orientation="vertical" tools:context=".MainActivity" > <LinearLayout android:layout_width="fill_parent" android:layout_height="3dp" android:background="#99CC00" android:orientation="horizontal" > </LinearLayout> </LinearLayout> Now it contains the first parent layer with the android: layout_width and android: layout_height attributes, which are set as fill_parent , which tells the layer to fill everything and everything. We also set the location of the entire contents in the center android: gravity = "center" .
Next, I create a sexy green bar using LinearLayout with 3dp height. Of course, this element was not considered for this, but one time it is possible to sin.
<LinearLayout android:layout_width="fill_parent" android:layout_height="3dp" android:background="#99CC00" android:orientation="horizontal" > </LinearLayout> On the screen, it looks like this:
Following the strip, I place two fields for text. Placed in the new LinearLayout , which I do horizontal .
<LinearLayout android:layout_width="fill_parent" android:layout_height="wrap_content" android:background="#FFf" android:orientation="horizontal" > <TextView android:id="@+id/textView2" android:layout_width="wrap_content" android:layout_height="wrap_content" android:layout_marginBottom="3dp" android:layout_marginLeft="10dp" android:layout_marginRight="5dp" android:layout_marginTop="6dp" android:text="@string/text2" android:textSize="16sp" /> <TextView android:id="@+id/textView1" android:layout_width="wrap_content" android:layout_height="wrap_content" android:layout_marginBottom="3dp" android:layout_marginTop="6dp" android:text="date" android:textSize="16sp" /> </LinearLayout> Everything is logically clear, but you should pay attention to filling the text with these elements. In our project there is a values folder in which the strings.xml file is stored . This file contains lines that, thanks to android: text = "@ string / text2", load the above TextView. The text can be specified directly in the code, but in this case, an annoying tablet with an error will interfere.
For the file of lines there is a visual editor that allows you to edit lines without digging through the code. It is permissible to add not only lines but also other resources. But as I understood, strings and styles should be stored separately.
Naturally, interface elements can be controlled programmatically. I will give an example from the project, where the actual date is inserted into the test field.
SimpleDateFormat sdf = new SimpleDateFormat("dd.MM.yyyy"); String currentDateandTime = sdf.format(new Date()); TextView textView1 = (TextView) findViewById(R.id.textView1); textView1.setText(currentDateandTime); Full listing of activity_main.xml and its logic:
<LinearLayout xmlns:android="http://schemas.android.com/apk/res/android" xmlns:tools="http://schemas.android.com/tools" android:layout_width="fill_parent" android:layout_height="fill_parent" android:background="#6c6c75" android:gravity="center" android:orientation="vertical" tools:context=".MainActivity" > <LinearLayout android:layout_width="fill_parent" android:layout_height="3dp" android:background="#99CC00" android:orientation="horizontal" > </LinearLayout> <LinearLayout android:layout_width="fill_parent" android:layout_height="wrap_content" android:background="#FFf" android:orientation="horizontal" > <TextView android:id="@+id/textView2" android:layout_width="wrap_content" android:layout_height="wrap_content" android:layout_marginBottom="3dp" android:layout_marginLeft="10dp" android:layout_marginRight="5dp" android:layout_marginTop="6dp" android:text="@string/text2" android:textSize="16sp" /> <TextView android:id="@+id/textView1" android:layout_width="wrap_content" android:layout_height="wrap_content" android:layout_marginBottom="3dp" android:layout_marginTop="6dp" android:text="date" android:textSize="16sp" /> </LinearLayout> <LinearLayout android:layout_width="match_parent" android:layout_height="wrap_content" android:layout_marginLeft="0dp" android:layout_marginRight="0dp" android:layout_marginTop="0dp" android:background="#FFf" android:gravity="bottom" android:orientation="vertical" > <EditText android:id="@+id/amount" android:layout_width="match_parent" android:layout_height="wrap_content" android:layout_marginTop="20sp" android:ems="10" android:hint="@string/amount_of_expense" > </EditText> <Button android:id="@+id/button2" android:layout_width="match_parent" android:layout_height="wrap_content" android:layout_marginLeft="4dp" android:layout_marginRight="4dp" android:background="@drawable/mybtn_style_selector" android:onClick="makebutton_Click" android:text="@string/makebutton" /> <Button android:id="@+id/button3" android:layout_width="match_parent" android:layout_height="wrap_content" android:layout_marginLeft="4dp" android:layout_marginRight="4dp" android:layout_marginTop="2dp" android:background="@drawable/mybtn_style_selector" android:onClick="costs_Click" android:text="@string/costs" /> </LinearLayout> <LinearLayout android:layout_width="match_parent" android:layout_height="80sp" android:layout_gravity="center_vertical" android:layout_marginTop="0dp" android:background="#fff" android:orientation="horizontal" > <TextView android:id="@+id/amount_per_month_text" android:layout_width="wrap_content" android:layout_height="wrap_content" android:layout_gravity="center" android:layout_marginLeft="20dp" android:layout_marginTop="20dp" android:text=" :" android:textSize="20sp" /> <Button android:id="@+id/amount_per_month" android:layout_width="140dp" android:layout_height="wrap_content" android:layout_marginLeft="5dp" android:layout_marginTop="40dp" android:onClick="reload_Click" android:background="@drawable/button321" android:text="" /> </LinearLayout> <LinearLayout android:layout_width="match_parent" android:layout_height="80sp" android:layout_gravity="center_vertical" android:layout_marginTop="0dp" android:background="#fff" android:orientation="horizontal" > <TextView android:id="@+id/amount_per_month_text2" android:layout_width="wrap_content" android:layout_height="wrap_content" android:layout_gravity="center" android:layout_marginLeft="20dp" android:layout_marginTop="0dp" android:text=" :" android:textSize="20sp" /> <Spinner android:id="@+id/spinner_month" android:layout_width="140dp" android:layout_height="wrap_content" android:layout_marginTop="20dp" > </Spinner> </LinearLayout> <LinearLayout android:layout_width="match_parent" android:layout_height="fill_parent" android:layout_marginTop="0dp" android:background="#FFf" android:gravity="bottom" android:orientation="vertical" > <Button android:id="@+id/button1" android:layout_width="match_parent" android:layout_height="wrap_content" android:background="@drawable/mybtn_style_selector" android:onClick="howtousebutton_Click" android:text="@string/howtousebutton" /> </LinearLayout> </LinearLayout> package com.laguna.sa; // @SuppressLint("SimpleDateFormat") public class MainActivity extends Activity { @Override protected void onCreate(Bundle savedInstanceState) { super.onCreate(savedInstanceState); setContentView(R.layout.activity_main); SimpleDateFormat sdf = new SimpleDateFormat("dd.MM.yyyy"); String currentDateandTime = sdf.format(new Date()); TextView textView1 = (TextView) findViewById(R.id.textView1); textView1.setText(currentDateandTime); // WorkWithDatabase wwd = new WorkWithDatabase(this); Cursor cursor = wwd.total_amount_for_this_month(); if(cursor.moveToFirst()) { Button amount_per_month = (Button ) findViewById(R.id.amount_per_month); amount_per_month.setText(""+cursor.getInt(0)+""); } String[] data = {"01", "02", "03", "04", "05", "06", "07", "08", "09", "10", "11", "12"}; // ArrayAdapter<String> adapter = new ArrayAdapter<String>(this, android.R.layout.simple_spinner_item, data); adapter.setDropDownViewResource(android.R.layout.simple_spinner_dropdown_item); final Spinner spinner = (Spinner) findViewById(R.id.spinner_month); spinner.setAdapter(adapter); // spinner.setPrompt(""); spinner.setOnItemSelectedListener(new AdapterView.OnItemSelectedListener() { public void onItemSelected(AdapterView<?> adapterView, View view, int pos, long l) { String month = spinner.getSelectedItem().toString(); set_selected_mont(month); } public void onNothingSelected(AdapterView<?> adapterView) { return; } }); } @Override public boolean onCreateOptionsMenu(Menu menu) { // Inflate the menu; this adds items to the action bar if it is present. getMenuInflater().inflate(R.menu.main, menu); return true; } public void makebutton_Click(View v){ // TextView date = (TextView) findViewById(R.id.textView1); // EditText amount = (EditText) findViewById(R.id.amount); if(amount.toString() != "") { WorkWithDatabase wwd = new WorkWithDatabase(this); wwd.entry_costs(date, amount); // amount.setText(""); reload_Click(v); } } // public void reload_Click(View v){ WorkWithDatabase wwd = new WorkWithDatabase(this); Cursor cursor = wwd.total_amount_for_this_month(); if(cursor.moveToFirst()) { Button amount_per_month = (Button ) findViewById(R.id.amount_per_month); amount_per_month.setText(""+cursor.getInt(0)+""); } } public void set_selected_mont(String month){ WorkWithDatabase wwd = new WorkWithDatabase(this); Cursor cursor = wwd.total_amount_for_selected_month(month); if(cursor.moveToFirst()) { Button amount_per_month = (Button ) findViewById(R.id.amount_per_month); amount_per_month.setText(""+cursor.getInt(0)+""); } } // public void costs_Click(View v){ Intent intent = new Intent(MainActivity.this,CostsActivity.class); startActivity(intent); } // public void howtousebutton_Click(View v){ Intent intent = new Intent(MainActivity.this, HowtouseActivity.class); startActivity(intent); } } There are no particularly complex actions that need explanations, the only thing I will focus on is the method of navigation in the application:
// public void costs_Click(View v){ Intent intent = new Intent(MainActivity.this,CostsActivity.class); startActivity(intent); } The transition from one Activity to another.
Database and work with it
In Android, I used the simplest solution for storing local data — SQLite and the SQLiteOpenHelper class helper, which does all the dirty work for me. For those who worked, for example with MySql, there should not be special difficulties in mastering and understanding.
SQLiteOpenHelper also controls the initial creation of the database in the file system, if necessary, makes an "upgrade".
Listing of the class for working with the WorkWithDatabase.java database:
package com.laguna.sa; import java.text.SimpleDateFormat; import java.util.Date; import android.annotation.SuppressLint; import android.content.ContentValues; import android.content.Context; import android.database.Cursor; import android.database.sqlite.SQLiteDatabase; import android.database.sqlite.SQLiteOpenHelper; import android.widget.EditText; import android.widget.TextView; public class WorkWithDatabase extends SQLiteOpenHelper { // private static final String DATABASE_NAME = "costs_database.db"; private static final int DATABASE_VERSION = 1; // public static final String TABLE_NAME = "costs"; public static final String UID = "_id"; public static final String DATE = "date"; public static final String AMOUNT = "amount"; public static final String MONTH = "month"; public WorkWithDatabase(Context context) { super(context, DATABASE_NAME, null, DATABASE_VERSION); // TODO Auto-generated constructor stub } // private static final String SQL_CREATE_ENTRIES = "create table if not exists " + TABLE_NAME + "( " + UID + " integer primary key autoincrement, " + DATE + " text not null, " + AMOUNT + " integer not null, " + MONTH + " integer not null);"; // private static final String SQL_DELETE_ENTRIES = "DROP TABLE IF EXISTS " + TABLE_NAME; @Override public void onCreate(SQLiteDatabase db) { db.execSQL(SQL_CREATE_ENTRIES); } @Override public void onUpgrade(SQLiteDatabase db, int oldVersion, int newVersion) { // db.execSQL(SQL_DELETE_ENTRIES); // onCreate(db); } // ------------------------------------------------------------------------------- // public void entry_costs(TextView date, EditText amount) { SQLiteDatabase wwd = this.getReadableDatabase(); // SimpleDateFormat sdf = new SimpleDateFormat("MM"); String month = sdf.format(new Date()); // ContentValues values = new ContentValues(); values.put("date", date.getText().toString()); values.put("amount", amount.getText().toString()); values.put("month", month.toString()); wwd.insert("costs", null, values); wwd.close(); } @SuppressLint("SimpleDateFormat") public Cursor obtaining_costs_for_this_month() { SQLiteDatabase wwd = this.getReadableDatabase(); SimpleDateFormat sdf = new SimpleDateFormat("MM"); String month = sdf.format(new Date()); String query = "SELECT * FROM costs WHERE month = "+ month +" ORDER BY _id DESC"; Cursor cursor = wwd.rawQuery(query, null); return cursor; } public Cursor total_amount_for_this_month() { SQLiteDatabase wwd = this.getReadableDatabase(); SimpleDateFormat sdf2 = new SimpleDateFormat("MM"); String month = sdf2.format(new Date()); String query = "SELECT SUM(amount) FROM costs WHERE month=" + month + ""; Cursor cursor = wwd.rawQuery(query, null); return cursor; } public Cursor total_amount_for_selected_month(String month) { SQLiteDatabase wwd = this.getReadableDatabase(); String query = "SELECT SUM(amount) FROM costs WHERE month=" + month + ""; Cursor cursor = wwd.rawQuery(query, null); return cursor; } } Note that to insert data is used:
ContentValues values = new ContentValues(); Inserting data about the principle of the column -> value.
Data acquisition, the process is not complicated. It is worth reading separately about Cursor . In my case, I feed rawQuery queries and work with Cursor.
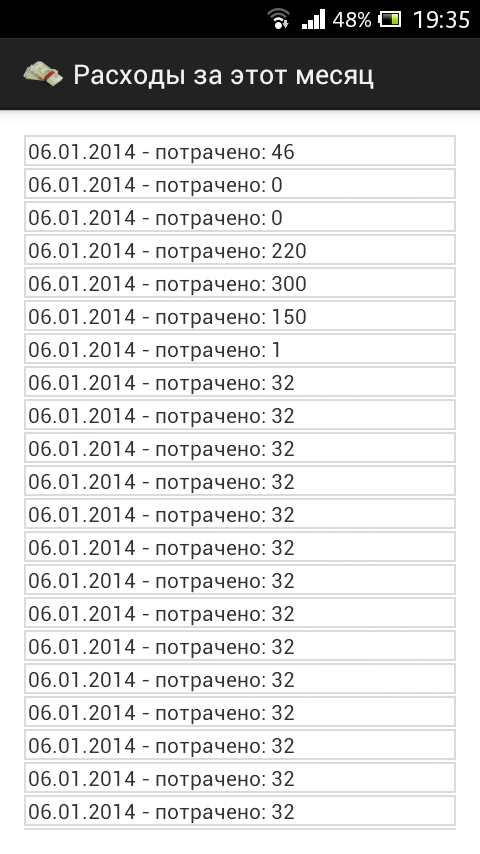
Here is an example of data output, a file listing that displays the amounts on a separate screen.
Listing the CostsActivity.java file and its views
<RelativeLayout xmlns:android="http://schemas.android.com/apk/res/android" xmlns:tools="http://schemas.android.com/tools" android:layout_width="match_parent" android:layout_height="match_parent" android:paddingBottom="@dimen/activity_vertical_margin" android:paddingLeft="@dimen/activity_horizontal_margin" android:paddingRight="@dimen/activity_horizontal_margin" android:paddingTop="@dimen/activity_vertical_margin" android:background="#fff" tools:context=".CostsActivity" > <ScrollView android:id="@+id/scrollView1" android:layout_width="wrap_content" android:layout_height="wrap_content" android:layout_alignParentBottom="true" android:layout_alignParentLeft="true" android:layout_alignParentRight="true" android:layout_alignParentTop="true" > <LinearLayout android:id="@+id/costslist" android:layout_width="match_parent" android:layout_height="wrap_content" android:orientation="vertical" > </LinearLayout> </ScrollView> </RelativeLayout> package com.laguna.sa; import android.os.Build; import android.os.Bundle; import android.annotation.SuppressLint; import android.annotation.TargetApi; import android.app.ActionBar.LayoutParams; import android.app.Activity; import android.database.Cursor; import android.view.Menu; import android.widget.LinearLayout; import android.widget.TextView; public class CostsActivity extends Activity { @SuppressWarnings("deprecation") @SuppressLint("NewApi") @Override protected void onCreate(Bundle savedInstanceState) { super.onCreate(savedInstanceState); setContentView(R.layout.activity_costs); LinearLayout linearLayout = (LinearLayout)findViewById(R.id.costslist); int sdk = android.os.Build.VERSION.SDK_INT; WorkWithDatabase wwd = new WorkWithDatabase(this); Cursor cursor = wwd.obtaining_costs_for_this_month(); while (cursor.moveToNext()) { int amount = cursor.getInt(cursor.getColumnIndex("amount")); String date = cursor.getString(cursor.getColumnIndex("date")); TextView dateTv = new TextView(this); LinearLayout.LayoutParams llp = new LinearLayout.LayoutParams(LayoutParams.MATCH_PARENT, LayoutParams.MATCH_PARENT); llp.setMargins(0, 1, 0, 1); // llp.setMargins(left, top, right, bottom); //------------------------------------------------------------ if(sdk < android.os.Build.VERSION_CODES.JELLY_BEAN) { dateTv.setBackgroundDrawable(getResources().getDrawable(R.drawable.test)); } else { dateTv.setBackground(getResources().getDrawable(R.drawable.test)); } //------------------------------------------------------------ dateTv.setLayoutParams(llp); dateTv.setPadding(4, 1, 2, 1); dateTv.setText(date + " - : " + amount); linearLayout.addView(dateTv); } cursor.close(); } @Override public boolean onCreateOptionsMenu(Menu menu) { // Inflate the menu; this adds items to the action bar if it is present. getMenuInflater().inflate(R.menu.costs, menu); return true; } } In the cycle we go through all the values and get the necessary ones. In the same place we form the necessary amount of TextView, add styles and is ready.
The program complained about methods not supported by some versions of the OS. I had to resort to version checking to set the Background. I would be grateful if the comments were sent on the true path regarding setBackground.
Publication and result.
I liked the publication, it all happened quickly and without unnecessary trouble. Great developer console, intuitive settings. The application posted in the evening was available at night.
Application itself:
Source: https://habr.com/ru/post/208344/
All Articles