The experience of creating a robot. Part 1
Good day! I want to share with all the experience in creating a robot, based on the Arduino. In the first part there will not be something original, perhaps even in some places similar to other articles, but I will try to describe exactly the problems that I encountered while assembling the robot.
I have long had an idea to create a robot, but I did not have enough time and knowledge.
And over time, I read various articles, inspired and rushed. Then I superficially imagined what microelectronics is, knew how to program a little, and decided that this knowledge would be enough.
The idea was to assemble a more or less compact robot, but rather passable and functional. I did not want to be attached to any specific platforms or to collect whale kits, so I decided to separately order parts and try to make as little as possible from improvised means.
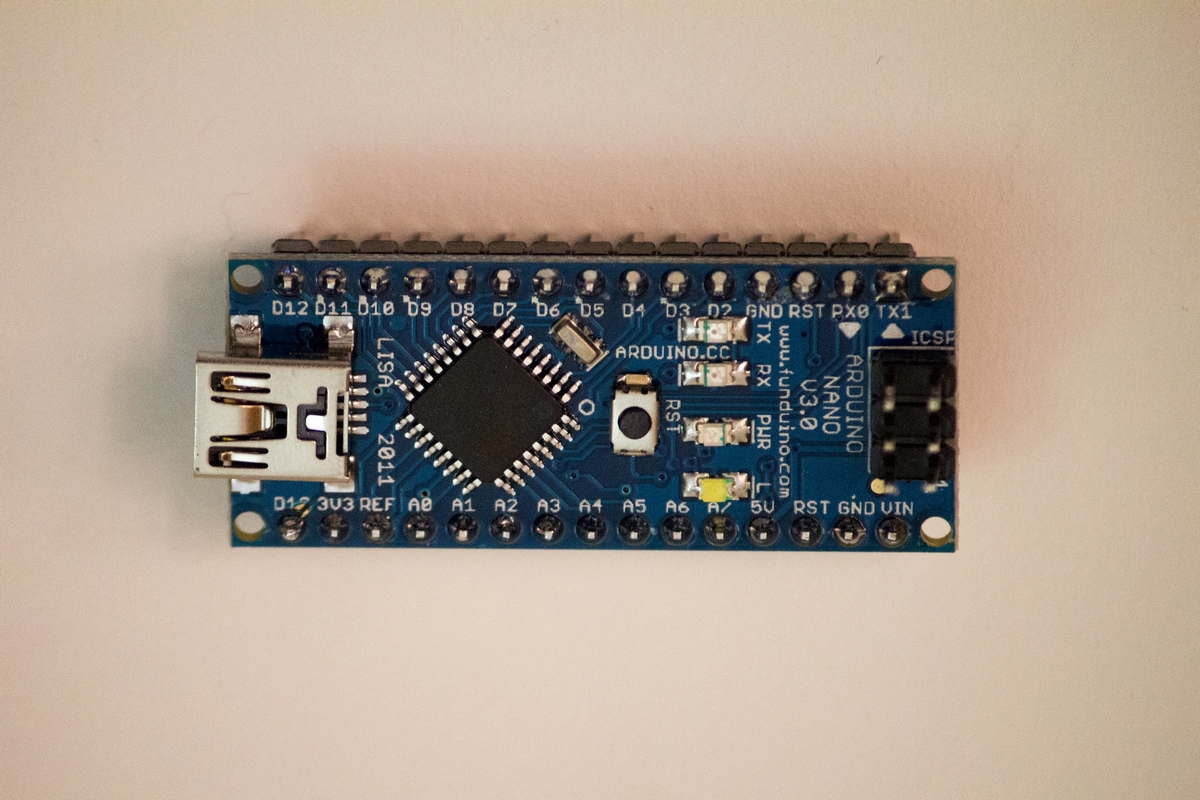
At first, I began to choose the “brain” of the robot. LEGO Mindstorms seemed to me very attractive, it attracted exactly what could be assembled from parts of any chassis, which one wanted. But I didn’t want a ready-made designer, I connected the wiring and I’m done, and I myself need to solder, program, study microcontrollers, and the LEGO set is a little expensive. Therefore, the choice fell on the Arduino family. And not so expensive, and you can program. I was advised to take the Arduino Uno, but since I decided to do it compactly, it was decided to take the Arduino Nano.
')
When I started to choose a chassis, I suddenly remembered that somewhere in the closet LEGO SpyBotics was gathering dust, it was something like the progenitor of Mindstorms.

Immediately it was decided to give it under the knife, in my case, under the soldering iron.
Small size, two motors, tracked chassis - all this is ideally suited to my needs. Moreover, this model is no longer on the move, the data cable was completely lost, it was a hell of a business to program this model, and this went against my desire to master microelectronics.
I decided that I was dropping the motors from the board, leaving them, and returning the board itself back to the cabinet, although it would probably be possible to drop various sensors from it for further experiments.
So, with the main details figured out, now the rest. And so I began to look for where you can choose and buy spare parts. I found a girl who orders things from China, she promised to help with the purchase and gave a link to Taobao, advising to buy parts from one seller to pay less for shipping. After a couple of days of analysis, I decided on the supplier and made an order.
And after a month of waiting, the parcel finally arrived.
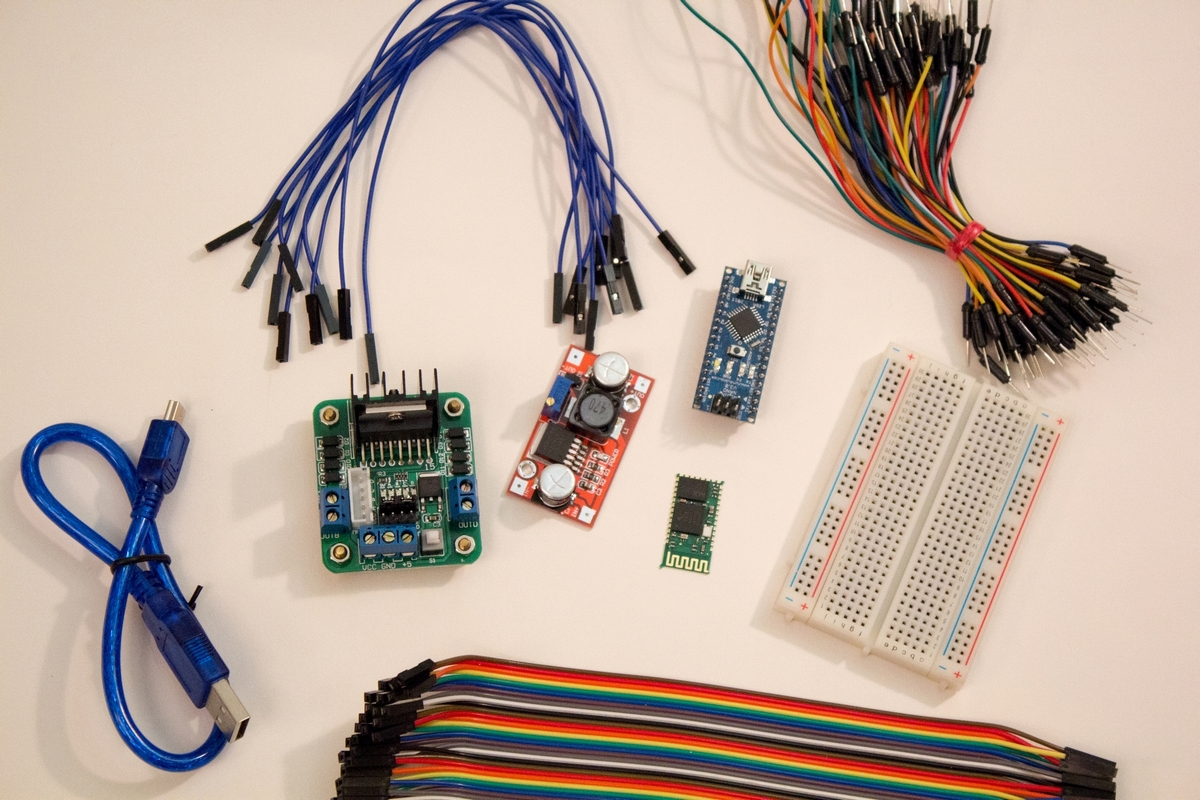
Content:
1) Arduino Nano V3.0 ATMEGA328P
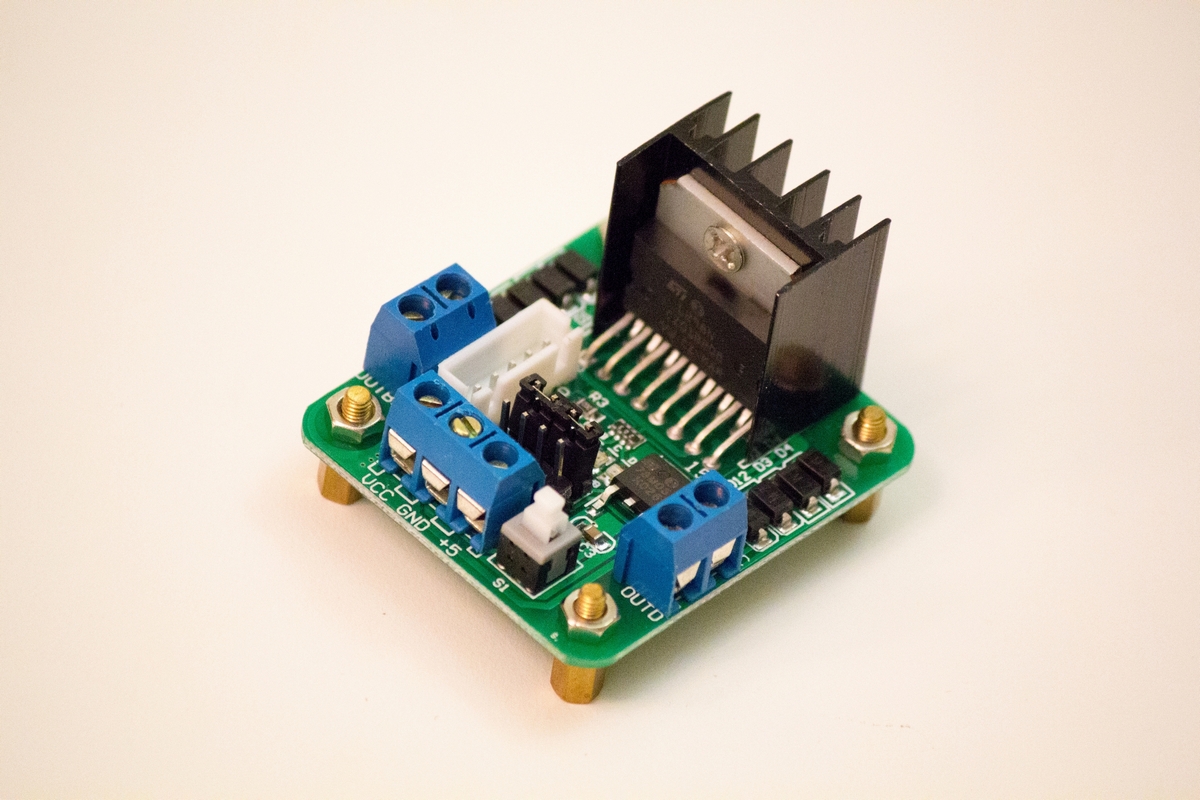
2) Motors driver L298
When I chose the motor control module, I came across an interesting option, especially for Nano - Feedback Control add-on
But in China, I did not find this model, so I ordered a regular model.
3) Bluetooth HC-05
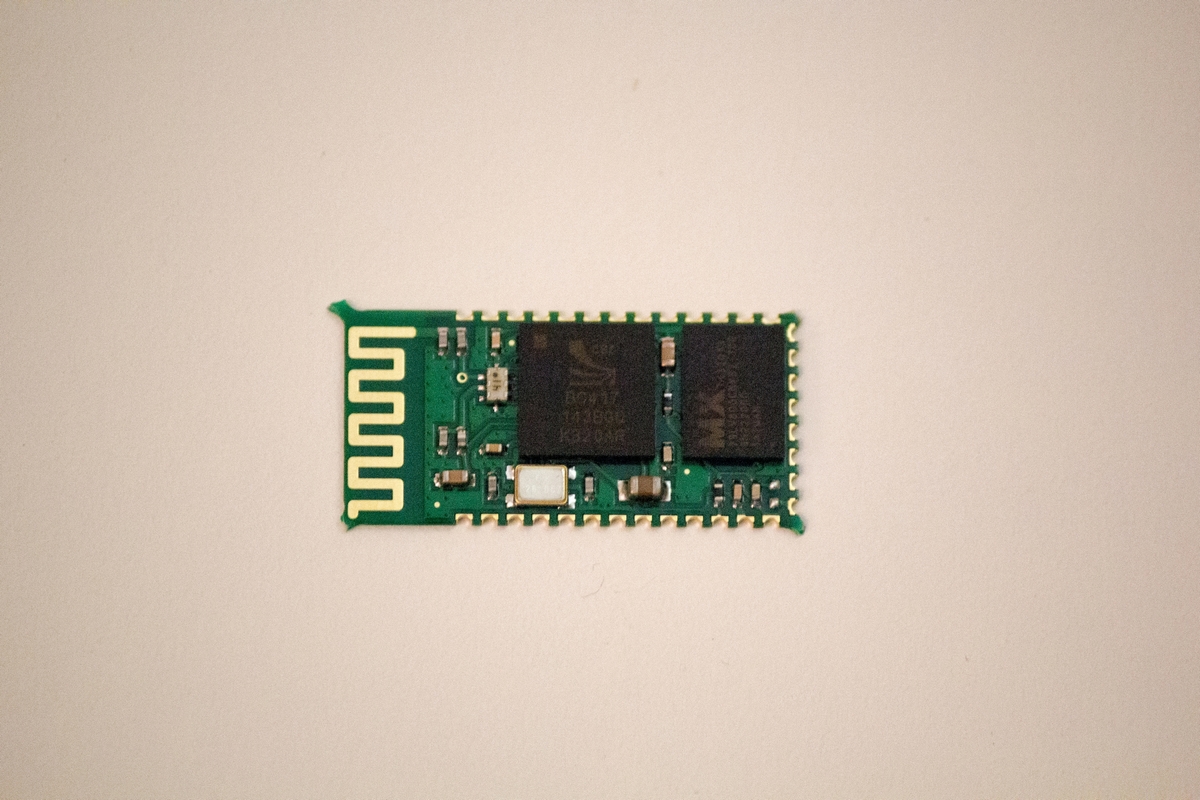
Through this module we will communicate with the PC. In the future I plan to write a control under Android.
4) LM2577 DC-DC Adjustable Step Up Power
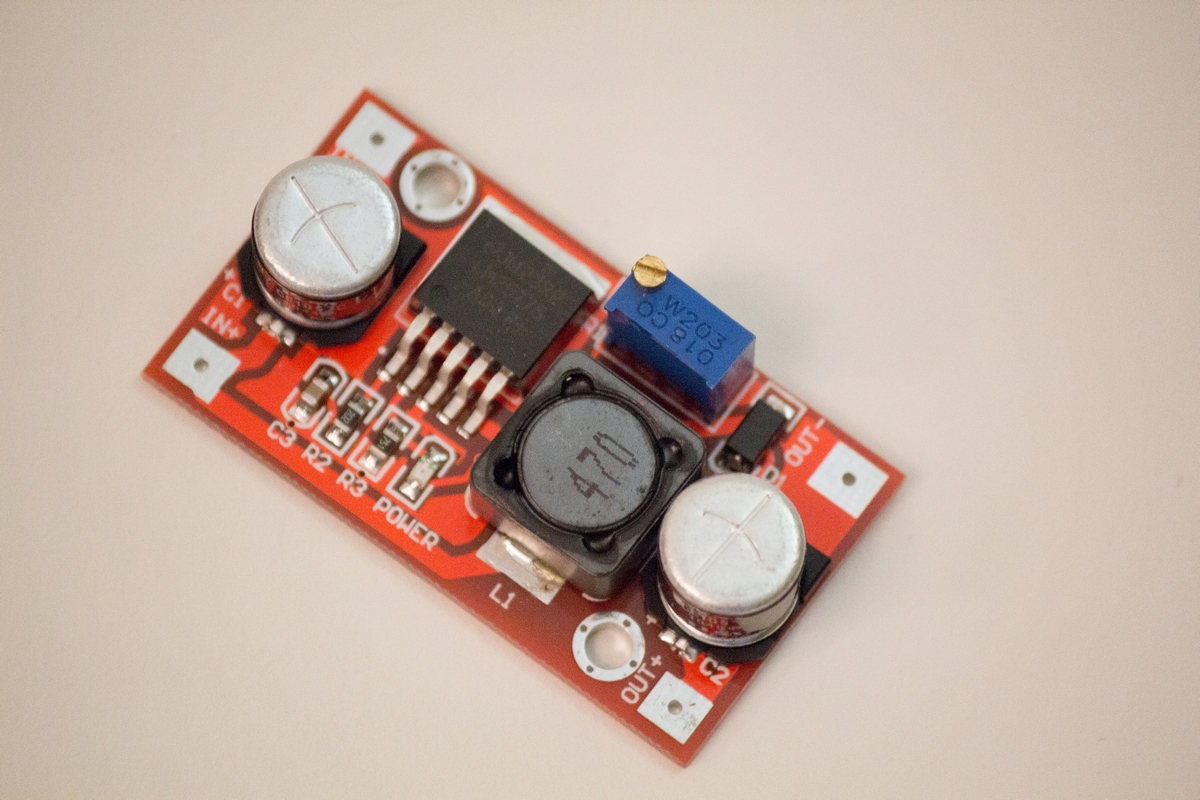
I decided to order this voltage converter just in case, because the SpyBotics chassis has only 3 AA batteries, and I didn’t know if I would have enough power.
Well, plus the little things: The circuit board and various wiring.
I did not order diodes, resistances and other trifles, I decided that they could be dropped from the old boards.
I decided to build it in stages, experimenting with various options.
The approximate plan was:
1) Connect to the Arduino driver motors, well, actually, the motors themselves.
2) Screw the brains to the chassis and install the batteries.
3) Tighten the remote control to the robot.
And then there will be a modernization of the robot and attempts to make it as autonomous as possible.
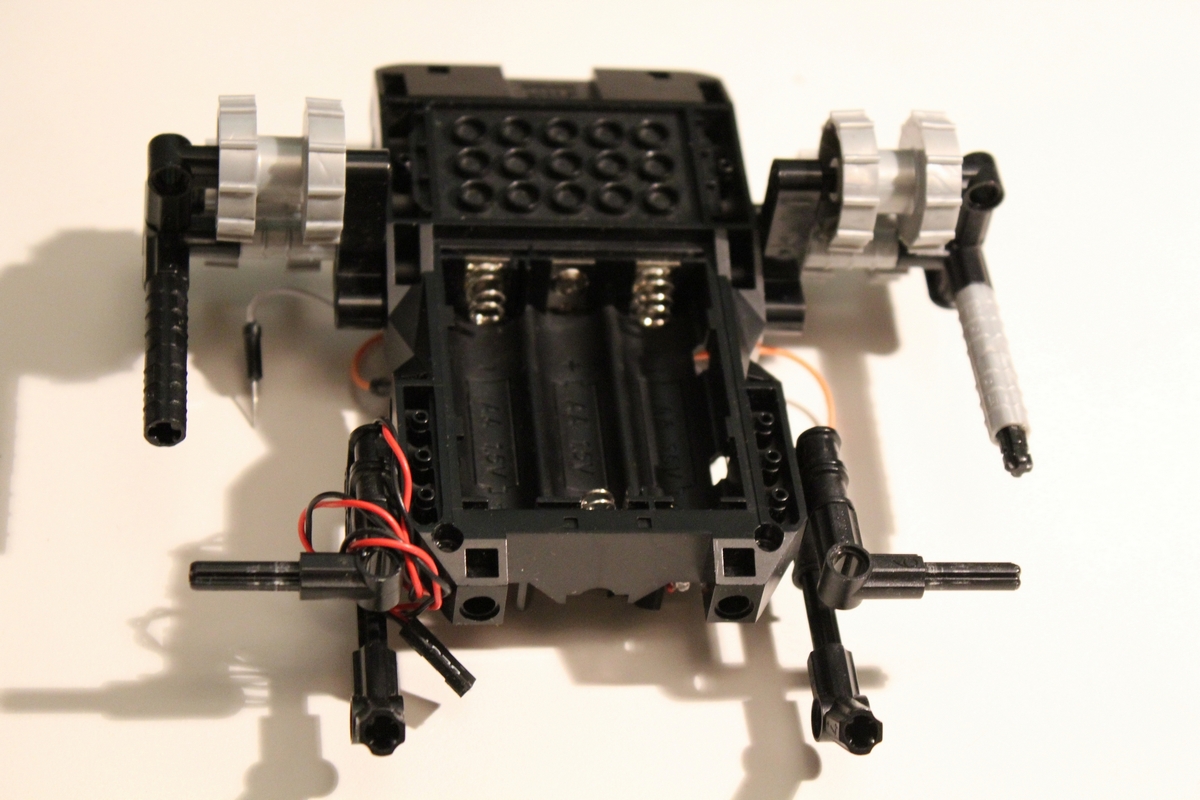
A couple of days before the arrival of the main parts, I decided to unsolder the motors from old brains and figure out how the whole system would be attached.
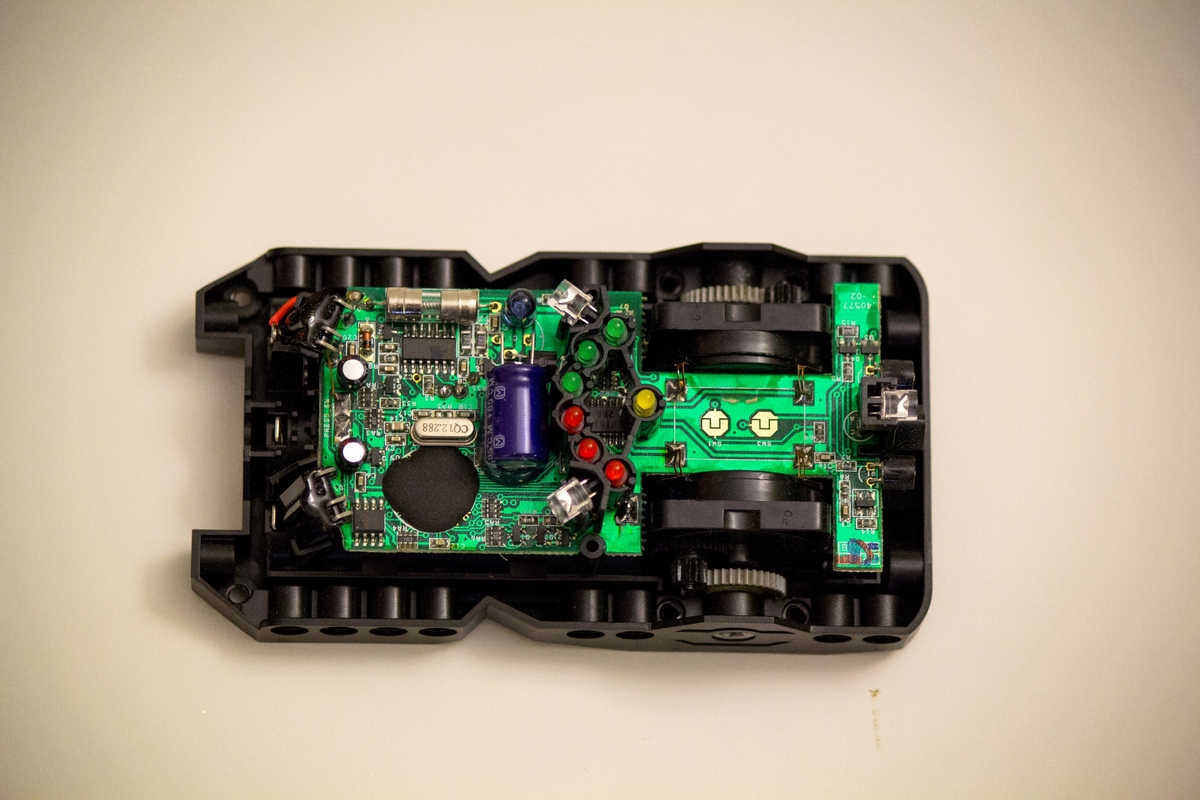
It turned out that it was not so easy, because the board was firmly enough to sit on the case.
And then the first surprise, the motors were held by attaching to the board. Therefore, I glued them and soldered to the wiring contacts for further convenience.
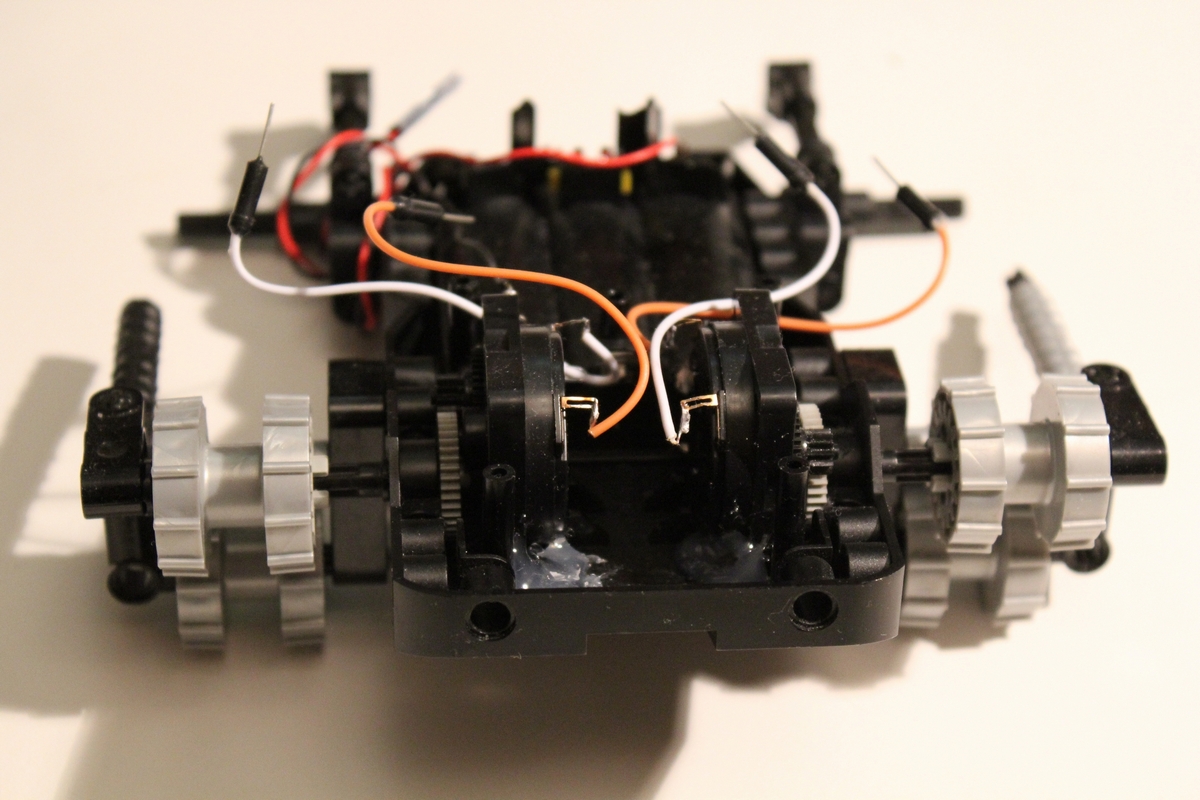
From the chassis itself, I decided not to experiment much and assemble it according to the standard scheme.

I tried to make the circuit flexible so that parts could be easily detached from the robot. I needed to figure out how to attach my details to LEGO. It turned out to be easier than it seemed. At first, I took up the driver of the engines, with a slight movement of the hand, attaching it to the LEGO details. True, I had to modernize the old building a little, it turned out such an interesting composition.
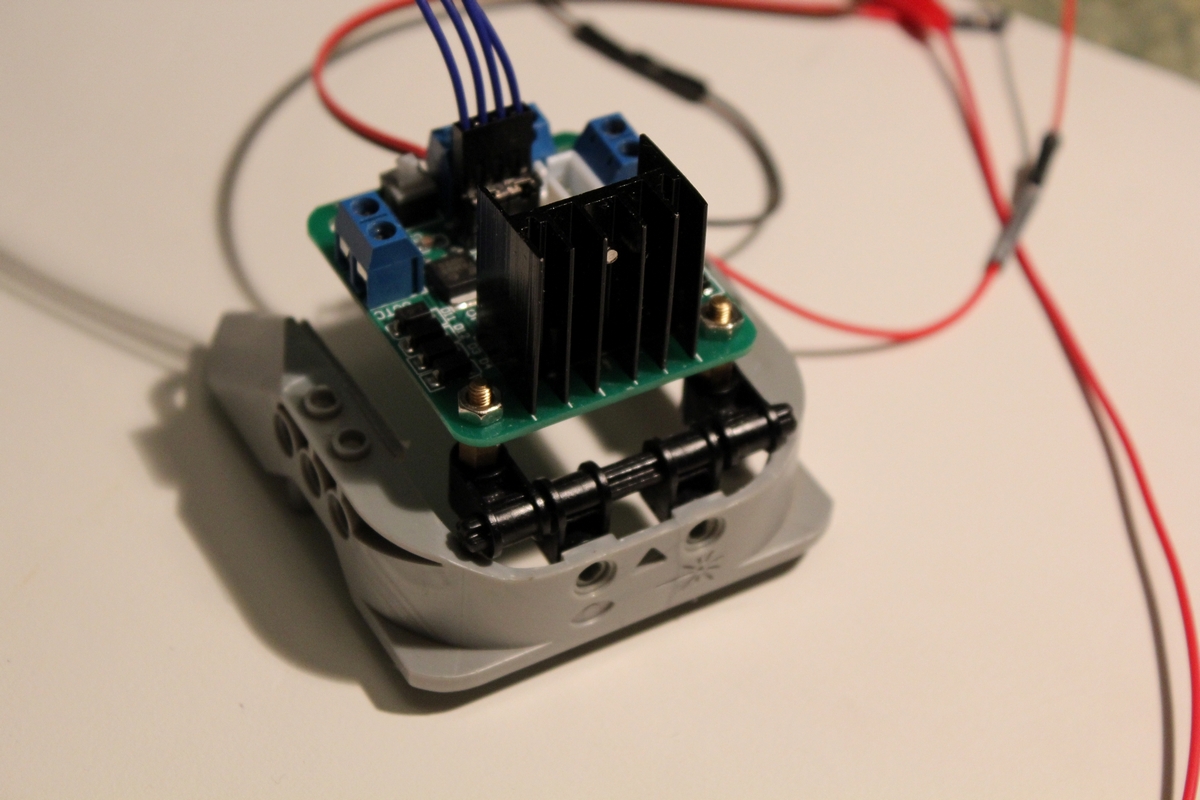
Which is no problem attached to the chassis of the robot.
Then I took the bluetooth module and the arduino. I glued the Bluetooth module to one of the parts so that it could be easily attached to any place. And for arduino I decided to use a connector, glued it to one of the LEGO parts, and soldered the necessary wires to it.

Now to attach the arduino, just plug it into the connector, and connect the power connector to it.
Finally, it's time to connect the assembled circuit and make the motors spin.
On the robot itself, it turned out to be inconvenient, so I had to reassemble the whole circuit into a breadboard and test it. For the future, I noted for myself always to start with the layout.
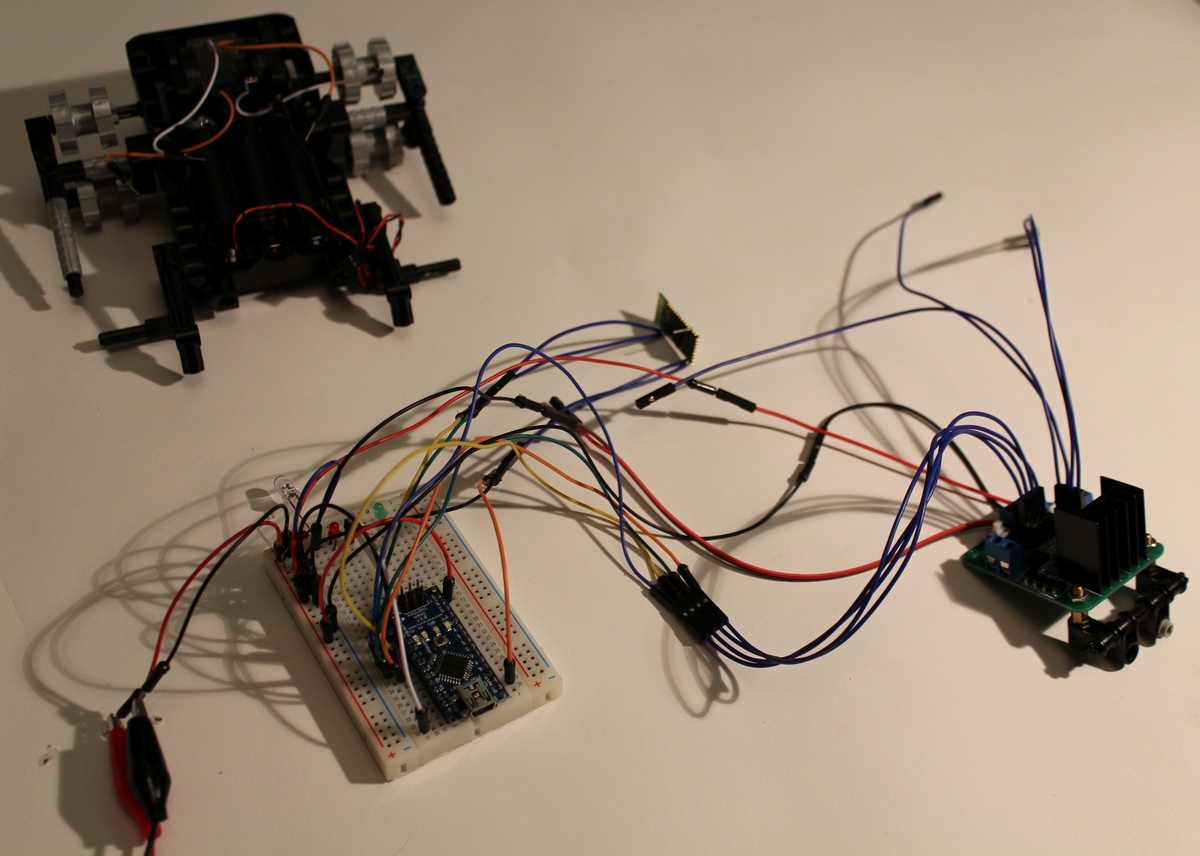
A smartphone was used for the tests, as it has bluetooth. Having rummaged on the Internet I found a couple of interesting programs. Blue Arduino seemed to me very comfortable. Nothing extra, the usual terminal for communication with arduino. Also interested in the Arduino Bluetooth Controller program, it’s convenient that the control interface is represented as a joystick and you can assign any command to any control very quickly. To test my robot already assembled, it came in very handy.
For arduino programming I used the standard package from the official site. It was written the simplest program, taken from test examples, just to test.
Here are the problems
At first, I came across the fact that when the bluetooth module is connected, the firmware is not flooded. But this was decided by the fact that the bluetooth power cord was easily disconnected from the arduino.
The biggest problem was that you need to choose the right power sources.
At first, for a long time I could not decide on the power scheme. On the Internet, I found a scheme with two separate sources, the "brains" and the engine driver. I immediately refused it and started testing various methods.

It turned out that the whole scheme can be powered both through the Arduino and through the engine driver.
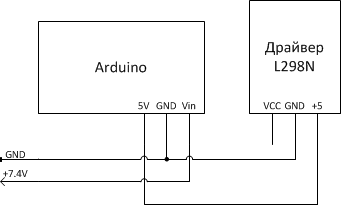
In the first circuit, I applied voltage to the Arduino at the Vin input, and we let the engine driver through 5V, but this way the motors did not have enough voltage.
My second scheme fed the driver of engines directly, and already it fed the arduino, with such a scheme, the engines were spinning well, but the brains began to dull. The program cycles have stopped working normally.
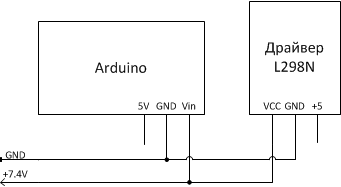
As a result, I just applied power in parallel, and everything began to work normally.
At the testing stage, everything was fine, because I was powered by a usb-wire. In vain, I initially rested in the deck for three AA batteries.
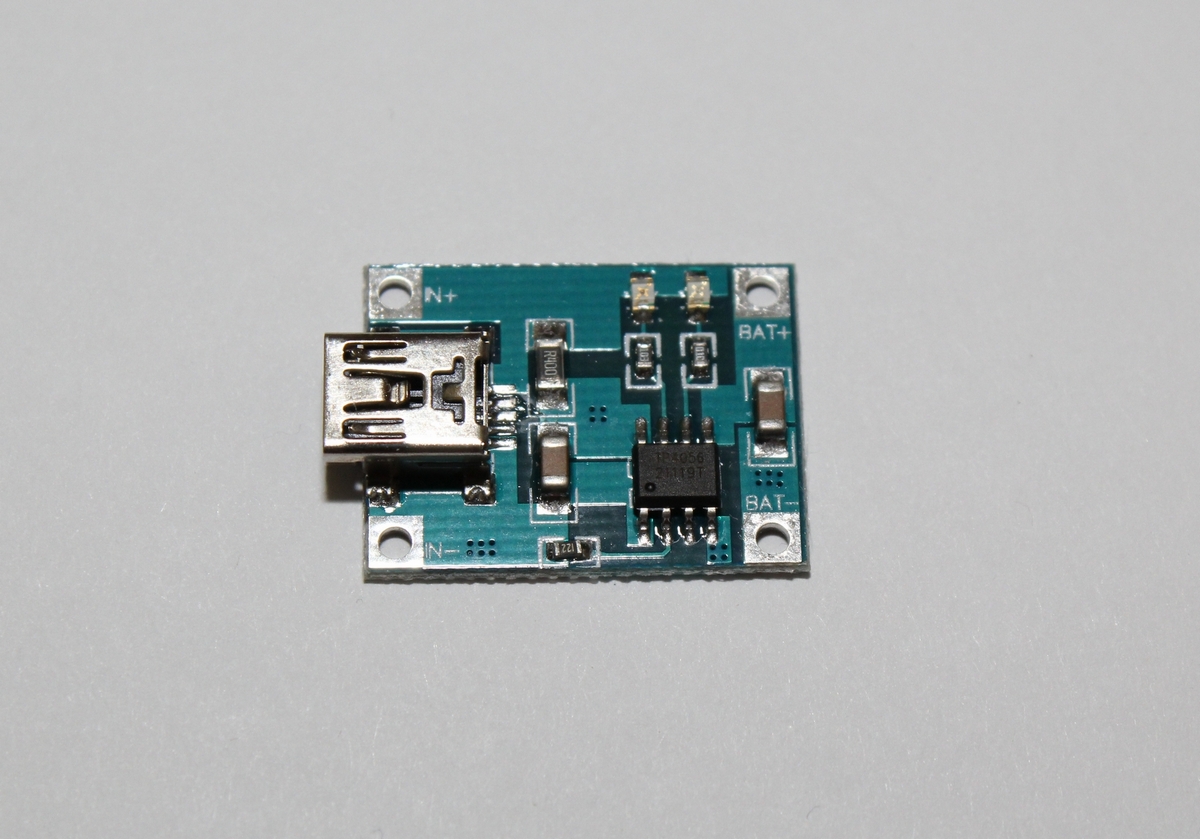
Three batteries were not enough to set the robot in motion, even with the use of a converter. As a result, the converter was removed from the circuit. While shopping, I found some great lithium-ion (li-ion) AA batteries.

They fit perfectly (voltage 3.7V). At the first test of these batteries, my robot rushed at high speed into the wall, I did not have time to stop it. Three batteries turned out to be too much. In the end, I left only two batteries.
To charge these batteries, the following module was purchased:
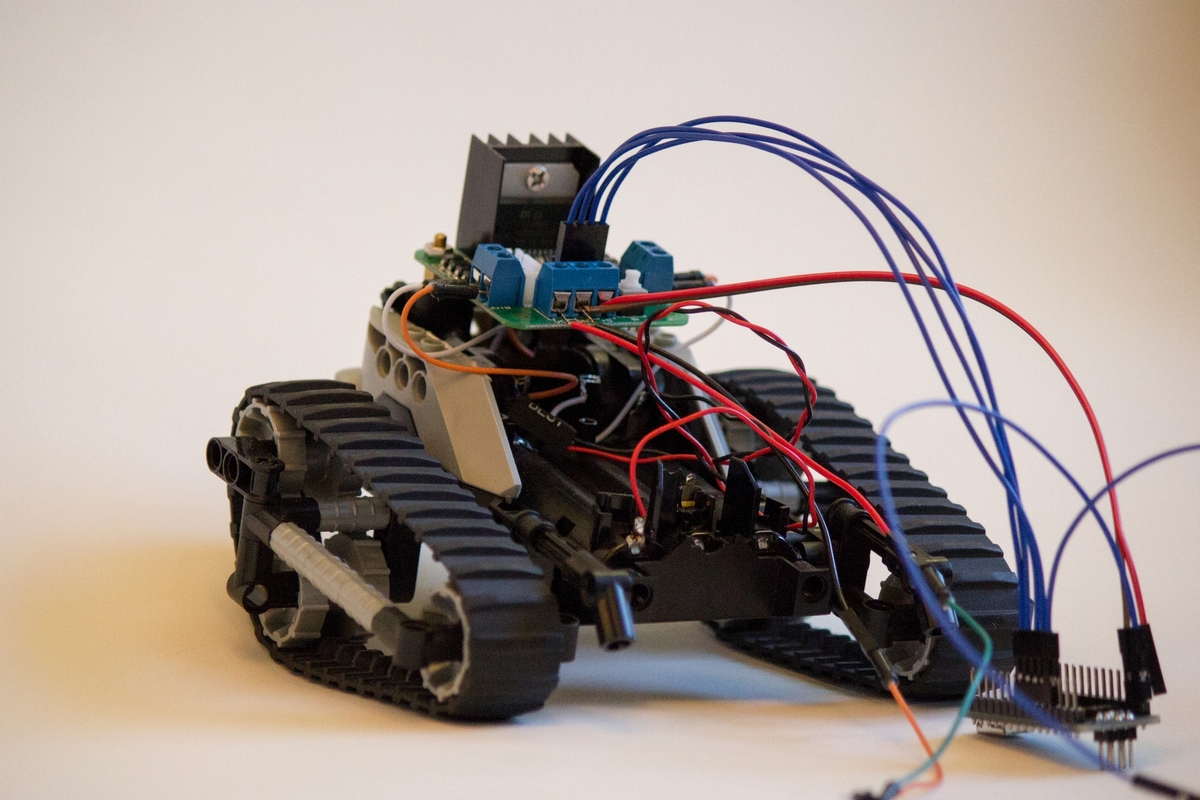
It turned out such a model of the robot.
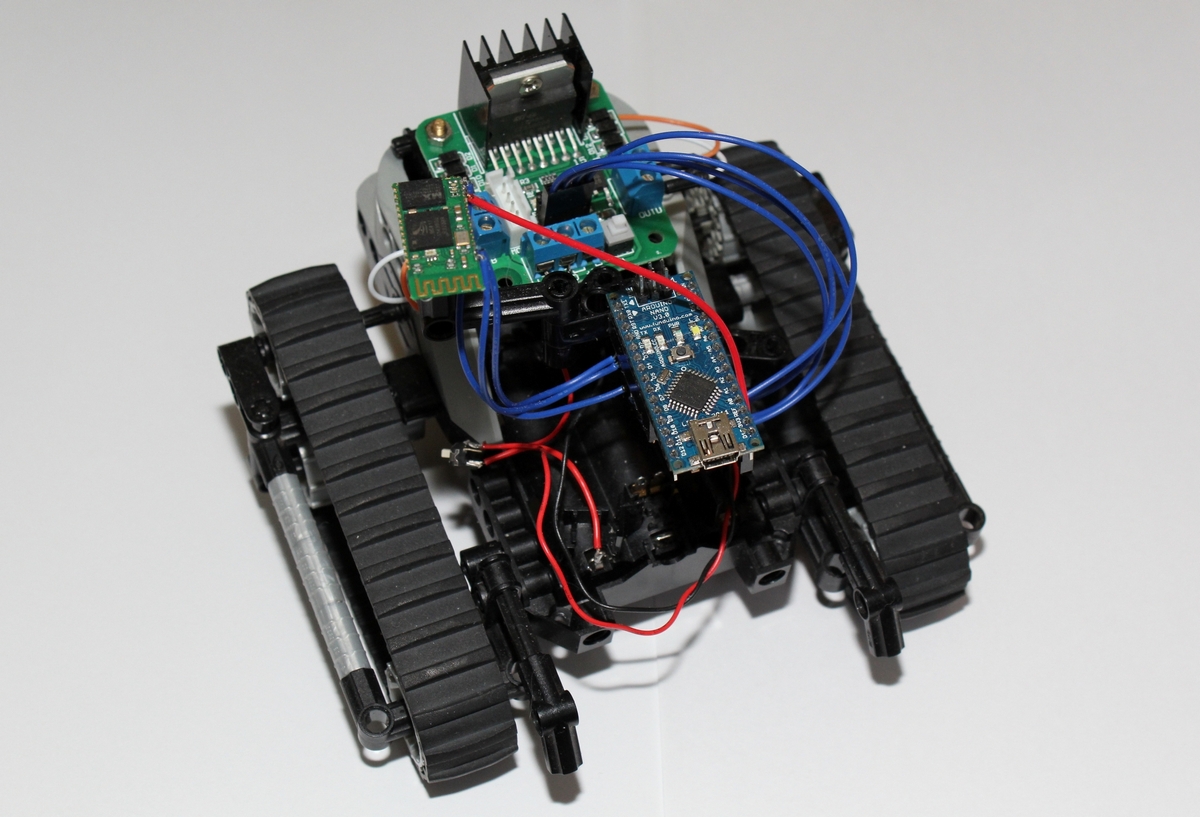
Then he had to rebuild the chassis, because he was very clumsy twitching, more precisely, he reared up, and was driving.
It turned out the model is quite compact, as I wanted. Patency has not yet verified, the main model turned out to be flexible - if necessary, you can easily remove the arduino board itself and use it in other projects. Also access to usb in free access, for debugging.
True, my model turns very roughly, the tracks turn, you have to try again to rebuild the chassis.
As a result, it turned out that he didn’t make any bias at all on programming, he spent more time on the assembly itself, but I think I’ll make it up later. First, I will test the various modules to the maximum, how they work and what they can do, and then I will make the system autonomous.
Thank you all for your attention! In the next article I will try to describe the connection of additional units to the robot, such as an ultrasonic range finder and a solar battery.
UPD
At the request of those wishing to add a video with testing your robot.
Preamble
I have long had an idea to create a robot, but I did not have enough time and knowledge.
And over time, I read various articles, inspired and rushed. Then I superficially imagined what microelectronics is, knew how to program a little, and decided that this knowledge would be enough.
The idea was to assemble a more or less compact robot, but rather passable and functional. I did not want to be attached to any specific platforms or to collect whale kits, so I decided to separately order parts and try to make as little as possible from improvised means.
Parts selection
At first, I began to choose the “brain” of the robot. LEGO Mindstorms seemed to me very attractive, it attracted exactly what could be assembled from parts of any chassis, which one wanted. But I didn’t want a ready-made designer, I connected the wiring and I’m done, and I myself need to solder, program, study microcontrollers, and the LEGO set is a little expensive. Therefore, the choice fell on the Arduino family. And not so expensive, and you can program. I was advised to take the Arduino Uno, but since I decided to do it compactly, it was decided to take the Arduino Nano.
')
When I started to choose a chassis, I suddenly remembered that somewhere in the closet LEGO SpyBotics was gathering dust, it was something like the progenitor of Mindstorms.
Immediately it was decided to give it under the knife, in my case, under the soldering iron.
Small size, two motors, tracked chassis - all this is ideally suited to my needs. Moreover, this model is no longer on the move, the data cable was completely lost, it was a hell of a business to program this model, and this went against my desire to master microelectronics.
I decided that I was dropping the motors from the board, leaving them, and returning the board itself back to the cabinet, although it would probably be possible to drop various sensors from it for further experiments.
So, with the main details figured out, now the rest. And so I began to look for where you can choose and buy spare parts. I found a girl who orders things from China, she promised to help with the purchase and gave a link to Taobao, advising to buy parts from one seller to pay less for shipping. After a couple of days of analysis, I decided on the supplier and made an order.
And after a month of waiting, the parcel finally arrived.
Content:
1) Arduino Nano V3.0 ATMEGA328P
2) Motors driver L298
When I chose the motor control module, I came across an interesting option, especially for Nano - Feedback Control add-on
But in China, I did not find this model, so I ordered a regular model.
3) Bluetooth HC-05
Through this module we will communicate with the PC. In the future I plan to write a control under Android.
4) LM2577 DC-DC Adjustable Step Up Power
I decided to order this voltage converter just in case, because the SpyBotics chassis has only 3 AA batteries, and I didn’t know if I would have enough power.
Well, plus the little things: The circuit board and various wiring.
I did not order diodes, resistances and other trifles, I decided that they could be dropped from the old boards.
Build robot
I decided to build it in stages, experimenting with various options.
The approximate plan was:
1) Connect to the Arduino driver motors, well, actually, the motors themselves.
2) Screw the brains to the chassis and install the batteries.
3) Tighten the remote control to the robot.
And then there will be a modernization of the robot and attempts to make it as autonomous as possible.
A couple of days before the arrival of the main parts, I decided to unsolder the motors from old brains and figure out how the whole system would be attached.
It turned out that it was not so easy, because the board was firmly enough to sit on the case.
And then the first surprise, the motors were held by attaching to the board. Therefore, I glued them and soldered to the wiring contacts for further convenience.
From the chassis itself, I decided not to experiment much and assemble it according to the standard scheme.
I tried to make the circuit flexible so that parts could be easily detached from the robot. I needed to figure out how to attach my details to LEGO. It turned out to be easier than it seemed. At first, I took up the driver of the engines, with a slight movement of the hand, attaching it to the LEGO details. True, I had to modernize the old building a little, it turned out such an interesting composition.
Which is no problem attached to the chassis of the robot.
Then I took the bluetooth module and the arduino. I glued the Bluetooth module to one of the parts so that it could be easily attached to any place. And for arduino I decided to use a connector, glued it to one of the LEGO parts, and soldered the necessary wires to it.
Now to attach the arduino, just plug it into the connector, and connect the power connector to it.
Robot programming
Finally, it's time to connect the assembled circuit and make the motors spin.
On the robot itself, it turned out to be inconvenient, so I had to reassemble the whole circuit into a breadboard and test it. For the future, I noted for myself always to start with the layout.
A smartphone was used for the tests, as it has bluetooth. Having rummaged on the Internet I found a couple of interesting programs. Blue Arduino seemed to me very comfortable. Nothing extra, the usual terminal for communication with arduino. Also interested in the Arduino Bluetooth Controller program, it’s convenient that the control interface is represented as a joystick and you can assign any command to any control very quickly. To test my robot already assembled, it came in very handy.
For arduino programming I used the standard package from the official site. It was written the simplest program, taken from test examples, just to test.
char incomingByte; // void setup() { Serial.begin(9600); // Serial.println("Robot online..."); } void loop() { if (Serial.available() > 0) // { incomingByte = Serial.read(); // if(incomingByte == 'w') // w, { digitalWrite(DR, HIGH); digitalWrite(DL, HIGH); digitalWrite(MR, LOW); digitalWrite(ML, LOW); Serial.println("Forward"); } if(incomingByte == 's') // s, { digitalWrite(DR, LOW); digitalWrite(DL, LOW); digitalWrite(MR, HIGH); digitalWrite(ML, HIGH); Serial.println("Backward"); } if(incomingByte == 'a') // a, { digitalWrite(DR, HIGH); digitalWrite(DL, LOW); digitalWrite(MR, LOW); digitalWrite(ML, HIGH); Serial.println("Left"); } if(incomingByte == 'd') // d, { digitalWrite(DR, LOW); digitalWrite(DL, HIGH); digitalWrite(MR, HIGH); digitalWrite(ML, LOW); Serial.println("Right"); } if(incomingByte == 'f') // f, { digitalWrite(DR, LOW); digitalWrite(DL, LOW); digitalWrite(MR, LOW); digitalWrite(ML, LOW); Serial.println("Stop"); } } } Here are the problems
At first, I came across the fact that when the bluetooth module is connected, the firmware is not flooded. But this was decided by the fact that the bluetooth power cord was easily disconnected from the arduino.
The biggest problem was that you need to choose the right power sources.
At first, for a long time I could not decide on the power scheme. On the Internet, I found a scheme with two separate sources, the "brains" and the engine driver. I immediately refused it and started testing various methods.
It turned out that the whole scheme can be powered both through the Arduino and through the engine driver.
In the first circuit, I applied voltage to the Arduino at the Vin input, and we let the engine driver through 5V, but this way the motors did not have enough voltage.
My second scheme fed the driver of engines directly, and already it fed the arduino, with such a scheme, the engines were spinning well, but the brains began to dull. The program cycles have stopped working normally.
As a result, I just applied power in parallel, and everything began to work normally.
At the testing stage, everything was fine, because I was powered by a usb-wire. In vain, I initially rested in the deck for three AA batteries.
Three batteries were not enough to set the robot in motion, even with the use of a converter. As a result, the converter was removed from the circuit. While shopping, I found some great lithium-ion (li-ion) AA batteries.
They fit perfectly (voltage 3.7V). At the first test of these batteries, my robot rushed at high speed into the wall, I did not have time to stop it. Three batteries turned out to be too much. In the end, I left only two batteries.
To charge these batteries, the following module was purchased:
Conclusion
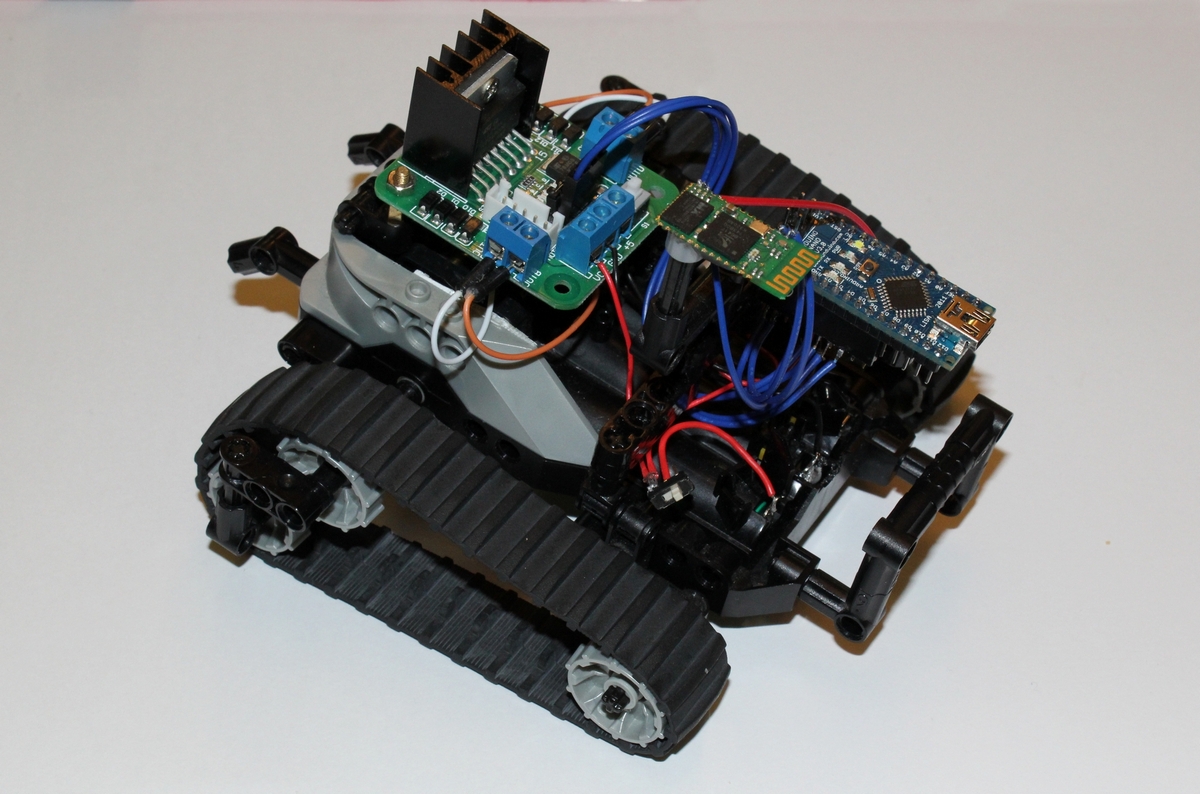
It turned out such a model of the robot.
Then he had to rebuild the chassis, because he was very clumsy twitching, more precisely, he reared up, and was driving.
It turned out the model is quite compact, as I wanted. Patency has not yet verified, the main model turned out to be flexible - if necessary, you can easily remove the arduino board itself and use it in other projects. Also access to usb in free access, for debugging.
True, my model turns very roughly, the tracks turn, you have to try again to rebuild the chassis.
As a result, it turned out that he didn’t make any bias at all on programming, he spent more time on the assembly itself, but I think I’ll make it up later. First, I will test the various modules to the maximum, how they work and what they can do, and then I will make the system autonomous.
Thank you all for your attention! In the next article I will try to describe the connection of additional units to the robot, such as an ultrasonic range finder and a solar battery.
UPD
At the request of those wishing to add a video with testing your robot.
Source: https://habr.com/ru/post/208110/
All Articles