An animation of the SVG path element
I think many have seen reviews of the new generation of game consoles from Polygon (Vox Media) . These are the ones where consoles were drawn in the style of blueprints:
The reviews looked cool, rather unusual and new. About how the main feature of reviews is implemented - SVG animation, how to make something similar to yourself, and what other “secret” possibilities the good old SVG hides in terms of animation of the
In general, the technique of such line animation is not new, just until recently, SVG and everything connected with it, in my opinion, was unfairly forgotten, but fortunately the situation is changing. So, the trick with the animation of the
')
The guys from Vox Media used a hybrid version (which, in my opinion, is redundant), by the way, you can (and should) read how they did it in their blog: Polygon feature design: SVG animations for fun and profit .
Vox Media suggests using
This is actually the working code used to animate the console from the beginning of the article.
In the
I think you noticed that some of the elements are displayed constantly, this is because they are not drawn using
We start simply with the movement along the line, while without rotation.
Here
Let's complicate the task, add rotation (well, let's change the marker from the circle to something more interesting). As a marker, we will have a rocket with a width of
The
The implementation can be viewed here: Marker animation along SVG path element with D3.js III .
First, to achieve an interesting effect in terms of design. You can display objects as you scroll, you can animate the text, though you have to take into account that by default each letter is a separate element of the
And you can use it from a practical point of view, for example, to animate movement along routes on charts and plans (animation of arrows, etc.). And also for infographics, there are a lot of options, if correctly used, you can very effectively manage the reader's attention.
That's all. Try, experiment, create - everything is in your hands. And may good luck accompany you this year.
UPD:
More articles on this topic:
The reviews looked cool, rather unusual and new. About how the main feature of reviews is implemented - SVG animation, how to make something similar to yourself, and what other “secret” possibilities the good old SVG hides in terms of animation of the
path element - can be found under the cat. Stroke-dasharray interpolation, theory
In general, the technique of such line animation is not new, just until recently, SVG and everything connected with it, in my opinion, was unfairly forgotten, but fortunately the situation is changing. So, the trick with the animation of the
path element is possible thanks to the stroke-dasharray property of the path element. This property allows you to set the parameters of the dotted line, namely the length of the stroke and the gap between the strokes. If we set the length of the stroke equal to the entire length of the line, we get an ordinary solid line. If we set the stroke length equal to zero, and the gap length is again equal to the entire length of the line, then we get an invisible line. And gradually increasing the length of the stroke with the length of the gap equal to the length of the entire line, we can imitate its drawing. With this approach, drawing will occur from the beginning of the line. If you suddenly need to draw from the end, then you need to use another property: stroke-dashoffset . This property defines the offset for the first stroke. Thus, reducing the offset and increasing the length of the stroke, we get the drawing from the end of the line.')
The guys from Vox Media used a hybrid version (which, in my opinion, is redundant), by the way, you can (and should) read how they did it in their blog: Polygon feature design: SVG animations for fun and profit .
SVG animation implementation
Vox Media suggests using
requestAnimationFrame for smooth animation, but we have slightly different goals, so we will go more simply by using the D3.js library and the duration-based animation implemented in it.This is actually the working code used to animate the console from the beginning of the article.
queue() .defer(d3.xml, "PS4.svg", "image/svg+xml") .await(ready); function ready(error, xml) { //Adding our svg file to HTML document var importedNode = document.importNode(xml.documentElement, true); d3.select("#pathAnimation").node().appendChild(importedNode); var svg = d3.select("svg"), svgWidth = svg.attr("width"), svgHeight = svg.attr("height"); var paths = svg.selectAll("path") .call(transition); function transition(path) { path.transition() .duration(5000) .attrTween("stroke-dasharray", tweenDash) .each("end", function() { d3.select(this).call(transition); }); // infinite loop } function tweenDash() { var l = this.getTotalLength(), i = d3.interpolateString("0," + l, l + "," + l); // interpolation of stroke-dasharray attr return function(t) { return i(t); }; } } In the
transition(path) function, we use transition.attrTween (name, tween) , which calls the interpolator defined in the tweenDash() function. To calculate the length, use the getTotalLength () method defined for the SVG path elements. Then, using the d3.interpolateString (a, b), the interpolator of the property stroke-dasharray , which interpolates the values from the stroke-dasharray: 0,l; before stroke-dasharray: l,l; (here the first value specifies the length of the stroke, and the second length of the gap). You can see how this works on bl.ocks.org : PlayStation 4: SVG animation .I think you noticed that some of the elements are displayed constantly, this is because they are not drawn using
path . In general, the preparation and optimization of vector images for the web is a rather extensive topic with a lot of nuances pulling on a separate article.Movement along the path element
path has another very useful method - getPointAtLength (distance in float) . It allows you to get the coordinates of a point located at a given distance from the beginning of the line. With it, you can realize the movement of any marker along the line, and, importantly, a smooth rotation by calculating the tangent to the existing line.We start simply with the movement along the line, while without rotation.
queue() .defer(d3.xml, "wiggle.svg", "image/svg+xml") .await(ready); function ready(error, xml) { //Adding our svg file to HTML document var importedNode = document.importNode(xml.documentElement, true); d3.select("#pathAnimation").node().appendChild(importedNode); var svg = d3.select("svg"); var path = svg.select("path#wiggle"), startPoint = pathStartPoint(path); var marker = svg.append("circle"); marker.attr("r", 7) .attr("transform", "translate(" + startPoint + ")"); transition(); //Get path start point for placing marker function pathStartPoint(path) { var d = path.attr("d"), dsplitted = d.split(" "); return dsplitted[1].split(","); } function transition() { marker.transition() .duration(7500) .attrTween("transform", translateAlong(path.node())) .each("end", transition);// infinite loop } function translateAlong(path) { var l = path.getTotalLength(); return function(i) { return function(t) { var p = path.getPointAtLength(t * l); return "translate(" + px + "," + py + ")";//Move marker } } } } Here
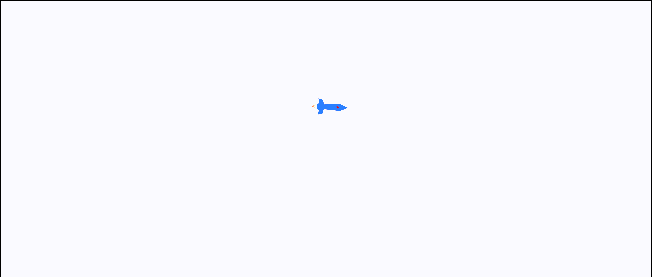
pathStartPoint(path) pulls the coordinates of the beginning of the line from the attribute d of the path element. In translateAlong(path) , using the interpolator, we set the coordinates of our marker. An example can be found here: Marker animation along SVG path element with D3.js. You can also combine line drawing animation and marker movement, it can look like this: Marker animation along SVG path element with D3.js II .Let's complicate the task, add rotation (well, let's change the marker from the circle to something more interesting). As a marker, we will have a rocket with a width of
48 and a length of 24 . Since by default the marker's snap point is the upper left corner, we need to shift it so that the snap is to the center of the marker. It is also necessary to take this into account when rotating, because it also occurs by default around the upper left corner. With an offset sort of sorted out. Now let's proceed directly to the rotation, here the tangent definition will help us, the angle will be determined using the arctangent.The
translateAlong(path) function that defines the interpolator will look like this: function translateAlong(path) { var l = path.getTotalLength(); var t0 = 0; return function(i) { return function(t) { var p0 = path.getPointAtLength(t0 * l);//previous point var p = path.getPointAtLength(t * l);////current point var angle = Math.atan2(py - p0.y, px - p0.x) * 180 / Math.PI;//angle for tangent t0 = t; //Shifting center to center of rocket var centerX = px - 24, centerY = py - 12; return "translate(" + centerX + "," + centerY + ")rotate(" + angle + " 24" + " 12" +")"; } } } The implementation can be viewed here: Marker animation along SVG path element with D3.js III .
Where and for what it can be used
First, to achieve an interesting effect in terms of design. You can display objects as you scroll, you can animate the text, though you have to take into account that by default each letter is a separate element of the
path , and there is a lot to come up with.And you can use it from a practical point of view, for example, to animate movement along routes on charts and plans (animation of arrows, etc.). And also for infographics, there are a lot of options, if correctly used, you can very effectively manage the reader's attention.
That's all. Try, experiment, create - everything is in your hands. And may good luck accompany you this year.
UPD:
More articles on this topic:

Source: https://habr.com/ru/post/207908/
All Articles