WDS and unattended installation of Windows 7
Good day, gentlemen, good! Habr in read-only mode I read for a long time, I decided to write an article here. I understand that the decision may not be entirely correct from someone’s point of view, but for me it all works the way I wanted. I work as a system administrator in an educational institution (GBOU SPO). In the submission of a park of 150 cars of various configurations. Before that, I already did a Windows XP image. And now I have set the following task for myself - to make a unified image of the Win7 OS. And that's how I coped with this task.
We have the following:
- Park of x86 architecture with various drivers;
- server (also known as a domain controller) with pre-configured WDS;
- a lot of software;
- wsus offline update for downloading updates;
- sysprep driver scanner to replace the local driver repository;
Description of the installation and configuration of WDS, I will not give, because this good in the vast runet abound. Here is one of them tyts .
Let's start with the installation of the OS, in this case we have Windows 7 Enterprise. After its completion, we fill the system with software. In my case, everything is a little easier. The enterprise has an App-V server. And all the necessary packages are pulled from it at the first launch. On the final image are only a few important programs.
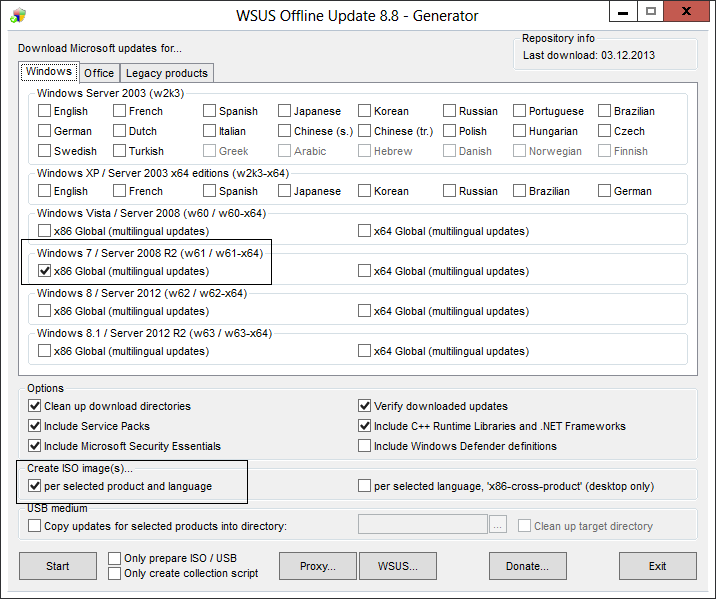
For this we need this program . After unpacking, run UpdateGenerator.exe, set the checkbox “Windows 7 / Server 2008r2 x86 global” and on “Create Iso images, per selected product” and click “Start!”.
')
After completing the work in the iso folder, you will find your image with updates. We mount it to our system and install it. I want to note that the process is quite long. When installing updates on this path - win7 creates a temporary user. After the 1st system reboot, this account is logged in. And in order not to be distracted once again for all this good - extract the image to any folder and run UpdateInstaller.exe. Check “Automatic reboot and recall”. By pressing the "START" button you can safely go to drink tea.
Everything is very simple. From the driverpacks.net website , we download the necessary driver packages. You can do in two ways. Choose the whole packages you need, or choose specific drivers for your needs. The price of the question is the size of the final image.
After we received the driver - create a folder on the disk and unzip them there. Next, download this and launch it. Next - we prescribe the path to our folder with firewood. Click alternately "scan", "default", "save", "done". Everything, now when installing the driver will be searched in this directory. Theoretically, you can put several driver scan points. Ie, locally, we will look for drivers on the NIC, and everything else will drag on the network balls. But I did not try it, only now I thought it up.

Since we will make an answer file - the following will be the best way to seal the OS. When running sysprep.exe, select “Switch to audit mode”. After the reboot, remove the profile from which you installed the system, also check the folder C: \ Users for the presence of tails.
Then - just call sysprep, but now choose “Switch to the system's welcome window (OOBE)” and “Shut down”. After the work is finished, your PC will turn off and it will be ready to capture the image.
Here I better provide you with a link to the source. It describes the process of creating an answer file for both the installation image and the OS image itself.
tyts
After all these actions, we have an automatic installation of the OS at 80%. Why? Because in my case, the choice of image, disk layout and input to the domain remained manual. Some points could be replaced, for example, to put a full-fledged WSUS service on the server. WDS could be supplemented with MDT, or deployed System Center Configuration Manager. But I went this way. Thank you for your attention, criticism welcome!
Start
We have the following:
- Park of x86 architecture with various drivers;
- server (also known as a domain controller) with pre-configured WDS;
- a lot of software;
- wsus offline update for downloading updates;
- sysprep driver scanner to replace the local driver repository;
Description of the installation and configuration of WDS, I will not give, because this good in the vast runet abound. Here is one of them tyts .
Let's start with the installation of the OS, in this case we have Windows 7 Enterprise. After its completion, we fill the system with software. In my case, everything is a little easier. The enterprise has an App-V server. And all the necessary packages are pulled from it at the first launch. On the final image are only a few important programs.
Generation and installation of updates
For this we need this program . After unpacking, run UpdateGenerator.exe, set the checkbox “Windows 7 / Server 2008r2 x86 global” and on “Create Iso images, per selected product” and click “Start!”.
')
After completing the work in the iso folder, you will find your image with updates. We mount it to our system and install it. I want to note that the process is quite long. When installing updates on this path - win7 creates a temporary user. After the 1st system reboot, this account is logged in. And in order not to be distracted once again for all this good - extract the image to any folder and run UpdateInstaller.exe. Check “Automatic reboot and recall”. By pressing the "START" button you can safely go to drink tea.
Driver substitution
Everything is very simple. From the driverpacks.net website , we download the necessary driver packages. You can do in two ways. Choose the whole packages you need, or choose specific drivers for your needs. The price of the question is the size of the final image.
After we received the driver - create a folder on the disk and unzip them there. Next, download this and launch it. Next - we prescribe the path to our folder with firewood. Click alternately "scan", "default", "save", "done". Everything, now when installing the driver will be searched in this directory. Theoretically, you can put several driver scan points. Ie, locally, we will look for drivers on the NIC, and everything else will drag on the network balls. But I did not try it, only now I thought it up.
Sealing and removing the profile
Since we will make an answer file - the following will be the best way to seal the OS. When running sysprep.exe, select “Switch to audit mode”. After the reboot, remove the profile from which you installed the system, also check the folder C: \ Users for the presence of tails.
Then - just call sysprep, but now choose “Switch to the system's welcome window (OOBE)” and “Shut down”. After the work is finished, your PC will turn off and it will be ready to capture the image.
Create Answer File
Here I better provide you with a link to the source. It describes the process of creating an answer file for both the installation image and the OS image itself.
tyts
the end
After all these actions, we have an automatic installation of the OS at 80%. Why? Because in my case, the choice of image, disk layout and input to the domain remained manual. Some points could be replaced, for example, to put a full-fledged WSUS service on the server. WDS could be supplemented with MDT, or deployed System Center Configuration Manager. But I went this way. Thank you for your attention, criticism welcome!
Source: https://habr.com/ru/post/207646/
All Articles