“Sun for Plankton” - the basis of light-modeling in DIALux
Hello Habr, today is already Friday, which means I can blow off my old tradition to publish on Fridays something useful and tasty food from the world of science and technology.
The new year is approaching and I would like to give everyone this mini Dialux tutorial (a free program for 2D lighting and 3D modeling).
After looking at this short article and twisting in the hands of the project attached to it you will get the most initial ideas about lighting modeling. Dare to lighting calculations it is not at all scary.
Today we will provide comfortable regulatory conditions for display and paperworkers.
For details under the cat.
(Attention! Under the cut traffic)
PS, just in case, I am not engaged by the developers, just as a rule, I share with myself that I am learning at the same time.
')

To begin with, what is Dialux and why it is free.
Dialux is a free program for three-dimensional modeling and lighting calculations, developed by the Germans at the institute of something and something. Free because the luminaire manufacturers are paying for the program (this has its pros and cons)
The dialux-help resource will tell you in more detail.
There you can download the program.
Immediately I will note at the moment there are two branches
1 - This is actually Dialux itself, the older less demanding.
2 - Dialux Evo is a novelty, with its charms, but more raw and voracious.
Dialux itself is quite enough for us (current version 4.11)
By the way, Dialux, after some tambourine dances, is launched in * nix under Wine. (at least on my netbook with LMDE, the truth is really bad)
And so let's get started
What is our task? There is an office space in which there are two workplaces, one window and a door, the task is to select working lighting in accordance with regulatory requirements. (on SP_52.13330.2011 we take about 300 lux)
I prepared in advance the layout in dwg (lies with the project itself)
I plotted the plan in millimeters (that is, the room 3000h4000mm) it is desirable that the walls were closer to the origin
Now let's start developing the lighting project itself.
Open the program and use the wizard to select a new interior project
Then we import our layout.
Let's go through the necessary steps, choose the scale of the layout I drew in millimeters (so mil)
The room is imported
It is necessary to correct it
But for the beginning we will adjust bindings it is possible to disconnect superfluous and to leave a binding to dwg and lamps
Now let's process the geometry, drag the points to our layout and click “Ok”
Insert windows and doors (put only on the previously outlined borders of the room)
Simply choose by clicking on the model sketch and dragging it into CAD space, then you adjust the dimensions
We get just such a beauty
Then we will add fixtures for this, in the right part of the screen in the tab lighting inside the room we will choose something to install the fixture, I chose to set the fixtures field. The program will tell you how many lights you need to meet the requirements for light.
I chose such a luminaire - Focus SPARK 32-N LED luminaire for interior lighting
Lamps are taken either using the lamp selection tab
(there will be links to directories), or ies files are downloaded and imported into the project.
I almost forgot to insert the ceiling and paint the walls. Everything is dragged onto the CAD window and set up. I think you already understood the general principle.
Dialux allows you to simulate various lighting conditions. We add emergency scenes, working scenes and then daylight, daylight depends on the location and the specified time of day (configured on the project tab)
We will divide the group of our lamps into single elements and make one of them both working and emergency.
Add furniture
In the top menu, select the results, run the calculation for all scenes.
And then we will get acquainted with the results of the calculation, there is a lot of nice and detailed it is better to try 1 time.
After the calculation, the 3D lighting model can be seen not only in the calculation results, but in directly in the CAD window, choosing the necessary lighting scenes.
Dialux allows you to export the necessary simulation results to pdf, jpg dwg, and indeed a lot more can, but that's another story
This is only the basics and the article was written in a short time, but I hope you have been useful and interesting.
Happy New Year!
Here is the source link.
The new year is approaching and I would like to give everyone this mini Dialux tutorial (a free program for 2D lighting and 3D modeling).
After looking at this short article and twisting in the hands of the project attached to it you will get the most initial ideas about lighting modeling. Dare to lighting calculations it is not at all scary.
Today we will provide comfortable regulatory conditions for display and paperworkers.
For details under the cat.
(Attention! Under the cut traffic)
PS, just in case, I am not engaged by the developers, just as a rule, I share with myself that I am learning at the same time.
')
To begin with, what is Dialux and why it is free.
Dialux is a free program for three-dimensional modeling and lighting calculations, developed by the Germans at the institute of something and something. Free because the luminaire manufacturers are paying for the program (this has its pros and cons)
The dialux-help resource will tell you in more detail.
There you can download the program.
Immediately I will note at the moment there are two branches
1 - This is actually Dialux itself, the older less demanding.
2 - Dialux Evo is a novelty, with its charms, but more raw and voracious.
Dialux itself is quite enough for us (current version 4.11)
By the way, Dialux, after some tambourine dances, is launched in * nix under Wine. (at least on my netbook with LMDE, the truth is really bad)
And so let's get started
What is our task? There is an office space in which there are two workplaces, one window and a door, the task is to select working lighting in accordance with regulatory requirements. (on SP_52.13330.2011 we take about 300 lux)
I prepared in advance the layout in dwg (lies with the project itself)
I plotted the plan in millimeters (that is, the room 3000h4000mm) it is desirable that the walls were closer to the origin
Now let's start developing the lighting project itself.
Open the program and use the wizard to select a new interior project
Fig. one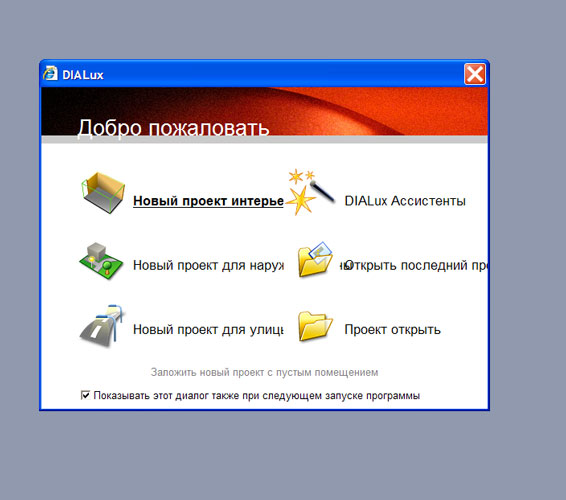
Then we import our layout.
Fig. 2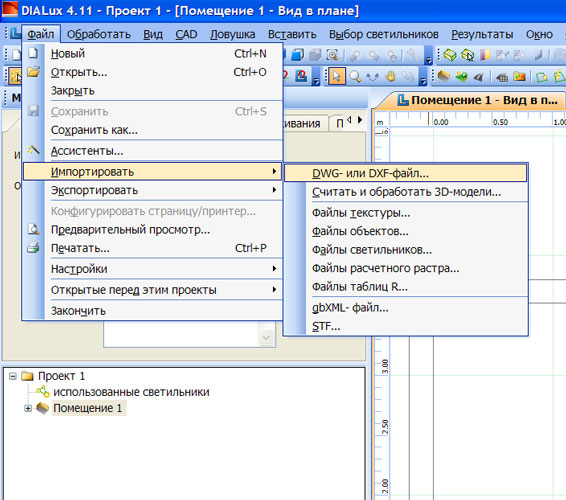
Let's go through the necessary steps, choose the scale of the layout I drew in millimeters (so mil)
Fig. 3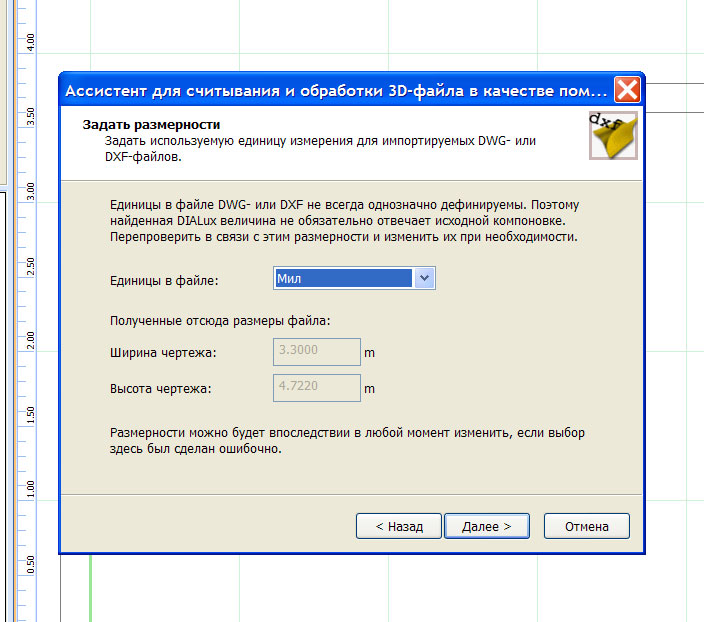
The room is imported
It is necessary to correct it
But for the beginning we will adjust bindings it is possible to disconnect superfluous and to leave a binding to dwg and lamps
Fig. four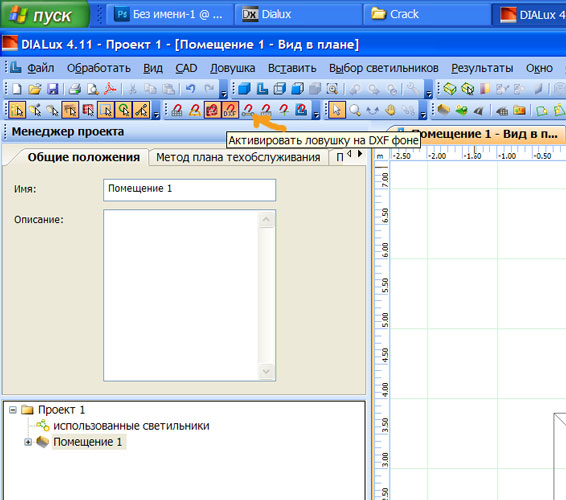
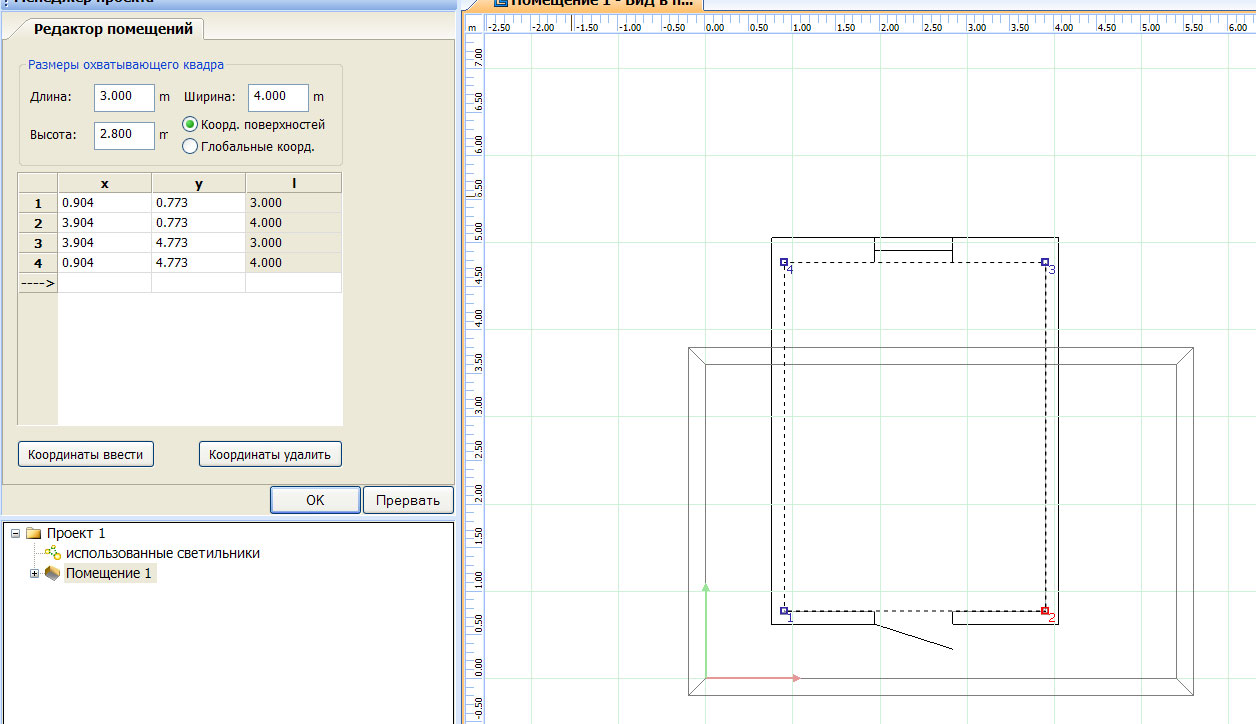
Now let's process the geometry, drag the points to our layout and click “Ok”
Fig. 5 and 6
Insert windows and doors (put only on the previously outlined borders of the room)
Simply choose by clicking on the model sketch and dragging it into CAD space, then you adjust the dimensions
We get just such a beauty
Fig. 7 and 8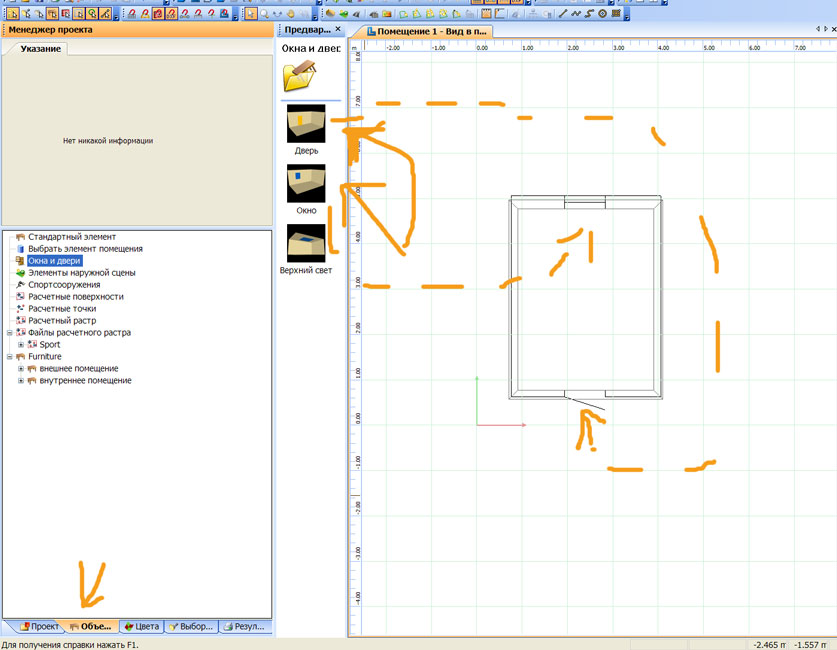
Then we will add fixtures for this, in the right part of the screen in the tab lighting inside the room we will choose something to install the fixture, I chose to set the fixtures field. The program will tell you how many lights you need to meet the requirements for light.
I chose such a luminaire - Focus SPARK 32-N LED luminaire for interior lighting
Lamps are taken either using the lamp selection tab
(there will be links to directories), or ies files are downloaded and imported into the project.
Fig. 9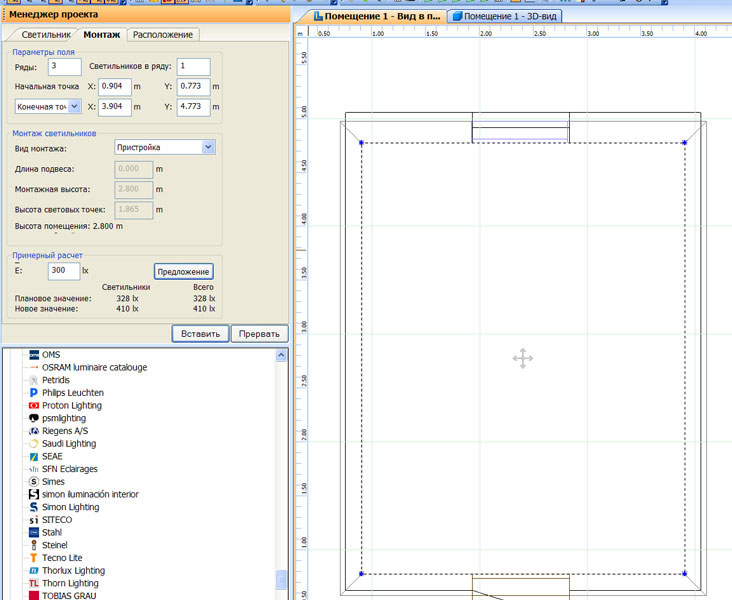
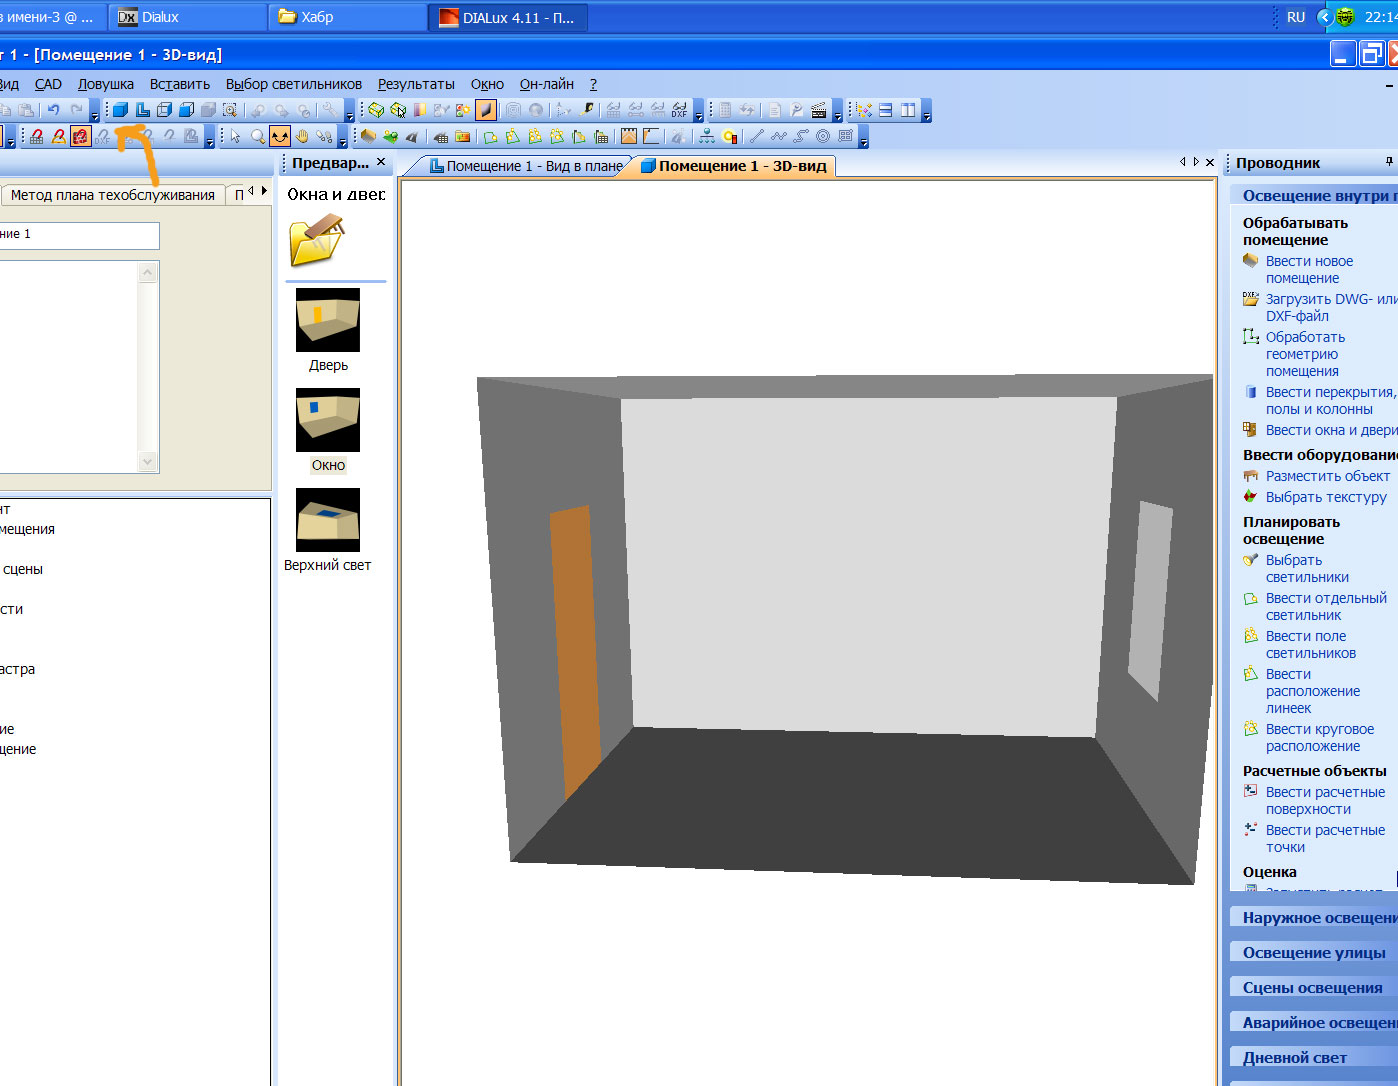
I almost forgot to insert the ceiling and paint the walls. Everything is dragged onto the CAD window and set up. I think you already understood the general principle.
Fig. ten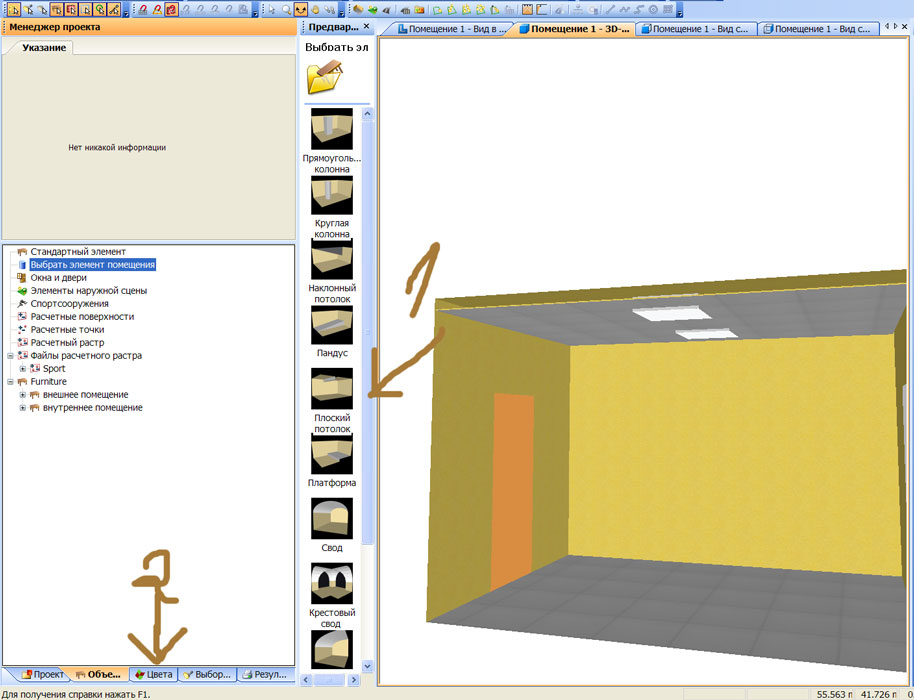
Dialux allows you to simulate various lighting conditions. We add emergency scenes, working scenes and then daylight, daylight depends on the location and the specified time of day (configured on the project tab)
Fig. eleven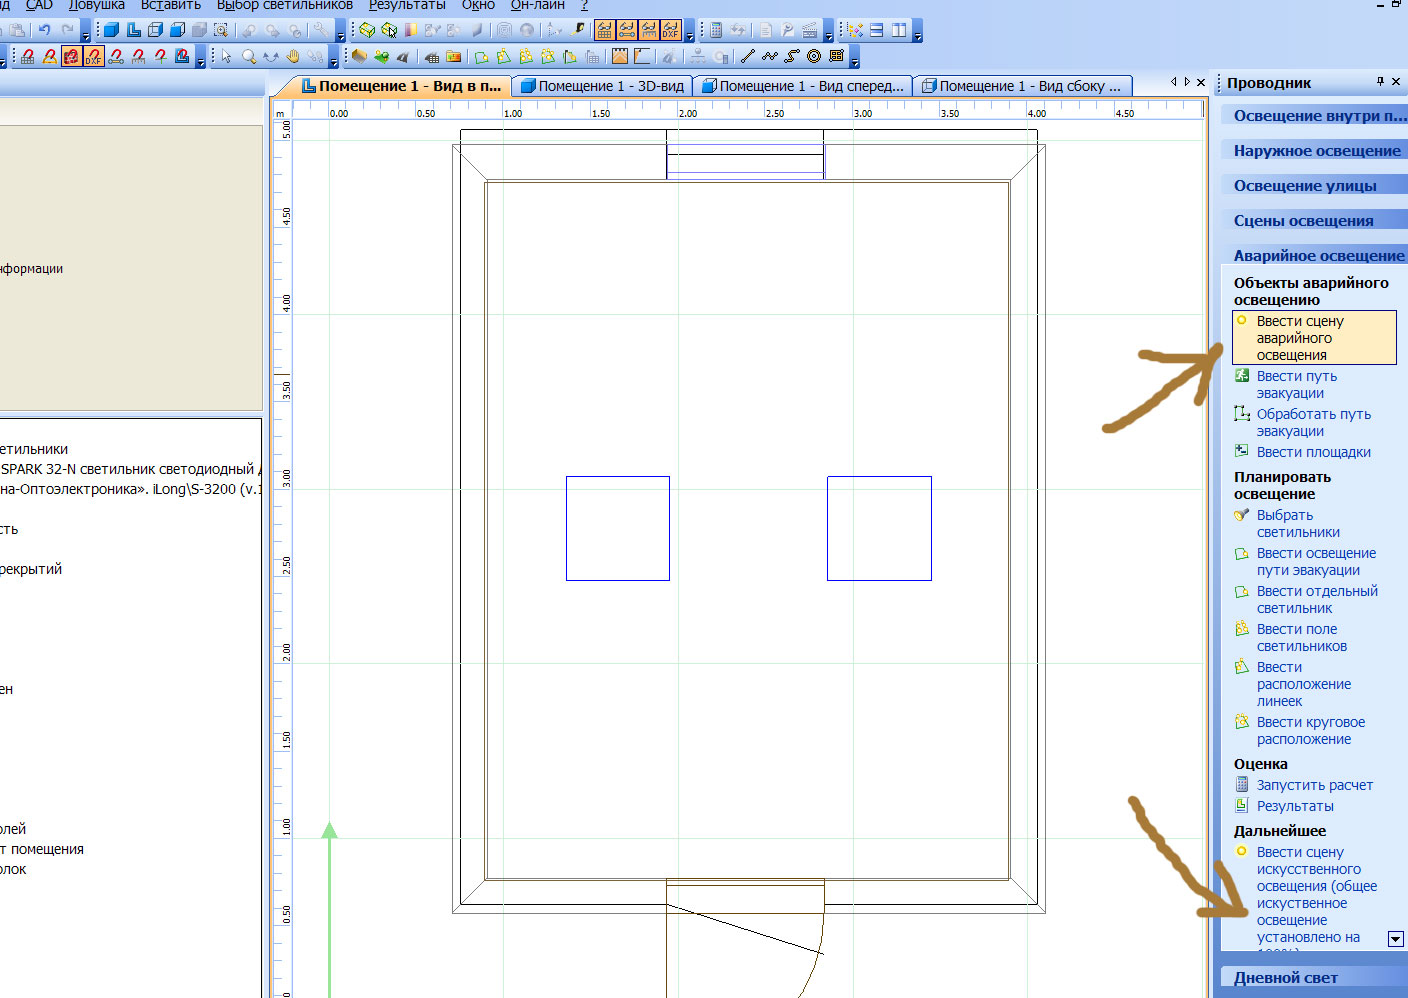
We will divide the group of our lamps into single elements and make one of them both working and emergency.
Fig. 12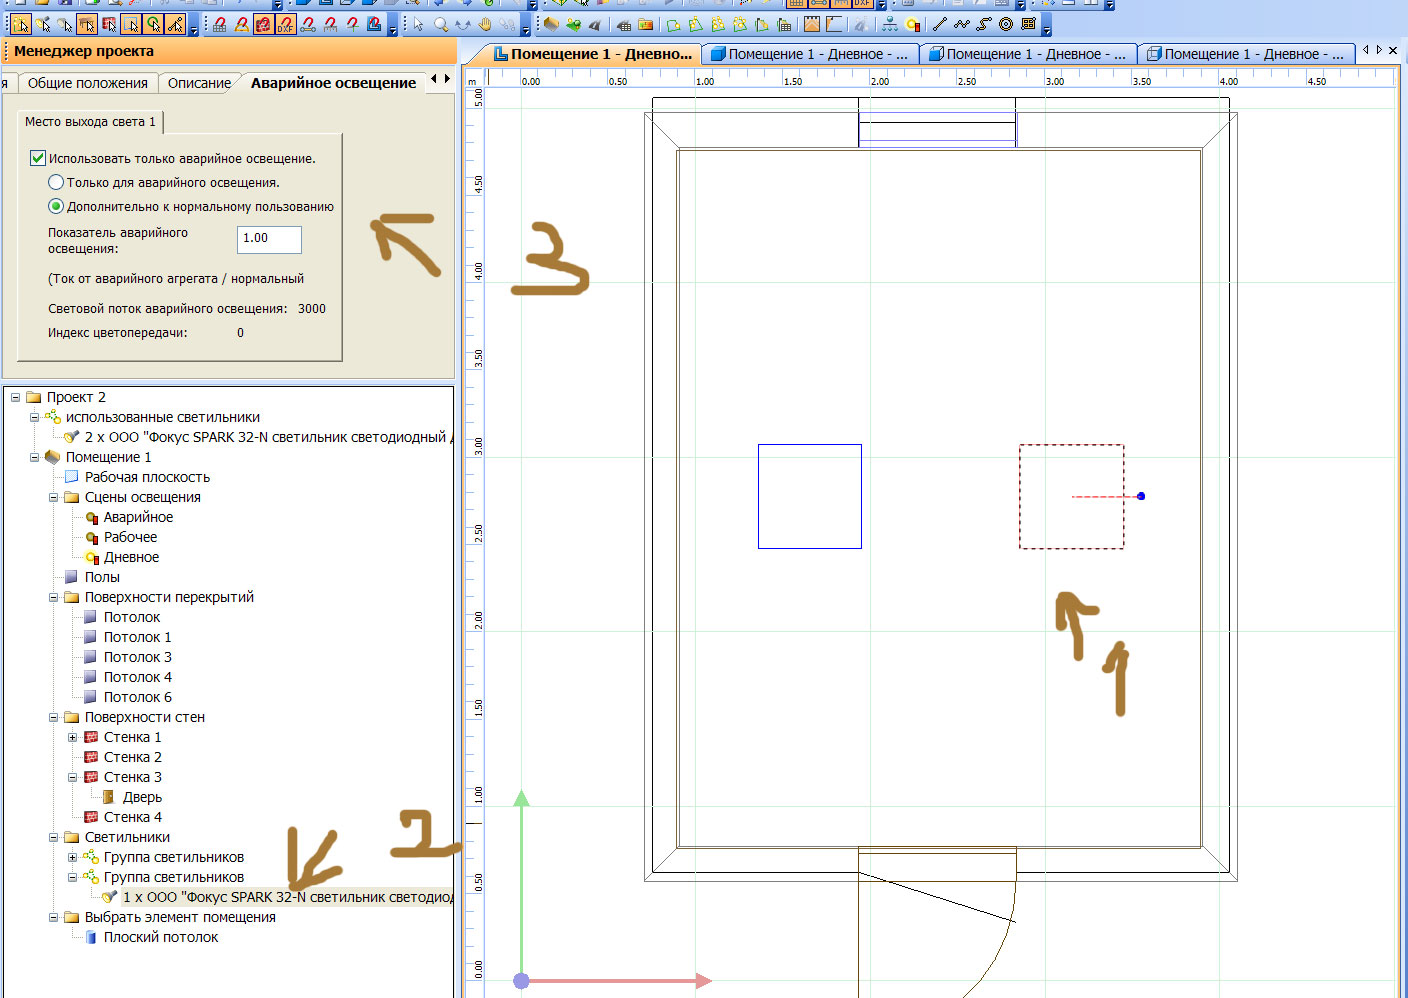
Add furniture
Fig. 13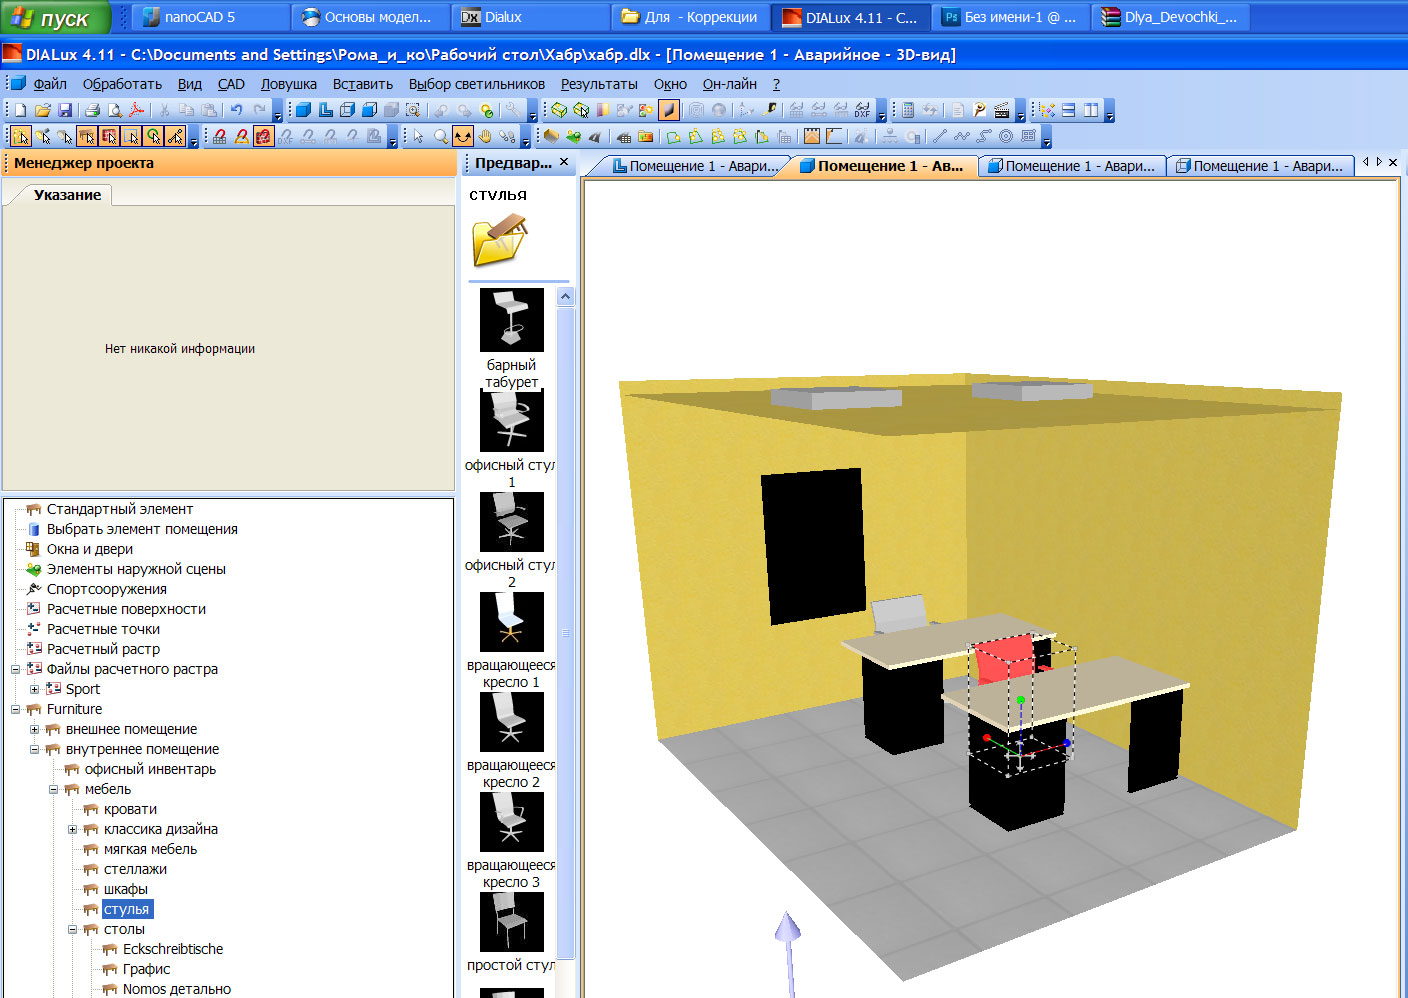
In the top menu, select the results, run the calculation for all scenes.
And then we will get acquainted with the results of the calculation, there is a lot of nice and detailed it is better to try 1 time.
Fig. 14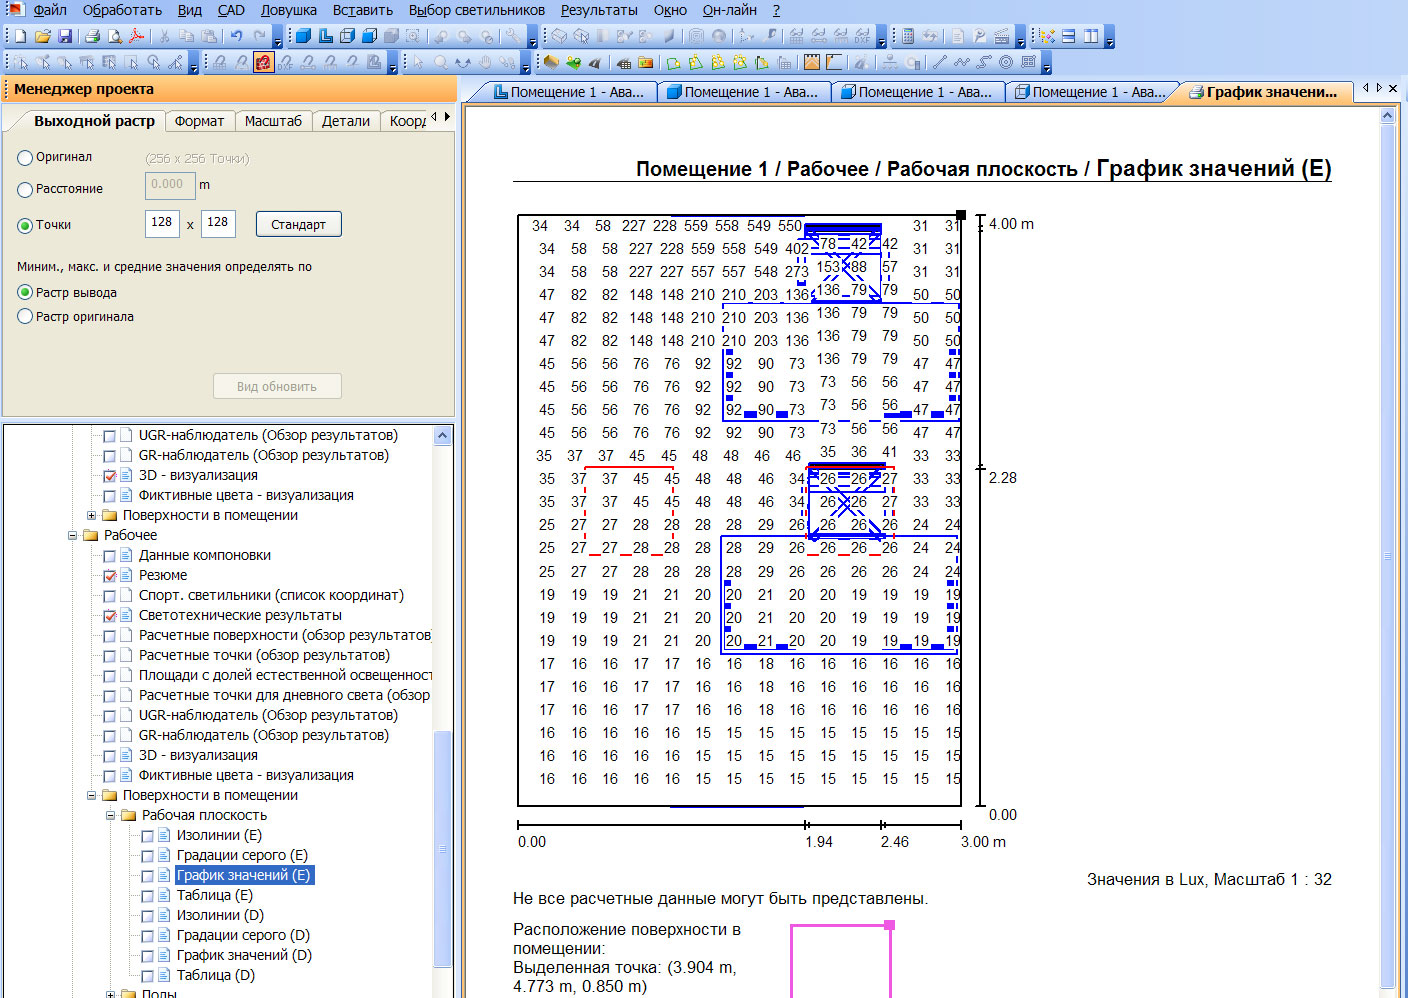
After the calculation, the 3D lighting model can be seen not only in the calculation results, but in directly in the CAD window, choosing the necessary lighting scenes.
Fig. 15
Dialux allows you to export the necessary simulation results to pdf, jpg dwg, and indeed a lot more can, but that's another story
This is only the basics and the article was written in a short time, but I hope you have been useful and interesting.
Happy New Year!
Here is the source link.
Source: https://habr.com/ru/post/207604/
All Articles