I2P proxy on hosting
Now, some resources in i2p are slowly beginning to crawl, so the question arose about convenient access to this network.
You can put an i2p router on your computer. Who wants to provide access to the entire home network, raise the proxy on the home router.
But my question was different. I wanted to be able to access i2p from any computer without installing additional software, even at the cost of security - because I don’t need to hide, but just watch something. If there is an opportunity to launch a remote desktop, then I’m from all Internet cafes and guests prefer to connect to the home server, and there is already my customized environment. In the case of slow connections or closed ports, it becomes difficult to use RDP. Therefore, the easiest and undemanding option is to raise the i2p router on the hosting and configure the http proxy.

There are no special requirements, VDS or just a rented server - depending on the needs and financial capabilities. If only there was a machine with root-access, which would draw java. The OS is not critical, if you really want to, then you can also raise it on windows proxies. But I did on Linux - cheaper and more familiar. Iron - AMD Athlon 64 5600+ X2, 2 GB RAM. But this is redundant, and I raised such a proxy on an inexpensive VDS with 256 RAM. The truth did not work very quickly and the resources were occupied by a decent percentage.
OS - debian wheezy. The choice of distribution does not play a role, just got used to debian for the last 15 years.
First we add the i2p repository to sources.list:
Download the repository key www.i2p2.de/_static/debian-repo.pub and add it to apt:
We update the package database and install i2p and i2p-keyring package (repository key updates):
Dependencies (including java) will be pulled out automatically.
You can start ip2 simply by typing " i2prouter start " in the console or by a service at system startup. Convenient, of course, service.
We type " dpkg-reconfigure i2p " (on behalf of the root), to the question of starting the service, we answer "Yes". Also at this step, you can set the size of the allocated memory, left 128MB and create a user to start the i2p-router.
')
For ubunt everything is configured in the same way, the command to add a repository is just different. Here more .
For other distros, you need to install java (sunjava, openjdk), download the archive from here and run the console installer " java -jar i2pinstall_.jar -console ". Running as a service remains on the user's conscience.
As a lazy person, I prefer web interfaces rather than configuration files. :)
Initially, access to the web interface is allowed only from the local computer. So we will make the first security hole - open access to the admin panel from any address. But first you need to somehow get to her. We take ssh and make a tunnel from port 7657 of hosting to port 7657 of our computer.
If we see the shell invitation, then the i2p-router admin panel becomes available via the link http://127.0.0.1:7657/ .
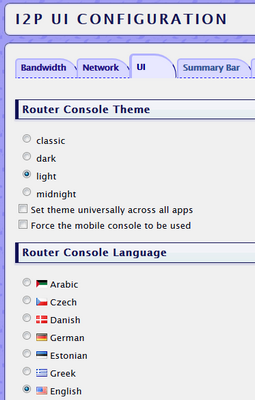
First, on the UI tab, we put English. Because if something needs to be found, then it is easier to search by the English names of terms, and not by Russian. For example, you can’t immediately guess that the “transit traffic” is “share bandwidth”.
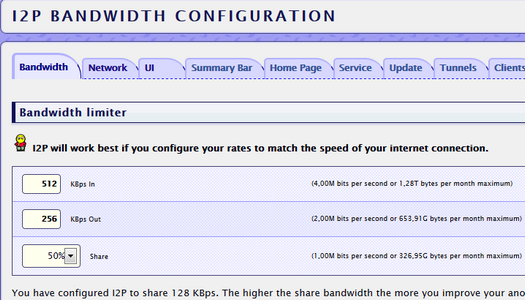
Bandwidth tab - I set the IN - 512, OUT - 256 and 50% share (the same transit traffic through your server).
Hosting with restrictions on traffic (albeit ten terabytes), but I do not want to spend a lot on outsiders, I also have my own needs. Of course, anonymity suffers and, potentially, speed. I want anonymity - share to 100%. Speed must be adjusted depending on the channel of your server and your needs.
Next, set up the address book - go to http://127.0.0.1:7657/dns , there is the Subscriptions tab. Initially, there is only www.i2p2.i2p / hosts.txt , which is rarely updated.
Add
Generally not necessarily all three, they can overlap, but I think it will not be worse. If you want, you can still search for lists of resources in the network.

We are starting to add the first hole - we are accessing the admin panel from any host, without tunnels
After that, the login to the admin should be available via the link http: // your_server: 7657 , the password should be requested at the entrance
By the way, for order it is still possible to change the port to some other one, it does not protect against a directed attack, but it can from random running bots. Although it would be better not to open access at all, but I am a lazy person and I don’t want to raise the ssh-tunnel every time I enter the settings. And sometimes you have to go to restart the service.
We open access to the proxy from any IP. Of course, the correct option is to simply drop the ssh tunnel on the desired port:
And in the browser settings set proxy 127.0.0.1:4444

But, as said above, all this is started not for the sake of security, but for the sake of convenience, so just open the port to the proxy.
Restart the server, wait a couple of minutes until the tunnels rise.
If necessary, you can configure https proxy in the same way on the same page .
That's right - a separate browser with disabled scripts, flash and other silver light, in which in the settings all traffic is chased through an i2p-proxy, to which an encrypted tunnel is passed (see above).
Wrong, but convenient - a script for the main browser, which automatically switches the proxy.
The browser configuration script is in /usr/share/doc/i2p-router/examples/scripts/i2pProxy.pac.gz
We unpack and put somewhere in the web server folder (do you also have a web server on the hosting? :)).
If they were set up from the site with pens, then the script is in the script / i2pProxy.pac folder .
We are looking for the line
We save, in the browser we go to the proxy settings in the field “automatic configuration script” we register

Everything. You will go around the network as usual, but when accessing your i2p browser, it will automatically go through your i2p proxy, asking for a password.
The solution is simple, platform-independent and does not require the installation of additional software. It should work even on androids and other iOS, if the local browser supports proxy.
But on my permanent computers, I prefer to switch access channels through the FoxyProxy plugin - I have more complex proxy selection rules than i2p / the rest of the Internet. :)
FoxyProxy for Firefox: addons.mozilla.org/en-US/firefox/addon/foxyproxy-standard
For chrome: chrome.google.com/webstore/detail/foxyproxy-standard/gcknhkkoolaabfmlnjonogaaifnjlfnp
For IE: getfoxyproxy.org/downloads/FoxyProxy-Standard-IE-1.0.8.exe (it did not work for me in IE11).
It turned out a convenient but insecure personal proxy for accessing the i2p network, which can be used from almost any place and from any OS. But for personal security, you still need to encrypt the channel from your computer to the server — either an ssh tunnel or vpn.
You can put an i2p router on your computer. Who wants to provide access to the entire home network, raise the proxy on the home router.
But my question was different. I wanted to be able to access i2p from any computer without installing additional software, even at the cost of security - because I don’t need to hide, but just watch something. If there is an opportunity to launch a remote desktop, then I’m from all Internet cafes and guests prefer to connect to the home server, and there is already my customized environment. In the case of slow connections or closed ports, it becomes difficult to use RDP. Therefore, the easiest and undemanding option is to raise the i2p router on the hosting and configure the http proxy.
Hosting
There are no special requirements, VDS or just a rented server - depending on the needs and financial capabilities. If only there was a machine with root-access, which would draw java. The OS is not critical, if you really want to, then you can also raise it on windows proxies. But I did on Linux - cheaper and more familiar. Iron - AMD Athlon 64 5600+ X2, 2 GB RAM. But this is redundant, and I raised such a proxy on an inexpensive VDS with 256 RAM. The truth did not work very quickly and the resources were occupied by a decent percentage.
Install i2p
OS - debian wheezy. The choice of distribution does not play a role, just got used to debian for the last 15 years.
First we add the i2p repository to sources.list:
deb http://deb.i2p2.no/ stable main deb-src http://deb.i2p2.no/ stable main Download the repository key www.i2p2.de/_static/debian-repo.pub and add it to apt:
apt-key add debian-repo.pub We update the package database and install i2p and i2p-keyring package (repository key updates):
apt-get update apt-get install i2p i2p-keyring Dependencies (including java) will be pulled out automatically.
You can start ip2 simply by typing " i2prouter start " in the console or by a service at system startup. Convenient, of course, service.
We type " dpkg-reconfigure i2p " (on behalf of the root), to the question of starting the service, we answer "Yes". Also at this step, you can set the size of the allocated memory, left 128MB and create a user to start the i2p-router.
')
For ubunt everything is configured in the same way, the command to add a repository is just different. Here more .
For other distros, you need to install java (sunjava, openjdk), download the archive from here and run the console installer " java -jar i2pinstall_.jar -console ". Running as a service remains on the user's conscience.
Basic i2p setup
As a lazy person, I prefer web interfaces rather than configuration files. :)
Initially, access to the web interface is allowed only from the local computer. So we will make the first security hole - open access to the admin panel from any address. But first you need to somehow get to her. We take ssh and make a tunnel from port 7657 of hosting to port 7657 of our computer.
C:\>ssh user@_ -L7657:127.0.0.1:7657 user@_'s password: Linux _ 3.2.0-4-amd64 #1 SMP Debian 3.2.51-1 x86_64 You have mail. Last login: Tue Dec 24 06:18:58 2013 _:~> If we see the shell invitation, then the i2p-router admin panel becomes available via the link http://127.0.0.1:7657/ .
First, on the UI tab, we put English. Because if something needs to be found, then it is easier to search by the English names of terms, and not by Russian. For example, you can’t immediately guess that the “transit traffic” is “share bandwidth”.
Bandwidth tab - I set the IN - 512, OUT - 256 and 50% share (the same transit traffic through your server).
Hosting with restrictions on traffic (albeit ten terabytes), but I do not want to spend a lot on outsiders, I also have my own needs. Of course, anonymity suffers and, potentially, speed. I want anonymity - share to 100%. Speed must be adjusted depending on the channel of your server and your needs.
Next, set up the address book - go to http://127.0.0.1:7657/dns , there is the Subscriptions tab. Initially, there is only www.i2p2.i2p / hosts.txt , which is rarely updated.
Add
http://i2host.i2p/cgi-bin/i2hostetag http://stats.i2p/cgi-bin/newhosts.txt http://no.i2p/export/alive-hosts.txt Generally not necessarily all three, they can overlap, but I think it will not be worse. If you want, you can still search for lists of resources in the network.
Access to admin from any computer
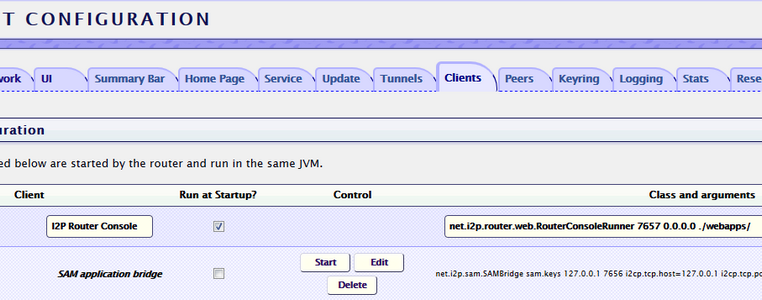
We are starting to add the first hole - we are accessing the admin panel from any host, without tunnels
- http://127.0.0.1:7657/configclients , field " I2P Router Console ", click Edit and change clientApp.0.args = 7657 :: 1,127.0.0.1 ./webapps/ to clientApp.0.args = 7657 0.0.0.0 ./webapps/
- http://127.0.0.1:7657/configui , below, under the list of languages, fields for entering the name and password for the admin panel.

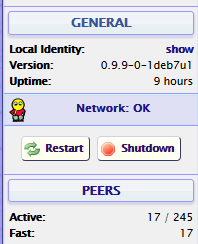
- Reboot the i2p router (for example, the Restart button on the left).
After that, the login to the admin should be available via the link http: // your_server: 7657 , the password should be requested at the entrance
By the way, for order it is still possible to change the port to some other one, it does not protect against a directed attack, but it can from random running bots. Although it would be better not to open access at all, but I am a lazy person and I don’t want to raise the ssh-tunnel every time I enter the settings. And sometimes you have to go to restart the service.
Configure http proxy
We open access to the proxy from any IP. Of course, the correct option is to simply drop the ssh tunnel on the desired port:
C:\>ssh user@_ -L4444:127.0.0.1:4444 user@_'s password: Linux _ 3.2.0-4-amd64 #1 SMP Debian 3.2.51-1 x86_64 You have mail. Last login: Tue Dec 24 07:37:52 2013 _:~> And in the browser settings set proxy 127.0.0.1:4444
But, as said above, all this is started not for the sake of security, but for the sake of convenience, so just open the port to the proxy.
- Go to http: // your_server: 7657 / i2ptunnelmgr , look for a tunnel called " I2P HTTP Proxy " there, go to its settings.
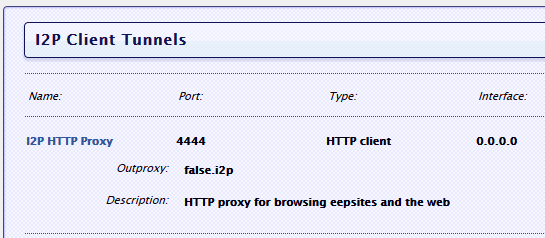
- In the point Access Point - Reachable by select 0.0.0.0
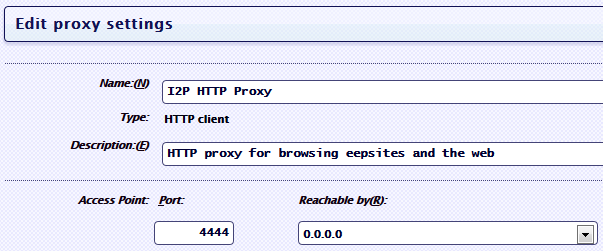
- Then put the password. The Local Authorization field, checkbox Enable , set the name and password and click Save .

Restart the server, wait a couple of minutes until the tunnels rise.
If necessary, you can configure https proxy in the same way on the same page .
Browser Setup
That's right - a separate browser with disabled scripts, flash and other silver light, in which in the settings all traffic is chased through an i2p-proxy, to which an encrypted tunnel is passed (see above).
Wrong, but convenient - a script for the main browser, which automatically switches the proxy.
The browser configuration script is in /usr/share/doc/i2p-router/examples/scripts/i2pProxy.pac.gz
We unpack and put somewhere in the web server folder (do you also have a web server on the hosting? :)).
If they were set up from the site with pens, then the script is in the script / i2pProxy.pac folder .
We are looking for the line
var i2pProxy = "PROXY 127.0.0.1:4444" in the file var i2pProxy = "PROXY 127.0.0.1:4444" ; and change the IP address and port to yours.We save, in the browser we go to the proxy settings in the field “automatic configuration script” we register
__/__i2pProxy.pacEverything. You will go around the network as usual, but when accessing your i2p browser, it will automatically go through your i2p proxy, asking for a password.
The solution is simple, platform-independent and does not require the installation of additional software. It should work even on androids and other iOS, if the local browser supports proxy.
But on my permanent computers, I prefer to switch access channels through the FoxyProxy plugin - I have more complex proxy selection rules than i2p / the rest of the Internet. :)
FoxyProxy for Firefox: addons.mozilla.org/en-US/firefox/addon/foxyproxy-standard
For chrome: chrome.google.com/webstore/detail/foxyproxy-standard/gcknhkkoolaabfmlnjonogaaifnjlfnp
For IE: getfoxyproxy.org/downloads/FoxyProxy-Standard-IE-1.0.8.exe (it did not work for me in IE11).
Conclusion
It turned out a convenient but insecure personal proxy for accessing the i2p network, which can be used from almost any place and from any OS. But for personal security, you still need to encrypt the channel from your computer to the server — either an ssh tunnel or vpn.
Source: https://habr.com/ru/post/207208/
All Articles