Yandex.Maps change API. Why we needed to break backward compatibility in a clusterer
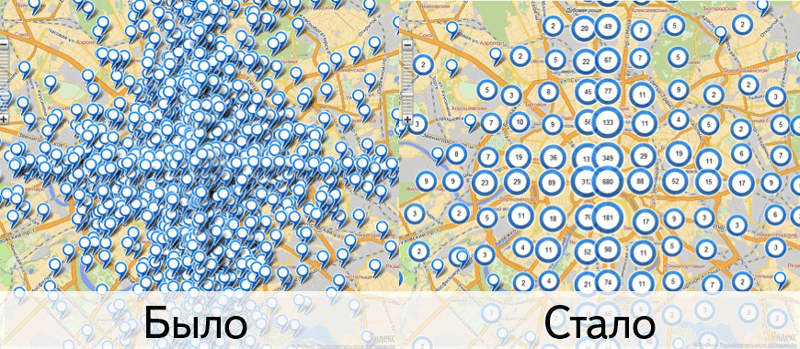
I work in Yandex, Yandex has maps, and maps has an API. API is the thing that allows you to embed Yandex maps on your website. Since version 2.0, our API is able to cluster tags on the client. Here are the labels before and after clustering:
The other day, the next release of our beta version 2.1.4. This release is notable for the fact that it happened what the Bolsheviks were so afraid of. As we warned , we had to break backward compatibility in a tag clusterizer.
')
In this article I want not only to list the innovations in working with the clusterizer in version 2.1.4, but also to explain why we needed to produce these innovations. And then you have to rewrite the code, and rewrite the code is sad, if you do not understand why it has to be done.
The content of the article:
In version 2.0, geo-objects were created, added to the map and rendered immediately, in one stream. The weaker the browser, the more objects you added to the map, the more likely it was to see the message.

This situation, our developer Anton calls the scientific term "zalipon."
Cluster begin to use when the number of labels on the card a lot. When there are a lot of objects, the problem of these very zlipons appears. It was necessary to solve something, and in the clusteriser it was decided to make asynchronous adding objects to the map by default. It was possible to understand that objects were added to the map by the objectsaddtomap event. This is one of the examples for version 2.0.
I can not say that working with this was very convenient. But it is better inconvenient than nothing - the hanging browser is a weightier argument than the beauty of the code.
In version 2.1 we stepped in the direction of the separation of objects and their display on the map. Someone might have noticed that the getOverlay methods have become asynchronous and inconvenient - this is it. In fact, asynchronous rendering of layouts is a great way to optimize the process of adding objects to the map.
To better understand the essence of things, look at the path of the label from its creation to the appearance on the map. The process can be divided into three stages:
On the first point, I think, explanations are not needed. It is not very clear what is the difference between stages two and three. Adding an object to a map is the process by which a label is attached to the parent collection (most often to map.geoObjects). The label receives from this collection some options, including a map projection. After the label object finds out in which projection the map is drawn, it can project its geometry onto the plane (which it does). After projecting the coordinates of the label on the plane, it becomes clear at which pixel point of the screen you need to draw the label icon. At this point, phase two ends.
The third stage is just the process of drawing a label on the map at a particular pixel coordinate. In version 2.1, we perform the first two stages synchronously, in one thread. But we draw the object by timeout.
So, since the labels are already drawn and asynchronously, it has become possible to simplify the clustering logic and remove the delayed addition of labels to the map. The clusterer no longer has the synchAdd options and the corresponding objectsaddtomap event has disappeared.
In other words, to upgrade to version 2.1.4, you will need to remove the subscription to the objectsaddtomap event from the code. All the code inside this event handler can now be executed immediately synchronously after adding objects to the clusteriser. (At the end of the article I will give a table with examples in the “became-was” format, for whom it is not interesting to read further - you can go straight to it.)
In version 2.0, the clusteriser was a successor of the ymaps.Collection object. It inherits from the collection the add, remove, setParent, and other methods as well as each, getIterator, and other unnecessary methods (I will explain why these methods were unnecessary). It seemed that the clusteriser is quite a collection — you can add objects to it and delete objects back. But not only does the clusteriser contain some elements, it may or may not show these elements on the map, and also generates additional cluster objects.
Therefore, what implementation of the each method you can do will still not be very logical. Whether it is necessary to sort through all the objects added. Whether it is necessary to walk on objects and clusters. But clusters are being rebuilt all the time. It came to the realization that the clustering is not quite a collection. That is not a collection at all.
Now the clusteriser has simple and clear public methods for accessing objects.
Look for examples of working with these methods in our documentation .
As you know, we use the grid clustering algorithm (for those interested in detail - here is a link to my ancient speech about the clustering unit). The algorithm is simple and therefore beautiful (when you cluster objects on the client, first of all you have to think about the speed of code execution).
The map was divided into square cells. Labels that fall into one cell form a cluster. In order not to cause computations with each small map dredge, the cells were combined into larger squares, which we called “cluster tiles”. All cluster tiles were processed, in which the visible area of the map was fully or partially hit.
In this version we decided not to introduce confusion into the concept of the word "tile". Now cluster tiles are located exactly in the same place as regular card tiles and always have a size of 256x256 pixels. This implies a limitation - the clusterization cell size should be a) not more than 256 and b) an entire number of clustering cells should fit into the tile. That is, the valid values for cluster sizes are 2, 4, 8, 16, 32, 64, 128, and 256.
Now the good news is that even if you set the wrong value, we will still bring it to the nearest correct one and everything will be fine. For what I wrote all this, you ask. Just because. Maybe it will be interesting to someone, and it will be pleasant to someone to know why the situation on the map has changed a bit after clustering.
Since the tiles are small and, generally speaking, the border of the map may coincide with the border of the tile, we introduced an additional indent for the visible area of the map -
I always suspected that no one but a couple of people (I and our documentator Olesya) could tell at once what the difference between Cluster and Clusterer is (if you understand the difference, you are a great fellow).
We studied the number of transitions to different pages of documentation - the Clusterer and Cluster pages are very popular. And I suspect that people who click on Cluster are victims of cruelty and misunderstanding. That is why it was decided to rename the entity Cluster to ClusterPlacemark. When you look at Clusterer and ClusterPlacemark, it seems to be becoming clearer what's what.
Since there were no people in the Maps API Club who were using clusters separate from the clusterizer (look for suffixes), this change should go completely unnoticed. And erroneous clicks in the documentation on Cluster instead of Clusterer should go into the distant past. However, if you liked reading the documentation for the Cluster object and see its loss as a loss of a close friend, read the documentation for the ClusterPlacemark.
I'll start with the fun - we finally added the ability to show a pop-up hint to the cluster label. You can do this with this code:
By default, hints will not be shown, because the clusters do not specify the value of the
Now, about changing hints and baluns in general. To work with baluns in version 2.0, each cluster created a
The disadvantage of this solution was the low speed of code execution. After all, if you have 100 clusters, each of them may have a balun, which means that each cluster must be created and assigned a balun manager in the
For more details on changing the code for opening baluns, see the summary table below.
In version 2.0, all geo-objects were equal. But some were more equal. Tags drawn on the canvas became interactive with the help of active areas. Labels rendered using DOM were interactive in their own right. This gave rise to differences in behavior and a lot of inconvenience.
Therefore, in version 2.1 it was decided to bring all the objects under the event horizon (whatever that means). Now all tags become interactive due to active areas overlaid on top of the map. Because of this, for the labels, now you need to specify what shape and size the active area above the label should be (when you hover over which part of the picture the cursor should change, the label should click and click).
Standard label-clusters have 3 types of pictures - large, medium and small. These pictures are round. If you try to move the mouse over the cluster label, you will see that the active area of the label coincides with the picture and is also a circle.


Some users have already encountered the fact that in version 2.1.3, when replacing images for a cluster icon, the active area still remains round (and the label is generally square or moreover triangular).

- a custom tag, and the circle was clickable anyway.
We have corrected this and now you can independently determine the shape of the active area for the label. You can do it this way (example for round labels).
The code is not very simple, so there is an alternative approach - simpler, but coarser. If you do not specify the shape parameter when describing icons, the rectangular area above the icon, which is formed based on the size and offset parameters, will become active. That is, such a code will also work fine, just a clickable area will be a rectangular area around the icon.

The picture is complex, so we don’t bother and make interactive a rectangular area around the icon. Choose a solution depending on the degree of your perfectionism.
Another small addition. If you do not want to show content inside the cluster label, you can set the clusterIconContentLayout option to null and the label will be shown without numbers inside
The API Cards Club came across questions on “how to set a style for a specific cluster”. There was no good answer to this question, as the keys indicated in the description of option.presetStorage worked only if they were set to the clusterer entirely. And for single tags, these keys are not suitable. In this version, the keys are universal - suitable for the clusteriser as a whole, and for label clusters in particular.
You can change the color of the cluster when you hover like this.
Two types of objects can be found in the clusteriser - cluster labels and single objects that are not included in any group of objects. Sometimes it is necessary to set options for those and others. It is clear that no one wants to go through all the labels and clusters in order to set the same options for each. To set options on all objects at once, these same options can be specified once through the clusterizer. And the clusterer will transfer these options to its child objects.
In particular, in version 2.0 it was possible to do this:
An inquisitive reader will ask with a squint: “And what if I want to set different types of cursors for cluster marks and single tags?” We considered this case and decided that cluster marks would also understand options that have a “cluster” prefix.
In this system, everything was fine, except for the case when you wanted to customize only single labels without affecting label-clusters. If you wanted to change only the options for single labels, you wrote
In version 2.1, it became a bit more convenient. Now all options for child objects are set with prefixes. For cluster labels with the 'cluster' prefix, for single labels - with the 'geoObject' prefix. Now the options of the child objects are independent of each other. Ask what you like more.
Otherwise, everything remains unchanged. All innovations are described in the documentation.
It is better to see once than read once and not to believe. How the measurements were taken. This case was taken as a sample:
This piece of code does not affect the moments in which backward compatibility is broken, so it can be run either in version 2.0.36 or in version 2.1.4 without changes, simply by switching the link to the API version. Time was measured in milliseconds.

I want to make a remark about IE11. Tests for all browsers were run on my laptop, and for IE11 on another laptop with Windows (I have a macbook). So, it’s not worth comparing the speed of its work with other browsers. But it is worth assessing how much the api has accelerated from version to version.
It is important to understand - we have reduced only the initialization time of the card with a clusterizer and labels. The browser executes the code, exhales, and then can return to drawing objects. At the same time, the total load did not change much - it was only distributed over time, some of the actions are performed later. Nevertheless, it is important for weak browsers - what they could not do in one thread at once and hung up, is now distributed over time and browsers can overpower this load.
We understand that any compatibility scrapping is a small tragedy in the life of a developer. But as time goes on, things change, we gain experience and get feedback from users. Many things wanted to change in version 2.0, but we could not do this because we promised not to change anything.
Now we have a bit of freedom in connection with the release of the new version 2.1. Of course, I wanted to change even more, but again we were restrained by the fact that we can change only small things (it is still 2.1, not 3.0).
We hope that at least some innovations will help you in the development and the benefit will block the inconvenience of having to rewrite the code.
I was told that the article should have a positive ending, so I congratulate everyone on the upcoming!
The other day, the next release of our beta version 2.1.4. This release is notable for the fact that it happened what the Bolsheviks were so afraid of. As we warned , we had to break backward compatibility in a tag clusterizer.
')
In this article I want not only to list the innovations in working with the clusterizer in version 2.1.4, but also to explain why we needed to produce these innovations. And then you have to rewrite the code, and rewrite the code is sad, if you do not understand why it has to be done.
The content of the article:
- Cancel asynchronous adding of tags (this item is worth reading for those who have somehow used the objectsaddtomap method).
- Change public clustering methods.
- Changing the way the map is divided into tiles (maybe no one will notice).
- Renaming the Cluster entity to the ClusterPlacemark (most likely no one will notice).
- Changes to clusterer.balloon and clusterer.hint (it is worth reading if you used cluster baluns or wanted to add hints to clusters).
- The task of arbitrary icons of clusters is what's new (it is worth reading if ... well, here it is clear).
- A small refinement of the preset option or how to change the color of the cluster when hovering.
- Prefixing options for clusters and labels in a cluster.
- Summary table of differences in the code.
- Comparison of the speed of the versions (for the credibility of the article).
Cancel asynchronous tagging.
In version 2.0, geo-objects were created, added to the map and rendered immediately, in one stream. The weaker the browser, the more objects you added to the map, the more likely it was to see the message.
This situation, our developer Anton calls the scientific term "zalipon."
Cluster begin to use when the number of labels on the card a lot. When there are a lot of objects, the problem of these very zlipons appears. It was necessary to solve something, and in the clusteriser it was decided to make asynchronous adding objects to the map by default. It was possible to understand that objects were added to the map by the objectsaddtomap event. This is one of the examples for version 2.0.
// . // , // , // . cluster.events.add('objectsaddtomap', function () { // . var geoObjectState = cluster.getObjectState(myGeoObjects[1]); // , . if (geoObjectState.isShown) { // , . if (geoObjectState.isClustered) { geoObjectState.cluster.state.set('activeObject', myGeoObjects[1]); geoObjectState.cluster.balloon.open(); } else { // , . myGeoObjects[1].balloon.open(); } } }); I can not say that working with this was very convenient. But it is better inconvenient than nothing - the hanging browser is a weightier argument than the beauty of the code.
In version 2.1 we stepped in the direction of the separation of objects and their display on the map. Someone might have noticed that the getOverlay methods have become asynchronous and inconvenient - this is it. In fact, asynchronous rendering of layouts is a great way to optimize the process of adding objects to the map.
To better understand the essence of things, look at the path of the label from its creation to the appearance on the map. The process can be divided into three stages:
- Creating a class instance
- Adding an object to the map
- Rendering label layout in HTML
On the first point, I think, explanations are not needed. It is not very clear what is the difference between stages two and three. Adding an object to a map is the process by which a label is attached to the parent collection (most often to map.geoObjects). The label receives from this collection some options, including a map projection. After the label object finds out in which projection the map is drawn, it can project its geometry onto the plane (which it does). After projecting the coordinates of the label on the plane, it becomes clear at which pixel point of the screen you need to draw the label icon. At this point, phase two ends.
The third stage is just the process of drawing a label on the map at a particular pixel coordinate. In version 2.1, we perform the first two stages synchronously, in one thread. But we draw the object by timeout.
So, since the labels are already drawn and asynchronously, it has become possible to simplify the clustering logic and remove the delayed addition of labels to the map. The clusterer no longer has the synchAdd options and the corresponding objectsaddtomap event has disappeared.
In other words, to upgrade to version 2.1.4, you will need to remove the subscription to the objectsaddtomap event from the code. All the code inside this event handler can now be executed immediately synchronously after adding objects to the clusteriser. (At the end of the article I will give a table with examples in the “became-was” format, for whom it is not interesting to read further - you can go straight to it.)
Modifying public clustering methods
In version 2.0, the clusteriser was a successor of the ymaps.Collection object. It inherits from the collection the add, remove, setParent, and other methods as well as each, getIterator, and other unnecessary methods (I will explain why these methods were unnecessary). It seemed that the clusteriser is quite a collection — you can add objects to it and delete objects back. But not only does the clusteriser contain some elements, it may or may not show these elements on the map, and also generates additional cluster objects.
Therefore, what implementation of the each method you can do will still not be very logical. Whether it is necessary to sort through all the objects added. Whether it is necessary to walk on objects and clusters. But clusters are being rebuilt all the time. It came to the realization that the clustering is not quite a collection. That is not a collection at all.
Now the clusteriser has simple and clear public methods for accessing objects.
- Clusterer.getGeoObjects - returns an array of elements added to the clusterizer
- Clusterer.getClusters - returns an array of clusters currently added to the map. Please note that these are not all clusters, but only those that are currently visible.
Look for examples of working with these methods in our documentation .
Changing the way the map is divided into tiles
As you know, we use the grid clustering algorithm (for those interested in detail - here is a link to my ancient speech about the clustering unit). The algorithm is simple and therefore beautiful (when you cluster objects on the client, first of all you have to think about the speed of code execution).
The map was divided into square cells. Labels that fall into one cell form a cluster. In order not to cause computations with each small map dredge, the cells were combined into larger squares, which we called “cluster tiles”. All cluster tiles were processed, in which the visible area of the map was fully or partially hit.
In this version we decided not to introduce confusion into the concept of the word "tile". Now cluster tiles are located exactly in the same place as regular card tiles and always have a size of 256x256 pixels. This implies a limitation - the clusterization cell size should be a) not more than 256 and b) an entire number of clustering cells should fit into the tile. That is, the valid values for cluster sizes are 2, 4, 8, 16, 32, 64, 128, and 256.
Now the good news is that even if you set the wrong value, we will still bring it to the nearest correct one and everything will be fine. For what I wrote all this, you ask. Just because. Maybe it will be interesting to someone, and it will be pleasant to someone to know why the situation on the map has changed a bit after clustering.
Since the tiles are small and, generally speaking, the border of the map may coincide with the border of the tile, we introduced an additional indent for the visible area of the map -
mapViewport (128 pixels by default). That is, always processed a little more than necessary. But the user most likely will not notice rebuilds when moving the map.Rename Cluster to ClusterPlacemark
I always suspected that no one but a couple of people (I and our documentator Olesya) could tell at once what the difference between Cluster and Clusterer is (if you understand the difference, you are a great fellow).
- Clusterer - clustering objects, something like a collection.
- Cluster is a group of objects generated by a clusterizer. The map looks like a label.
We studied the number of transitions to different pages of documentation - the Clusterer and Cluster pages are very popular. And I suspect that people who click on Cluster are victims of cruelty and misunderstanding. That is why it was decided to rename the entity Cluster to ClusterPlacemark. When you look at Clusterer and ClusterPlacemark, it seems to be becoming clearer what's what.
Since there were no people in the Maps API Club who were using clusters separate from the clusterizer (look for suffixes), this change should go completely unnoticed. And erroneous clicks in the documentation on Cluster instead of Clusterer should go into the distant past. However, if you liked reading the documentation for the Cluster object and see its loss as a loss of a close friend, read the documentation for the ClusterPlacemark.
Changes to clusterer.balloon and clusterer.hint
I'll start with the fun - we finally added the ability to show a pop-up hint to the cluster label. You can do this with this code:
var clusterer = new ymaps.Clusterer(); clusterer.createCluster = function (center, geoObjects) { // - . var clusterPlacemark = ymaps.Clusterer.prototype.createCluster.call(this, center, geoObjects), geoObjectsLength = clusterPlacemark.getGeoObjects().length, hintContent; if (geoObjectsLength < 10) { hintContent = ' '; } else if (geoObjectsLength < 100) { hintContent = ' '; } else { hintContent = ' '; } clusterPlacemark.properties.set('hintContent', hintContent); return clusterPlacemark; }; By default, hints will not be shown, because the clusters do not specify the value of the
hintContent field (there is a circle with numbers on the map, it’s better not to describe the words anyway). As you begin to set this value, hints will begin to show.Now, about changing hints and baluns in general. To work with baluns in version 2.0, each cluster created a
.balloon field. The discovery of the balloon looked like cluster.balloon.open(); .The disadvantage of this solution was the low speed of code execution. After all, if you have 100 clusters, each of them may have a balun, which means that each cluster must be created and assigned a balun manager in the
cluster.balloon field. Therefore, as part of the work on speed, it was decided to make one manager of baluns and hints per clusterizer. Now the balun on the cluster can be opened like this: // -. clusterer.balloon.open(clusterPlacemark); For more details on changing the code for opening baluns, see the summary table below.
Setting arbitrary cluster icons - what's new
In version 2.0, all geo-objects were equal. But some were more equal. Tags drawn on the canvas became interactive with the help of active areas. Labels rendered using DOM were interactive in their own right. This gave rise to differences in behavior and a lot of inconvenience.
Therefore, in version 2.1 it was decided to bring all the objects under the event horizon (whatever that means). Now all tags become interactive due to active areas overlaid on top of the map. Because of this, for the labels, now you need to specify what shape and size the active area above the label should be (when you hover over which part of the picture the cursor should change, the label should click and click).
Standard label-clusters have 3 types of pictures - large, medium and small. These pictures are round. If you try to move the mouse over the cluster label, you will see that the active area of the label coincides with the picture and is also a circle.
Some users have already encountered the fact that in version 2.1.3, when replacing images for a cluster icon, the active area still remains round (and the label is generally square or moreover triangular).
- a custom tag, and the circle was clickable anyway.
We have corrected this and now you can independently determine the shape of the active area for the label. You can do it this way (example for round labels).
clusterer.options.set({ clusterIcons: [ { href: 'images/small.png', size: [20, 20], offset: [-10, -10], shape: new ymaps.shape.Circle(new ymaps.geometry.pixel.Circle([0, 0], 10)) }, { href: 'images/medium.png', size: [30, 30], offset: [-15, -15], shape: new ymaps.shape.Circle(new ymaps.geometry.pixel.Circle([0, 0], 15)) }, { href: 'images/big.png', size: [40, 40], offset: [-20, -20], shape: new ymaps.shape.Circle(new ymaps.geometry.pixel.Circle([0, 0], 20)) } ] }); The code is not very simple, so there is an alternative approach - simpler, but coarser. If you do not specify the shape parameter when describing icons, the rectangular area above the icon, which is formed based on the size and offset parameters, will become active. That is, such a code will also work fine, just a clickable area will be a rectangular area around the icon.
The picture is complex, so we don’t bother and make interactive a rectangular area around the icon. Choose a solution depending on the degree of your perfectionism.
clusterer.options.set({ clusterIcons: [ { href: 'images/small.png', size: [20, 20], offset: [-10, -10] }, { href: 'images/medium.png', size: [30, 30], offset: [-15, -15] }, { href: 'images/big.png', size: [40, 40], offset: [-20, -20] } ] }); Another small addition. If you do not want to show content inside the cluster label, you can set the clusterIconContentLayout option to null and the label will be shown without numbers inside
clusterer.options.set('clusterIconContentLayout', null);A small refinement of the cluster preset
The API Cards Club came across questions on “how to set a style for a specific cluster”. There was no good answer to this question, as the keys indicated in the description of option.presetStorage worked only if they were set to the clusterer entirely. And for single tags, these keys are not suitable. In this version, the keys are universal - suitable for the clusteriser as a whole, and for label clusters in particular.
You can change the color of the cluster when you hover like this.
clusterer.events.add('mouseenter', function (e) { var target = e.get('target'); if (typeof target.getGeoObjects == 'function') { target.options.set('preset', 'islands#redClusterIcons'); } }); clusterer.events.add('mouseleave', function (e) { var target = e.get('target'); if (typeof target.getGeoObjects == 'function') { target.options.set('preset', 'islands#blueClusterIcons'); } }); Prefixing options for clusters and labels in a cluster
Two types of objects can be found in the clusteriser - cluster labels and single objects that are not included in any group of objects. Sometimes it is necessary to set options for those and others. It is clear that no one wants to go through all the labels and clusters in order to set the same options for each. To set options on all objects at once, these same options can be specified once through the clusterizer. And the clusterer will transfer these options to its child objects.
In particular, in version 2.0 it was possible to do this:
clusterer.options.set('cursor', 'help'); And the view of the cursor changed both for single objects and for label clusters.An inquisitive reader will ask with a squint: “And what if I want to set different types of cursors for cluster marks and single tags?” We considered this case and decided that cluster marks would also understand options that have a “cluster” prefix.
clusterer.options.set({ // . ursor: 'pointer', // -. clusterCursor: 'help' }); In this system, everything was fine, except for the case when you wanted to customize only single labels without affecting label-clusters. If you wanted to change only the options for single labels, you wrote
clusterer.options.set('cursor', 'help'); And they got too massive effect - the options extended to both single objects and clustered labels. That is, if you wanted to affect only single labels, you had to set options anyway for both single objects and clusters.In version 2.1, it became a bit more convenient. Now all options for child objects are set with prefixes. For cluster labels with the 'cluster' prefix, for single labels - with the 'geoObject' prefix. Now the options of the child objects are independent of each other. Ask what you like more.
// . lusterer.options.set('geoObjectCursor', 'help'); Summary table of changes
| It was | It became |
|---|---|
| |
| |
| |
| |
Otherwise, everything remains unchanged. All innovations are described in the documentation.
Comparison of clustering speed in versions 2.0.36 and 2.1.4
It is better to see once than read once and not to believe. How the measurements were taken. This case was taken as a sample:
<!doctype html> <html> <head> <title> </title> <meta http-equiv="Content-Type" content="text/html; charset=UTF-8"> <script src="http://api-maps.yandex.ru/2.0.36/?load=package.full &lang=ru-RU&ns=ym" type="text/javascript"></script> <script type="text/javascript"> ym.ready(function() { var map = new ym.Map('map', { center: [55.755381, 37.619044], zoom: 13 }), coords = [], center = [55.755381, 37.619044], placemarks = [], i; for (i = 0; i < 10000; i++) { coords[i] = [ center[0] + 0.5 * Math.random() * Math.random() * Math.random() * (Math.random() < 0.5 ? -1 : 1), center[1] + 0.7 * Math.random() * Math.random() * Math.random() * (Math.random() < 0.5 ? -1 : 1) ]; } var startTime = +new Date(); for (i = 0, l = coords.length; i < l; i++) { placemarks[i] = new ym.GeoObject({ geometry: { type: "Point", coordinates: coords[i] } }); } var clusterer = new ym.Clusterer(); clusterer.add(placemarks); map.geoObjects.add(clusterer); var stopTime = +new Date(); alert(stopTime - startTime); }); </script> </head> <body> <div id="map" style="height: 400px; width: 800px;"></div> </body> </html> This piece of code does not affect the moments in which backward compatibility is broken, so it can be run either in version 2.0.36 or in version 2.1.4 without changes, simply by switching the link to the API version. Time was measured in milliseconds.
I want to make a remark about IE11. Tests for all browsers were run on my laptop, and for IE11 on another laptop with Windows (I have a macbook). So, it’s not worth comparing the speed of its work with other browsers. But it is worth assessing how much the api has accelerated from version to version.
It is important to understand - we have reduced only the initialization time of the card with a clusterizer and labels. The browser executes the code, exhales, and then can return to drawing objects. At the same time, the total load did not change much - it was only distributed over time, some of the actions are performed later. Nevertheless, it is important for weak browsers - what they could not do in one thread at once and hung up, is now distributed over time and browsers can overpower this load.
Conclusion
We understand that any compatibility scrapping is a small tragedy in the life of a developer. But as time goes on, things change, we gain experience and get feedback from users. Many things wanted to change in version 2.0, but we could not do this because we promised not to change anything.
Now we have a bit of freedom in connection with the release of the new version 2.1. Of course, I wanted to change even more, but again we were restrained by the fact that we can change only small things (it is still 2.1, not 3.0).
We hope that at least some innovations will help you in the development and the benefit will block the inconvenience of having to rewrite the code.
I was told that the article should have a positive ending, so I congratulate everyone on the upcoming!
Source: https://habr.com/ru/post/207202/
All Articles