MINIX X7 - Rockchip RK3188 high-quality media player
There are now a lot of Chinese mini-computers on the Rockchip RK3188 chip, both in the form of dongles and media players. Earlier, I wrote about Tronsmart MK908 dongle and Kingnovel K-R42 media player. Today I will tell you about a media player called MINIX X7.
► Specifications
 Mali 400MP quad-core video accelerator
 Rockchip RK3188 quad-core processor with Cortex A9 architecture
 2 GB of RAM
 Android 4.2.2 operating system
 16 GB user memory + SD card slot
 Connectivity: Wi-Fi (802.11 b / g / n (2.4GHz / 5GHz), Ethernet 10 / 100Mbps, Bluetooth
Minix X7 stands out among competitors with support for 802.11n 5GHz Wifi
There are 2 modifications in the model range: X7 and X7 mini. The main differences between the X7 and X7 Mini are:
- Wifi 802.11n 5GHz support
- connected external Wifi antenna
- the amount of permanent memory is 16GB (8GB in version Mini)
The cost of the MINIX X7 is ~ $ 135, the X7 mini is $ 113 (when purchased in China).
► Appearance and equipment
The mini-computer comes in a rather large box: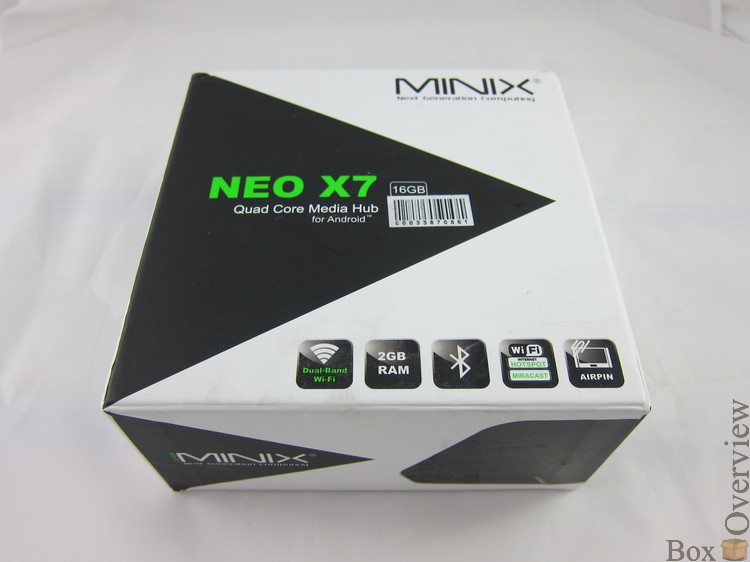
')
The side of the delivery is listed:
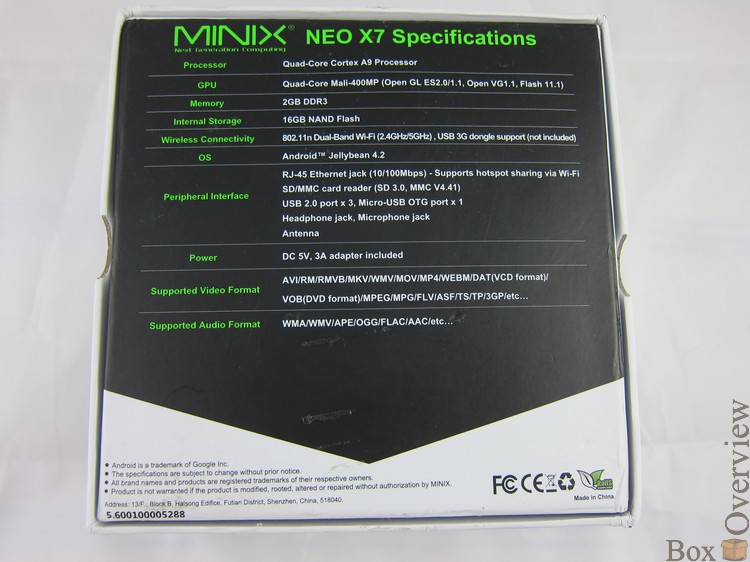
Behind - brief technical specifications:
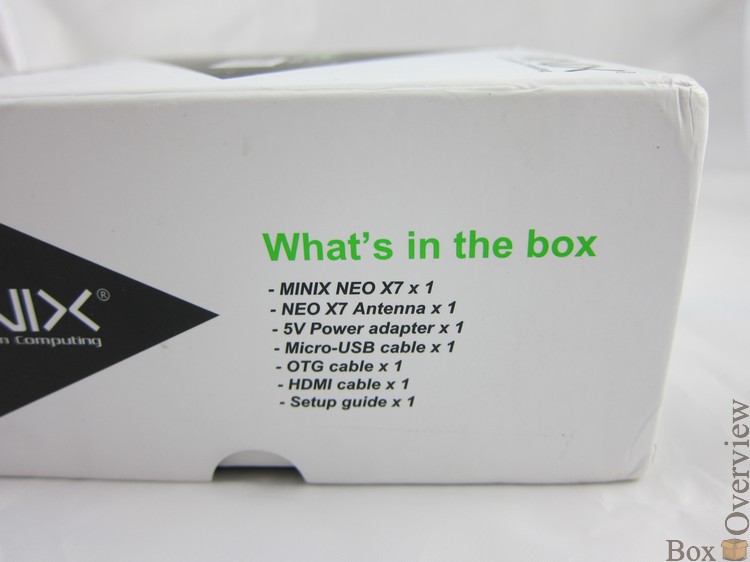
Inside is the X7 itself, and under it is a hidden set of accessories. There are really a lot of them:
-HDMI cable
-USB cable
-OTG cable
-Charger
-Remote Control

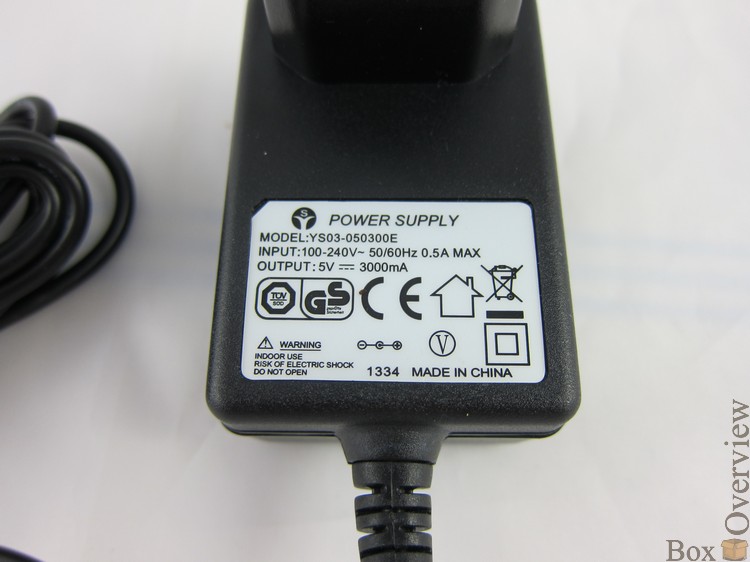
3A power supply:
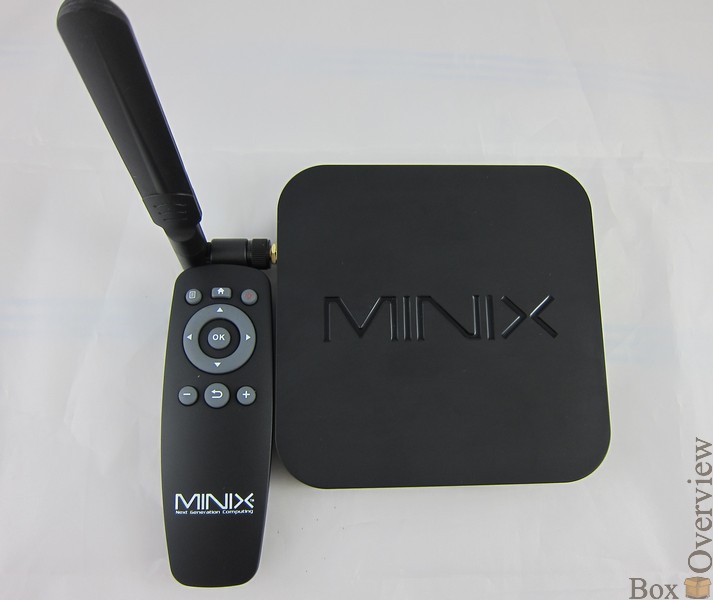
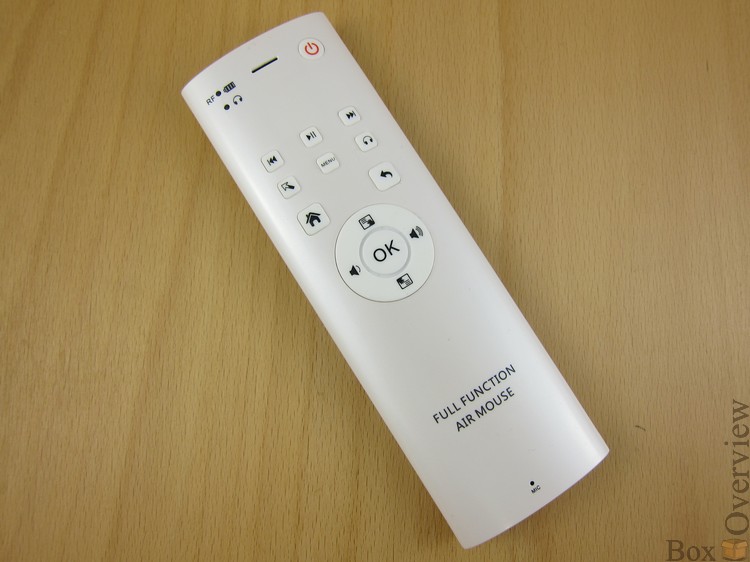
The console is quite simple:
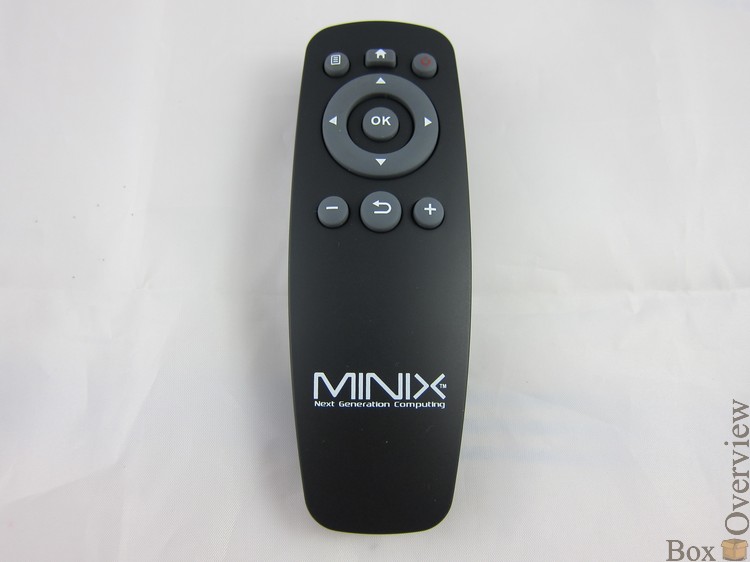
The cursor is controlled by clamping the control arrows. There is no gyro in the console.
To control, you can connect a wireless mouse and keyboard. Or buy a gyroscopic mouse-keyboard. For example iPazzport:
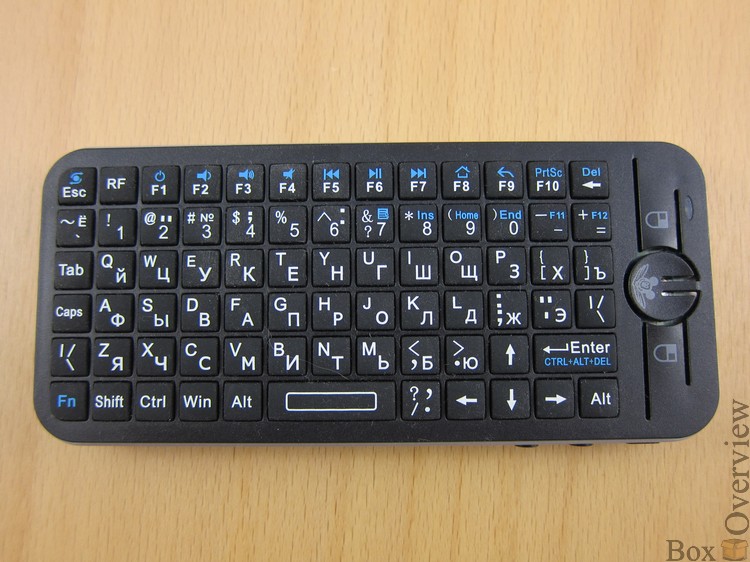
Either a mouse-keyboard with touchpad UKB-500-RF ( review )
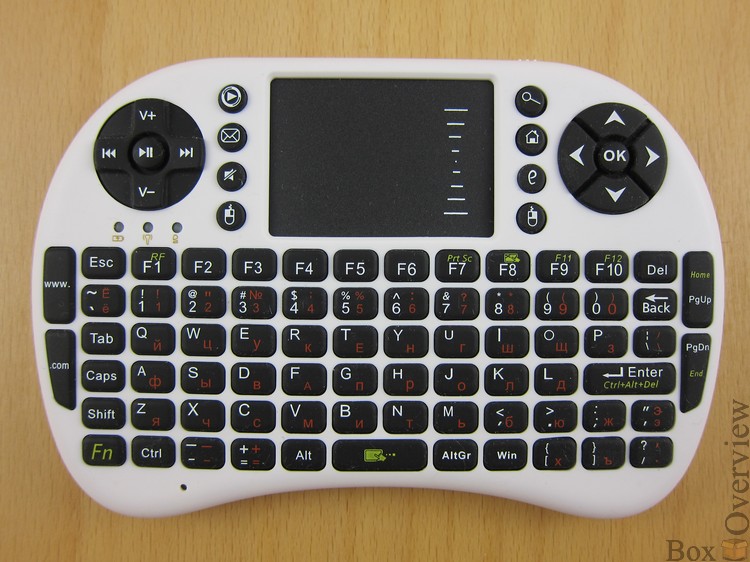
I decided to try something new and ordered myself such a mouse-keyboard:
It differs from iPazzport and UKB-500 by the presence of a comparatively convenient media console, as well as an external speaker, a headphone input and a microphone. It turns out such a Skype-phone itself. The disadvantages include the absence of the Russian keyboard layout. The appearance of the console seems cumbersome, but for me it seems to be a plus - the console is perfectly in the hand.
We will return to this console a little later, and now we will continue to study the appearance of the MINIX X7.
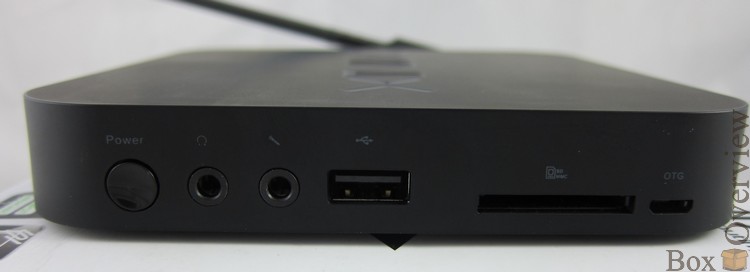
Expansion ports and control buttons are located on two sides. On the right side are:
- power button
headphone input
microphone input
-USB input
SD card slot
-OTG port
Located behind:
-button recovery
-full HDMI
-2 USB ports
-LAN-port (10 / 100Mbps)
-input for power supply

A very good set of ports turned out. I liked the full-size HDMI port (finally, no need to look for adapters), as well as the presence of a headphone input (convenient if you connect the MINIX X7 to a monitor that does not have audio output).
Wifi antenna is mounted on the left:

On top of the case is made of a nice non-slip plastic, which quickly becomes covered with prints.
Behind the plastic is simpler, the robot logo is depicted in the center:
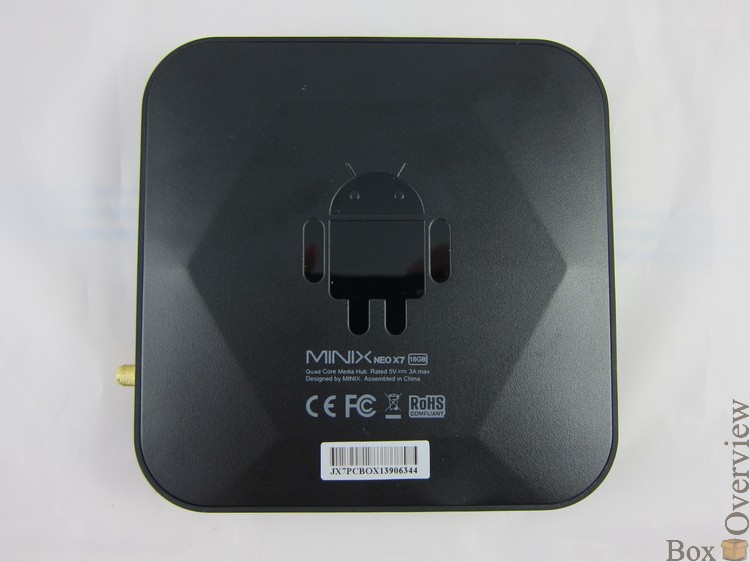
It should be noted that the MINIX X7 is really well assembled. Plastic of excellent quality and a good fit parts. Well, in general, the appearance is very pleasant and it will not be a shame to put it next to your TV.
Unfortunately, we couldn't open the MINIX X7 on our own, so let's look at the photos from the Network ( source ):
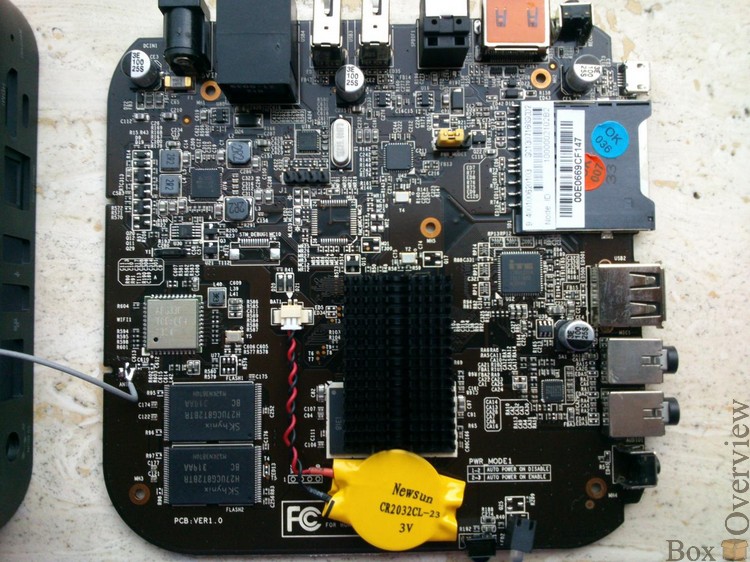
There is a radiator on top of the RK3188 chip, and the MINIX X7 practically does not heat up during operation. Support for 802.11n 5GHz Wifi is provided by the Broadcom AP6330 chip.
Back view:
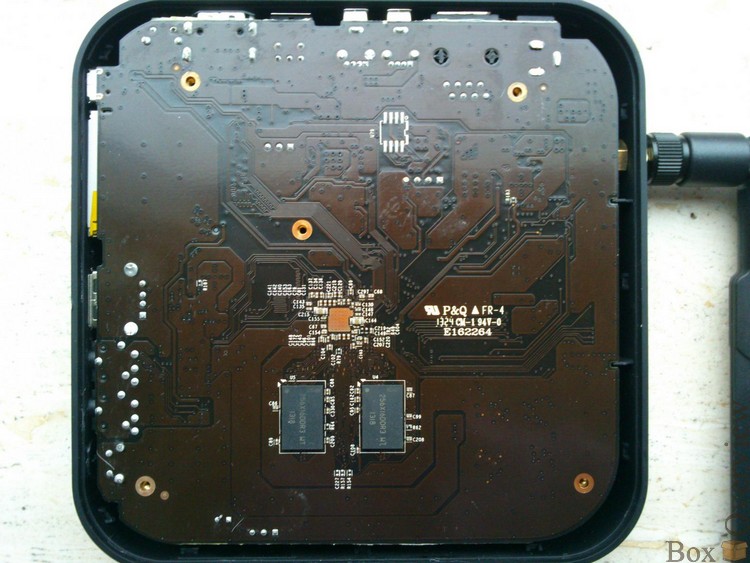
Everything is done quite neatly.
► Firmware
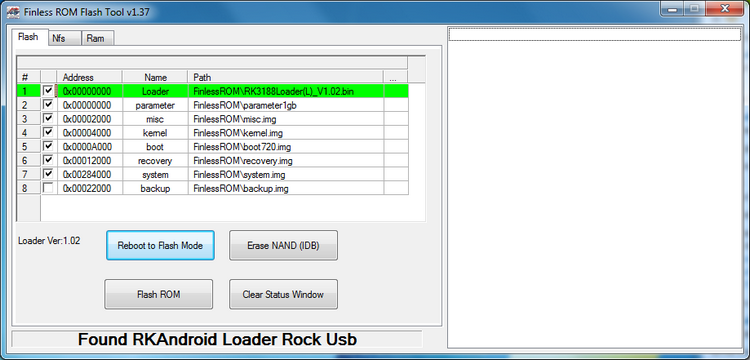
The manufacturer often releases new firmware and with a 99% probability you will receive a device with the firmware of some old version. I recommend updating not on the official firmware, but on the modified one.The most famous modified firmware for MINIX X7 is Finless ROM. It is quite simple to install it, for this we need to switch the device to the firmware update mode. For this you need:
1. Connect the USB cable to the OTG port of MINIX X7, and then connect the other end to the computer.
2. Power up your MINIX X7
3. Clamp the reset button with a needle or paper clip.
4. Hold down the Reset button and hold the Power button on the MINIX X7 for 2 seconds.
5. Windows will play the discovery sound of a new device.
6. Now you are in firmware update mode and you need to install device drivers.
Installing a device driver:
1. Download the latest firmware from the Freaktab forum and unpack it.
2. When we hit the firmware update mode, Windows will detect one unknown device.
3. Open Device Manager and select an unknown device.
4. Click the right mouse button and select “Update Driver” (“Update Driver”)
5. In the dialog, select the item to search for drivers on the computer. Click "Browse"
6. Go to the folder with the firmware, find the drivers folder, select the folder with the driver for 32-bit or 64-bit OS
7. Select a folder with the required version of Windows
8. Device driver installation should occur.
9. Restart your computer and MINIX X7. Download the MINIX X7 in firmware update mode following the instructions above.
10. If you did everything correctly, the Flash tool should show the message “Found RKAndroid Loader Rock Usb”. If this message does not exist, then the drivers are not installed and you need to repeat steps 1-8.
Now that we are in the firmware update mode and the drivers have been installed correctly, you can proceed directly to the firmware installation.
When updating the firmware, ALL user data is deleted. If necessary, make a backup.
Firmware:
1. In the Flash tool, click "Erase NAND (IDB)". This item is required!
2. Press the “Flash ROM” button and wait until the process is completed.
4. After flashing, the MINIX X7 will reboot.
The first power-up after the firmware update takes longer than normal download. After a full load, wait another 2 minutes for the system applications to make their changes to the system.
In the Finless ROM firmware, there is the possibility of overclocking; for this, the firmware has a folder with different settings for the frequency of the processor, video accelerator and RAM. By default, the CPU operates at a maximum frequency of 1.6 GHz, a 600 MHz GPU and RAM at a frequency of 400 MHz. In the folder oc_1080_kernels , which can be downloaded in the theme with the firmware, there are kernel files with different frequency settings.
The maximum frequencies are: for the CPU - 1.8 GHz, for the GPU - 798 MHz, for the RAM - 800 MHz. The oc_1080_kernels folder contains as many as 16 combinations of different frequencies.
By default, the firmware uses the output image in 1080p format, if your TV or monitor does not support this output - in the 720p_kernel_boot folder you will find the kernel files with the outputs in 720p. It is easy to update the kernel files, follow the instructions for installing the firmware and leave a tick just opposite the kernel and boot files, after selecting their location.

It is also possible to flash the boot file with or without AirPin support.
At the time of this writing, a modified firmware from lewy20041 was released, you can download it on the same Freaktab forum
► Software and performance
Android 4.2.2 is pre-installed in the media player: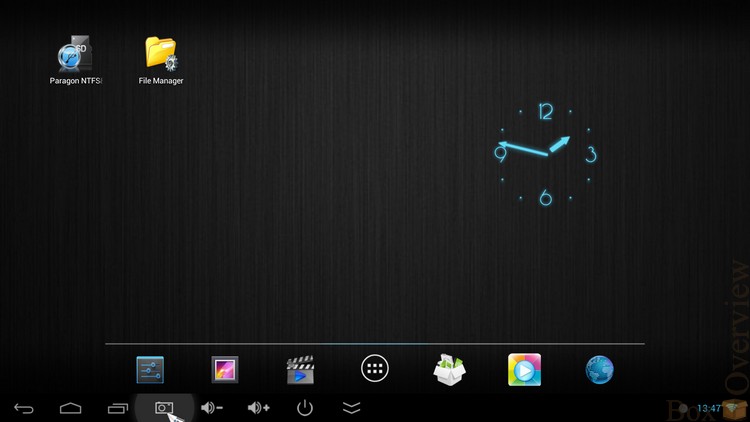

Initially, the kernel is used with a FULL HD image output. The Android interface sometimes seems a bit thoughtful, but it is not annoying. There are no special modifications from the usual Android 4.2.2. From useful features, the ability to switch MINIX to sleep mode, restart, or turn off is added:

The MINIX X7 is equipped with a 4-core Rockchip RK3188 processor with a frequency of up to 1.6 GHz and a 4-core Mali 400MP GPU. The amount of RAM is 2GB, constant - 16GB.
Let's look at the test results in various synthetic performance tests.
We will conduct tests in 3 modes: image output in 1080p and 720p at standard frequencies and 1080p with maximum frequencies CPU / GPU / RAM.
| Conclusion | CPU, MHz | GPU, MHz | RAM, MHz |
|---|---|---|---|
| 1080p | 1.6 | 600 | 400 |
| 720p | 1.6 | 600 | 400 |
| 1080p, MAX | 1.8 | 798 | 800 |
Let's start with Antutu. The table shows the results of tests on the Finless firmware with 1080p and 720p output at standard frequencies, as well as the overclocked core with 1080p output.
Results:

| Conclusion | Multitasking | Dalvik | CPU INT | CPU FLOAT | Multitasking RAM | Ram | 2D | 3D | Result |
|---|---|---|---|---|---|---|---|---|---|
| 1080p | 3759 | 1336 | 2591 | 1754 | 2022 | 925 | 1018 | 2147 | 17490 |
| 720p | 3606 | 1317 | 2612 | 1820 | 2045 | 1029 | 1545 | 2433 | 18536 |
| 1080p, MAX | 4106 | 1477 | 2904 | 2066 | 2308 | 1129 | 1564 | 3515 | 21118 |
The test results in 1080p and 720p with basic frequency settings are very close, while decreasing the resolution, the test results in 2D and 3D increased logically. When using a kernel with maximum frequencies and 1080p output, the results increased on all counts.
Quadrant:
| Firmware | Result |
|---|---|
| 1080p | 5066 |
| 720p | 5556 |
| 1080p, MAX | 5884 |
The results are logical, as in the previous test: performance is higher when displaying an image at 720p and even higher when using an overclocked core.
Vellamo:
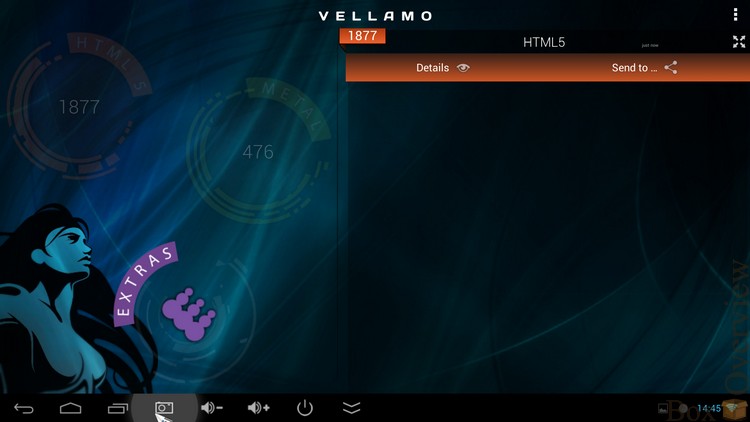
| Conclusion | HTML5 | Metal |
|---|---|---|
| 1080p | 1877 | 476 |
| 720p | 2105 | 515 |
| 1080p, MAX | 2096 | 599 |
Nenamark 2:

| Conclusion | Result |
|---|---|
| 1080p | 42.8fps |
| 720p | 60.1fps |
| 1080p, MAX | 60fps |
In all tests, the core with the maximum GPU frequencies shows the first results. In the process, the body does not heat up much, but still, use the core with the maximum CPU / GPU / RAM frequencies only at your own peril and risk!
► Wifi
The MINIX X7 is equipped with dual-band Wifi for operation at 2.4 GHz and 5 GHz. Unfortunately, I did not have a 5GHz router, so the Wifi test was performed on an 802.11g router.The signal level is good both near the access point and through the wall:

► Management
I have already gathered a decent set of different Air mouse: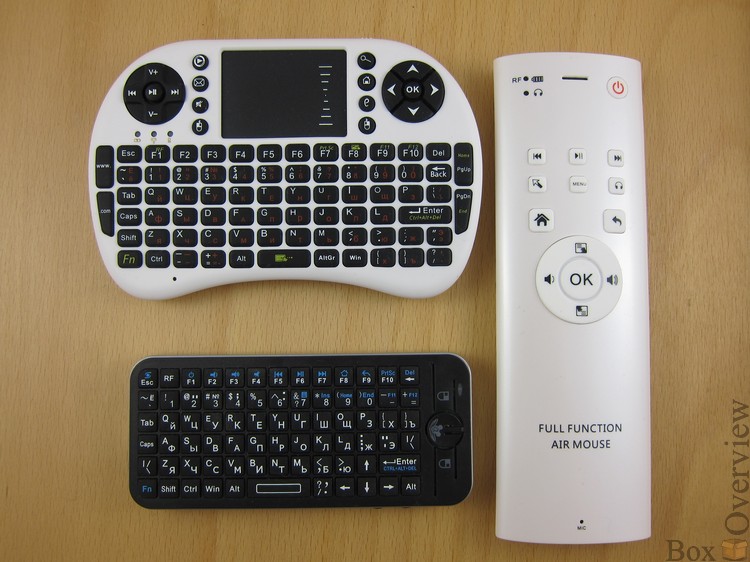
But now we will focus only on one of them - a mouse-keyboard called Q6. As I said earlier - the difference from other similar devices lies in the presence of a microphone, headphone input and external speaker.
In addition to the control panel itself, the package includes a USB receiver, a small USB recharging cable and instructions in English:

I think everyone noticed a very original inscription "FULL FUNCTION AIR MOUSE". For this special thanks to the Chinese Cap.
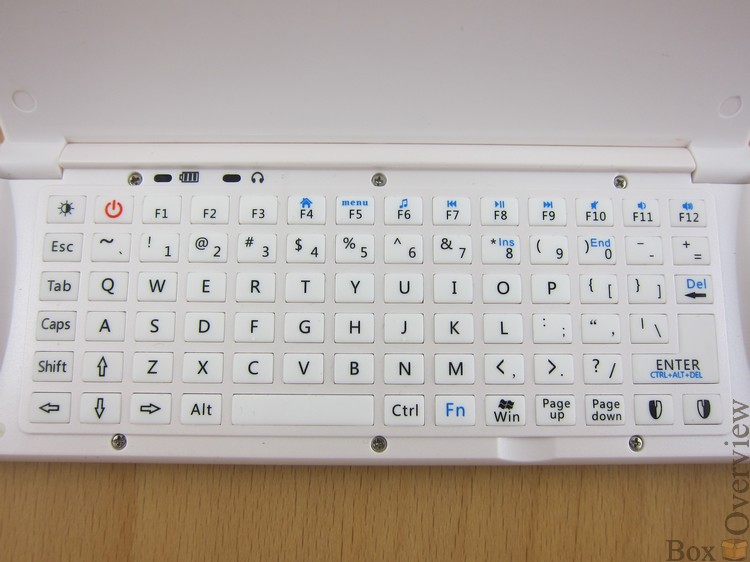
The full-size QWERTY keyboard hides under a flip cover at the back:

You can connect Q6 not only to Android devices, but also to a standard PC on Windows. On the keyboard are added several useful combinations for managing Windows:
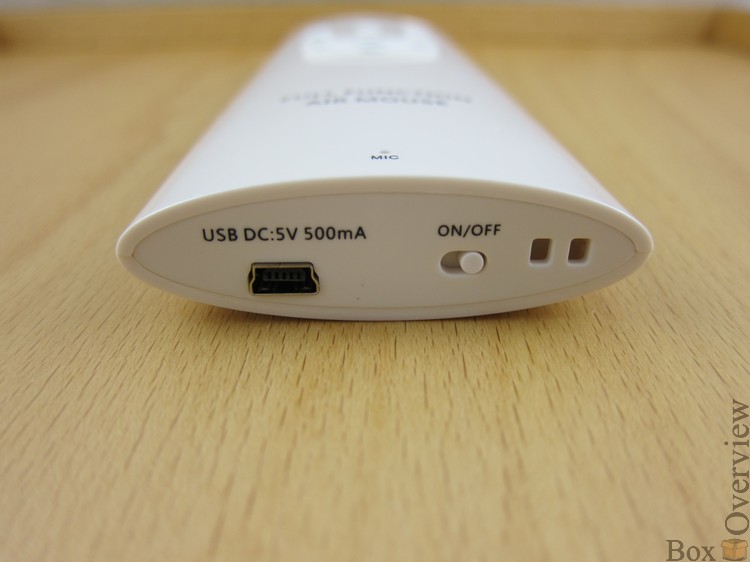
The input for the charger and the power switch are located below:
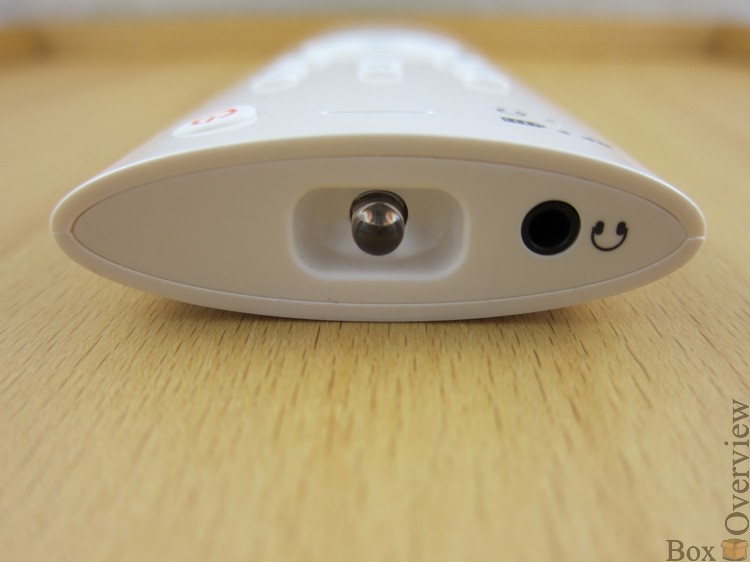
Top - headphone input and signal transmitter
In front there is a minimum set of control buttons and indicators:

1 - battery charge indicator and transmitter operation. Fast blinking - the device cannot connect to the receiver, slow blinking - low battery charge. Constantly the indicator is on when charging.
2 - sound transmission indicator
3 - power button (does not work on all devices, the MINIX X7 does not work)
4.6 - switch to previous or next track
5 - start playback / pause
7 - on / off button cursor control
8 - opening the menu
9 - switching the audio output to the mouse
10 - Home button
11 - “Back” button
12.13 - scroll the page up / down
14.15 - adjust the sound louder / quieter
Working with the remote control is very convenient, but working with the keyboard requires a bit of practice. When the lid is tilted, all the buttons on the remote are locked, but the mouse cursor remains to work. Those. There is no need to open and close the keyboard cover every time if you need to move the cursor.
The volume of the external speaker is not very high, which in principle is logical, because This is not a portable speaker, but a speaker phone. But the radius of the normal sound transmission is quite small - only 3-4 meters with direct visibility.
For me, the favorite among the Air mouse is still iPazzport.
► Manage media player using a smartphone
Rockchip has developed its own device management utility that allows you to remotely control a mini-computer from a smartphone, or any other device running Android.In the firmware itself, the server of this application is already installed. We just need to install the application.
 RKRemoteControl (2MB) on your smartphone or tablet.
Then, we start the application and connect to the found server:
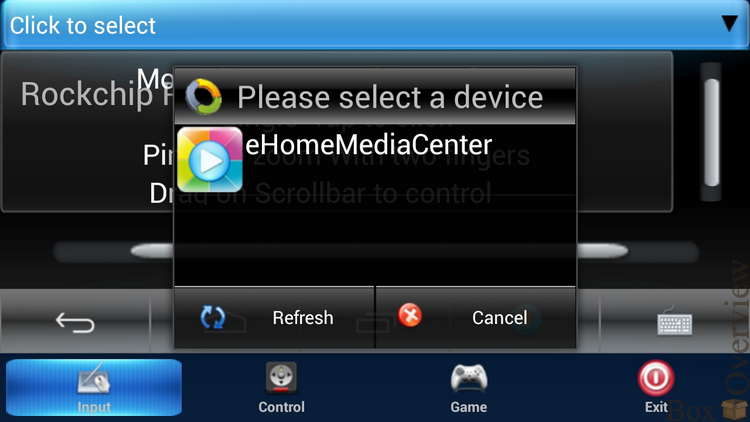
For devices to detect each other, they must be in the same network.
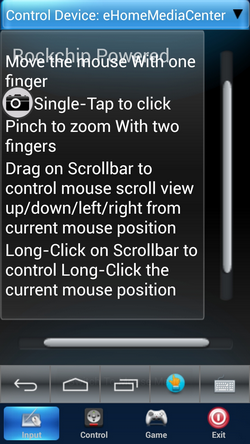
RKRemoteControl works can work in several modes:
1) Mouse mode. Moving the finger on the touch screen of the control device, we move the cursor in the system of the controlled device. A single tap on the screen is equal to a click. To scroll, you must use the vertical or horizontal scrollbar on the control device.
2) Scroll mode. When dragging, it will scroll (slide) on the managed device. Tap on the screen corresponds to a click.
Keyboard icon can call its screen version:
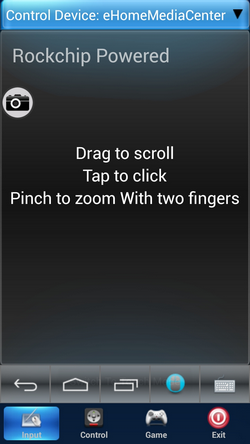
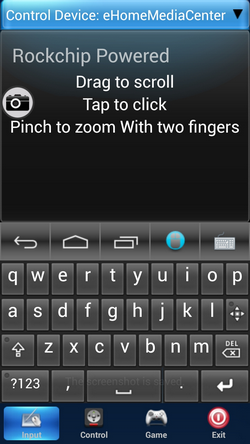
Also, the row of the buttons “Back”, “Home”, “Task List” is duplicated.
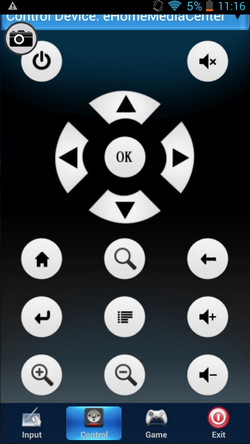
By selecting the Control icon, we are taken to the video / audio player control screen:
Clicking on the Game icon we see the game control settings screen.
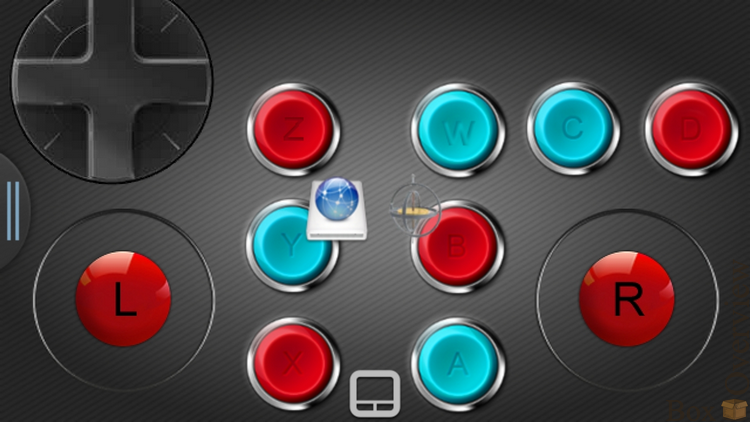
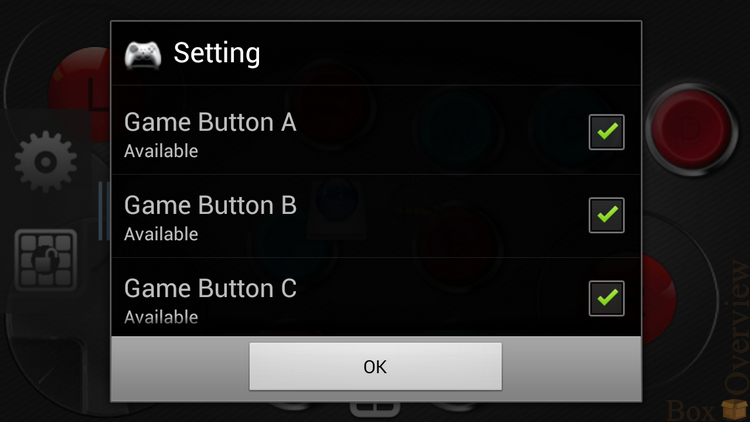
On the screen of the phone, it looks too messy, but we can remove the buttons we do not need by calling the appropriate settings menu.
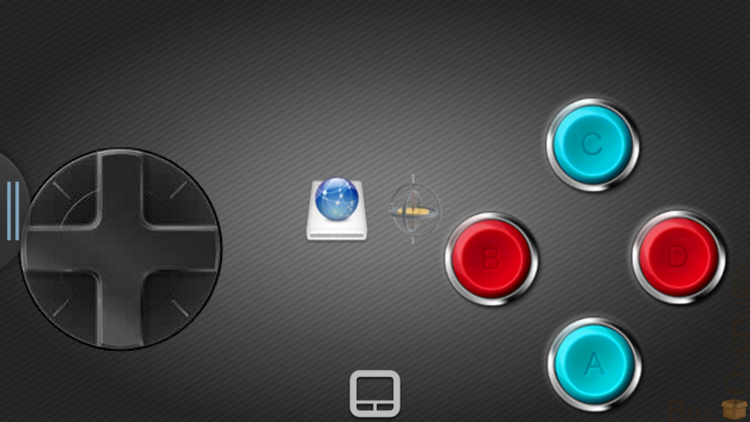
Set the classic layout of the gamepad:
Now you need to set up control on the MINIX X7.
Run the program RKGameControl, select / create a management profile:
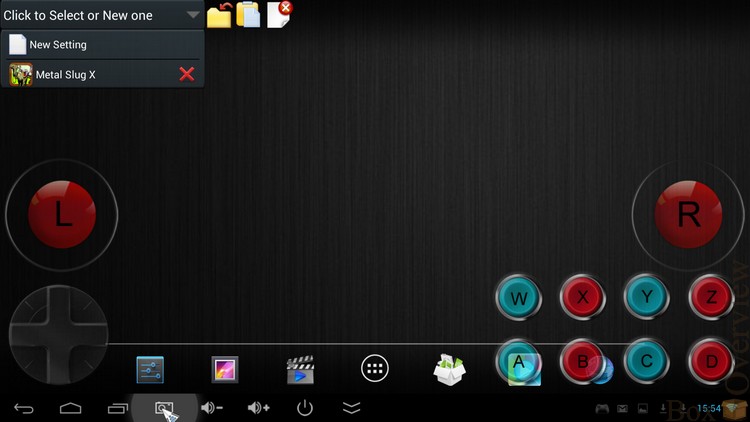
We start the game we need, while the settings will remain on top of the screen. Let's set up control in Metal Slug X:

Just drag the buttons from RKGameControl to the necessary screen buttons.
Be sure to save the settings in RKRemoteControl and then hide the program by clicking on the icon with the yellow folder.
Everything, you can play!
In the same way, you can configure any game in which no slide operation is required. Just drag the management stick to the right place, place the buttons and save the profile.
In RKRemoteControl, you can enable control using an accelerometer or a gyroscope. This will allow you to play games that apply this type of control.
► Video
XBMC works, but there are problems with playing FULL HD - the video is noticeably slow. With lighter files, the device copes without problems.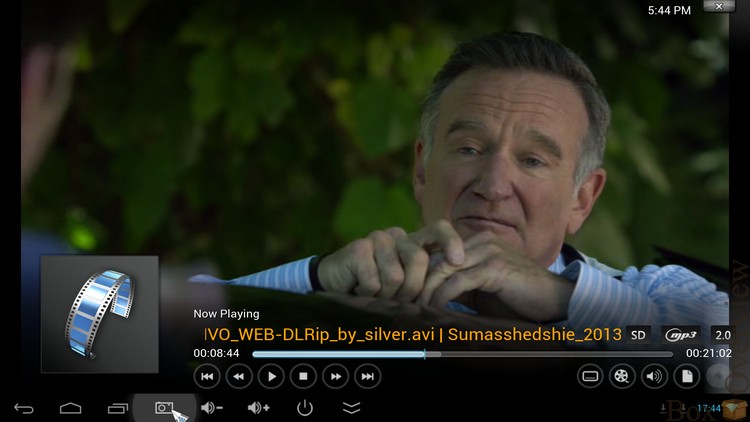
In MX-Player, FULL HD plays better, but still heavy files cause playback problems.

UPD: if you turn on HW + decoding, then all playback problems disappear.
UPD2: in MX Player, videos with a bitrate of 8-10 Mbit / s are well played, with a bit rate of 17 Mbit / s already slowed down.
► Conclusions
 Excellent build quality and body materials 1080p image output Wifi 802.11n 5GHz support High-quality firmware from third-party developers Overclocking capability
 Problems with playing heavy Full HD video No AV output The price is rather high compared to competitors.
It turned out a very interesting device, not without drawbacks: on the one hand, excellent quality of materials, Wifi 802.11ac and a lot of firmware, and on the other hand, problems with playing heavy FULL HD video. But for me personally, the MINIX X7 is the best solution for mini-computers at the moment. And you can install Linux on it, though without hardware support for video decoding, but that's another story ...
► Where to buy?
You can purchase the MINIX X7 in the DX.COM store for $ 132.30 for the version with an external antenna and $ 112.20 for the X7 mini version.Keyboard Q6 can be bought there at a price of $ 45.90 .
I remind you that you can subscribe not to miss new reviews and articles
 on the company’s page (“subscribe” button), or on your favorite social network:
  Vkontakte , in
  Google + , in
  Twitter
If you do not have an account on Habrahabr, you can read and comment on our articles on BoxOverview.com
Source: https://habr.com/ru/post/207154/
All Articles