Capturing and shooting a demo video of an iOS application with improvised and not so much means - ways and solutions
Almost a year ago I wrote about how to make a device-bracket from high-quality materials for capturing video from a mobile device’s screen, and even got a symmetrical answer — a critical essay that real shooting is not needed, and it’s better to capture video of an application or simulator.
Today, on a couple of real-life examples, we will look at different ways of capturing video from the screen of devices on iOS and see why the author of the response publication is wrong on many points - learn about the advantages and disadvantages of each of the methods and draw the appropriate conclusions for ourselves.
')
I invite everyone under the cut to understand, choose the appropriate one from the 5 reviewed and tested methods and see examples of the video obtained in different ways.
Capture video or live shooting?
All methods of recording and capturing video for the purpose of demonstrating the capabilities of applications and games can be divided into two common parts - capturing and recording in various ways only what is happening on the screen and traditional camera shooting of the entire device’s screen, along with the whole environment.
The first approach is applicable in cases when you need to show only what is happening on the screen, what is practiced, for example, in reviews of games, or when you need to get a high-quality video stream for further processing and editing, for example, to insert it into a video clip inside a virtual screen.
The second approach is more suitable for cases when it is necessary to demonstrate how the device and the application interacts with the environment, or to show how to control the application or game with the help of special gestures.
Both approaches have their own advantages and disadvantages, but, recently, shooting with a traditional camera is becoming increasingly important not only due to the growing problems with various video capture methods, but also because modern applications and games often use control schemes gestures that also needs to be demonstrated.
The advantages of direct video capture include the possibility, with the right approach, to get a better and cleaner picture of what is happening on the screen without any distortion - which is almost ideal for the subsequent use of the video stream in promotional videos with the addition of various effects.
At this point, the advantages of the method end and the disadvantages begin, which are already characteristic of each specific method of capture.
I will not say that using a bare video stream for demonstration is not enough and that you will need to spend time adding video and fingers that will show gestures, and some environment that will make the video more visually interesting - if you capture the bare video , then you yourself understand why you are doing this, therefore we will consider only technical aspects.
There are several basic ways to capture screen video iOS apps.
Method number 1 - recording simulator screen
The easiest way is to record the computer screen with the application running on the iOS simulator.
There are many programs that allow you to record video screen, but I can not advise anyone this method, suitable only for very simple applications - and that is not a fact.
The main disadvantage is that no matter how fast the computer is, if you need to demonstrate the smoothness of the animation at 60 frames per second, then this will not work.
The resolutions of screens and mobile devices and computers are growing, which requires considerable resources for recording and compressing on the fly video - which leads to frame loss and consequently jerky discrete video - even the simulator itself does not cope with fast enough rendering.
An iPad with a Retina, for example, no longer fits into any ordinary monitor, even a large one.
In addition, when recording video from the screen, when it is also necessary to record sound, in most programs designed for this purpose, due to the specifics of such recording, sound and video are desynchronized.
Therefore, the method of recording the simulator screen is no longer suitable for most applications and games.
Even without resorting to more resource-intensive applications, I recorded a test video by running the Maps application in the simulator, the brakes and twitching of which are visible to the naked eye, and on the Map device does not slow down.
Method # 2 - Record via AirPlay
There are programs for both Mac and Windows, for example, Reflector, which allow you not only to turn your computer into an AirPlay receiver, but also to record an incoming video stream - any iOS device on board connects to the computer, just like an Apple TV, and starts broadcasting video to computer.
Here the main problem is the bandwidth of the Wi-Fi channel.
Even when we were developing games specifically for AirPlay, making almost a console from iOS devices, it became clear that even perfect Wi-Fi would not be able to transmit the picture in high quality and without loss of frames.
It was hoped that with the advent of 802.11n the problem would be solved and the channel would be enough for Full HD, but it still remains hope.
Moreover, as screen resolutions grow in resolution and video over the air network, more and more computing resources are required - and the changes taking place in iOS itself also add up, obviously, requiring resources for their own needs.
Modern devices do not cope - even the newest.
The old iPad 2 without Retina worked tolerably well at 720p resolution, but on the new iOS the brakes are already there, and at 1080p there is a noticeable loss of frames even on the iPhone 5S and especially on the iPad with Retina screens - the unloaded Wi-Fi of the latest generation without any neighbors channel, which should be enough, not much help.
It seems that is why Apple is not very much paying users attention to AirPlay in terms of use for games.
As a result, AirPlay is only suitable for transmitting an already finished, recorded video, which is buffered at the receiver side, thus leveling the narrowness of the channel - this method is not suitable for games or screen recording.
To illustrate the problem, I recorded two videos. A simple application and game that requires several large resources. Even in a simple application, an effect is noticeable, similar to the fact that the frame rate is far from 60, and there are noticeable delays and jerks in the game.
At the same time, there are no frame losses on the devices themselves and the FPS is not lower than 60.
Method number 3 - recording through the library to record game video
There are already ready systems for recording and for the purpose of the subsequent exchange of gaming videos directly from the game code, for example, Everyplay.
Yes, and own recording of game frames from Open GL to a file is easy to do thanks to the examples.
The method is quite good, but there are drawbacks too.
For normal applications implemented on UIKit, such recording will occur with an unrealistically low frame rate, and Open GL games must be sufficiently optimized to be able to allocate the necessary resources for video recording and not to slow down.
Examples of records can be viewed on the site of the same Everyplay - simple games give a good FPS at the output, and where the resources of iron are required by the game itself, there are jerkings and brakes.
Method number 4 - recording through a video capture device
A device for capturing video is often used by large gaming portals for capturing game video - we tried it, and we even tried a few - the iOS device connects to such a device or video capture card using a special HDMI cable.
Apart from the price of the video capture equipment itself, there are drawbacks to this method - besides the fact that the device or the capture board also requires good enough and, therefore, expensive iron to obtain good quality, in this case there is a problem typical of those we have considered earlier ways.
Relatively inexpensive video capture devices are very few. At the same time, many of them do not allow recording video from iOS to Full HD even with a converter - iOS transmits a signal to 1920x1080p with 60 FPS, and cheap devices can write either 30 FPS Full HD or Interlaced mode. Therefore, on our first device, we, dancing with a tambourine, could only record 720p.
Relatively recently, a more powerful device appeared, but due to the size of the picture, other shortcomings have already appeared.
The very recording of a video stream on a computer requires a recording speed on the disc of at least 160-380 megabytes per second - even during compression. To be able to record Full HD at low speed, you need a good codec, for example, Apple Pro Codec, which comes in the kit to the Final Cut Pro package. Without a codec, either a very powerful disk system is needed or frames will be lost - the problem has been known for a long time, for which, in the settings of video capture programs, there is a special option to automatically stop recording if a frame is detected.
It turned out that with the transition to the Lightning connector, it seems that the iron for video conversion was taken directly from the device to the cable itself, which was discovered by portals who like to disassemble and explore various technological devices - and the quality has gone down compared to the old type of HDMI wire, which on Full HD gave almost perfect picture.
Plus, the game or application must be sufficiently optimized so that the performance and frame rate are not affected, since the system takes a lot of resources to generate a video stream.
In the examples below, a significant improvement is already noticeable - a simple application gives a very good frame rate, but the game still has a certain video resolution.
And the problem is exactly on the transmission and system video conversion side - 60 FPS is stably measured in the game itself.
Below is an example with more noticeable brakes when the video was captured from the iPad Retina. With excellent FPS on the device at the output, there are delays and skips. There is a sharp contrast between the smoothness of the animation between the one that was made by hand and the one that is visible on the screen, in the captured video stream.
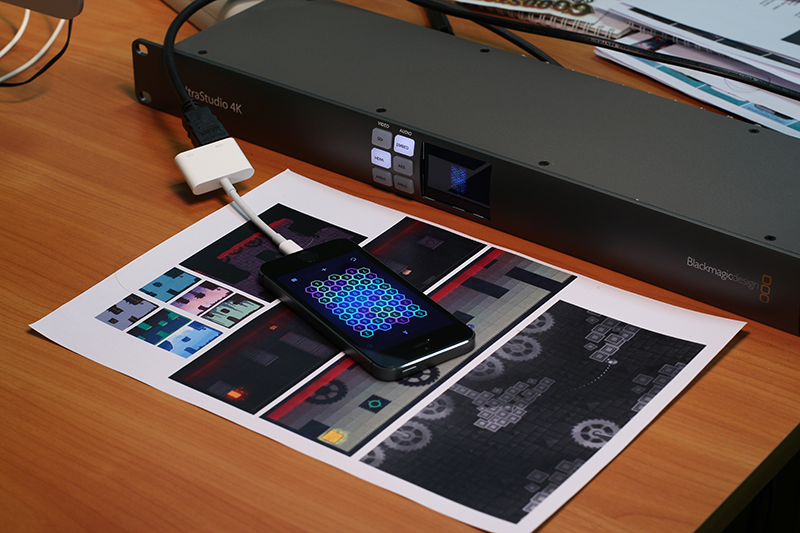
Method number 5 - the traditional recording DSLR-camera from life
From the point of view of the lack of brakes, twitching video and frame rate subsidence, traditional video recording is the most ideal way.
The disadvantage is that recording in good is likely to require not only more expensive, even compared to a video capture device, equipment, but also certain time costs - to create the scene, set the light, record a lot of duplicates and then process it to smooth the flaws. .
The question with the photographic technique is that all the same rules and requirements apply to screen recording as for traditional photography.
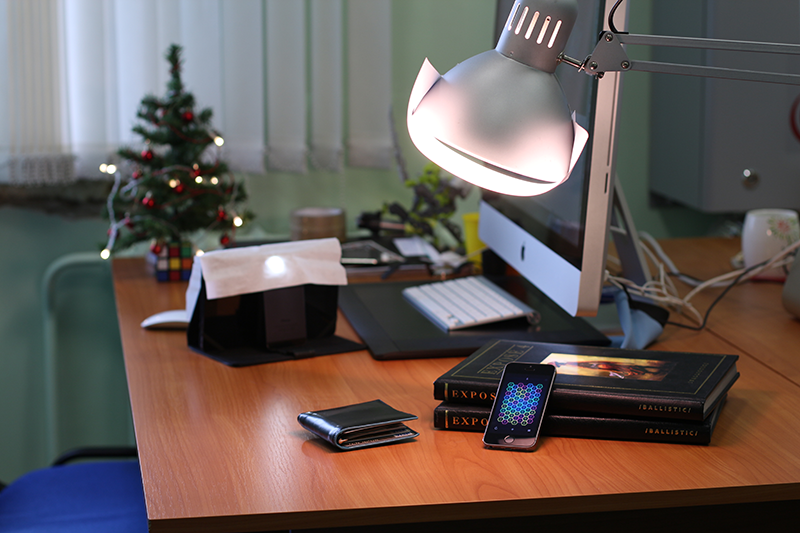
In particular, besides the DSLR carcass itself, a separate high-aperture lens will also be needed - to avoid noise, especially if you need to shoot in dim lighting or if the application interface or game is made in dark colors. For example, a 50mm lens, which is well suited for grocery shooting, can cost from a hundred to several thousand dollars. We approached the average version with f / 1.4 aperture.
The light and the scene are already dependent on the requirements. As you can see from the photo, here we saved by using cheap improvised means - for lack of glare, we simply wrapped a regular desk lamp with a sheet of ordinary office paper. And the role of daylight in the form of a bright glare on the table in the final video below in our winter conditions was accomplished with an iPhone flash, the light of which we also scattered by closing the LED with paper.

In addition, field shooting has another drawback - the hands of those who work a lot with computers usually tremble.
As many shots were filmed due to the fact that even having a ready-made script, it’s not easy to shoot a video right away, the atmosphere grew tense and more and more emotional with comments in more and more Russian - but we laughed well watching videos from “the shaking hand ”starring.
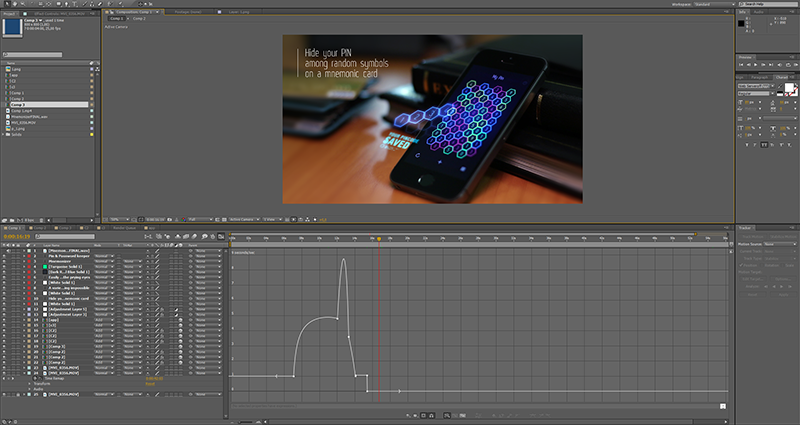
The question of a shaking hand was solved more by fast rewinding - the Time Remap function in After Effects.
We also solved other issues, starting with simply finding good shooting parameters and ending with the fact that the focus of the device will upset the slightest shift - the automatic focus will not work in most cases, since it will focus on the hands and not on the screen , and with good optics, with perfect focusing on the screen, the grating between the crystals will be visible and the moire will be visible in the video.
In the examples below, which were made without duplicates and hastily, it is noticeable that the device does not quite get into focus, if you watch the screen close-up.
Draw conclusions and the final movie
Summing up, I will say that the choice of method of capturing or shooting the screen depends primarily on the task and the specifics of the application or game itself.
For some, an inexpensive and quick solution will work, and for others, if you need a good picture, you will have to tinker regardless of the method chosen.
Either optimize the application so that it does not slow down with simpler ways, or spend time, effort and money on more complex methods - while optimization can be a relatively dead-end path, since even relatively simple-looking games can use mobile iron resources at close to the limit. the border.
It is not always worth running for expensive equipment right away, and if necessary, it is necessary to approach its choice and purchase carefully after studying its characteristics in order not to waste money without solving the problem.
Thanks for reading and watching!
PS I used to write out my experience of a couple of years of video capture on iOS all night — I’ll answer the questions, how I’ll sleep, as Moscow time is closer to after dinner.
Source: https://habr.com/ru/post/207140/
All Articles