Apple cake: all men
 This IT apple cake in every sense I want to coincide with the day, traditionally considered to be the day of men in Russia. Unfortunately, I can’t give everyone a try on the version I’ve cooked, but I can give the opportunity to repeat this feat (or make the girl / wife / mother repeat - underline =)) and evaluate the taste of the culinary product in this way. The tasters, who were lucky to try out the cake, expressed their utmost approval to them)
So, about the process. The cake consists of four, roughly speaking, components: sponge cake, apple layer, creamy caramel mousse and frosting.
To begin with - what we need to create a biscuit cake base.
Ingredients for sponge cake:
4 eggs
200 ml of sugar
1 bag of vanilla sugar or a pinch of vanillin
200 ml of flour
1 tbsp. l starch
3/4 tablespoons baking powder
a pinch of salt
Cooking sponge cake:
There are two basic ways to bake a biscuit. The classic method, based on the separation of whipping egg whites and yolks, is rather laborious and capricious, so I always use a simplified recipe. It is incredibly simple, but it gives good results.
We break 4 eggs into a 2-liter saucepan, pour sugar, salt and vanilla sugar or vanilla into the same place. Beat the mixture with a mixer for 15 minutes at maximum speed - it should turn white, thicken and increase in volume 3 times. Then mix the flour, starch and baking powder and sift the mixture into the egg mass. Gently stir from bottom to top until the lumps disappear.

Split the bottom of the split form with baking paper, lightly sprinkle the walls with flour, and then pour the prepared mass into the mold.

Bake at 180 degrees for about 40 minutes.

It smells awesome at the same time =)
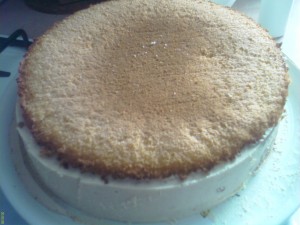
Cool the finished biscuit, remove it from the mold and cut it along the horizontal horizontally into two cakes. Bottom cake enclosed again in the bezel of the split form.
')
Next you need to prepare the apple layer.
Products:
2-3 apples
half lemon juice
3 tablespoons white sugar
1/3 cup brown sugar (can be replaced with the same white)
1.5 tsp ground cinnamon
1 tbsp. l butter
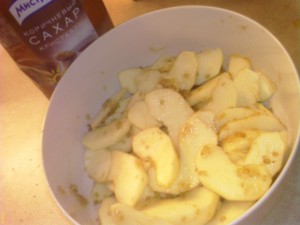
Cooking:
We clean the apples and cut into thin slices. In a bowl, mix the juice of half a lemon, all the sugar and cinnamon, add the apple slices to the mixture and mix gently.
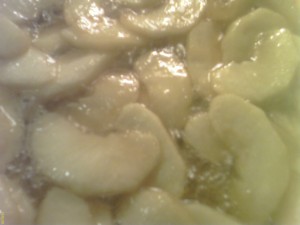
Put a spoonful of butter in a frying pan, melt it, pour the apple mixture into it and fry, stirring for about 15 minutes, gently turning the apples until the sugar turns brown and caramelized. We spread the prepared mass on the lower biscuit cake in a detachable form, spreading it evenly over the entire width.
The next stage is the preparation of creamy caramel mousse.
What we need:
400 ml of whipping cream 33-35% fat (can not be used from a can)
0.4 glass of sugar
2 tbsp. l powdered sugar
1 cup of milk
1 stick or several large pieces of cinnamon
3 tsp. instant gelatin (not the one to be soaked for 40-60 minutes)
1/4 cup cold water
4 egg yolks
To begin with, beat the mixer with powdered sugar with a mixer for 2 to 5 minutes - you will clearly notice when they change their state and become creamy. Then it is better not to whip, otherwise the cream can exfoliate and turn into butter and whey =)
Cover the bowl with cream and put in the fridge for now, while we ourselves start caramel. To do this, from 0.4 cups of sugar pour 2 tbsp. spoon to the yolks, and the rest of the sugar and cinnamon sticks put in a saucepan and melt, stirring, over medium heat to amber. Without overcooking the caramel, we pour milk into it - everything hisses and the caramel immediately stiffens, but this is nothing. Stir further and it will dissolve in the milk.
Bringing the milk to a boil, remove from heat and throw out pieces of cinnamon from it.
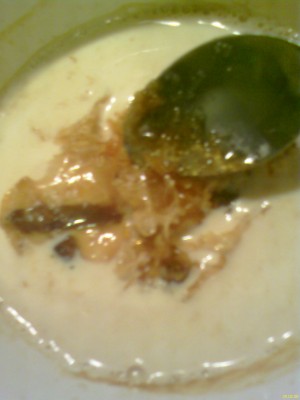
After that, beat the yolks with sugar aside. Pour caramel milk into the yolks with a thin stream, stirring actively, put the mixture on medium heat and continuously stirring, bring to a boil - but do not boil! And then the yolk is curtailed. The mixture should thicken to a state of sauce, time will require 5 minutes.
Soaked gelatin dissolve on low heat or in a microwave and pour into the egg-milk mixture. Stir thoroughly, add whipped cream into the mixture and stir again.
Pour the mixture onto apples in a detachable form, cover with a second biscuit cake and freeze in the fridge. After that, remove the side of the split form.
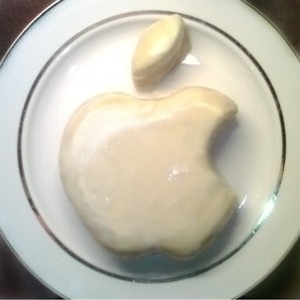
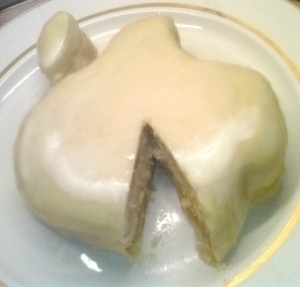
So, the most important thing is the design =)
You can print the Apple logo on the printer (I have a cake mold with a diameter of 28 cm, therefore you need to enter the logo in this diameter), put a stencil on the cake, draw it and cut it with a knife. But I did not have a printer, so I had to draw on the eye%) The bit bitten off can be identified with the help of a suitable glass / saucer size. Leaf-cake is cut from a bitten off piece. The edges of the biscuit are slightly rounded to achieve the apple effect)
Next, you need to pour the cake with icing. It was thought that I would buy ready-made chocolate or sugar icing in the store, but bypassing all the large Moscow supermarkets found bleak facts: ready-made culinary semi-finished products almost disappeared from sale in Moscow = (I had to think of an alternative. I bought three 100-gram white chocolate bars for the glaze, but you can make icing from powdered sugar and lemon juice (the recipe is easily in the internet).
I broke the tiles into pieces and put them in the microwave for 3 minutes; then stirred the resulting liquid mass and poured it a cake. Frozen excess glaze from the bottom of the plate had to be cut and removed (right in the mouth :)).
But the result was unsatisfactory - the glaze was rather dull and did not give an applelogo effect. I had to come up with additional tricks. To achieve transparency, we needed 2 sachets of transparent gelatin pouring for the cake (it is sold ready-made in sachets). I mixed the first one with a glass of milk, heated the recipe on the back of the bag and filled the cake with this mass, it turned out to be a white glossy layer a couple of millimeters thick. I did the same with the second one, but took a glass of pure water (as an option - you can take clarified apple juice) - you get the same transparent layer. At this stage, the results suited me, and the experiments were completed =)
If you move not only to read a lot of books, but even apply them in life (for which you must be a gourmet maniac), I wish you good luck and pleasant tea with the cake =) If you follow the instructions, the tasters are guaranteed success;)
Congratulations, dear man! =)
Note: gimlis suggested to me here that it is better not to use white Ritter Sport for melting - it crumples. In general, it is better not to overheat chocolate when melting, otherwise crystallization begins. I grabbed the first tiles I got (I had chocolate, I don’t remember the name) - but I was lucky, everything was fine =)
PS: I apologize for the quality of the photos - there was no camera, I had to shoot a 2-megapixel camera of my PDA.
Source: https://habr.com/ru/post/20709/
All Articles