Dive into Litecoin, or how to start mining scrypt currency

Foreword
It's no secret for anyone that the cryptocurrency is gaining momentum, becoming ever closer to international recognition. At one time, I was engaged in Bitcoin mining on video cards, but for more than a year now I have remained “not in business” with the advent of ASIC miners. I have always been against ASIC - farms, and therefore decided for myself not to join their owners. A few words about the reasons - ASIC farms are expensive, not very common and very specific, this greatly increases the threshold for entering mining and cryptocurrency as such, and the selective distribution of these devices contributes to a drop in entropy. To some, these reasons may not seem to be weighty enough, but for me they have become decisive. Not long ago, I realized that one of the Bitcoin forks was beginning to gain momentum, and it was protected from ASIC farms, which caused my serious interest. Nevertheless, most of the information on the Internet is outdated, and I had to go through a thorny path to get my first farm to work, so I decided to share my experience with you.
Step 0 - Assess the situation and understand how the cryptocurrency works
All of us, as cryptocurrency enthusiasts, wish her prosperity, especially if our income depends on its prosperity. But it is worth remembering that the cryptocurrency market is not yet stable, and that cryptocurrency should not be the only source of income because of the attendant risks. If your goal is easy money, then it is better to look for it elsewhere, and if not, welcome to the community!
So what is mining? Mining is essentially a network. By connecting your computer to the network, you become part of a single large crypto network that computes many hashes. Each time a hash is calculated, the machine performing the calculation has a chance to detect the block. For finding the miner's block, 50LTC is awarded (this number may differ for other currencies). Finding a block depends on luck; however, the system is programmed with a constant number of blocks, and the average time required to find a block can be calculated. Regulation is carried out using the complexity of the system, which is configured flexibly depending on the speed of the system as a whole. Speed is measured in hashes per second. At the time of this writing, the current unit of measurement of hashes per second was kh / s (kilo-kkes per second).
1000 h / s = 1kh / s
1000 kh / s = 1mh / s
1000 mh / s = 1gh / s
')
A miner should always strive to get as much kh / s as possible with a minimum electricity flow of 1 kilohash.
Step 1 - Build a Farm
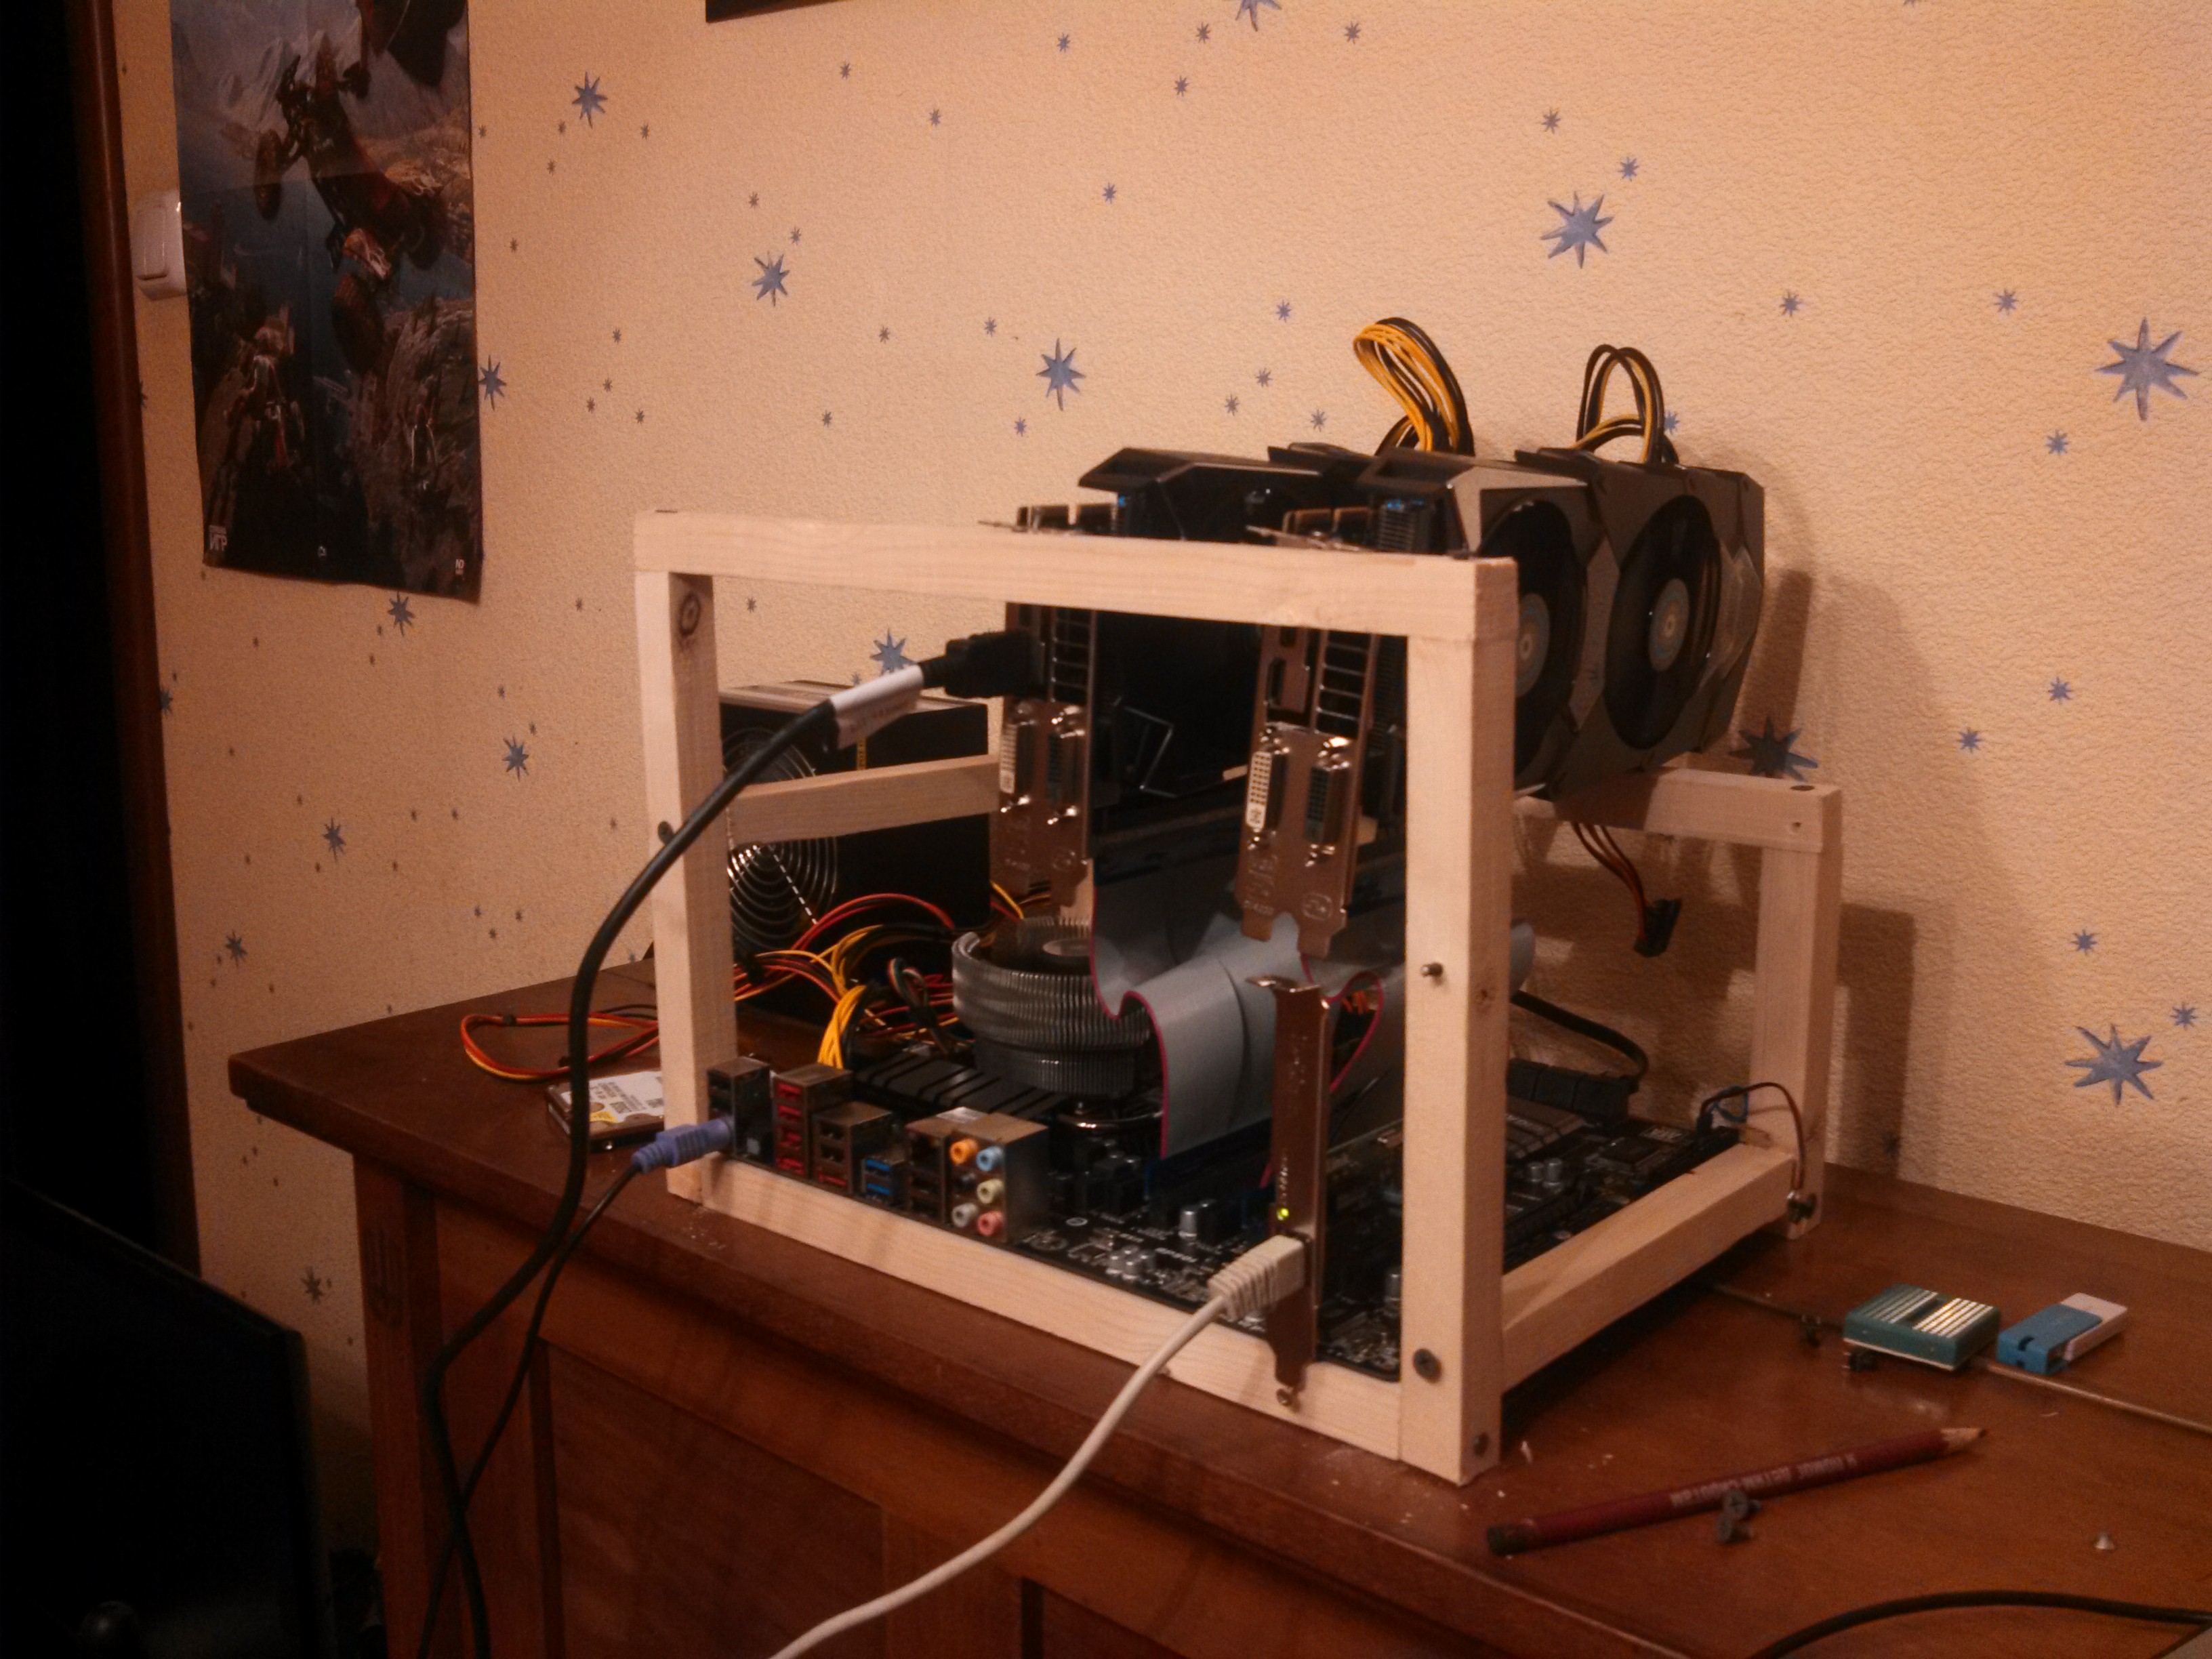
So, let's say you decide to mine Litecoin (or another scrypt currency). Of course, you can use your main PC for mining, but since usually only one video card is installed on the PC, and the video card is not always ATI, I will start with the construction of the farm. In addition, at the time of this writing, mining with 1 video card is on the verge of, and very soon may stop generating revenue. If you are interested in setting up software - go to the next item.
Collecting a farm iron should be chosen on the basis of the rule - all for video cards. This means that it does not really matter to us what kind of processor, RAM or hard disk we will have - the number of PCI-e slots and a good power source are important for us.
Suppose you have already found a 1200 watt modular power supply and you already have a motherboard with a RAM, some kind of processor and a 16GB flash drive. The worst idea would be to hide it all in the hull - farms, as a rule, generate a lot of heat, which means you need to cool them accordingly. A very simple solution is to whip out a wooden case or buy a ready-made metal one.
Now the most important thing is the choice of video cards. At the choice it is worth being guided by this table and this calculator . Your goal is the number of kh / s. More about him a little later. It is worth remembering that sometimes it is cheaper to buy 2 video cards that deliver 700kh / s than one 1000kh / s, and it's not always easy to find a favorite card, so accessibility is also an important factor.
It is also necessary to get raisers - loops, which serve to remove video cards from the motherboard.

There are two types of raisers - with and without additional power. Power - the main scourge of any farm, and if you have more than 3 video cards involved - it is recommended to use raisers with additional power. Otherwise, video cards may either not start at all, or you risk to overload the power tracks on the motherboard and burn them. Non-powered raisers can be converted to powered raisers by following the instructions from here . Do not use CrossFireX when connecting video cards, this leads to poor results.
It remains only to configure the hardware - go to the UEFI / BIOS and set the following settings:
- Automatically turn on after power off.
- Disable ALL excess peripherals. We leave only USB, network card and IOMMU.
- Install the boot from USB-HDD as the main one.
- Disable checking for the presence of the keyboard and monitor.
Since, alas, there is no single interface for UEFI / BIOS — some of these settings may be missing or hidden — you will have to read the instructions for the motherboard.
Step 2 - Put the software
Since the farm is a device that implies remote control and requires working with video cards - Linux will be a very good solution. In this guide, I will describe the configuration of Ubuntu 12.04.
To begin with, we are preparing an installation flash drive, for this we download the x86 or x64 version of the mini-image.
If you are using Linux or OSX, then we write it using
sudo dd if = mini.iso of = / dev / sdX bs = 4M
where mini.iso is the path to the downloaded file, and / dev / sdX is the USB flash drive.
If you
As soon as everything is ready, we plug the USB flash drive into the farm (which already has another flash drive designed to serve it as a hard disk) and follow the instructions on the screen until the list of packages appears, select Xubuntu-desktop. OpenSSH server and finish the installation. After the reboot, you should already be able to immediately connect to the farm via SSH.
At this stage, if you are going to set up a farm remotely it is very useful to have Filezilla, I advise you to turn off the monitor only when everything is already working for you - personal experience suggests that this is a good idea.
First of all, you need to enable autologin in lightDM - we enter in the terminal
sudo /usr/lib/lightdm/lightdm-set-defaults --autologin username username is replaced with your username.
Now you need to install the ATI proprietary module.
For x86_64:
sudo add-apt-repository ppa:xorg-edgers/ppa sudo apt-get update sudo apt-get install fglrx-installer For x86:
sudo add-apt-repository ppa:xorg-edgers/ppa sudo apt-get update sudo apt-get install fglrx Reboot and continue. Now you need to download two development kits, open the browser and download one , two .
Still need to put some libraries and a couple of useful things.
sudo apt-get install build-essential cdbs fakeroot dh-make debhelper debconf libstdc++6 dkms libqtgui4 wget execstack libelfg0 dh-modaliases ia32-libs ia32-libs-multiarch i386 lib32gcc1 libc6-i386 linux-headers-3.5.0-17-generic libcurl4-openssl-dev libncurses5-dev pkg-config automake yasm screen For mining, we need cgminer 3.7.2, just this version ! In the subsequent support for mining on the GPU is cut.
Download it:
wget http://ck.kolivas.org/apps/cgminer/3.7/cgminer-3.7.2.tar.bz2 && tar xf cgminer-3.7.2.tar.bz2 Now install the SDK:
mkdir amdapp_2-8 cd amdapp_2-8 tar -zxvf ~//AMD-APP-SDK-v2.8-lnx64.tgz sudo ./Install-AMD-APP.sh mkdir ADL_SDK cd ADL_SDK mv ~//ADL_SDK_5.0.zip . unzip ADL_SDK_5.0.zip cp include/* ../cgminer-3.7.2/ADL_SDK And collect the cgminer:
cd cgminer-3.7.2 CFLAGS="-O2 -Wall -march=native -I /opt/AMDAPP/include/" LDFLAGS="-L/opt/AMDAPP/lib/x86_64" ./configure --enable-scrypt --enable-opencl make -j2 sudo make install We reboot again and everything is difficult behind, it is time for the most difficult thing - settings.
Step 3 - Configure the software and select the pool
So, now it is worth stopping for a while the romp with the software and choose a pool for yourself. A pool is your “employer”, you give your farm a pool, and he pays you for using it. The pool is needed in order to have a more or less stable profit, since without it, it is possible to search for a block (for which 50 LTC is issued) for a very long time, and luck plays a big role. At the pool, however, as a rule, it has solid power, which means it often finds blocks, dividing the income between its miners. Many mining gurus are of the opinion that if you mine for a long time - the pool does not matter, however this is not entirely true. A pool must somehow distribute the funds it receives, and not all pools do it the same. When choosing a pool, you should choose a suitable payment system for you. At the moment there are 2 main types of payment:
- PPS - P ay P er S hare
- PPLNS - P ay P er L ast N S hares
PPS means that the pool pays you for each calculation. This sounds tempting, since your income will depend only on the complexity, but not on luck. Nevertheless, one has to pay for such stability - pools with this method of payment take a large commission, moreover, if the pool suddenly starts to be very unlucky there is a chance that the pool will go bankrupt.
PPLNS reduces the commission to a minimum, and the chance of bankruptcy to 0, since it pays only for the last H calculations that took place before finding the next block. Thus, you depend on pool luck and complexity at the same time.
List of pools
As soon as you have decided on the pool and have an account, you can start the setup. Create a script in the .sh home folder, for example start.sh and write the following there:
#!/bin/bash export DISPLAY=:0 export GPU_USE_SYNC_OBJECTS=1 export GPU_MAX_ALLOC_PERCENT=100 ./cgminer --scrypt -o stratum+tcp://poo.l:3333 -u username.worker -p pass Replace username.worker with your username and worker, pass - with the password stratum + tcp: //poo.l: 3333 - with the address of your pool
We start - and hurray, the farm works!
But that is not all. With these settings, you can lose a lot of kh / s, which you could gain by applying fine tuning. This is something from the area of shamanism, so for beginners, I advise you to take the configuration from a table already known to us, or find it on the Internet. For those who consider themselves advanced, I will give a little help on the settings:
- thread-concurrency - responsible for concurrency, that is, how many hashes will try to calculate cgminer at a time. This value must be selected, it is even easier to take from the table, or set the number of shaders.
- shaders - an alternative to specifying thread-concurrency, you need to know how many shaders your video card contains and specify them, then cgminer will choose the parallelism itself.
- intencity (-I) - how much video memory will be clogged. This parameter is required , and not less than 13. The maximum value is 20. Setting a too large value may slow down, as the memory will be overwritten and lead to errors.
- g - Number of processes on one GPU
- auto-fan - automatic regulation of the cooler
- gpu-memclock - memory frequency. Very important, you must specify a multiple of 250. It is this frequency that is most important when working with the scrypt encryption algorithm on which Litecoin is built.
- gpu-engine - core frequency - not so important here. In fact, the “magical ratio” of this frequency to the frequency of memory is important. Finding such a frequency can give a strong performance boost.
Remember that the last two parameters are dangerous to use! When overclocking your video cards, you always have a chance to burn them, so as long as you are not sure what you are doing - do not use these parameters.
To be able to remotely open the miner to run it costs through the GNU Screen
screen -dmS miner start.sh As soon as you want to leave it without turning off the miner - press Ctrl + A + D to return, enter the command
screen -r miner Now the monitor can be turned off, just like the keyboard.
Afterword
I hope that this article will help everyone who wants to start mining cryptocurrency, but does not know how. I had to look for this information for a long time, and I spent about a week so that my farm would work in full force.
Thanks to the good community / r / litecoinminig for the help!
Successful mining and Happy, Habr!
Source: https://habr.com/ru/post/207030/
All Articles