Windows Azure Media Services vs. Amazon Elastic Transcoder. Part 1: Windows Azure Media Services
Good day to all who have found the strength to look at Habr in the last working week of this year! This time I would like to share with you the experience of using services for working with multimedia content provided by cloud providers. To make the process more interesting, we will look at two cloud providers: Windows Azure Media Services and Amazon Elastic Transcoder. After that, of course, do not forget to compare them! So let's go!
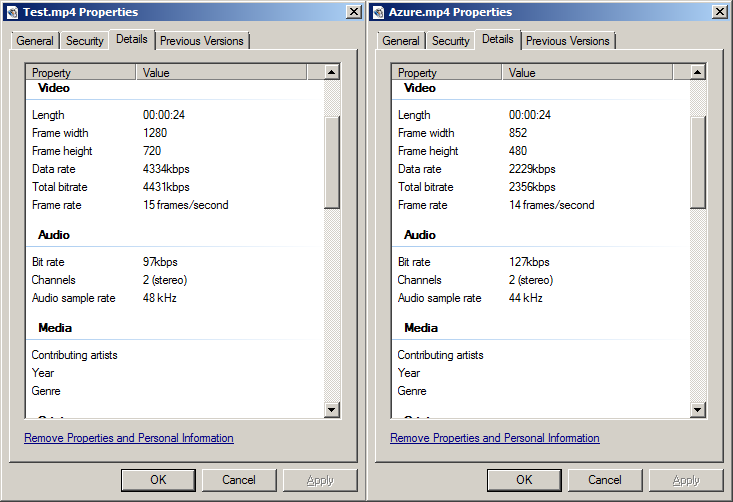
Let the input data for us will be a video file taken with a mobile device in 720p format (Android). Its duration is 24 seconds, and the size is 13 MB. We want to convert it to 480p format.
So, we will create a new Solution in Visual Studio. Suppose that a client to work with each cloud provider must implement some basic functionality. So that, for example, we could easily replace the use of Windows Azure Media Services with Amazon Elastic Transcoder. Therefore, we will declare the basic interface:
Each client implementing this interface should be able to:
The general principle of working with the client will be as follows:
Accordingly, the Convert method in pseudocode will look like this:
Let's begin with implementation of the client for work with Windows Azure Media Services. Before we start writing code, we need to create a new endpoint to work with this Windows Azure service. To do this, go to the Windows Azure Management Portal and select New -> App Services -> Media Service -> Quick Create.
')
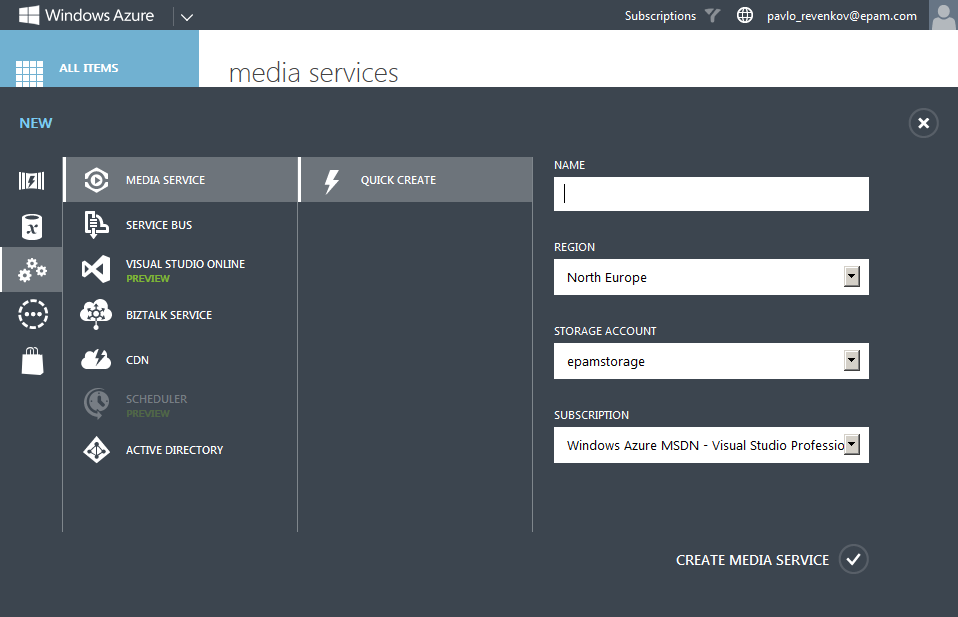
We need to specify the name of the new service (Name), the region (Region) in which the capacity will be allocated, the storage account (Storage Account), and the subscription (Subscription) in which we want to use Windows Azure Media Services service.
Now, to work with the service, we need to get an Account Name and Access Key. To do this, go to the Media Services section of the Windows Azure Management Portal and click the Manage Keys button.
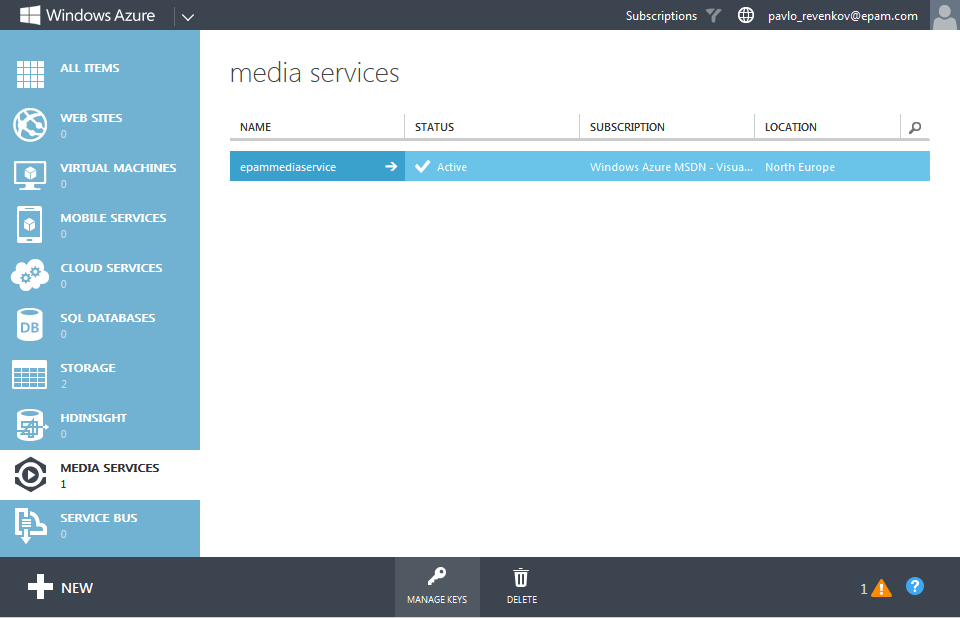
After that, in the window that appears, we need to copy the Account Name and Primary Access Key values.

We define the copied values in the constants of our class working with Windows Azure Media Services:
So, before proceeding directly to writing the code of the corresponding class, we need to connect the Windows Azure Media Services SDK assembly. To do this, use the package manager NuGet. In the context menu of our project, select the item “Manage NuGet Packages ...”. We are looking for and install the appropriate package:

The base object for working with Windows Azure Media Services is MediaContext. Similar to the DataContext in the Entity Framework. In the class constructor, create it using AccountName and AccessKey:
This object will allow us to work with all entities provided by Windows Azure Media Services.
The first entity we need is the Media Processor. All tasks (Tasks) that we send for processing Windows Azure Media Services must be processed by a specific type of processor. All possible processor variants are presented here . But we are interested in Windows Azure Media Encoder. This processor is directly responsible for encoding the video stream into various formats. Add the receipt of the corresponding processor in our constructor:
You also need to create a so-called Asset - a description of the entities that will be used as input or output parameters for the processor. This object will store references to the used storage account, links to files intended for processing, etc. Create such an object. It will store the input parameters, that is, links to files intended for encoding into the format we need.
All coding tasks (Tasks) are performed as part of some job (Job). Therefore, we need to create such an object:
Finally, it is necessary to link all the entities that we have created. Create appropriate tasks for transcoding one video to another. To do this, we will declare another method that will be called immediately before starting the job (Job) for encoding:
Here you should pay attention to the name Preset, which we ask. This is an indication of exactly what format we want to recode our video. A list of all possible options can be found here . According to the condition - we will encode the original video in the format 480p.
Thus, having created several tasks (Tasks) for coding into different formats, you can use one source file, say, shot in 1080p.
So, all the methods that are specific to working with Windows Azure Media Services we have implemented. Let us turn to the implementation of the IVideoConverter interface.
Since Windows Azure Media Services is working in the cloud, before starting the encoding operation, you need to upload the necessary files to the storage. The UploadFile method deals with this in our interface. Actually its implementation:
We assume that the file name is the key to access the object in the repository. That is, all objects will be stored in the root container of the repository. Using Asset for input parameters we add a link to a new object (file name in the storage) and, in fact, we load this file directly into the storage using the Upload method of the AssetFile object.
Accordingly, the method of uploading a file from the repository will be similar:
Since we have only one output parameter (actually, output Asset), then in the OutputMediaAssets collection corresponding to Job, we get a reference to a single object.
In addition to the output file with the mp4 extension, Asset contains metadata files about the encoding process. We need to download exactly mp4 file. As a matter of fact, this is what we do with the Download method of the corresponding AssetFile object.
Now we will implement a method that will run the encoding and wait for the results of its execution:
The Job object provides notification of a change in its state using the corresponding events. Sign up for this event:
Then we send this task for processing by performing the Submit method. And wait until the task is completed.
Thus, the only method that remains unrealized is Convert. This method will essentially simply call previously implemented methods in the appropriate order. Its implementation:
As we can see, everything is quite simple:
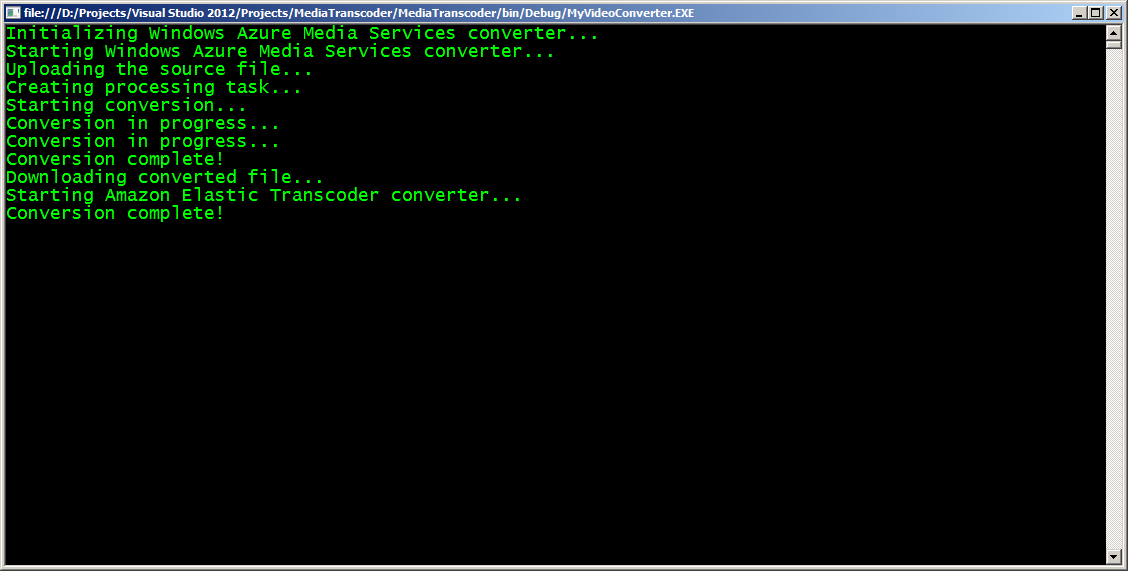
As a result, calling the Convert method is allowed in the console application, we get the following result:
Compare the source and received files:
This completes the implementation of the client for working with Windows Azure Media Services. Next year, we will write a client to work with Amazon Elastic Transcoder. Do not switch! All successful working week and happy New Year!
Continued ...
Input data
Let the input data for us will be a video file taken with a mobile device in 720p format (Android). Its duration is 24 seconds, and the size is 13 MB. We want to convert it to 480p format.
Basic interface
So, we will create a new Solution in Visual Studio. Suppose that a client to work with each cloud provider must implement some basic functionality. So that, for example, we could easily replace the use of Windows Azure Media Services with Amazon Elastic Transcoder. Therefore, we will declare the basic interface:
public interface IVideoConverter{void Convert(string sourceFile, string destinationFile);void UploadFile(string localFile);void DownloadFile(string localFile);void WaitForConversionToComplete();}Each client implementing this interface should be able to:
- UploadFile - upload a file from local storage to the cloud;
- DownloadFile - download the recoded file from the cloud storage to the local one;
- Convert - to actually be able to transcode a file from one format to another;
- WaitForConversionToComplete - wait for the results of the encoding operation.
The general principle of working with the client will be as follows:
IVideoConverter client = new IVideoConverter();client.Convert(“___”, “___”);Accordingly, the Convert method in pseudocode will look like this:
public void Convert(string sourceFile, string destinationFile){//UploadFile(sourceFile);//();//WaitForConversionToComplete();//DownloadFile(destinationFile);}Windows Azure Media Services
Let's begin with implementation of the client for work with Windows Azure Media Services. Before we start writing code, we need to create a new endpoint to work with this Windows Azure service. To do this, go to the Windows Azure Management Portal and select New -> App Services -> Media Service -> Quick Create.
')
We need to specify the name of the new service (Name), the region (Region) in which the capacity will be allocated, the storage account (Storage Account), and the subscription (Subscription) in which we want to use Windows Azure Media Services service.
Now, to work with the service, we need to get an Account Name and Access Key. To do this, go to the Media Services section of the Windows Azure Management Portal and click the Manage Keys button.
After that, in the window that appears, we need to copy the Account Name and Primary Access Key values.
We define the copied values in the constants of our class working with Windows Azure Media Services:
public class MediaServicesClient : IVideoConverter{private const string AccountName = "MEDIA_SERVICE_NAME";private const string AccessKey = "MEDIA_SERVICE_KEY";}So, before proceeding directly to writing the code of the corresponding class, we need to connect the Windows Azure Media Services SDK assembly. To do this, use the package manager NuGet. In the context menu of our project, select the item “Manage NuGet Packages ...”. We are looking for and install the appropriate package:
The base object for working with Windows Azure Media Services is MediaContext. Similar to the DataContext in the Entity Framework. In the class constructor, create it using AccountName and AccessKey:
public MediaServicesClient(){_mediaContext = new CloudMediaContext(AccountName, AccessKey);}This object will allow us to work with all entities provided by Windows Azure Media Services.
The first entity we need is the Media Processor. All tasks (Tasks) that we send for processing Windows Azure Media Services must be processed by a specific type of processor. All possible processor variants are presented here . But we are interested in Windows Azure Media Encoder. This processor is directly responsible for encoding the video stream into various formats. Add the receipt of the corresponding processor in our constructor:
private const string MediaProcessorName = "Windows Azure Media Encoder";public MediaServicesClient(){..._mediaProcessor = GetMediaProcessor();}private IMediaProcessor GetMediaProcessor(){return _mediaContext.MediaProcessors.Where(x => x.Name == MediaProcessorName).ToList().First();}You also need to create a so-called Asset - a description of the entities that will be used as input or output parameters for the processor. This object will store references to the used storage account, links to files intended for processing, etc. Create such an object. It will store the input parameters, that is, links to files intended for encoding into the format we need.
private const string InputAssetName = "MediaServices_InputAsset";private readonly IAsset _inputAsset;public MediaServicesClient(){..._inputAsset = CreateInputAsset();}private IAsset CreateInputAsset(){return _mediaContext.Assets.Create(InputAssetName, AssetCreationOptions.None);}All coding tasks (Tasks) are performed as part of some job (Job). Therefore, we need to create such an object:
private const string JobName = "MediaServices_Job";private readonly IJob _job;_job = CreateEncodingJob();private IJob CreateEncodingJob(){return _mediaContext.Jobs.Create(JobName);}Finally, it is necessary to link all the entities that we have created. Create appropriate tasks for transcoding one video to another. To do this, we will declare another method that will be called immediately before starting the job (Job) for encoding:
private const string PresetName = "H264 Broadband SD 16x9";private void CreateTask(){var task = _job.Tasks.AddNew(TaskName,_mediaProcessor,PresetName,TaskOptions.ProtectedConfiguration);task.InputAssets.Add(_inputAsset);task.OutputAssets.AddNew(OutputAssetName, AssetCreationOptions.None);}Here you should pay attention to the name Preset, which we ask. This is an indication of exactly what format we want to recode our video. A list of all possible options can be found here . According to the condition - we will encode the original video in the format 480p.
Thus, having created several tasks (Tasks) for coding into different formats, you can use one source file, say, shot in 1080p.
So, all the methods that are specific to working with Windows Azure Media Services we have implemented. Let us turn to the implementation of the IVideoConverter interface.
Since Windows Azure Media Services is working in the cloud, before starting the encoding operation, you need to upload the necessary files to the storage. The UploadFile method deals with this in our interface. Actually its implementation:
public void UploadFile(string localFile){var fileName = Path.GetFileName(localFile);var assetFile = _inputAsset.AssetFiles.Create(fileName);assetFile.Upload(localFile);}We assume that the file name is the key to access the object in the repository. That is, all objects will be stored in the root container of the repository. Using Asset for input parameters we add a link to a new object (file name in the storage) and, in fact, we load this file directly into the storage using the Upload method of the AssetFile object.
Accordingly, the method of uploading a file from the repository will be similar:
public void DownloadFile(string localFile){var outputAsset = _job.OutputMediaAssets.Single();var outputFile = outputAsset.AssetFiles.ToList().Single(x => x.Name.Contains(".mp4"));outputFile.Download(localFile);}Since we have only one output parameter (actually, output Asset), then in the OutputMediaAssets collection corresponding to Job, we get a reference to a single object.
In addition to the output file with the mp4 extension, Asset contains metadata files about the encoding process. We need to download exactly mp4 file. As a matter of fact, this is what we do with the Download method of the corresponding AssetFile object.
Now we will implement a method that will run the encoding and wait for the results of its execution:
public void WaitForConversionToComplete(){_job.StateChanged += JobOnStateChanged;_job.Submit();_job.GetExecutionProgressTask(CancellationToken.None).Wait();}The Job object provides notification of a change in its state using the corresponding events. Sign up for this event:
private void JobOnStateChanged(object sender, JobStateChangedEventArgs state){switch (state.CurrentState){case JobState.Finished:{Console.WriteLine("Conversion complete!");break;}case JobState.Queued:case JobState.Scheduled:case JobState.Processing:{Console.WriteLine("Conversion in progress...");break;}case JobState.Canceled:case JobState.Canceling:case JobState.Error:{Console.WriteLine("An error has been occured during the job execution!");break;}}}Then we send this task for processing by performing the Submit method. And wait until the task is completed.
Thus, the only method that remains unrealized is Convert. This method will essentially simply call previously implemented methods in the appropriate order. Its implementation:
public void Convert(string sourceFile, string destinationFile){Console.WriteLine("Uploading the source file...");UploadFile(sourceFile);Console.WriteLine("Creating processing task...");CreateTask();Console.WriteLine("Starting conversion...");WaitForConversionToComplete();Console.WriteLine("Downloading converted file...");DownloadFile(destinationFile);}As we can see, everything is quite simple:
- Uploaded file;
- Created a coding task;
- We sent the task for execution and waited for the results;
- Download the file.
As a result, calling the Convert method is allowed in the console application, we get the following result:
Compare the source and received files:
This completes the implementation of the client for working with Windows Azure Media Services. Next year, we will write a client to work with Amazon Elastic Transcoder. Do not switch! All successful working week and happy New Year!
Continued ...
Source: https://habr.com/ru/post/207018/
All Articles