Android widget development
On Habré, there are already enough articles on how to develop a “hello world” widget for Android devices. You can read more about this online, including on Google for developers , StackOverflow, and other resources. It would seem that everything was chewed up in detail, there are hundreds of examples - why write another article when there is enough information around?
However, when we started developing the widget, we had to spend several weeks trying to figure out the nuances and implement the project in the way we had originally conceived it.
We hope our experience will help save time on the implementation of your widget.
Android Stuido was chosen for development . The product is still very raw, not all developers are ready to switch to it, but the excellent Preview work and the wide capabilities of the Gradle build system take precedence over all the shortcomings. Therefore, we ventured to try, and as it turned out, not in vain.
For testing, in addition to direct debugging on a test smartphone, we also used software emulators. Standard use is quite problematic, various high-performance emulators Android-x86 , AndroVM , Genymotion , Manymo and others were considered. As a result, we chose Genymotion - it bribed us with its ease of installation and the speed of Android-x86, detailed instructions for setting up and installing are necessary for testing on devices with Android 4.0 and below.
These emulators work fine under various operating systems: Linux, Mac, Windows, developers have different preferences, and it is wrong to persuade them, so cross-platform tools help out.
')
Also, these programs help with automated testing: tests are written using the Android Instrumentation Framework, JUnit, Robotium. More on this in the next article, which we will publish soon :)
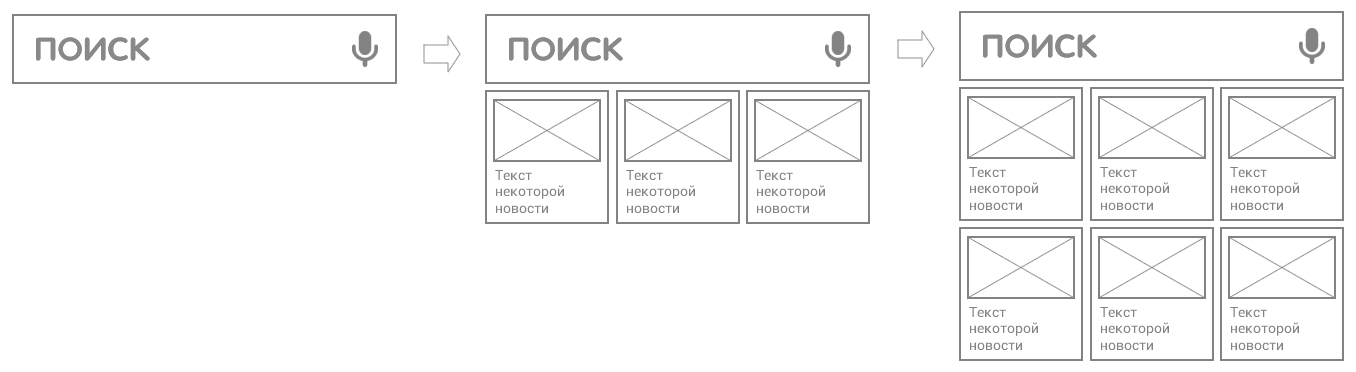
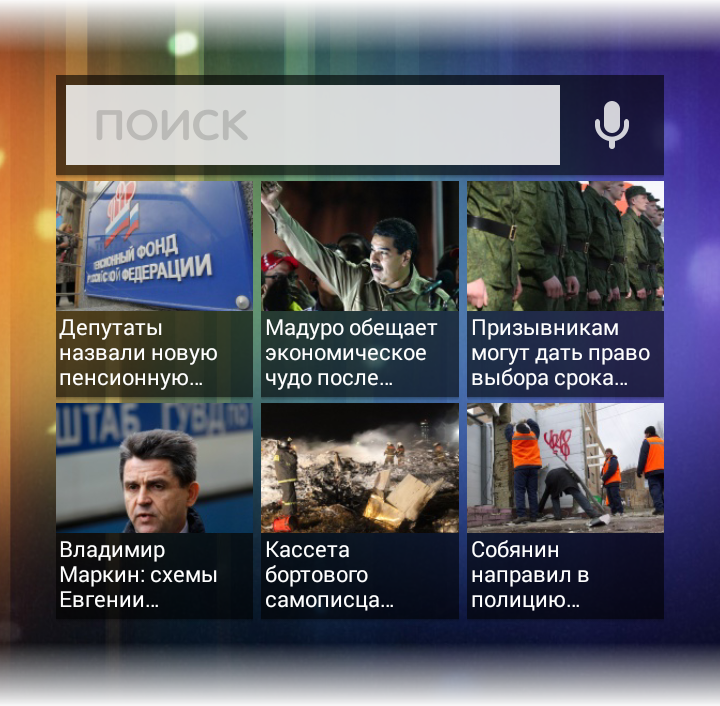
So, we want the user to see the search form, the voice query button, and when the available size of the widget increases, announcements of actual news.
According to Google Play, there are about 4,500 different kinds of devices with Android support in the world.

In addition to the screen resolution, these devices can vary in diagonals and density of points per unit area (ppi). Fortunately, the task can be simplified to use hardware-independent pixels (dp) to determine the size of widget elements. Most smartphones use a 4x4 grid, for 7-inch tablets the grid can be 6x6, and the cell size itself depends on the launcher and Android API versions. In the table we gave the resulting dimensions in dp for various devices:
You can build on the formulas:
for API under 14 size = (74 x number of cells) - 2
for the latest versions, size = (70 x number of cells) - 30
If during testing you encounter problems on a particular device, for example, when you change the screen orientation, then it is easier to add a separate layout or specify the size you want in dimens.xml, rather than trying to adjust the parameters. At the design stage, pay attention to reusable elements in order to render them in separate layouts during development, and use Insert to insert them into the required place. In our application, this technology was used for news, and for the implementation of the shadow of some elements of home_news_row.xml:
home_news_item.xml:
We receive the data for the widget from the server in JSON - everything is quite simple and described in detail in the documentation. If the widget is set to the minimum size (search line and voice query icon), we do not request for current news announcements, and when we increase the widget, we first check whether there are cached current news, then take the available data, thereby saving traffic and battery.
After analyzing the current distribution of Android versions, we found that version 2.2 is still relevant and needs to be supported. Unfortunately, support for resizing the widget is only available from version 3.0, so for older versions we will make a static version of the deployed widget. The share of devices of versions 3.x is currently insignificant, and we decided to respond to the resizing of the widget since Android 4.1 using the onAppWidgetOptionsChanged method. But not everything is smooth with him: it does not work in some modified firmware. I had to look for an alternative solution, and it was found: we used the com.sec.android.widgetapp.APPWIDGET_RESIZE event in the onReceive () method:
When installing the widget on the home screen, the user can select the color and transparency in the settings. In this implementation, there is nothing complicated, but there is one nuance: the level of transparency must be added to the selected color. For example, this is how it is implemented here:
The resulting color with a level of transparency is applied to the widget element. In our case, we simply set the setBackgroundColor () on LinearLayout.
There are also situations when, in landscape mode, the cell size of the widget is smaller than in portrait mode, and therefore the text of a given length does not fit. You can try to reduce the size of the text, but on devices with low resolution, it becomes unreadable. In this regard, when changing the orientation, we simply reduce the number of displayed text.setMaxLines (2) lines in the layout of the landscape mode, and leave the font size the same:
The last property adds an ellipsis at the end of the line.
In order to make our widget easier to find in the list of installed ones, we need the final touch: preparing picture previews, or previewImage. You can try to reproduce the final widget in the graphical editor, we used the Widget Preview application .
Here's what happened in the end:
Download the final application here .
Thanks for attention!
However, when we started developing the widget, we had to spend several weeks trying to figure out the nuances and implement the project in the way we had originally conceived it.
We hope our experience will help save time on the implementation of your widget.
Training
Android Stuido was chosen for development . The product is still very raw, not all developers are ready to switch to it, but the excellent Preview work and the wide capabilities of the Gradle build system take precedence over all the shortcomings. Therefore, we ventured to try, and as it turned out, not in vain.
For testing, in addition to direct debugging on a test smartphone, we also used software emulators. Standard use is quite problematic, various high-performance emulators Android-x86 , AndroVM , Genymotion , Manymo and others were considered. As a result, we chose Genymotion - it bribed us with its ease of installation and the speed of Android-x86, detailed instructions for setting up and installing are necessary for testing on devices with Android 4.0 and below.
These emulators work fine under various operating systems: Linux, Mac, Windows, developers have different preferences, and it is wrong to persuade them, so cross-platform tools help out.
')
Also, these programs help with automated testing: tests are written using the Android Instrumentation Framework, JUnit, Robotium. More on this in the next article, which we will publish soon :)
Design
So, we want the user to see the search form, the voice query button, and when the available size of the widget increases, announcements of actual news.
According to Google Play, there are about 4,500 different kinds of devices with Android support in the world.
In addition to the screen resolution, these devices can vary in diagonals and density of points per unit area (ppi). Fortunately, the task can be simplified to use hardware-independent pixels (dp) to determine the size of widget elements. Most smartphones use a 4x4 grid, for 7-inch tablets the grid can be 6x6, and the cell size itself depends on the launcher and Android API versions. In the table we gave the resulting dimensions in dp for various devices:
| Samsung GT-i9000 | Nexus 4 | Samsung tab | Nexus 7 | |
|---|---|---|---|---|
| 1 x 1 | 64 x 58 | 64 x 58 | 74 x 74 | 80 x 71 |
| 2 x 2 | 144 x 132 | 152 x 132 | 148 x 148 | 176 x 159 |
| 4 x 3 | 304 x 206 | 328 x 206 | 296 x 222 | 368 x 247 |
You can build on the formulas:
for API under 14 size = (74 x number of cells) - 2
for the latest versions, size = (70 x number of cells) - 30
If during testing you encounter problems on a particular device, for example, when you change the screen orientation, then it is easier to add a separate layout or specify the size you want in dimens.xml, rather than trying to adjust the parameters. At the design stage, pay attention to reusable elements in order to render them in separate layouts during development, and use Insert to insert them into the required place. In our application, this technology was used for news, and for the implementation of the shadow of some elements of home_news_row.xml:
<?xml version="1.0" encoding="utf-8"?> <LinearLayout xmlns:android="http://schemas.android.com/apk/res/android" android:id="@+id/news_row" android:layout_width="match_parent" android:layout_height="match_parent"> <include android:id="@+id/news_item1" layout="@layout/home_news_item"/> <include android:id="@+id/news_item2" layout="@layout/home_news_item"/> </LinearLayout> home_news_item.xml:
<?xml version="1.0" encoding="utf-8"?> <LinearLayout xmlns:android="http://schemas.android.com/apk/res/android" android:orientation="horizontal" android:layout_width="match_parent" android:layout_height="match_parent"> <ImageView android:id="@+id/news_img" android:scaleType="centerCrop" android:layout_weight="1"/> <TextView android:id="@+id/news_text" android:layout_width="match_parent" android:layout_height="match_parent" android:textSize="13sp"/> </LinearLayout> Implementation
We receive the data for the widget from the server in JSON - everything is quite simple and described in detail in the documentation. If the widget is set to the minimum size (search line and voice query icon), we do not request for current news announcements, and when we increase the widget, we first check whether there are cached current news, then take the available data, thereby saving traffic and battery.
After analyzing the current distribution of Android versions, we found that version 2.2 is still relevant and needs to be supported. Unfortunately, support for resizing the widget is only available from version 3.0, so for older versions we will make a static version of the deployed widget. The share of devices of versions 3.x is currently insignificant, and we decided to respond to the resizing of the widget since Android 4.1 using the onAppWidgetOptionsChanged method. But not everything is smooth with him: it does not work in some modified firmware. I had to look for an alternative solution, and it was found: we used the com.sec.android.widgetapp.APPWIDGET_RESIZE event in the onReceive () method:
public void onReceive(Context context, Intent intent) { if (intent.getAction().contentEquals("com.sec.android.widgetapp.APPWIDGET_RESIZE")) { handleResize(context, intent); } super.onReceive(context, intent); } private void handleResize(Context context, Intent intent) { AppWidgetManager appWidgetManager = AppWidgetManager.getInstance(context); Bundle newOptions = getOptions(context, intent); int appWidgetId = intent.getIntExtra("widgetId", 0); if (!newOptions.isEmpty()) { onAppWidgetOptionsChanged(context, appWidgetManager, appWidgetId, newOptions); } } public Bundle getOptions(Context context, Intent intent) { Bundle newOptions = new Bundle(); int appWidgetId = intent.getIntExtra("widgetId", 0); int widgetSpanX = intent.getIntExtra("widgetspanx", 0); int widgetSpanY = intent.getIntExtra("widgetspany", 0); if(appWidgetId > 0 && widgetSpanX > 0 && widgetSpanY > 0) { newOptions.putInt(AppWidgetManager.OPTION_APPWIDGET_MIN_HEIGHT, widgetSpanY * 74); newOptions.putInt(AppWidgetManager.OPTION_APPWIDGET_MIN_WIDTH, widgetSpanX * 74); } return newOptions; } @Override public void onAppWidgetOptionsChanged(Context context, AppWidgetManager appWidgetManager, int appWidgetId, Bundle newOptions) { Log.d("height", newOptions.getInt(AppWidgetManager.OPTION_APPWIDGET_MIN_HEIGHT)); Log.d("width", newOptions.getInt(AppWidgetManager.OPTION_APPWIDGET_MIN_WIDTH)); } When installing the widget on the home screen, the user can select the color and transparency in the settings. In this implementation, there is nothing complicated, but there is one nuance: the level of transparency must be added to the selected color. For example, this is how it is implemented here:
int color = Color.parseColor(“#FFFFFF”); int transparent =150; color = Color.argb(transparent, Color.red(color), Color.green(color), Color.blue(color)); The resulting color with a level of transparency is applied to the widget element. In our case, we simply set the setBackgroundColor () on LinearLayout.
There are also situations when, in landscape mode, the cell size of the widget is smaller than in portrait mode, and therefore the text of a given length does not fit. You can try to reduce the size of the text, but on devices with low resolution, it becomes unreadable. In this regard, when changing the orientation, we simply reduce the number of displayed text.setMaxLines (2) lines in the layout of the landscape mode, and leave the font size the same:
android:maxLines="3" android:ellipsize="end" The last property adds an ellipsis at the end of the line.
In order to make our widget easier to find in the list of installed ones, we need the final touch: preparing picture previews, or previewImage. You can try to reproduce the final widget in the graphical editor, we used the Widget Preview application .
Here's what happened in the end:
Download the final application here .
Thanks for attention!
Source: https://habr.com/ru/post/206748/
All Articles