Working with Group Policy Preferences: How to Stop Using Specific Devices
 Now for most users, it is no longer a secret that any computer consists not only of a “tiliviser” and a “processor”, which the system unit was called, but it contains a decent number of devices that the operating system must know about to function properly. More advanced users also know that, beginning in the 90s of the last century, the world first learned about the concept associated with Windows-based systems, such as Plug and Play or, more simply, PnP, which is a technology that allows operating system to automatically perform some configuration settings for connected devices. Well, for the emergence of additional features and the correct operation of the connected devices, of course, you should install the drivers developed by the manufacturers of the components. In turn, such drivers administrators can install on target computers using various methods: they can independently run around computers with CDs or DVDs and install such drivers; can place them in a shared folder on file servers and install them using scripts; integrate drivers into operating systems using tools such as Windows ADK; install drivers using Microsoft System Center Configuration Manager, as well as many other methods. But, by and large, this article is not about that.
Sometimes such situations may arise when you simply need to turn off a particular device on a particular computer or, conversely, force users to work with specific devices. To perform such operations instead of the user, without disabling (or, conversely, forcibly not including) the device forever, you can use a certain element of the Group Policy preference, which will be discussed later in this article.
Site group preferences "Devices"
Since one of the Group Policy preference elements is responsible for the task associated with device management, such an element should be controlled by a specific dynamic library, which is simply required to be present on both computers with a server and client operating systems. In principle, as is the case with most client side extensions of preference items, the Devices element is responsible for the gpprefcl.dll library, which, in turn, is tied to the GUID {1A6364EB-776B-4120-ADE1-B63A406A76B5}. This element of preference, as I have already mentioned a little higher, allows you only to enable or disable the classes or types of certain hardware devices. In other words, installing, updating, and removing drivers are not the tasks that could be performed using this client side extension. However, I believe that it would be extremely useful and convenient if Microsoft implemented this feature for the next release of server operating systems.
Therefore, since the possibilities of the current expansion of the client side are extremely limited, in the following procedure I will step by step talk about how to disable the DVD drive. Since this example can be attributed to the most basic, we will slightly complicate the task by the fact that the drive will have to be switched off only on computers whose addresses belong to a specific IP range. So, to realize such a task, you will need to perform the following steps:
- First, of course, in the Group Policy Management snap-in, you should create a new GPO (or use an existing one that will be suitable for the above purpose), for example, " Group Policy Preferences - 18 ", and if necessary, associate it with the required department, and then select a command from the context menu that allows you to open the Group Policy Management Editor for such an object. In my case, solely for simplicity, such an object was associated with the level of the entire domain, but in a production environment, I do not recommend performing such actions;
- In the GPME snap-in, go to Computer Configuration \ Settings \ Control Panel Settings \ Devices ( Computer Configuration \ Preferences \ Control Panel Settings \ Devices ). Despite the fact that this node can be found both in the computer configuration node and in the user configuration node, so that the settings we have defined apply to all users of the target computers, the first node was selected. Now, being in the current node, in the details pane, open the context menu and select the New> Device commands, as can be seen in the following illustration:
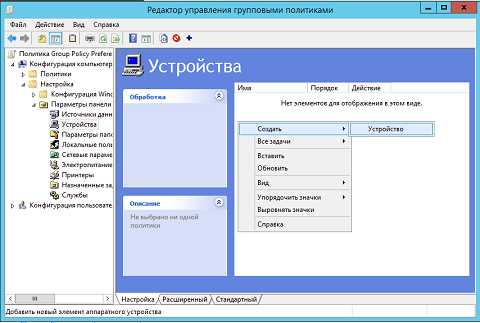
Fig. 1. Creating a new preference item - Here, as can be seen in the following illustration, in the displayed dialog box for creating a device preference item for such elements, you are practically not given the opportunity to select any properties or parameters. So, from the Action drop-down list, you can choose an action that allows you to enable the selected class or device type (“ Use this device (enable) ”), or, alternatively, disable them (action “ Do not use this device (turn off) ” ( Do not use this device (disable )). Since in this example the DVD drive will be disabled, the second option is selected from this list. Most likely, the only thing you should pay attention to when using this client side extension is the following two text fields. The Device class text field should include the name of the specific device class to which this policy will apply. Here you can immediately draw attention to the fact that this text field is not subject to manual changes. That is, to select an existing class, you will need to click on the browse button ( ... ), and then select the required class from the additional dialog box “ Select device class or device ”. In this case, it is " DVD-ROM and CD-ROM drives " ( DVD / CD-ROM drives ). In turn, the Device Type text field allows you to enter necessary information into it, since it is responsible for the name of a specific device that already belongs to the class you selected in the previous text field. As you can see in the following illustration, the class I have chosen is the class of DVD drives, but I can already specify the type as “ HL-DT-ST DVD-ROM GDR8164B ATA Device ”, which is my real drive. In the event that the drives on the target computers differ, you can specify either a different type or leave this field empty so that absolutely all types are disabled for the selected device class. Be sure to note that the list of device types you can see the one that will completely coincide with all the devices that are installed on the computer on which you are currently using the GPME snap-in. The dialog boxes for creating a preference item and choosing device types are shown below:
')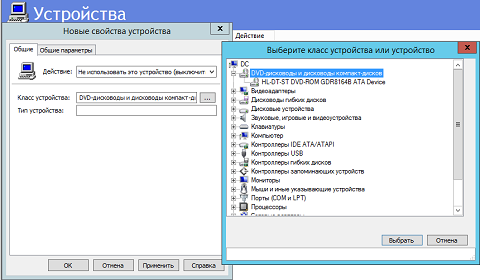
Fig. 2. Preference item properties and device type selection dialog - After all the above settings have been made (and there are not so many of them), you should think about targeting to the level of elements. Therefore, you need to go to the “ Common Options ” tab, select the “ Item-level targeting ” checkbox, and click on the “ Targeting ” button. Since in this example we are interested in the range of IP addresses, in the displayed dialog window of the targeting editor from the drop-down list of creating elements one should select the element IP address range . Here, as can be seen in the following illustration, in contrast to the predecessor system, Windows Server 2012, in version R2, it became possible to use not only the IPv4 address range, but also, due to the increasing popularity of IPv6, the use of the sixth version addresses. To determine the range of IPv6 addresses, select the Use IPv6 check box, and then enter the address range in the appropriate format in the appropriate text box. Despite the fact that I have only configured a local address for the channel, for example, we indicate it in this text field. And besides this, just in case, we will add a range of IPv4-addresses through the operator OR . In a production environment, this is best done if you do not have IPv6 addresses implemented everywhere. In the example above, the targeting editor dialog will look like this:
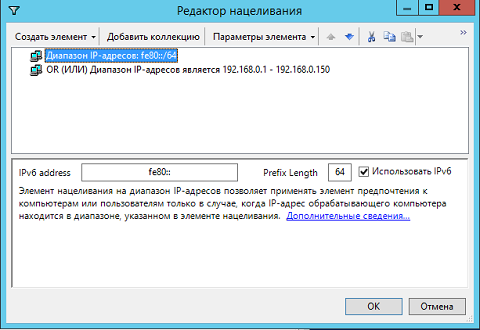
Fig. 3. Targeting editor dialog - When all the required settings and settings have been made, you can close the Group Policy Management Editor and update the policy settings on the target computers.
It remains to check in the device manager, whether it was possible to make the expected changes. After you open the device manager on the target machine, it will be immediately noticeable that despite the fact that the device type in the preference item was not defined, the DVD drive still disconnected because the class was specified. Consequently, everything turned out.
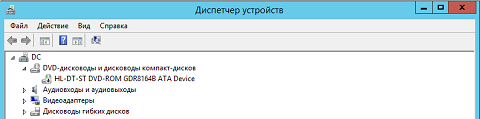
Fig. 4. Result of applying group policy
Conclusion
From this article, you learned about the principle of operation of the next element of preference, which is responsible for the state of specific classes and types of devices on target computers. With the introduction of the simplest example, it was demonstrated how to turn off DVD drives on all computers from a certain range of IP addresses. In the next article of this series, we will talk about the next element of Group Policy preference, namely about the configuration of network parameters.
Source: https://habr.com/ru/post/206744/
All Articles