How to deploy version control system (VCS) without command line
Since our team of programmers is developing several projects at once, it quickly became necessary to have a version control system.
Naturally, the search began with the study of Habr - and led to an unexpected result. Despite the fact that version control systems appeared in 1986, most of the tutorials on working with modern version control systems turned out to be incomplete and strongly tied to work with the command line.
We have nothing against the command line as a whole, but in our small development team (4 people) there are no fans working with the command line :).
')
Why do we think that working with the command line is inefficient?
- A waste of time entering data. Stuff commands much longer than clicking the mouse.
- A waste of time to learn. Learning new syntax in an era of intuitive interfaces is definitely longer than learning a graphical interface.
- Probability of error It is easier to make a mistake when entering data via the command line (the human factor has not been canceled).
- Violation of the principles of automation . Perhaps this is the main point. The computer is designed to speed up work and replace a person when performing routine operations. In the case of the command line, we always work manually , in fact, we have to write the same program code each time (even if it is primitive).
Unfortunately, we were not able to find a full-fledged Russian-language manual for working with modern version control systems. Having gathered information from various articles and English-language videos on YouTube, we decided to make our own guide, which:
- It will be step-by-step instructions (our programmers will work on it).
- It will work from start to finish (that is, using it you will get a small but complete result - a working distributed version control system).
- Will work using only graphical interfaces (see reasons above).
Introduction
Contrary to the expectations of experienced system administrators and other fans and fans of working with the command line, this article will not contain any commands that are executed using the command line. The whole article is written in a language that is understandable even to those who only recently started programming, but have already thought about introducing VCS (version control system). Each step of the VCS setup is chewed to the smallest detail with a cast of prins and additional explanations.
If you are not a fan of “For Dummies” manuals, then you can not read this article and go your own way in solving the problem of raising VCS.
Used programs and services
To deploy VCS (version control system) we will use the following programs and services:
- Mercurial is a cross-platform distributed version control system designed to work effectively with very large code repositories.
- TortoiseHg is a graphical frontend for the Mercurial version control system.
- Bitbucket is a web service for hosting projects and their joint development, based on the version control system Mercurial and Git.
Deploying a version control system - step by step instructions
1. Download and install TortoiseHg from the official website: http://tortoisehg.bitbucket.org/

This client will need to be installed on all computers from which the joint development of projects will be conducted.
In this manual, all steps for setting up and working with the version control system will be performed using TortoiseHg version: 2.10.1 for Windows 64-bit with Mercurial 2.8.1.
2. Register in Bitbucket web service: https://bitbucket.org/
The whole registration process is reduced to filling in the contact information (Username, Email, etc.) and confirming the email address specified during registration by clicking on the “Confirm this email address” button in the email received after registration.

Registering to the Bitbucket service is also required for all members of your development team. Fortunately, startups in this service have a free account that allows you to create private repositories with 5 users. It is also possible to increase the maximum number of members of the team participating in the development of a free rate of up to 8 people.
A complete list of tariffs can be found by following the link: https://bitbucket.org/plans
3. Logging in to your account in the Bitbucket service, you can immediately change the interface language of your account to Russian.
To do this, in the upper right corner of the main menu, select the “Manage account” section from the drop-down list and on the page that opens, select the desired interface language from the “Language” drop-down list

4. To create a repository for your project, you need to go to the main page of your account ( https://bitbucket.org/dashboard/overview ) and click on the button “Create your first repository”

5. On the page for creating a new repository, specify the following settings:
- Name - Enter the name of your new repository. This name is used to build an access link to your repository.
Important! It is better to indicate the name in Latin letters, otherwise the link to the repository will end with a hyphen and look like a difficult to understand: https: //yashlogin@bitbucket.org/your login/--------
- Description - Provide a brief description of your repository (optional field)
- Access Level - Check this box if you want only members of your development team (private repository) to have access to your repository.
- Creating forks - Put "Allow only private forks"
- Repository Type - Select “Mercurial”
- Project Management - Check the "Task Tracker" and "Wiki" checkboxes
- Language - Select the development language in which your project is written. In my case, this is PHP.
Upon completion of specifying all the settings, the page will be ironed like this:

Check the entered data again and if everything is entered correctly, click the “Create repository” button.
6. After creating a new repository, you will be taken to the Getting Started page:

Where, by clicking on the “I start from scratch” link, you can get a link to connect to your repository using TortoiseHg.
The link will look like this: https: //yourlogin@bitbucket.org/yourlogin/name repository
7. On your computer, create an empty folder in which your project files that are connected to the Mercurial version control system will be stored in the future.
Important! Folder must be empty. For example, I had to temporarily transfer all files to another directory (to make a backup copy) to connect a folder with an existing project (a bunch of software code). Later we will return all the files in place, but for now you need to completely clear the folder for the connection.
Next, click on the empty folder intended for storing project files connected to the Mercurial version control system, right-click and select the item “TortoiseHg-> Clone ...” from the drop-down menu

8. In the window that opens, you need to specify in the Source field a link to connect to the repository you have created from step 6

And press the "Clone" button.
9. The system will ask you for the password from your account in the Bitbucket service, specify it.

10. If everything was done without deviating from this instruction, then the new folder “.hg” with the service files of the created repository will appear in the folder.
11. Now you can safely return the files (program code) of your project to the folder intended for storing project files connected to the Mercurial version control system
Important! Do not touch the ".hg" service directory. He needed to work VCS.
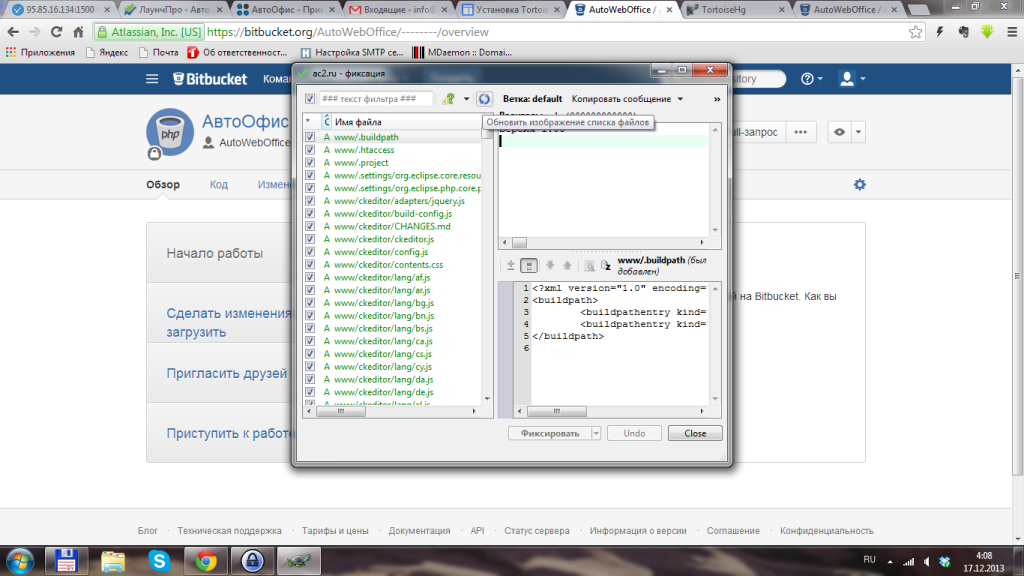
12. Again, right-click on our project folder and select “Hg Commit ...” from the drop-down menu.

13. You will see a dialog box designed to record all changes made on your project (in this case, we added our program codes to the initially empty project folder).
You need to select all the modified (added) files, specify a comment (for example, Version 1.00) to the change and click the "Fix" button.
The system will ask to confirm the addition, click "Add".

14. If everything was done correctly, the system will record the changes made, and you will see approximately the following window:
Actually, in the future, when you develop, after completing a small piece of code, you will perform the action from clause 12 (click “Hg Commit ...”) to commit the change made to the version control system. This will give you the opportunity at any time to roll back the system to the previous commit.
Considering the above, in practice you should write a more detailed commentary than “Version 1.00” for each of the fixations.
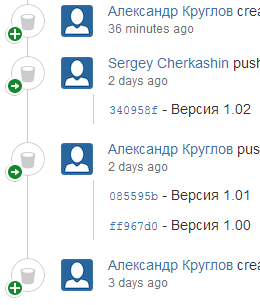
15. Next, right-click on the project folder and select the item “Hg Workbench ...” from the drop-down menu.

16. In the window that opens, you can see the entire history of saved (fixed) changes in the code, you can roll back to the desired fixation, and also send the changes to the repository you created earlier.
To do this, in the control panel, select the "Push Incoming Changes to" button.

After that, you will be shown a dialog box asking you to confirm the “push” and asking you to enter the password for your Bitbucket account. Agree and enter the password.
The system will start copying files to your repository on the Bitbucket server. Do not rush and wait for the process to complete.
17. Now a copy of your project files is stored in your repository on Bitbucket servers. In your Bitbucket account you can see the entire history of working with your project.

Subtotals of connecting version control system (VCS)
At the moment we have created a repository and put all the files of our project in it. That is, you can now connect to your repository from any computer and get a stable version of the files stored in it.
The process of connecting your second computer is to copy files from the repository to a second computer. You need to go through steps 1 - Install TortoiseHg and 7 - Import repository files, to copy files to the second, third, and following your work computers.
Connect employees to your repository.
The main purpose of connecting a version control system (VCS) to your project is to organize collaboration. Those. While you are developing one system, in most cases you can do without VCS, but if there are several developers, then the probability of regular loss (mashing) of program codes and system version conflicts is very high.
Therefore, now let's connect another programmer to our project (we invite the participant) and set up a workplace for him.
Connecting an employee to our repository
18. All employees who will have access to your repository must be registered on the Bitbucket service. They also need TortoiseHg installed on their computers.
How to register on the service and install TortoiseHg, I told a little earlier in this manual. Therefore, this process should not cause you and your colleagues any difficulties.
19. Log in to your account on the Bitbucket service:

Click on the “Send Invitation” button located in the “Invite a member to this repository” section.
20. The system will bring you a dialog box asking you to enter the email address of the user to whom you want to give access to the repository. In addition, you will need to specify permissions (“read” or “write”). Because In this manual, we show how to connect another developer to the repository, then specify a “record”.

After the employee has entered the email address and specified the access rights, click the Share button.
21. The invited member will receive an email with a link to the invitation. He will need to go through this link and accept the invitation to access your repository.

Once again, all members of your repository must be registered in the Bitbucket service.
22. After the invitation is accepted, the new participant will see this repository in his account and his link to access it using TortoiseHg.

23. Next, your employee must perform step 7 of this instruction to get the project files to his computer.
All changes made by you and your assistants will be saved in your repository. You can watch what and when it was changed and, if desired, roll back your project to the required version at any time.

I think the introductory article on deploying a version control system without using the command line can be ended with this. Passing the above steps will allow you to implement a full-fledged VCS in your project, i.e. After completing all the steps, you will get, though not a big, but a complete result.
We used this approach for the development of the project: AvtoOffice is a platform for online business
If after reading the article you have any questions for me or clarification and addition of instructions, please write in the comments. I would be very grateful if you strengthen the article with your understanding of VCS.
PS: In the next article I will try to describe in an accessible language what “Branches” are, “Tags” and “Forks” and how to work with them.
Source: https://habr.com/ru/post/206618/
All Articles