How to scale Meteor
From the translator : MeteorJS - open (MIT) full-stack JavaScript framework (both client and server). Current version 0.7.0 - version 1.0 is planned to be released at the beginning of 2014. Publications on Habré: 1 , 2 , 3 .
Component Diagram:
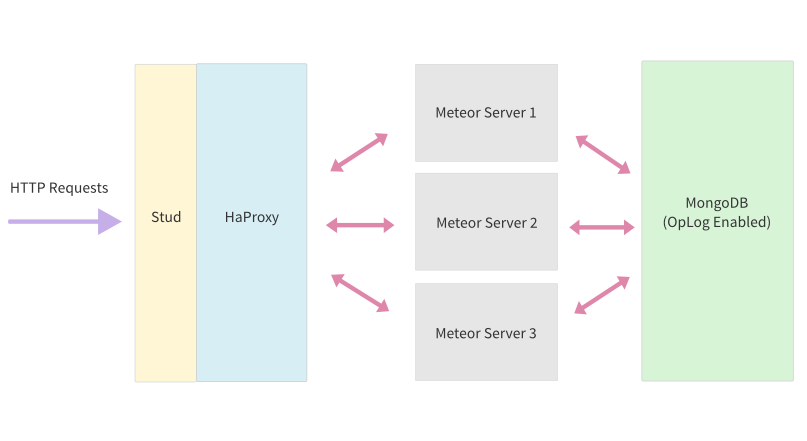
There are three servers Meteor, one MongoDb-server and HaProxy -server, as a load balancer. For SSL support, we put Stud in front of HaProxy.
Let's discuss the components and their configuration.
I use a single-server replica set with oplog support. It is better, of course, to use a lot of server, but I simplified it a little, for greater clarity.
')
First of all, you need to run MongoDb, so that it knows about the replica. Use the following command to configure the meteor replica set:
After that, open the Mongo-shell, and enter the following settings for our single-server replica:
So, as we use a dedicated MongoDb server, it is necessary to prevent unauthorized access to it. You can configure the firewall, or use role access in MongoDb itself. To simplify the configuration, I assume that you have a firewall configured correctly, or refer to the MongoDb role access documentation .
The database for the Meteor application is called the app . To integrate with oplog , we will use a database called local , in which oplog itself will be located.
When planning a deployment of a scalable Meteor application, there are a few things to consider. We will talk about them.
In the previous article, I already talked about how oplog can help scale-out Meteor. There are two options. You can use SmartCollections or a preliminary version of Meteor with oplog ( UPD released Meteor 0.7.0 with full support for OpLog. You should use it.).
In either case, you will need to specify an additional MongoDB connection URL to the oplog (to the local database, which I mentioned earlier). For SmartCollection, you will need to set the OPLOG_URL environment variable , for the preliminary implementation of the oplog in Meteor, the MONGO_OPLOG_URL variable.
(And of course, as usual, you need to remember to install MONGO_URL )
IE 8 and 9 do not send cookies with an AJAX request and this will break our load balancer, which we will discuss later. Fortunately, SockJS has a built-in solution to this problem, but it is turned off by default in Meteor. To enable it, you need to export the following environment variable:
It is very important that you choose the same servers for Meteor. It is necessary that they be in the same data center, have the same performance, OS and architecture, otherwise the load will be incorrectly balanced.
In the current setup, I use only one process per server, so multi-core servers are unlikely to help. Try to use a single-core hardware environment for servers. In the following articles I will talk about this in more detail.
It is very important to deploy your Meteor servers correctly, properly configuring the server. If possible, ask for help from someone who is familiar with this. Or you can use Meteor-Up , which I created in order to deploy Meteor applications that are ready for commercial use.
To balance the load of our Meteor application, I will use HaProxy. It is very stable and tested in industrial operation by many companies. HaProxy also supports sticky-session and has some other useful settings.
There are several options for implementing sticky-session. They are implemented using cookies, hashing the client's IP or modifying the URL. There are more options, but these are the most common.
Hashing a client's IP address is the easiest way to implement, but with it it’s impossible to balance the load properly. We cannot trust IP information and transparent proxy servers (very much used by providers) hide the original IP, which for us will result in increased load on some of the servers.
Modifying the URL is a good option and is very well supported by SockJS. But it needs to implement additional logic in the load balancer and in Meteor.
The cookie-based solution suits us best - it is perfectly balanced and easy to configure.
It is very important to choose a good load balancing algorithm. There are several of them in HaProxy. The roundrobin algorithm is recommended documentation. It is great for applications that do not contain an internal state (stateless), created, for example, on RoR or PHP.
However, Meteor is based on state accounting and long-term connections, so it’s better to use the leastconn algorithm. In it, a new connection is given to the server with the least number of connections. This gives a uniform load distribution, even in the case of a temporary shutdown of a server. In the case of roundrobin, the load would be uneven.
See how I set up HaProxy, this is the configuration file:
I deleted some parts of the configuration file for clarity. The full version can be found here .
The use of SSL in commercial operation, in my opinion, is mandatory. Unfortunately, the stable version of HaProxy does not support SSL. But we can use Stud before HaProxy as the second end of the SSL connection. And of course, it’s better to deploy Stud on the same server as HaProxy.
You can use the following settings file:
Here is the full version of the settings file.
Stud requires that your SSL certificate and private key be in the same .pem file. Read more in this manual.
P.S. A new hub has appeared on the Habr : Meteor.JS - subscribe.
Scaling up
Component Diagram:
There are three servers Meteor, one MongoDb-server and HaProxy -server, as a load balancer. For SSL support, we put Stud in front of HaProxy.
Let's discuss the components and their configuration.
MongoDb setup
I use a single-server replica set with oplog support. It is better, of course, to use a lot of server, but I simplified it a little, for greater clarity.
')
Configure a single server replica
First of all, you need to run MongoDb, so that it knows about the replica. Use the following command to configure the meteor replica set:
mongod --replSet meteor After that, open the Mongo-shell, and enter the following settings for our single-server replica:
var config = {_id: "meteor", members: [{_id: 0, host: "127.0.0.1:27017"}]} rs.initiate(config) Access control
So, as we use a dedicated MongoDb server, it is necessary to prevent unauthorized access to it. You can configure the firewall, or use role access in MongoDb itself. To simplify the configuration, I assume that you have a firewall configured correctly, or refer to the MongoDb role access documentation .
The database for the Meteor application is called the app . To integrate with oplog , we will use a database called local , in which oplog itself will be located.
Meteor Setup
When planning a deployment of a scalable Meteor application, there are a few things to consider. We will talk about them.
Oplog support
In the previous article, I already talked about how oplog can help scale-out Meteor. There are two options. You can use SmartCollections or a preliminary version of Meteor with oplog ( UPD released Meteor 0.7.0 with full support for OpLog. You should use it.).
You can learn more about the integration of the MongoDb oplog into the Meteor from David Gracer’s talk in DevShop 10.
In either case, you will need to specify an additional MongoDB connection URL to the oplog (to the local database, which I mentioned earlier). For SmartCollection, you will need to set the OPLOG_URL environment variable , for the preliminary implementation of the oplog in Meteor, the MONGO_OPLOG_URL variable.
(And of course, as usual, you need to remember to install MONGO_URL )
Support sticky-session in IE 8 and 9
IE 8 and 9 do not send cookies with an AJAX request and this will break our load balancer, which we will discuss later. Fortunately, SockJS has a built-in solution to this problem, but it is turned off by default in Meteor. To enable it, you need to export the following environment variable:
export USE_JSESSIONID=1 Use Meteor version 0.6.6 or later, this option has appeared since this version.
Server selection
It is very important that you choose the same servers for Meteor. It is necessary that they be in the same data center, have the same performance, OS and architecture, otherwise the load will be incorrectly balanced.
In the current setup, I use only one process per server, so multi-core servers are unlikely to help. Try to use a single-core hardware environment for servers. In the following articles I will talk about this in more detail.
Deployment
It is very important to deploy your Meteor servers correctly, properly configuring the server. If possible, ask for help from someone who is familiar with this. Or you can use Meteor-Up , which I created in order to deploy Meteor applications that are ready for commercial use.
Configure Load Balancer (HaProxy)
To balance the load of our Meteor application, I will use HaProxy. It is very stable and tested in industrial operation by many companies. HaProxy also supports sticky-session and has some other useful settings.
Sticky-session support
There are several options for implementing sticky-session. They are implemented using cookies, hashing the client's IP or modifying the URL. There are more options, but these are the most common.
Hashing a client's IP address is the easiest way to implement, but with it it’s impossible to balance the load properly. We cannot trust IP information and transparent proxy servers (very much used by providers) hide the original IP, which for us will result in increased load on some of the servers.
Modifying the URL is a good option and is very well supported by SockJS. But it needs to implement additional logic in the load balancer and in Meteor.
The cookie-based solution suits us best - it is perfectly balanced and easy to configure.
Load balancing algorithm
It is very important to choose a good load balancing algorithm. There are several of them in HaProxy. The roundrobin algorithm is recommended documentation. It is great for applications that do not contain an internal state (stateless), created, for example, on RoR or PHP.
However, Meteor is based on state accounting and long-term connections, so it’s better to use the leastconn algorithm. In it, a new connection is given to the server with the least number of connections. This gives a uniform load distribution, even in the case of a temporary shutdown of a server. In the case of roundrobin, the load would be uneven.
Customization
See how I set up HaProxy, this is the configuration file:
defaults mode http timeout connect 5s timeout client 10s timeout server 10s frontend public #binding port 80 bind *:80 default_backend apps backend apps #load balancing algorithm balance leastconn #using JSESSIONID as the cookie cookie JSESSIONID insert nocache #adding server server host1 host1.example.com cookie host1 server host2 host2.example.com cookie host2 server host3 host3.example.com cookie host3 I deleted some parts of the configuration file for clarity. The full version can be found here .
SSL using Stud
The use of SSL in commercial operation, in my opinion, is mandatory. Unfortunately, the stable version of HaProxy does not support SSL. But we can use Stud before HaProxy as the second end of the SSL connection. And of course, it’s better to deploy Stud on the same server as HaProxy.
Make sure you install Stud from source . The version received by apt-get is outdated.
You can use the following settings file:
#bind to defualt SSL port frontend = "[*]:443" #haproxy host and port backend = "[localhost]:80" #location of the .pem file pem-file = "/path/to/ssl.pem" Here is the full version of the settings file.
Stud requires that your SSL certificate and private key be in the same .pem file. Read more in this manual.
P.S. A new hub has appeared on the Habr : Meteor.JS - subscribe.
Source: https://habr.com/ru/post/206330/
All Articles