How to add additional fields in the system properties
 As you know, the registry, namely changing existing or adding new partitions and parameters, allows you to do a lot with Windows operating systems. You can change the options available in the control panel, customize additional components of the system, customize your taskbar and desktop, as well as modify existing or add new items to various context menus. It turns out that if you know which particular registry key you want to change or add, you can not only customize your system, but also fully automate this process, which is very convenient without any doubt.
Some changeable parameters can be easily localized using the same Process Monitor or RegMon utility (I already managed to say something about these utilities in the article “ Examples of monitoring the registry ”), and with some parameters, in turn, you will have to tinkering, as their localization may be much more difficult than it seems at first glance. Sometimes it’s all very simple with the values of the required parameters (for example, if this is a DWORD parameter, you will not encounter any difficulties in determining the value), and sometimes the task of generating eigenvalues can be very complex (for example, it can be the value of the parameter responsible for the location of the directory from which to take pictures for the lock screen of the Windows 8.1 operating system). There are infinitely many examples with both the parameters themselves and their values.
Today, in this small article, you will learn about some of the registry settings that allow you to add additional user information in the system properties window. Moreover, to make it more interesting, the parameters will be added centrally, i.e. Using Group Policy Preference Features I suppose we can proceed, and we will begin with
Localization of registry parameters responsible for additional fields of system properties
First of all, you should remember the name of the information that should be displayed in the “System Properties” component of the control panel. According to official sources from Microsoft, "equipment manufacturers are also called suppliers of computing equipment or OEM." So, we can conclude that the information displayed in the properties of the system will be called OEM information. Initially, in a clean operating system that was installed from the corresponding disk or image downloaded from TechNet or MSDN, such information is simply not available, since no suppliers have yet had time to play around with the original image of the system.
In the event that the parameters are initially absent in the system registry, it can be difficult to find them using monitoring tools or, as in this example, which is even worse, it is impossible at all. For this reason, in order to localize the required parameters, you will need to take advantage of the features of the Windows System Manager Manager ( System Image Manager, SIM ), which allows you to create your own, unique images of the operating system.
Windows Installation Manager allows you to change the settings for an installation of Windows. To determine the available options, Windows Installation Manager creates a directory file and reads its contents. A directory file is a small file containing a list of all the options available in a particular Windows image. That is, you are copying the main Windows image file (\ Sources \ Install.wim) from the Windows installation DVD to some folder on your computer that serves you. In other words, in the SIM Manager, you go to the Windows image group and select the previously copied file from the installation disk. In the event that you have not previously created a catalog file, the dispatcher will warn you that such a file will be created at this stage. If the WIM file contains several system images, you will be prompted to select a specific image. Windows Setup Manager then creates a catalog file based on the image file you select in the Install.wim file. In principle, as can be seen in the following illustration, this process may take a bit and take you a few minutes:
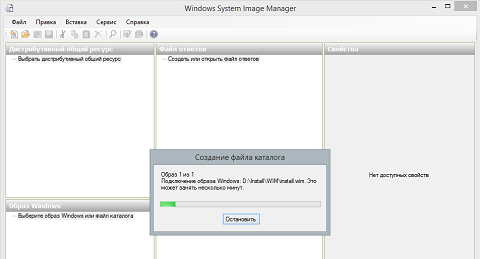
Fig. 1. Creating a catalog file and adding an operating system image
After that, an answer file is created, which contains all the parameters for automating the Windows installation. It is also not a difficult task. All you need to do is select the “ New Answer File ” command from the File menu ( File> New Answer File ), after which the necessary configuration steps should be displayed in the answer file panel. The configuration steps are the Windows installation phases during which you can customize the image. Windows unattended installation settings can be applied in one or more configuration steps, depending on the setting you use. In this example, the configuration stage we are interested in is called oobeSystem. Typically, this step is used to configure Windows shell settings, create user accounts, and also specify language and regional settings.
And in order to add the required procedure to this stage, you need to add a specific component of the operating system. All components are located in the Components node, which can be found on the Windows Image pane. The most important thing is to understand which component and for what purpose you will add. Since we are interested in OEM information, it will be easy to localize the required component. It is called Microsoft-Windows-Shell-Setup> OEMInformation. Localized this component, it only remains to add it to the oobeSystem stage, which is also called the seventh pass. Now, in order to add it, you need to select such a component, call the context menu for it, and then select the “ Add Setting to Pass 7 oobeSystem ” command. The process of adding is shown below:
')
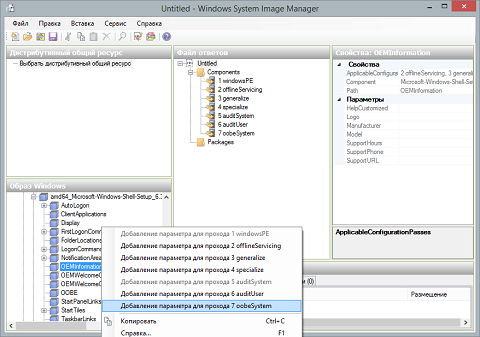
Fig. 2. Add a component to the 7th pass
After that, find the required parameters in the system registry is not difficult. It is only necessary to go to the seventh pass of the answer file and find the component just added. On the right, on the properties panel of the component you added, all possible parameters that the operating system allows you to change will be displayed. As you can see in the following illustration, you can use the following parameters to change OEM information (parameters in the registry are created with the same names):
- Logo . Represents the path to the logo. Here you should pay attention to the fact that the image should be saved in the BMP-format, and its size should not exceed 120x120 pixels. Moreover, be sure to note that such a picture should be located on the target computer and the length of the string you specify should not exceed 259 characters;
- Manufacturer . This option allows you to specify the name of the computer manufacturer. The length of this string is also limited - 256 characters;
- Model . This parameter is the target computer model. The limit on the number of characters of this parameter coincides with the previous parameter;
- SupportHours . It is also a common string parameter, with which you are allowed to specify the hours of support;
- SupportPhone . Ordinary phone number for the support service you specified;
- SupportURL . The last available option, where you are allowed to define a link to the website of the computer manufacturer. Here the maximum length of a string may not be 256 characters anymore, but 2083.
These parameters are shown below:
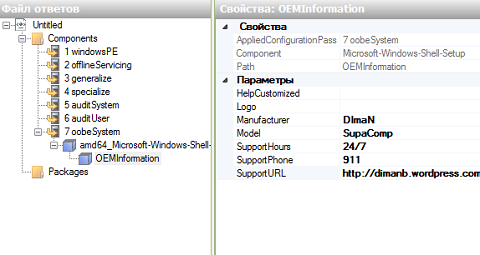
Fig. 3. OEM Information Options in Windows Installation Manager
We have already dealt with the parameters and, thus, have partially solved the problem with the localization of the registry parameters. But it remains to find out exactly where such parameters will be created. How can I find the section myself? This is also not difficult. In order to find out exactly which registry key will be used, you should create an installation image and deploy it to a virtual (or physical) machine under test. After that, you will need to open the registry editor and search for the registry key that will match the component you added, that is, OEMInformation . All these parameters of the type of string parameters (REG_SZ) will be saved in the HKLM \ SOFTWARE \ Microsoft \ Windows \ CurrentVersion \ OEMInformation section . As you can see in the following illustration, in this section you can find the settings you configured, and the System window will look like the one shown on the right:
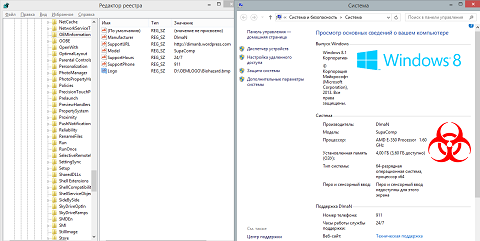
Fig. 4. Parameters in the registry and the result of their use
Centralized distribution of OEM information to previously deployed systems
In that case, if you have already managed to install operating systems on your client computers, and after that you needed to make changes to the parameters discussed earlier, of course, you can take advantage of Group Policy functionality. As you guessed, the policy settings of the administrative templates to configure such information simply does not exist. For this reason, we will need to use workarounds, namely, to refer to the preferences of group policy.
Suppose that we need to make changes in the system properties window only for computers that have the Windows 8.1 operating system installed. In this case, this whole task can be divided into 3 stages, namely: copying the required image to the same location on client computers, creating new registry parameters, and also targeting the created parameters only to a specific circle of computers (machines that work under Windows 8.1). Consider everything in order:
- First, you need to open the Group Policy Management snap-in and create a GPO target object, for example, OEMInfo , and then open the Group Policy Management Editor snap-in from the context menu of such an object;
- In the snap-in snap-in, go to the Computer Configuration node ( Computer Configuration ), since these parameters do not depend on the user who logged in and the registry settings are located in the HK_LOCAL_MACHINE section, and then go to the Settings \ Windows Configuration \ Files folder. "( Preferences \ Windows Settings \ Files ), call the context menu in the details area and select the" New "command, and then the" File "( New> File );
- In the new file properties preference item dialog box that appears, select the “ Create ” action, and in the “ Source files ” and “ Final file ” text boxes ( Source file (s) and Destination file ) specify the path to the copied file on the file share. a resource (for example, \\ DC \ Logo \ Biohazard.bmp) and a new path to the file on the client machine (say, c: \ OEMLOGO \ Biohazard.bmp). The preference item being created dialog box is shown below:
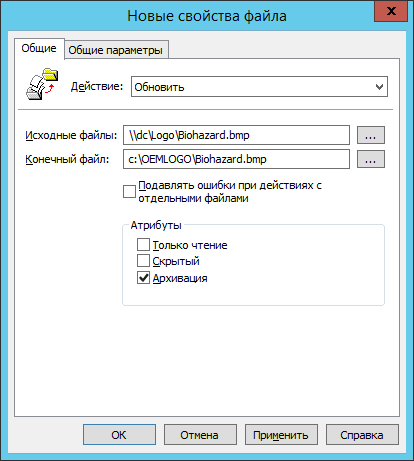
Fig. 5. File Preference Item - Now you need to create all six registry settings. To do this, in the same Windows Configuration node, go to the Registry node ( Registry ). Here, in the details pane, to create the first preference item, you will need to select the “ New> Registry Item ” command from the context menu;
- In the dialog box of the new registry preference item, you need to fill in a lot more parameters than in the previous case. Here, since the registry settings are created for the first time, it follows from the drop-down list of actions to select the “ Create ” command ( Create ). From the drop-down list “ Hive ” ( Hive ) you need to select the registry key in which the required parameter will be created. In this case, it will be HKEY_LOCAL_MACHINE . Using the " Key Path " text box, you must define the section in which the parameters will be created. Since this section is not initially in the registry editor, it is simply pointless to call the registry elements browser, and you will need to type all the way manually. In this example, this path would look like this: SOFTWARE \ Microsoft \ Windows \ CurrentVersion \ OEMInformation . The above three parameters will be identical for all six preference items created. The following three parameters: “ Parameter Name ”, “ Parameter Type ” and “ Value ” ( Value name , Value type , Value data ) are used to define the name of the parameter (for example, Logo ), its type, which REG_SZ refers to (in all six cases ), as well as the value itself, which in the case of this parameter will look like “ : \ OEMLOGO \ Biohazard.bmp ”. The dialog box for the completed tab of the general settings of the registry preference item is shown below:
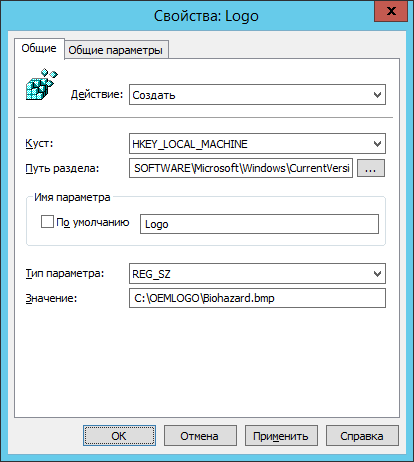
Fig. 6. Creating a registry preference item - Now, to quickly create the remaining five preference items, you can copy the created first item to the clipboard and perform the paste operation five times in a row. After that, it will only be necessary to change the last three parameters in the properties dialog box of duplicated preference items, and all the required items will be created. Ultimately, the Group Policy Management Editor snap-in window should look like this:
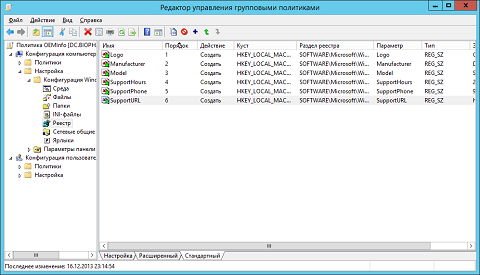
Fig. 7. Group Policy Management Editor with preference items created - There remains the task of targeting the generated preference items. To execute it, open the dialog boxes of properties of preference items and go to the Common Options tab. Here you need to select the checkbox for the Item-level targeting option and, by clicking on the Targeting button, go to the targeting editor. When you are in the targeting editor, you will need to select the Operating System element from the item creation list, and then indicate in the product drop-down list that the target operating system should be Windows 8.1. After the targeting item is added, you can save changes to the preference items. The targeting editor is shown in the following illustration:
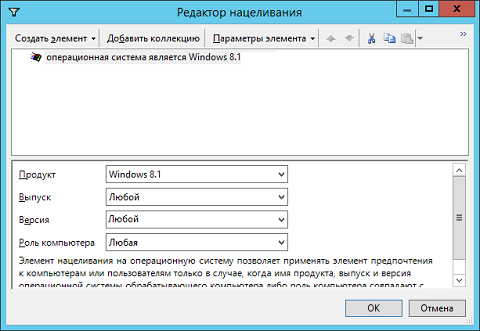
Fig. 8. Targeting editor for previously created preference items - After all actions are completed, boldly close the GPME snap-in, associate the GPO with the required organizational unit, and update the policy settings on the target computers.
Ultimately, after updating the policy settings on client computers, the system properties window should look exactly the same as in Figure 4 in the current article.
Conclusion
In this article, you learned how to find and create parameters in the system registry that are required to add new fields in the properties window of the Windows operating system. The algorithm for searching for such parameters using the Windows Installation Manager, as well as the principle of their centralized configuration using Group Policy functionality, was considered. I hope that the information from this article has been useful for you, and if you want to know how you can execute one or another scenario with which you have difficulties using the registry settings management tools and group policy, write about this scenario in the comments to this article, and I will try to sort out your question in one of the following articles on the use of group policy functionality.
Source: https://habr.com/ru/post/206326/
All Articles