We build an OpenVPN bridge under Mac OSX
Once I had the need to have access to a local network from a remote place. To perform this task, an OSX server was installed on the iMac in which remote access VPN was configured. Everything worked quite well except mDNS (Bonjour). As it turned out, this VPN implementation does not support multicast. And it was vital because of the presence of some special applications that only work on the local network.
After a brief search, there were several solutions to this problem. One of them was free to install the “Network Beacon” program and set the paths to the Bonjour services in it. Another solution was paid and suggested the installation of a special application “ShareTool” which firstly can build its own SSH tunnels and secondly transmit information about the services on the server side through the tunnel.
There are two minuses to this solution. The first is that you need to buy a license for each car. Well, the second is that this decision is still a crutch. And I wanted to do everything as clean as possible.
')
The solution was the construction of a VPN bridge based on OpenVPN with a virtual adapter “tap”.
But how to do that? On the network, I found many different instructions for setting up such a configuration, but not a single option for building a bridge under OSX.
And then I remembered how I set up a bridge for expanding the wireless network and decided to do everything in a similar way.
All subsequent steps will require superuser rights. Therefore, we open the terminal and immediately switch to the limitless possibilities mode.
First, install the TunTap driver
You can download it at this link: tuntap_20111101.tar.gz
Unpack, run the installer. After the installation is complete, we load the modules into the kernel.
Next, we install OpenVPN itself via MacPorts.
For those who do not know yet - Easy-RSA is no longer part of the OpenVPN package for this, download it separately by the link:
easy-rsa-release-2.x.zip
For more convenience, copy the contents of the folder "openvpn2" in "/ etc / openvpn".
We unpack in it Easy-RSA 2.
We rule vars for ourselves and generate keys. Editing “vars” consists in correcting the information on the certificate holder and key, as well as changing (if necessary) the Diffie-Hellman parameters.
For the server.
And the client.
In conclusion, we generate the Diffie - Hellman parameters.
Edit the pattern from "/ etc / openvpn / sample-config-files /" or create a new “server.conf”.
For example, my version
Now let's move on to the next step, creating a bridge using MacOS itself.
Run the System Settings and select Network.

Click on the gear and select "Manage virtual interfaces".
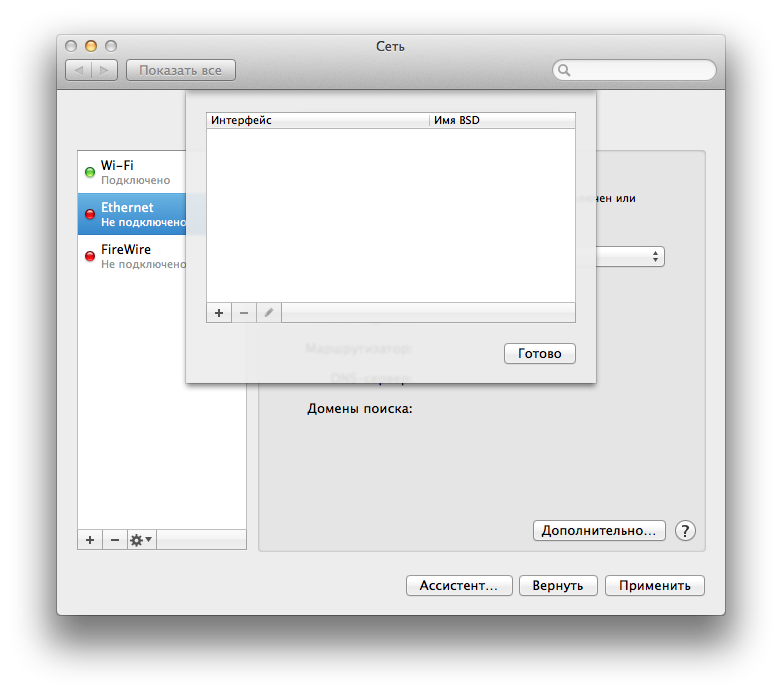
Next, click on the plus and select "New Bridge ...".
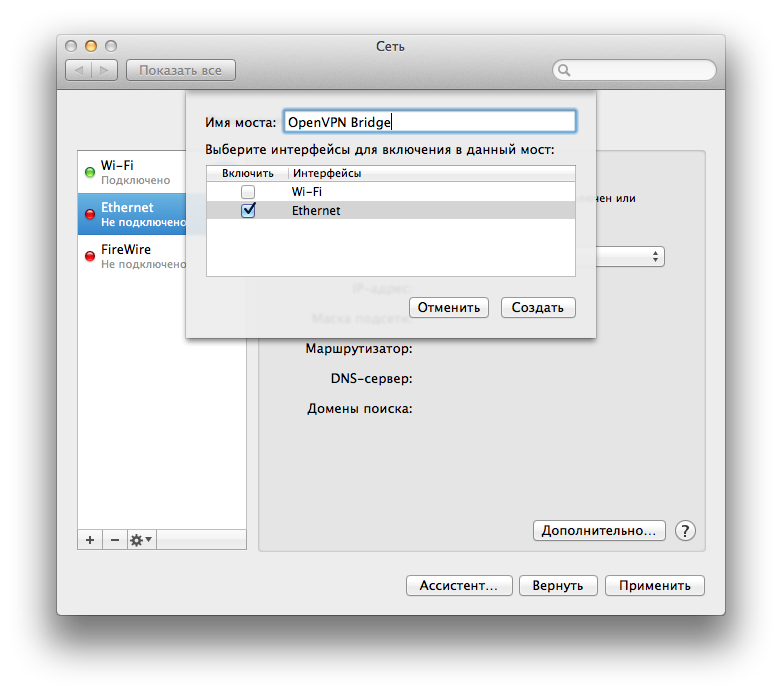
Here we will never see our “tap” interface even when the OpenVPN server is running. But as it turned out with all the "friendliness" MacOs gives you the opportunity to create a network bridge with one interface. And this is exactly what we need. We select the adapter with which we are connected to the network and call the bridge at our discretion. Click "create" and "ready."
Next, we configure the bridge connection in the same way as the network interface was configured and click Apply.

Everything, the network is configured and the window can be closed. It is no longer needed.
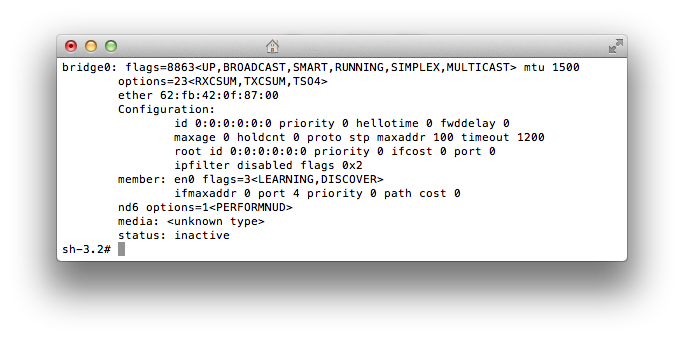
Now you can check in the terminal the presence of a bridge with one member. Run the ifconfig command and make sure that the bridge0 has one member in its role, which is the interface that we chose when creating it.
The next step is the creation of a script that should perform two functions. First, convince the kernel to skip packets and, second, add the “tap” interface to the bridge.
Create the file "/etc/openvpn/scripts/up.sh".
Save and make it executable.
The path to this script is specified in the server configuration and starts after the creation of the virtual interface.
Checking the configuration
Is the server running? If so, then kill it "Control + C". If you flew with errors, then look with what and fix it.
Now go to the autorun server.
Create a file "/Library/LaunchDaemons/org.openvpn.bridge.plist" with the following content.
Save and run the server.
Everything, with start of the server coped. Go to the client.
I will briefly describe only the option of running the client from under MacOS. Since I’m connecting to this server from MacBook and I didn’t have to put Xcode and MacPorts on it, I decided to use an all-inclusive solution like Tunnelblick .
Create a configuration folder. For example on the desktop. Make it easier on the server. Further it will be clear why.
In the folder, create the file “config.ovpn” and set the configuration.
Example.
We save and copy the keys and certificates created at the beginning to the same folder.
After copying the keys and certificates, you need to change their owner. It must match the user under which we build the configuration. For one we leave the superuser's paradise.
Next, rename the folder with the configuration and keys (the folder name will be the name of the configuration in “Tunnelblick”) and add the extension “.tblk”
After that we transfer the configuration to the client with the installed “Tunnelblick” in any convenient way. Then open the "Finder" find the location of the configuration and click on it twice. It will automatically be added to the configurations.
Run “Tunnelblick”, select your configuration from the list and click the “Connect” button. And if everything is done correctly, then after a few seconds we already have full access to the remote local network, including all multicast protocols.
After a brief search, there were several solutions to this problem. One of them was free to install the “Network Beacon” program and set the paths to the Bonjour services in it. Another solution was paid and suggested the installation of a special application “ShareTool” which firstly can build its own SSH tunnels and secondly transmit information about the services on the server side through the tunnel.
There are two minuses to this solution. The first is that you need to buy a license for each car. Well, the second is that this decision is still a crutch. And I wanted to do everything as clean as possible.
')
The solution was the construction of a VPN bridge based on OpenVPN with a virtual adapter “tap”.
But how to do that? On the network, I found many different instructions for setting up such a configuration, but not a single option for building a bridge under OSX.
And then I remembered how I set up a bridge for expanding the wireless network and decided to do everything in a similar way.
Step One - Configuring OpenVPN
All subsequent steps will require superuser rights. Therefore, we open the terminal and immediately switch to the limitless possibilities mode.
sudo -s First, install the TunTap driver
You can download it at this link: tuntap_20111101.tar.gz
Unpack, run the installer. After the installation is complete, we load the modules into the kernel.
kextload /Library/Extensions/tun.kext kextload /Library/Extensions/tap.kext Next, we install OpenVPN itself via MacPorts.
port install openvpn2 For those who do not know yet - Easy-RSA is no longer part of the OpenVPN package for this, download it separately by the link:
easy-rsa-release-2.x.zip
For more convenience, copy the contents of the folder "openvpn2" in "/ etc / openvpn".
cp -r /opt/local/share/doc/openvpn2 /etc/openvpn We unpack in it Easy-RSA 2.
mkdir /etc/openvpn/easy-rsa unzip –j easy-rsa-release-2.x.zip easy-rsa-release-2.x/easy-rsa/2.0/\* -d /etc/openvpn/easy-rsa/2.0/ We rule vars for ourselves and generate keys. Editing “vars” consists in correcting the information on the certificate holder and key, as well as changing (if necessary) the Diffie-Hellman parameters.
cd /etc/openvpn/easy-rsa/2.0 nano vars source vars ./clean-all ./build-ca For the server.
./build-key-server server And the client.
./build-key client In conclusion, we generate the Diffie - Hellman parameters.
./build-dh Edit the pattern from "/ etc / openvpn / sample-config-files /" or create a new “server.conf”.
For example, my version
# port 1194 # proto udp # . . dev tap # ca /etc/openvpn/easy-rsa/2.0/keys/ca.crt cert /etc/openvpn/easy-rsa/2.0/keys/server.crt key /etc/openvpn/easy-rsa/2.0/keys/server.key # vars. "dh1024.pem" "dh2048.pem" dh /etc/openvpn/easy-rsa/2.0/keys/dh1024.pem # ifconfig-pool-persist /etc/openvpn/ipp.txt # . server-bridge 192.168.2.2 255.255.255.0 192.168.2.224 192.168.2.254 # push "route 192.168.2.0 255.255.255.0" # script-security 2 up /etc/openvpn/scripts/up.sh # . # . learn-address /etc/openvpn/scripts/routes.sh # . client-to-client # duplicate-cn # 10 60 . keepalive 10 60 # comp-lzo # persist-key # OpenVPN persist-tun # . 1 0 verb 3 Now let's move on to the next step, creating a bridge using MacOS itself.
Step Two - “Bridge Building”
Run the System Settings and select Network.
Click on the gear and select "Manage virtual interfaces".
Next, click on the plus and select "New Bridge ...".
Here we will never see our “tap” interface even when the OpenVPN server is running. But as it turned out with all the "friendliness" MacOs gives you the opportunity to create a network bridge with one interface. And this is exactly what we need. We select the adapter with which we are connected to the network and call the bridge at our discretion. Click "create" and "ready."
Next, we configure the bridge connection in the same way as the network interface was configured and click Apply.
Everything, the network is configured and the window can be closed. It is no longer needed.
Now you can check in the terminal the presence of a bridge with one member. Run the ifconfig command and make sure that the bridge0 has one member in its role, which is the interface that we chose when creating it.
The next step is the creation of a script that should perform two functions. First, convince the kernel to skip packets and, second, add the “tap” interface to the bridge.
Step Three - Launch
Create the file "/etc/openvpn/scripts/up.sh".
#!/bin/bash # ARP /usr/sbin/sysctl -w net.link.ether.inet.proxyall=1 # /usr/sbin/sysctl -w net.inet.ip.forwarding=1 # tap /sbin/ifconfig bridge0 addm tap0 Save and make it executable.
chmod +x /etc/openvpn/scripts/up.sh The path to this script is specified in the server configuration and starts after the creation of the virtual interface.
Checking the configuration
/opt/local/sbin/openvpn2 –config /etc/openvpn/server.conf Is the server running? If so, then kill it "Control + C". If you flew with errors, then look with what and fix it.
Now go to the autorun server.
Create a file "/Library/LaunchDaemons/org.openvpn.bridge.plist" with the following content.
<?xml version="1.0" encoding="UTF-8"?> <!DOCTYPE plist PUBLIC "-//Apple//DTD PLIST 1.0//EN" "http://www.apple.com/DTDs/PropertyList-1.0.dtd"> <plist version="1.0"> <dict> <key>KeepAlive</key> <true/> <key>Label</key> <string>org.openvpn.bridge</string> <key>ProgramArguments</key> <array> <string>/opt/local/sbin/openvpn2</string> <string>--config</string> <string>/etc/openvpn/server.conf</string> </array> <key>RunAtLoad</key> <true/> </dict> </plist> Save and run the server.
launchctl load /Library/LaunchDaemons/org.openvpn.bridge.plist Everything, with start of the server coped. Go to the client.
Step Four - Customer
I will briefly describe only the option of running the client from under MacOS. Since I’m connecting to this server from MacBook and I didn’t have to put Xcode and MacPorts on it, I decided to use an all-inclusive solution like Tunnelblick .
Create a configuration folder. For example on the desktop. Make it easier on the server. Further it will be clear why.
In the folder, create the file “config.ovpn” and set the configuration.
Example.
client dev tap proto udp # # IP. remote my.server.tld 1194 resolv-retry infinite nobind persist-key persist-tun ca ca.crt cert client.crt key client.key comp-lzo verb 3 We save and copy the keys and certificates created at the beginning to the same folder.
cp /etc/openvpn/easy-rsa/2.0/keys/ca.crt /Users/username/Desktop/MyVpnConfig/ cp /etc/openvpn/easy-rsa/2.0/keys/client.crt /Users/username/Desktop/MyVpnConfig/ cp /etc/openvpn/easy-rsa/2.0/keys/client.key /Users/username/Desktop/MyVpnConfig/ After copying the keys and certificates, you need to change their owner. It must match the user under which we build the configuration. For one we leave the superuser's paradise.
chown -R username:staff /Users/username/Desktop/MyVpnConfig exit Next, rename the folder with the configuration and keys (the folder name will be the name of the configuration in “Tunnelblick”) and add the extension “.tblk”
mv /Users/username/Desktop/MyVpnConfig /Users/username/Desktop/MyVpnConfig.tblk After that we transfer the configuration to the client with the installed “Tunnelblick” in any convenient way. Then open the "Finder" find the location of the configuration and click on it twice. It will automatically be added to the configurations.
Run “Tunnelblick”, select your configuration from the list and click the “Connect” button. And if everything is done correctly, then after a few seconds we already have full access to the remote local network, including all multicast protocols.
Source: https://habr.com/ru/post/206322/
All Articles