Cheap USB PC Button
The idea is to launch a script by pressing a physical button connected to a computer.

button
Options:
I conducted all the experiments on Raspberry PI with debian on board (or rather, raspbmc firmware).
Any distribution kit that uses udev to track system devices is suitable for implementation.
')
The device on the basis of which the button will be made can be any: an old half-broken usb keyboard, a mouse, a camera, and indeed everything that clings to via USB and can be recognized by the system.
I found a mouse on the market for 70 rubles, which can serve as a button and is quite competitive with other options.
The scheme of the button is simple to ugliness
important note on the wiring diagram: see PS101 at the end of the article
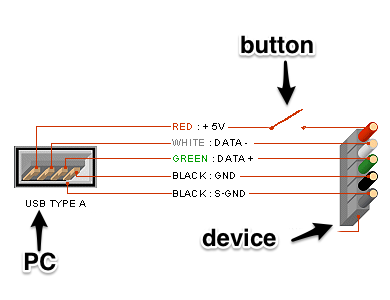
While the button is pressed, the entire circuit is closed, the device is energized and the system sees that a new device is connected.
When the button is pressed, the circuit breaks and the device disappears from the system.
This logic is key in the whole process of creating a button.
I disassembled the old keyboard and got it
Button operation check:
The udevd process monitors the connection / disconnection of the device and creates the device file in the / dev / directory (for a complete explanation, see the links at the end of the article for details)
While connecting devices, udevd checks the list of rules in the /etc/udev/rules.d/ directory
Rules can live as in one file or in several.
Create a file and add a rule:
in debian there is no need to restart udev after changing the rules, everything happens automatically.
This rule is executed only when all conditions are met:
ATTRS {name} == "LITEON Technology USB Multimedia Keyboard" (the name of the connected device is the same)
ATTRS {phys} == "usb-bcm2708_usb-1.2 / input0" (the device is connected to a specific USB port. I need this, because I use 2 buttons made of the same keyboards)
ACTION == "add" (the rule only works when the device is only added, there is also a " remove " parameter. If you do not specify Action, the script will run continuously while the device is connected)
RUN + = "/ bin / sh /home/pi/usb.sh" (our script itself, which is started by pressing a button, never started up without / bin / sh , also see PS01 below)
The list of attributes can be found as follows:
where /dev/input/by-path/platform-bcm2708_usb-usb-0\:1.2\:1.0-event-kbd is the device address
device address in the system can be found at the time of connecting the device:
For debugging, I used the rule:
and checked if the simlink device was created / dev / ABC
That's all. We got a button, by pressing which runs the script in the system.
cost:
old keyboard - 0p
button - 10p
case - 0 p
And the most important thing is that such a button does not require knowledge of microcontrollers and a special ability to solder, it is convenient and accessible to everyone :)
PS01 I stumbled upon an interesting bug and could not take it: the script specified in the rule runs 2 times. Can someone tell me?
PS10 The button must be held for about 2 seconds, since it is necessary to wait for the device to initialize in the system
PS11 If you decide to repeat the project with any changes, I strongly recommend at least scrolling through the list of references
PS100 Python script to work with udev github.com/bockro/misc usb_checker.py
PS101 Important note from Blangel
Thank you for reading to the end.
button
Options:
- Arduino nano - 1400 r (orig), 300 r (not orig). (pluses: you can hang many buttons on 1 usb port; minuses: you need to solder + understand how it works and you will have to keep the program constantly on your computer, which will wait for the button to be pressed)
- USBbutton - 780 r (pluses: everything is beautifully decorated and done; cons: high price and it is win-only)
- U-HID Nano - 1150 r (pluses: there is software; minuses: high price + need to be soldered)
- Usb device (almost any) - 0 - 100 p (pluses: almost 0 cost, no need to program; cons: linux, possible soldering, usb cable damage)
I conducted all the experiments on Raspberry PI with debian on board (or rather, raspbmc firmware).
Any distribution kit that uses udev to track system devices is suitable for implementation.
')
The device on the basis of which the button will be made can be any: an old half-broken usb keyboard, a mouse, a camera, and indeed everything that clings to via USB and can be recognized by the system.
I found a mouse on the market for 70 rubles, which can serve as a button and is quite competitive with other options.
Making a button
The scheme of the button is simple to ugliness
important note on the wiring diagram: see PS101 at the end of the article
While the button is pressed, the entire circuit is closed, the device is energized and the system sees that a new device is connected.
When the button is pressed, the circuit breaks and the device disappears from the system.
This logic is key in the whole process of creating a button.
I disassembled the old keyboard and got it
microchip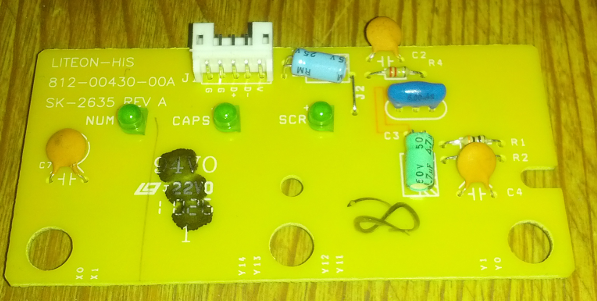
In one of the versions of this button, I used the closure of specific contacts on the keyboard
In order to emulate pressing any key, a program was launched in the background that was waiting for pressing this key.

In one of the versions of this button, I used the closure of specific contacts on the keyboard
In order to emulate pressing any key, a program was launched in the background that was waiting for pressing this key.
Button operation check:
The shortest udev theory
The udevd process monitors the connection / disconnection of the device and creates the device file in the / dev / directory (for a complete explanation, see the links at the end of the article for details)
While connecting devices, udevd checks the list of rules in the /etc/udev/rules.d/ directory
Rules can live as in one file or in several.
Create a file and add a rule:
pi@raspbmc:~$ cat /etc/udev/rules.d/20-usb_button.rules ATTRS{name}=="LITEON Technology USB Multimedia Keyboard", ATTRS{phys}=="usb-bcm2708_usb-1.2/input0", ACTION=="add", RUN+="/bin/sh /home/pi/usb.sh" in debian there is no need to restart udev after changing the rules, everything happens automatically.
This rule is executed only when all conditions are met:
ATTRS {name} == "LITEON Technology USB Multimedia Keyboard" (the name of the connected device is the same)
ATTRS {phys} == "usb-bcm2708_usb-1.2 / input0" (the device is connected to a specific USB port. I need this, because I use 2 buttons made of the same keyboards)
ACTION == "add" (the rule only works when the device is only added, there is also a " remove " parameter. If you do not specify Action, the script will run continuously while the device is connected)
RUN + = "/ bin / sh /home/pi/usb.sh" (our script itself, which is started by pressing a button, never started up without / bin / sh , also see PS01 below)
The list of attributes can be found as follows:
pi@raspbmc:~$ udevadm info -a -p $(udevadm info -q path -n /dev/input/by-path/platform-bcm2708_usb-usb-0\:1.2\:1.0-event-kbd) looking at device '/devices/platform/bcm2708_usb/usb1/1-1/1-1.2/1-1.2:1.0/input/input107/event0': KERNEL=="event0" SUBSYSTEM=="input" DRIVER=="" looking at parent device '/devices/platform/bcm2708_usb/usb1/1-1/1-1.2/1-1.2:1.0/input/input107': KERNELS=="input107" SUBSYSTEMS=="input" DRIVERS=="" ATTRS{name}=="LITEON Technology USB Multimedia Keyboard" ATTRS{phys}=="usb-bcm2708_usb-1.2/input0" ATTRS{uniq}=="" ATTRS{properties}=="0" .... where /dev/input/by-path/platform-bcm2708_usb-usb-0\:1.2\:1.0-event-kbd is the device address
device address in the system can be found at the time of connecting the device:
pi@raspbmc:~$ udevadm monitor --env |grep DEVLINKS DEVLINKS=/dev/input/by-id/usb-LITEON_Technology_USB_Multimedia_Keyboard-event-kbd /dev/input/by-path/platform-bcm2708_usb-usb-0:1.2:1.0-event-kbd For debugging, I used the rule:
SUBSYSTEM=="usb", ATTRS{ID_MODEL_ID}=="c312", SYMLINK+="ABC" and checked if the simlink device was created / dev / ABC
Total
That's all. We got a button, by pressing which runs the script in the system.
cost:
old keyboard - 0p
button - 10p
case - 0 p
And the most important thing is that such a button does not require knowledge of microcontrollers and a special ability to solder, it is convenient and accessible to everyone :)
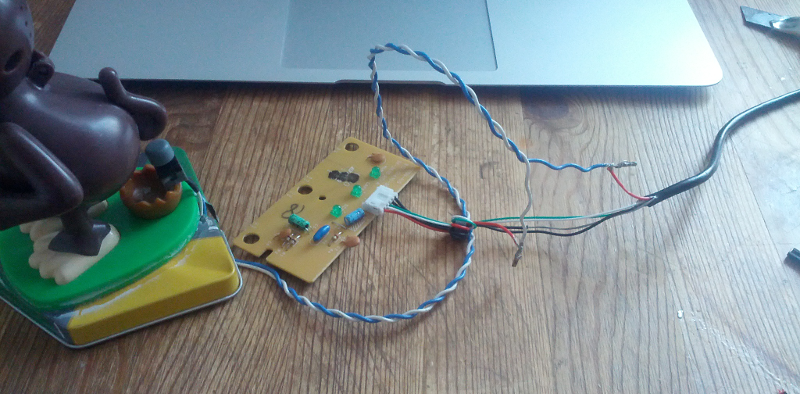
PS00 about my case for the button.
A monkey on a spring and if you press on the head, then the monkey presses the button with its tail, which leads to the closure of the chain
A monkey on a spring and if you press on the head, then the monkey presses the button with its tail, which leads to the closure of the chain
PS01 I stumbled upon an interesting bug and could not take it: the script specified in the rule runs 2 times. Can someone tell me?
PS10 The button must be held for about 2 seconds, since it is necessary to wait for the device to initialize in the system
PS11 If you decide to repeat the project with any changes, I strongly recommend at least scrolling through the list of references
PS100 Python script to work with udev github.com/bockro/misc usb_checker.py
PS101 Important note from Blangel
You made a short-open wire +5 V in USB, however, Data would also be better to close / open.
Let's remember the story - why did the +5 V and GND pins be made in the USB connector?
First, so that the USB device has time to make a software reset and be ready to receive and send data.
But secondly, there are old computers (and especially the funny motherboards from Pentium 4 on ICH5) that are badly implemented by the USB bus, and as a result, the computer will hang or reboot.
And there are also very cheap buggy Chinese devices with a similar effect and calculated on the connection only through a USB connector.
So it would be better to close and open 3 contacts - +5 V and Data ± (and the power to close to the data). This can be done, for example, with the help of 2 Soviet switches, which were placed in the floor lamp, only one button should have a 3-5 mm button ...
In your case, you can not do it, but at least I should mention this in the article, otherwise I didn’t notice anything like that among the comments.
Links
- [RU] Excellent translation to opennet about using udev
- [ENG] Main manual on writing udev rules
- [ENG] Presentation about udev. Many examples and explanations
- [RU] Habr: use udev to automatically mount devices
- man udev
Thank you for reading to the end.
Source: https://habr.com/ru/post/206122/
All Articles