Secrets of buttons in Android. Part 2: Layout Refactoring
Greetings, dear community.
In the previous article, using only the layout, we made the “on / off” button, and this is what we did then:
The XML is pretty weighty. In this article I will show how to make it truly beautiful. We will cut the code in half, removing everything that may make it difficult to maintain our application or cause team lead dissatisfaction. In this article, we will use string resources (
You can also download the draft Android application from the previous article, which we will finalize in this part .
')
Our button looks like this:
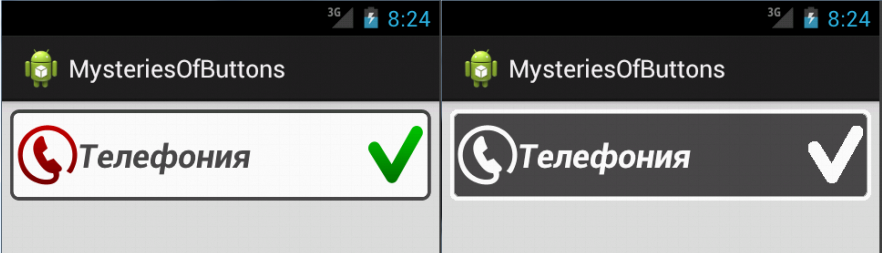

On the right are the buttons in the pressed state, that is, while we hold them with our fingers. On the left - not pressed, in the On and Off mode.
Let's refactor the code. There certainly are flaws, such as the word
So we declared the text constant
A bit better, although the amount of code from this has only grown, but this is a payment for the possibility of conveniently localizing the application. How exactly can it be localized? Our
What if we need ten of these buttons, differing only in the inscription and the left icon? Copy all? Then the size of the layout file will be prohibitively large and contain 80% of duplicate code. This is where styles come to our rescue. Let's style everything that can be repeated. Fortunately, the ADT plugin for Eclipse makes it a little easier if you are not very familiar with developing Android style files.
To extract the style, open our layout
Specify the name of the style:

Click OK. The resulting style can be seen in the
But the text of the button has greatly decreased:
Now, to make ten buttons, you need to write a lot less text, and a minimum of duplication of code. Please note: the
If you start the application now, you will see that everything “floated”, and the result is not at all what we expected. Why? Because even though the style was created, it did not apply to the button.
You can apply a style to a button by specifying the
This gives us the opportunity to register the style in the subject. Open the
This is the theme of our application. Let's point out that all
What is
And one more fix we have to do. The style we created is not inherited from the style of the buttons, which means that our control has lost its ability to click. It is easy to check if you start the application now and try to press the button. How to cure it? We need to inherit our style from the
Where did I get the
Now everything works as it should. But we need to make a couple more small improvements. As you noticed, in the
As you can see, besides
Now let's replace the
And the text of the
Let's think about styles again. We made the same style for all
Here is another way to set the color - in the resource file using the
Not every
All window attributes in our styles. For each new Activity, it is enough to specify the
Compare the original layout with the optimized one. Here is what we had:
And so what happened:
The truth has become more beautiful? All common attributes of buttons and windows in styles. When creating new buttons, we will only write to them those attributes that distinguish the new button from others: icon, name, identifier, location in the parent element.
All numeric constants are hidden in the file
The difference between the original and the optimized version is noticeable even on one window element. In real applications, there are dozens of them in the window, and therefore optimized code will be an order of magnitude easier to read and maintain. My biggest iPUMB application - FUIB online contains about 40 activity. If it were not for the styles, I would have to copy the design of the windows 40 times, and if the designers came up with something new, I would have to change this code 40 times.
Another beauty of styles is the unification of code in team development. Once written, the style file gave all members of our development team a ready-made tool for window layout, and all our windows looked like a single whole, and without any refactorings or “fits.”
I would be glad if this article was useful to you. In the following articles I will definitely share other subtleties of layout in Android.
Ready project Android applications from this article
The Android application project from the previous article that we are finalizing in this part
Secrets of buttons in Android. Part 1: Layout Basics
Application localization
How Android selects the most appropriate resource
In the previous article, using only the layout, we made the “on / off” button, and this is what we did then:
<RelativeLayout xmlns:android="http://schemas.android.com/apk/res/android" android:layout_width="match_parent" android:layout_height="match_parent" android:padding="6dp" android:background="#dddddd" > <ToggleButton android:id="@+id/act_main_btn_telephony" android:layout_width="match_parent" android:layout_height="wrap_content" android:background="@drawable/button_background" android:drawableLeft="@drawable/icon_phone" android:drawableRight="@drawable/icon_on_off" android:gravity="left|center_vertical" android:textOn="" android:textOff="" android:textSize="24sp" android:textStyle="bold|italic" android:textColor="@color/text_color" android:onClick="onToggleButtonClick" /> </RelativeLayout> The XML is pretty weighty. In this article I will show how to make it truly beautiful. We will cut the code in half, removing everything that may make it difficult to maintain our application or cause team lead dissatisfaction. In this article, we will use string resources (
strings.xml ), dimension resources ( dimens.xml ), styles and themes ( styles.xml ). If you are not familiar with the first part of the article, I recommend at least to run through her eyes.You can also download the draft Android application from the previous article, which we will finalize in this part .
')
Our button looks like this:
On the right are the buttons in the pressed state, that is, while we hold them with our fingers. On the left - not pressed, in the On and Off mode.
Text resources strings.xml
Let's refactor the code. There certainly are flaws, such as the word
strings.xml file. It has already been created and is in the res/values directory. Open it and replace its contents with the following: <?xml version="1.0" encoding="utf-8"?> <resources> <string name="app_name">MysteriesOfButtons</string> <string name="action_settings"></string> <string name="act_main_telephony"></string> </resources> So we declared the text constant
act_main_telephony . Now let's replace the text of the android:textOn and android:textOff with the link @string/act_main_telephony : <ToggleButton android:id="@+id/act_main_btn_telephony" android:layout_width="match_parent" android:layout_height="wrap_content" android:background="@drawable/button_background" android:drawableLeft="@drawable/icon_phone" android:drawableRight="@drawable/icon_on_off" android:gravity="left|center_vertical" android:textOn="@string/act_main_telephony" android:textOff="@string/act_main_telephony" android:textSize="24sp" android:textStyle="bold|italic" android:textColor="@color/text_color" /> A bit better, although the amount of code from this has only grown, but this is a payment for the possibility of conveniently localizing the application. How exactly can it be localized? Our
strings.xml file strings.xml located in the res/values directory. Now we are writing a Russian text to it. Suppose we want to support more and English. To do this, we create the res/values-en directory, and create another file strings.xml . It should contain all the same constants as the first file, but in English already. When you start an application, Android searches in the application first of all for the locale that is set for the user in the system by default. If the application does not have resources for this locale, then Android takes resources from the default locale, that is, from the res/values directory without suffixes. There may be text in any language, not necessarily Russian or English. This resource will be used if the user does not fit any other resource in the application. You can localize not only the values resources, but also any other, for example, often localize drawable , if some text is specified by a picture. If you are interested in the details, I recommend reading an interesting article about the localization of applications from Google and how Android selects the most appropriate resource . If there is time, I will try to prepare a separate article on localization with examples, since this question is quite extensive.Styles and themes: styles.xml
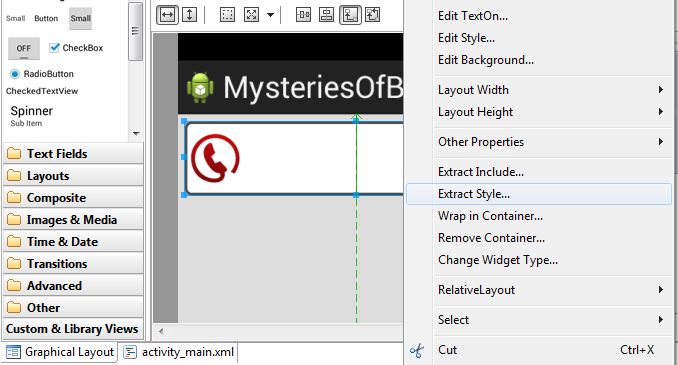
What if we need ten of these buttons, differing only in the inscription and the left icon? Copy all? Then the size of the layout file will be prohibitively large and contain 80% of duplicate code. This is where styles come to our rescue. Let's style everything that can be repeated. Fortunately, the ADT plugin for Eclipse makes it a little easier if you are not very familiar with developing Android style files.
To extract the style, open our layout
activity_main.xml in Graphical Layout mode and select the button. Right-click on it and select Extract Style :Specify the name of the style:
styleOnOffButton and leave all attributes selected except for android:drawableLeft , android:textOn and android:textOff , which will be different for each button in our application. The remaining attributes will be rendered in style:Click OK. The resulting style can be seen in the
res/values/styles.xml : <style name="styleOnOffButton"> <item name="android:background">@drawable/button_background</item> <item name="android:drawableRight">@drawable/icon_on_off</item> <item name="android:gravity">left|center_vertical</item> <item name="android:onClick">onToggleButtonClick</item> <item name="android:textColor">@color/text_color</item> <item name="android:textSize">24sp</item> <item name="android:textStyle">bold|italic</item> </style> But the text of the button has greatly decreased:
<ToggleButton android:id="@+id/act_main_btn_telephony" android:layout_width="match_parent" android:layout_height="wrap_content" android:drawableLeft="@drawable/icon_phone" android:textOn="@string/act_main_telephony" android:textOff="@string/act_main_telephony" /> Now, to make ten buttons, you need to write a lot less text, and a minimum of duplication of code. Please note: the
android:layout_width and android:layout_height are not rendered to the style. They must be present for each element in the layout file. The android:id attribute, of course, has its own for each object, so it is also not taken into style. However, the resulting code is compact enough to be convenient to reuse.If you start the application now, you will see that everything “floated”, and the result is not at all what we expected. Why? Because even though the style was created, it did not apply to the button.
You can apply a style to a button by specifying the
style="@style/styleOnOffButton" . This would be done automatically if we turned on the Set style attribute on extracted elements option when extracting the style. Both ways will work, but these are not the best options, since this line will need to be assigned to each instance of the button in each window. I would like to avoid this. As a rule, applications use the same style for identical controls, this is one of the basic design rules. That is, all the on / off buttons look the same, differing only in icons and text. Few who make one rectangular, another tidy, and the third diamond.This gives us the opportunity to register the style in the subject. Open the
styles.xml and find the following text there: <!-- Application theme. --> <style name="AppTheme" parent="AppBaseTheme"> <!-- All customizations that are NOT specific to a particular API-level can go here. --> </style> This is the theme of our application. Let's point out that all
ToggleButton buttons must have the same style, our style: <!-- Application theme. --> <style name="AppTheme" parent="AppBaseTheme"> <!-- All customizations that are NOT specific to a particular API-level can go here. --> <item name="android:buttonStyleToggle">@style/styleOnOffButton</item> </style> What is
android:buttonStyleToggle , what else can you stylize, and where to read about it? I could not find full documentation on styles. If someone saw her, please write in the comments. Therefore, I refer directly to the source of Android, fortunately they are open to all. I work with ADT, and my source code for Android styles is here: adt-bundle-windows\sdk\platforms\android-< API>\data\res\values\themes.xml . Source Window->Android SDK Manager using the Android SDK Manager utility, which runs directly from Eclipse, the Window->Android SDK Manager menu.And one more fix we have to do. The style we created is not inherited from the style of the buttons, which means that our control has lost its ability to click. It is easy to check if you start the application now and try to press the button. How to cure it? We need to inherit our style from the
android:style/Widget.Button.Toggle - this is the default style for all ToggleButton : <style name="styleOnOffButton" parent="android:style/Widget.Button.Toggle"> <item name="android:background">@drawable/button_background</item> <item name="android:drawableRight">@drawable/icon_on_off</item> <item name="android:gravity">left|center_vertical</item> <item name="android:onClick">onToggleButtonClick</item> <item name="android:textColor">@color/text_color</item> <item name="android:textSize">24sp</item> <item name="android:textStyle">bold|italic</item> </style> Where did I get the
android:style/Widget.Button.Toggle ? From the same Android sources, the styles.xml .Dimension resources: dimens.xml
Now everything works as it should. But we need to make a couple more small improvements. As you noticed, in the
styleOnOffButton style styleOnOffButton is an attribute android:textSize , which is given by the constant 24sp . If there is any text in our application besides the buttons, we will probably want to make it the same in size to preserve the overall style. And this means that we will use the 24sp constant more than once in different places. And if we then want to experiment with the size of the text, then we will have to change these constants throughout the application. To avoid this, let's declare a named size constant. Open the res/values/dimens.xml and replace all its contents with the following: <resources> <dimen name="text_size">24sp</dimen> <dimen name="activity_padding">6dp</dimen> </resources> As you can see, besides
text_size there is another constant here - activity_padding . If we recall the code of our layout, then we will see the constant android:padding="6dp" in the RelativeLayout tag. And since it is also logical to make the indents from the borders of the screen for all windows of the application the same, this value suggests itself in constants.Now let's replace the
24sp constant in style with a new resource @dimen/text_size : <style name="styleOnOffButton" parent="android:style/Widget.Button.Toggle"> <item name="android:background">@drawable/button_background</item> <item name="android:drawableRight">@drawable/icon_on_off</item> <item name="android:gravity">left|center_vertical</item> <item name="android:onClick">onToggleButtonClick</item> <item name="android:textColor">@color/text_color</item> <item name="android:textSize">@dimen/text_size</item> <item name="android:textStyle">bold|italic</item> </style> And the text of the
RelativeLayout tag in the activity_main.xml file with a constant in the resources: <RelativeLayout xmlns:android="http://schemas.android.com/apk/res/android" android:layout_width="match_parent" android:layout_height="match_parent" android:padding="@dimen/activity_padding" android:background="#dddddd" > And a little more about styles.
Let's think about styles again. We made the same style for all
ToggleButton , so why not make a style for all windows? Moreover, except for the indents from the borders, all windows will have a common background color. This style will be simple, we do not need to inherit it from anything, let's prescribe it manually. Open the styles.xml and add the following code to the end before the closing tag: <color name="activity_background_color">#dddddd</color> <style name="styleActivity"> <item name="android:background">@color/activity_background_color</item> <item name="android:padding">@dimen/activity_padding</item> </style> Here is another way to set the color - in the resource file using the
color tag.Not every
RelativeLayout is the main element of the Activity, so we cannot prescribe the style to all RelativeLayout , as we did with the ToggleButton . In this case, the style must be specified explicitly in those elements where it is needed, using the style attribute. Let's prescribe the style of our layout and see what happened in our toga: <RelativeLayout xmlns:android="http://schemas.android.com/apk/res/android" android:layout_width="match_parent" android:layout_height="match_parent" style="@style/styleActivity" > <ToggleButton android:id="@+id/act_main_btn_telephony" android:layout_width="match_parent" android:layout_height="wrap_content" android:drawableLeft="@drawable/icon_phone" android:textOn="@string/act_main_telephony" android:textOff="@string/act_main_telephony" /> </RelativeLayout> All window attributes in our styles. For each new Activity, it is enough to specify the
style="@style/styleActivity" its root element, and the window will look the same as other application windows.Conclusion
Compare the original layout with the optimized one. Here is what we had:
<RelativeLayout xmlns:android="http://schemas.android.com/apk/res/android" android:layout_width="match_parent" android:layout_height="match_parent" android:padding="6dp" android:background="#dddddd" > <ToggleButton android:id="@+id/act_main_btn_telephony" android:layout_width="match_parent" android:layout_height="wrap_content" android:background="@drawable/button_background" android:drawableLeft="@drawable/icon_phone" android:drawableRight="@drawable/icon_on_off" android:gravity="left|center_vertical" android:textOn="" android:textOff="" android:textSize="24sp" android:textStyle="bold|italic" android:textColor="@color/text_color" android:onClick="onToggleButtonClick" /> </RelativeLayout> And so what happened:
<RelativeLayout xmlns:android="http://schemas.android.com/apk/res/android" android:layout_width="match_parent" android:layout_height="match_parent" style="@style/styleActivity" > <ToggleButton android:id="@+id/act_main_btn_telephony" android:layout_width="match_parent" android:layout_height="wrap_content" android:drawableLeft="@drawable/icon_phone" android:textOn="@string/act_main_telephony" android:textOff="@string/act_main_telephony" /> </RelativeLayout> The truth has become more beautiful? All common attributes of buttons and windows in styles. When creating new buttons, we will only write to them those attributes that distinguish the new button from others: icon, name, identifier, location in the parent element.
All numeric constants are hidden in the file
dimens.xml , we will not have any copy-paste of the same constants. All string constants are in the strings.xml file. To localize the application for other languages, it is enough to translate only this file.The difference between the original and the optimized version is noticeable even on one window element. In real applications, there are dozens of them in the window, and therefore optimized code will be an order of magnitude easier to read and maintain. My biggest iPUMB application - FUIB online contains about 40 activity. If it were not for the styles, I would have to copy the design of the windows 40 times, and if the designers came up with something new, I would have to change this code 40 times.
Another beauty of styles is the unification of code in team development. Once written, the style file gave all members of our development team a ready-made tool for window layout, and all our windows looked like a single whole, and without any refactorings or “fits.”
I would be glad if this article was useful to you. In the following articles I will definitely share other subtleties of layout in Android.
useful links
Ready project Android applications from this article
The Android application project from the previous article that we are finalizing in this part
Secrets of buttons in Android. Part 1: Layout Basics
Application localization
How Android selects the most appropriate resource
Source: https://habr.com/ru/post/206064/
All Articles