Proteus and two and a half hello world for UART and USB on the microcontroller
Recently I shoveled folders on Dropbox and came across my first crafts. When I took the first steps with microcontrollers, almost immediately I began to visit thoughts and ideas about managing my crafts with a PC, or in some way communicate with this PC. It seemed fascinating and "serious." Now I try to test everything at once in the gland, but at the beginning I wanted to step on the rake and shoot myself in the foot painlessly and quickly. Proteus has always helped me in this. Reassembling projects dozens of times was important so that you could experiment with comfort, if I may say so. Then I bought the company debugging and that in Proteus, that in the hardware - everything became equally fast.
First of all, I wanted to try UART and USB, and then Ethernet. Every wish I made up my “project”. Many ideas remained in the form of a project for Proteus - the idea got bored immediately after the implementation of the program part.
I hope this post will help everyone who wanted to try to make their USB device or just to see that all this is not so difficult; Moreover, I wanted to be able to try immediately in the simulator. Tell as a beginner for a beginner - so that you want to open Google and start reading to do more, learn better.
I will not talk about registers, modes. I doubt this will help light the fire in my eyes. Perhaps, someone will want to do something useful for themselves and simple examples have more chances to drag this extremely fascinating work (and for me it's practically a drug). And before you run on ebay or start counting the days from the moment you send a debug card from China, you can try your hand at a virtual microcontroller.
I would like to try to make two kind of hello world projects, which, however, are not much more complicated than standard LED blinking. There are a lot of images under the cut.
The description and code examples in the text will be for the PIC18F4550 microcontroller, I beg you to forgive me, I did not work with atmel. And STM8 / 32 are missing even in version 8.
The code for the microcontrollers was written for the mikroC compiler from Mikroelektronika and was written for ease of understanding, I hope it came out at least partially for me.
Proteus, it seems to me, was created for the prototyping and testing of the software in the first place. Perhaps that is why he allows multiple simplifications in the creation of schemes. Below is an absolutely sufficient set for testing communication with a PC via UART / USB. I want to note again that such a scheme will work only in Proteus.
All projects are attached to the article, so by installing the program, you can immediately try everything.
')

The topic is beaten, but still let me describe it again.
To connect putty or any other arbitrary program to our virtual microcontroller, we need to do a few things.
The COMPIM module uses a virtual port, in order to connect to it, you need to create another one and connect them as a null modem .
A good helper here is the free com0com utility .
There we create two virtual ports, in my case it is COM 3 and 4. We connect one to the Proteus COMPIM, the second is already used “outside”
Program window

This is how it will look in devmgmt.msc (Device Manager)

Now everything is ready for the test.
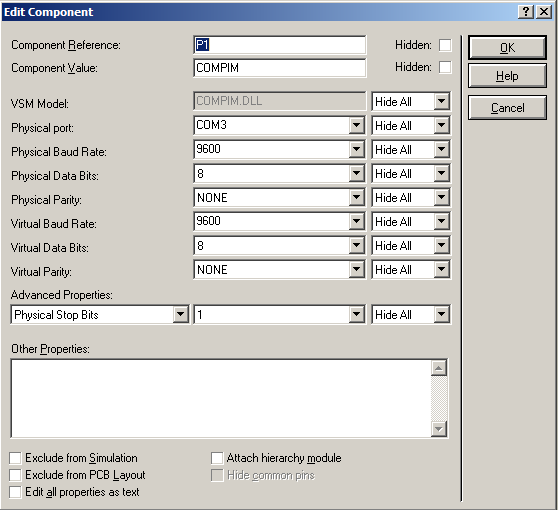
Configure the COMPIM device (right click - Edit properties).
Let me remind you that my com0com emulates COM3 / COM4 ports
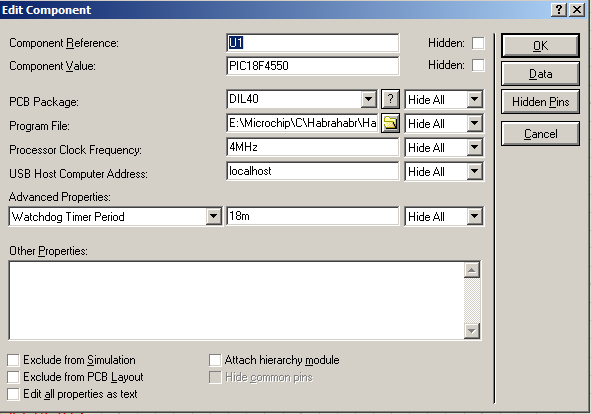
Just in case, I will attach a picture with the settings of the microcontroller
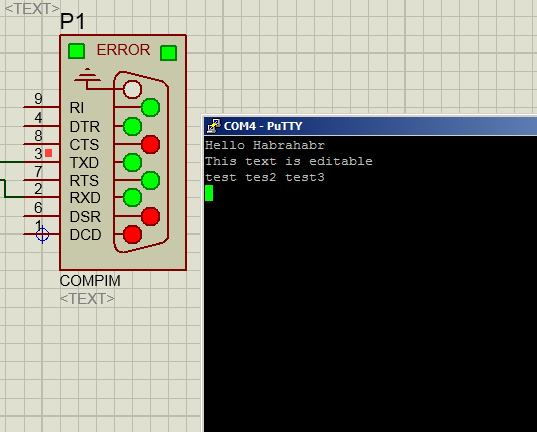
Turn on Putty, convert it to Serial mode and connect to COM4. Now ... click on the button - you will get the result
We print the text in the terminal window and the microcontroller echo us back. Pressing enter translates the caret + new line.
Backspace also works. I immediately remembered how I chatted with friends on the Hyper Terminal, spending hours on the telephone line ...
Now you can play with the microcontroller by changing the code.
Making my USB device was not easy for me then. We will test the HID device, that is, in most cases - the input device.
I really wanted to make an automatic password entry, as well as lock the computer when I moved away, and unlock when I approached. Well, a bunch of something else that could be implemented through a virtual keyboard.
A bunch of useful information on HID can be found here . Read - do not reread.
In short: each USB HID device has a special description, a descriptor. Which describes what kind of device it is, how it can be controlled, how much it consumes from the bus, or whether it has independent power and a lot of other information. Therefore, we need to make a correct description so that the OS can understand that this is a keyboard and can work with it.
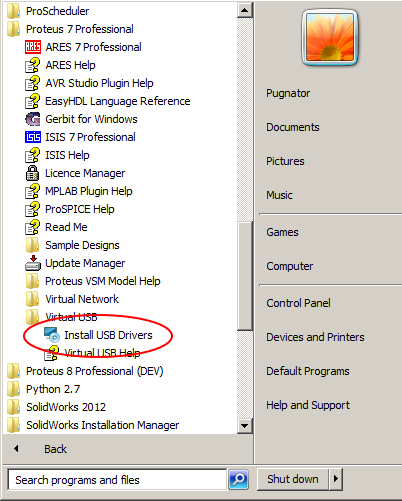
But first, in order for Proteus to forward its virtual USB host to our real PC, you need to install a virtual driver, it comes with
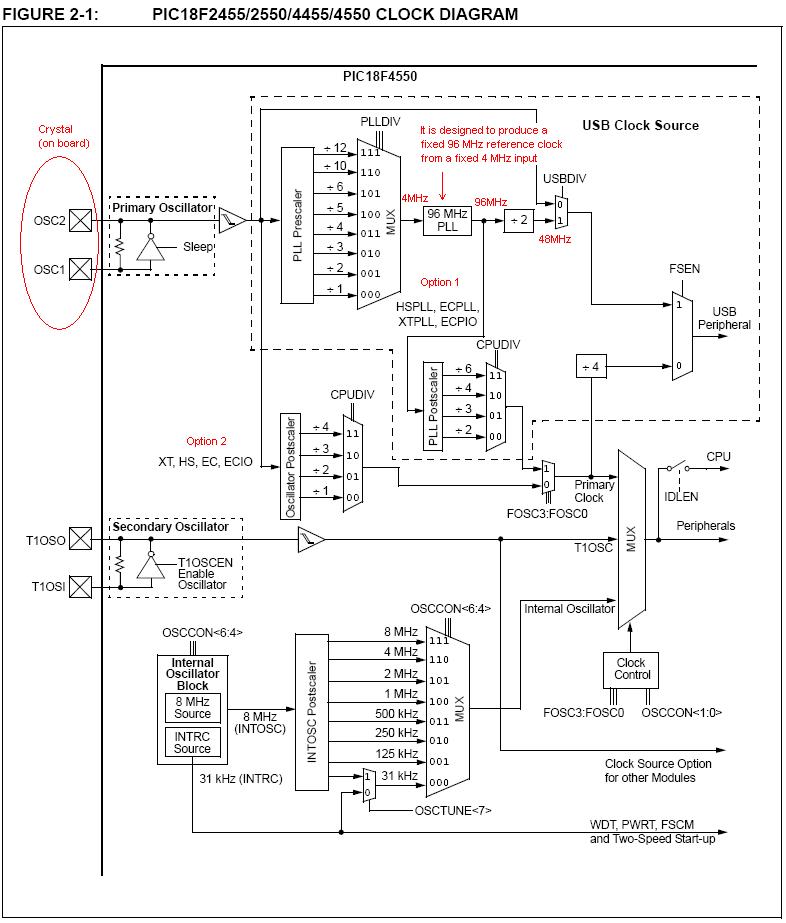
In order for the device to work as a full-fledged FullSpeed USB 2.0, you need to enable the PLL and configure it accordingly.
In Proteus, it is also necessary to set the processor frequency as 96 MHz.
It was very useful for me to just run through his eyes and experiment. It immediately became clear where to dig in endless pdf from usb.org
In our case, there is a bit of a “standard” change descriptor:
We changed the VID / PID, indicated that we have an I / O buffer of 8 bytes each and, in fact, indicated that we have a keyboard device and it should be used this way.
All variable names speak for themselves.
This handle is added to the project, and will be automatically used during assembly.
In fact, all the work consists in filling the corresponding buffer and sending it to the PC. No more difficult than with the UART. All work is done in the interrupt routine. Included with the IDE are already ready-made libraries to work with HID.
Here it should be clarified that scan keyboard codes are different from ASCII, but in order not to overload the code (we also have hello world), I avoided this inconvenience in a primitive way. It will work only for lowercase letters. Those interested can make the conversion themselves. I use a similar device for KVM At work, a wireless keyboard extension - our D-Link KVMs don't want to understand USB wireless dongles.
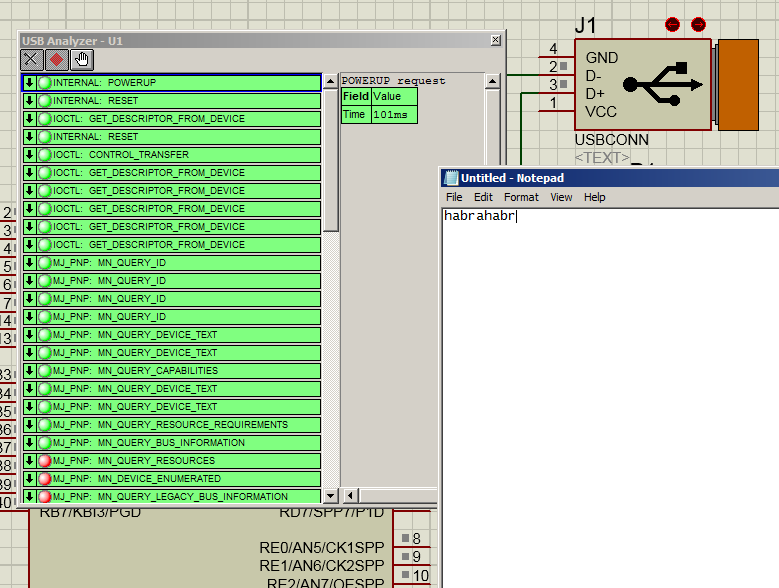
Now open the Notepad, launch Proteus (first click on the virtual plug - the USB connector is “inserted”), immediately transfer the focus to Notepad with the mouse and watch how our creation prints the word habrahabr .
And in the dispatcher our device appeared

Now you can add something of your own based on this.
A few words about how it works.
8 bytes are reserved for keyboard I / O:
0 Modifier
1 Not used
2 Key 1
3 Key 2
4 Key 3
5 Key 4
6 Key 5
7 Key 6
Modifiers are special Ctrl, Shift, Alt keys. They can be combined. For example, for the Ctrl Alt Del combination:
Modifier: 0b00000 101 Ctrl , Shift, Alt
Key code: 0x4c (Delete key)
It should be remembered that immediately after transferring the data, it is necessary to erase the USB buffer, otherwise the effect of a sticky key is obtained. That is, send eight zero bytes to the PC. In the example, the clearUSB subroutine does this.
Read more about scancodes described in microchip appnote.
In the same way, you can create a regular HID device and send / receive bytes from a PC, and according to the logic of operation it is almost no different from the same UART. But this already requires a separate job, for example, from libusb on the PC side.
Not reflected in the title, but this is also worth mentioning.
Unfortunately, this example will not be complete, as this is a topic for another conversation.
But, at least, I will describe how to set up the simulator itself, and some things will still work.
Here is just an example of what works in the gland, but does not always work in the simulator. In Proteus, VSM models are implemented for ENC28J60 and RTL8019 microcircuits. Yes, yes, the same chip that we all knew from budget network cards. The use of ENC is described quite widely and there should be no problems here. For example, the distinguished Lifelover aka Redsh described everything for a long time and most elaborately. Therefore, so as not to be boring, take 8019, the more I write software for it for use with the Z80.
As with USB, we need to install drivers, but now WinPCAP. They lie in the Virtual Network folder, next to the USB drivers. Or download the latest version from the site.
After that, we will have a new virtual network interface with the address 192.168.95.1, which, of course, can be changed.
We make a debugging interface on the UART using the scheme we already know.
HINT: If you are annoyed with TEXT inscriptions - put a space in the component Description
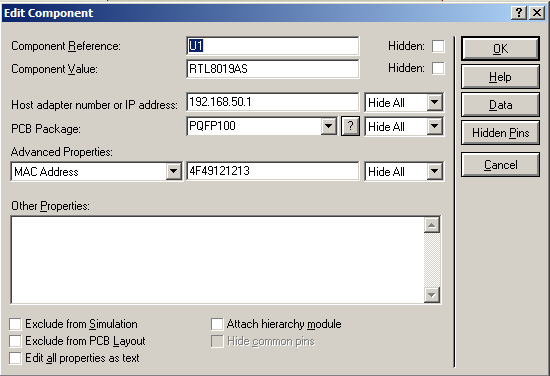
In the properties of the chip, write the number or IP of our virtual network card and you can change some settings.
In my case it is 192.168.50.1 (I changed)
Next thing for the software. A full-fledged driver for 8019 is not yet ready for me, and this is the topic of a separate large article, although this anachronism is hardly interesting to someone. But even without setting up the protocols (the IP address is 0.0.0.0 now), since I enabled ICMP / Broadcast in the registers, we can ping some left address in our subnet, and thenetwork card of the microcircuit will happily flash us an LED when it receives a packet. After each attempt, use the new address, and the ARP table is cached.

Along with the projects, ready-made HEX is attached, so you can not even download the compiler if you just need to check that everything works.
For the simulation to work, do not forget to tell the microcontroller where your HEX file is located.
You can download all the files at this link.
I hope someone will burn the desire to try and implement in the gland.
First of all, I wanted to try UART and USB, and then Ethernet. Every wish I made up my “project”. Many ideas remained in the form of a project for Proteus - the idea got bored immediately after the implementation of the program part.
I hope this post will help everyone who wanted to try to make their USB device or just to see that all this is not so difficult; Moreover, I wanted to be able to try immediately in the simulator. Tell as a beginner for a beginner - so that you want to open Google and start reading to do more, learn better.
I will not talk about registers, modes. I doubt this will help light the fire in my eyes. Perhaps, someone will want to do something useful for themselves and simple examples have more chances to drag this extremely fascinating work (and for me it's practically a drug). And before you run on ebay or start counting the days from the moment you send a debug card from China, you can try your hand at a virtual microcontroller.
I would like to try to make two kind of hello world projects, which, however, are not much more complicated than standard LED blinking. There are a lot of images under the cut.
The description and code examples in the text will be for the PIC18F4550 microcontroller, I beg you to forgive me, I did not work with atmel. And STM8 / 32 are missing even in version 8.
The code for the microcontrollers was written for the mikroC compiler from Mikroelektronika and was written for ease of understanding, I hope it came out at least partially for me.
Proteus and MCU strapping
Proteus, it seems to me, was created for the prototyping and testing of the software in the first place. Perhaps that is why he allows multiple simplifications in the creation of schemes. Below is an absolutely sufficient set for testing communication with a PC via UART / USB. I want to note again that such a scheme will work only in Proteus.
All projects are attached to the article, so by installing the program, you can immediately try everything.
')
U (S) ART
The topic is beaten, but still let me describe it again.
To connect putty or any other arbitrary program to our virtual microcontroller, we need to do a few things.
The COMPIM module uses a virtual port, in order to connect to it, you need to create another one and connect them as a null modem .
A good helper here is the free com0com utility .
There we create two virtual ports, in my case it is COM 3 and 4. We connect one to the Proteus COMPIM, the second is already used “outside”
Program window
This is how it will look in devmgmt.msc (Device Manager)
Now everything is ready for the test.
Create a program for the test
char uart_rd; void main() { UART1_Init(9600); UART1_Write_Text("Hello Habrahabr"); UART1_Write(10); UART1_Write(13); for(;;) { if(UART1_Data_Ready()) { uart_rd = UART1_Read( ); switch(uart_rd) { case 0xD: UART1_Write(10); UART1_Write(13); break; default: UART1_Write(uart_rd); break; } } } } Configure the COMPIM device (right click - Edit properties).
Let me remind you that my com0com emulates COM3 / COM4 ports
Just in case, I will attach a picture with the settings of the microcontroller
Turn on Putty, convert it to Serial mode and connect to COM4. Now ... click on the button - you will get the result
We print the text in the terminal window and the microcontroller echo us back. Pressing enter translates the caret + new line.
Backspace also works. I immediately remembered how I chatted with friends on the Hyper Terminal, spending hours on the telephone line ...
Now you can play with the microcontroller by changing the code.
For example, you can add a primitive command handler.
#define CRLF UART1_Write(10);UART1_Write(13) char uart_rd = 0; char cmd[32] = {0}; int char_counter = 0; void cmd_exec(void) { if (strstr(cmd, "hello")) { UART1_Write_Text("EHLO"); CRLF; } else if (strstr(cmd, "test")) { UART1_Write_Text("TSET"); CRLF; } else { UART1_Write_Text("Unknown command"); CRLF; } char_counter=0; memset(cmd, 0, sizeof cmd); } void main(void) { UART1_Init(9600); UART1_Write_Text("MCU started"); UART1_Write(10); UART1_Write(13); for(;;) { if(UART1_Data_Ready()) { uart_rd = UART1_Read( ); switch(uart_rd) { case 0xD: CRLF; cmd_exec(); break; default: UART1_Write(uart_rd); break; } cmd[char_counter++] = uart_rd; if(char_counter == (sizeof cmd - 1)) { CRLF; cmd_exec(); } } } } USB HID
Making my USB device was not easy for me then. We will test the HID device, that is, in most cases - the input device.
I really wanted to make an automatic password entry, as well as lock the computer when I moved away, and unlock when I approached. Well, a bunch of something else that could be implemented through a virtual keyboard.
A bunch of useful information on HID can be found here . Read - do not reread.
In short: each USB HID device has a special description, a descriptor. Which describes what kind of device it is, how it can be controlled, how much it consumes from the bus, or whether it has independent power and a lot of other information. Therefore, we need to make a correct description so that the OS can understand that this is a keyboard and can work with it.
But first, in order for Proteus to forward its virtual USB host to our real PC, you need to install a virtual driver, it comes with
In order for the device to work as a full-fledged FullSpeed USB 2.0, you need to enable the PLL and configure it accordingly.
In Proteus, it is also necessary to set the processor frequency as 96 MHz.
Under the spoiler, an explanation of how the master oscillator works (in the case of the PIC)
Descriptor
It was very useful for me to just run through his eyes and experiment. It immediately became clear where to dig in endless pdf from usb.org
In our case, there is a bit of a “standard” change descriptor:
We changed the VID / PID, indicated that we have an I / O buffer of 8 bytes each and, in fact, indicated that we have a keyboard device and it should be used this way.
All variable names speak for themselves.
The code itself is a lot of code
const unsigned int USB_VENDOR_ID = 0xdead; const unsigned int USB_PRODUCT_ID = 0xbeaf; const char USB_SELF_POWER = 0x80; // Self powered 0xC0, 0x80 bus powered const char USB_MAX_POWER = 50; // Bus power required in units of 2 mA const char HID_INPUT_REPORT_BYTES = 8; const char HID_OUTPUT_REPORT_BYTES = 8; const char USB_TRANSFER_TYPE = 0x03; //0x03 Interrupt const char EP_IN_INTERVAL = 1; const char EP_OUT_INTERVAL = 1; const char USB_INTERRUPT = 1; const char USB_HID_EP = 1; const char USB_HID_RPT_SIZE = 63; /* Device Descriptor */ const struct { char bLength; // bLength - Descriptor size in bytes (12h) char bDescriptorType; // bDescriptorType - The constant DEVICE (01h) unsigned int bcdUSB; // bcdUSB - USB specification release number (BCD) char bDeviceClass; // bDeviceClass - Class Code char bDeviceSubClass; // bDeviceSubClass - Subclass code char bDeviceProtocol; // bDeviceProtocol - Protocol code char bMaxPacketSize0; // bMaxPacketSize0 - Maximum packet size for endpoint 0 unsigned int idVendor; // idVendor - Vendor ID unsigned int idProduct; // idProduct - Product ID unsigned int bcdDevice; // bcdDevice - Device release number (BCD) char iManufacturer; // iManufacturer - Index of string descriptor for the manufacturer char iProduct; // iProduct - Index of string descriptor for the product. char iSerialNumber; // iSerialNumber - Index of string descriptor for the serial number. char bNumConfigurations; // bNumConfigurations - Number of possible configurations } device_dsc = { 0x12, // bLength 0x01, // bDescriptorType 0x0200, // bcdUSB 0x00, // bDeviceClass 0x00, // bDeviceSubClass 0x00, // bDeviceProtocol 8, // bMaxPacketSize0 USB_VENDOR_ID, // idVendor USB_PRODUCT_ID, // idProduct 0x0001, // bcdDevice 0x01, // iManufacturer 0x02, // iProduct 0x00, // iSerialNumber 0x01 // bNumConfigurations } ; /* Configuration 1 Descriptor */ const char configDescriptor1[]= { // Configuration Descriptor 0x09, // bLength - Descriptor size in bytes 0x02, // bDescriptorType - The constant CONFIGURATION (02h) 0x29,0x00, // wTotalLength - The number of bytes in the configuration descriptor and all of its subordinate descriptors 1, // bNumInterfaces - Number of interfaces in the configuration 1, // bConfigurationValue - Identifier for Set Configuration and Get Configuration requests 0, // iConfiguration - Index of string descriptor for the configuration USB_SELF_POWER, // bmAttributes - Self/bus power and remote wakeup settings USB_MAX_POWER, // bMaxPower - Bus power required in units of 2 mA // Interface Descriptor 0x09, // bLength - Descriptor size in bytes (09h) 0x04, // bDescriptorType - The constant Interface (04h) 0, // bInterfaceNumber - Number identifying this interface 0, // bAlternateSetting - A number that identifies a descriptor with alternate settings for this bInterfaceNumber. 2, // bNumEndpoint - Number of endpoints supported not counting endpoint zero 0x03, // bInterfaceClass - Class code 0, // bInterfaceSubclass - Subclass code 0, // bInterfaceProtocol - Protocol code 0, // iInterface - Interface string index // HID Class-Specific Descriptor 0x09, // bLength - Descriptor size in bytes. 0x21, // bDescriptorType - This descriptor's type: 21h to indicate the HID class. 0x01,0x01, // bcdHID - HID specification release number (BCD). 0x00, // bCountryCode - Numeric expression identifying the country for localized hardware (BCD) or 00h. 1, // bNumDescriptors - Number of subordinate report and physical descriptors. 0x22, // bDescriptorType - The type of a class-specific descriptor that follows USB_HID_RPT_SIZE,0x00, // wDescriptorLength - Total length of the descriptor identified above. // Endpoint Descriptor 0x07, // bLength - Descriptor size in bytes (07h) 0x05, // bDescriptorType - The constant Endpoint (05h) USB_HID_EP | 0x80, // bEndpointAddress - Endpoint number and direction USB_TRANSFER_TYPE, // bmAttributes - Transfer type and supplementary information 0x40,0x00, // wMaxPacketSize - Maximum packet size supported EP_IN_INTERVAL, // bInterval - Service interval or NAK rate // Endpoint Descriptor 0x07, // bLength - Descriptor size in bytes (07h) 0x05, // bDescriptorType - The constant Endpoint (05h) USB_HID_EP, // bEndpointAddress - Endpoint number and direction USB_TRANSFER_TYPE, // bmAttributes - Transfer type and supplementary information 0x40,0x00, // wMaxPacketSize - Maximum packet size supported EP_OUT_INTERVAL // bInterval - Service interval or NAK rate } ; const struct { char report[]; } hid_rpt_desc = { 0x05, 0x01, // USAGE_PAGE (Generic Desktop) 0x09, 0x06, // USAGE (Keyboard) 0xa1, 0x01, // COLLECTION (Application) 0x05, 0x07, // USAGE_PAGE (Keyboard) 0x19, 0xe0, // USAGE_MINIMUM 224(Keyboard LeftControl) 0x29, 0xe7, // USAGE_MAXIMUM 231(Keyboard Right GUI) (left and right: alt, shift, ctrl and win) 0x15, 0x00, // LOGICAL_MINIMUM (0) 0x25, 0x01, // LOGICAL_MAXIMUM (1) 0x75, 0x01, // REPORT_SIZE (1) 0x95, 0x08, // REPORT_COUNT (8) 0x81, 0x02, // INPUT (Data,Var,Abs) 0x95, 0x01, // REPORT_COUNT (1) 0x75, 0x08, // REPORT_SIZE (8) 0x81, 0x03, // INPUT (Cnst,Var,Abs) 0x95, 0x05, // REPORT_COUNT (5) 0x75, 0x01, // REPORT_SIZE (1) 0x05, 0x08, // USAGE_PAGE (LEDs) 0x19, 0x01, // USAGE_MINIMUM (Num Lock) 0x29, 0x05, // USAGE_MAXIMUM (Kana) 0x91, 0x02, // OUTPUT (Data,Var,Abs) 0x95, 0x01, // REPORT_COUNT (1) 0x75, 0x03, // REPORT_SIZE (3) 0x91, 0x03, // OUTPUT (Cnst,Var,Abs) 0x95, 0x06, // REPORT_COUNT (6) 0x75, 0x08, // REPORT_SIZE (8) 0x15, 0x00, // LOGICAL_MINIMUM (0) 0x25, 0x65, // LOGICAL_MAXIMUM (101) 0x05, 0x07, // USAGE_PAGE (Keyboard) 0x19, 0x00, // USAGE_MINIMUM (Reserved (no event indicated)) 0x29, 0x65, // USAGE_MAXIMUM (Keyboard Application) 0x81, 0x00, // INPUT (Data,Ary,Abs) 0xc0 // END_COLLECTION } ; //Language code string descriptor const struct { char bLength; char bDscType; unsigned int string[1]; } strd1 = { 4, 0x03, { 0x0409 } } ; //Manufacturer string descriptor const struct{ char bLength; char bDscType; unsigned int string[10]; } strd2={ 22, //sizeof this descriptor string 0x03, { 'H','a','b','r','a','h','a','b','r' } } ; //Product string descriptor const struct{ char bLength; char bDscType; unsigned int string[15]; } strd3={ 32, //sizeof this descriptor string 0x03, { 'H','a','b','r','a','K','e','y','b','o','a','r','d' } } ; //Array of configuration descriptors const char* USB_config_dsc_ptr[1]; //Array of string descriptors const char* USB_string_dsc_ptr[3]; void USB_Init_Desc(){ USB_config_dsc_ptr[0] = &configDescriptor1; USB_string_dsc_ptr[0] = (const char*)&strd1; USB_string_dsc_ptr[1] = (const char*)&strd2; USB_string_dsc_ptr[2] = (const char*)&strd3; } This handle is added to the project, and will be automatically used during assembly.
The simplest program to type text
unsigned short USBResponse[8] = { 0} absolute 0x500; unsigned short USBCommand[8] = {0} absolute 0x508; char *text="habrahabr"; int i = 0; void interrupt(void) { USB_Interrupt_Proc( ); } void clrUSB(void) { memset(USBCommand, 0, sizeof USBCommand); while ( !HID_Write(&USBCommand, sizeof USBCommand)); } void main(void) { ADCON1 |= 0x0F; CMCON |= 7; HID_Enable(&USBResponse, &USBCommand); delay_ms(1000); for (i=0; i < strlen(text); i++) { USBCommand[2] = text[i] - 93; while ( !HID_Write(&USBCommand, sizeof USBCommand)); clrUSB(); delay_ms(200); } } In fact, all the work consists in filling the corresponding buffer and sending it to the PC. No more difficult than with the UART. All work is done in the interrupt routine. Included with the IDE are already ready-made libraries to work with HID.
Here it should be clarified that scan keyboard codes are different from ASCII, but in order not to overload the code (we also have hello world), I avoided this inconvenience in a primitive way. It will work only for lowercase letters. Those interested can make the conversion themselves. I use a similar device for KVM At work, a wireless keyboard extension - our D-Link KVMs don't want to understand USB wireless dongles.
Now open the Notepad, launch Proteus (first click on the virtual plug - the USB connector is “inserted”), immediately transfer the focus to Notepad with the mouse and watch how our creation prints the word habrahabr .
And in the dispatcher our device appeared
Now you can add something of your own based on this.
A few words about how it works.
8 bytes are reserved for keyboard I / O:
0 Modifier
1 Not used
2 Key 1
3 Key 2
4 Key 3
5 Key 4
6 Key 5
7 Key 6
Modifiers are special Ctrl, Shift, Alt keys. They can be combined. For example, for the Ctrl Alt Del combination:
Modifier: 0b00000 101 Ctrl , Shift, Alt
Key code: 0x4c (Delete key)
It should be remembered that immediately after transferring the data, it is necessary to erase the USB buffer, otherwise the effect of a sticky key is obtained. That is, send eight zero bytes to the PC. In the example, the clearUSB subroutine does this.
Read more about scancodes described in microchip appnote.
In the same way, you can create a regular HID device and send / receive bytes from a PC, and according to the logic of operation it is almost no different from the same UART. But this already requires a separate job, for example, from libusb on the PC side.
Ethernet
Not reflected in the title, but this is also worth mentioning.
Unfortunately, this example will not be complete, as this is a topic for another conversation.
But, at least, I will describe how to set up the simulator itself, and some things will still work.
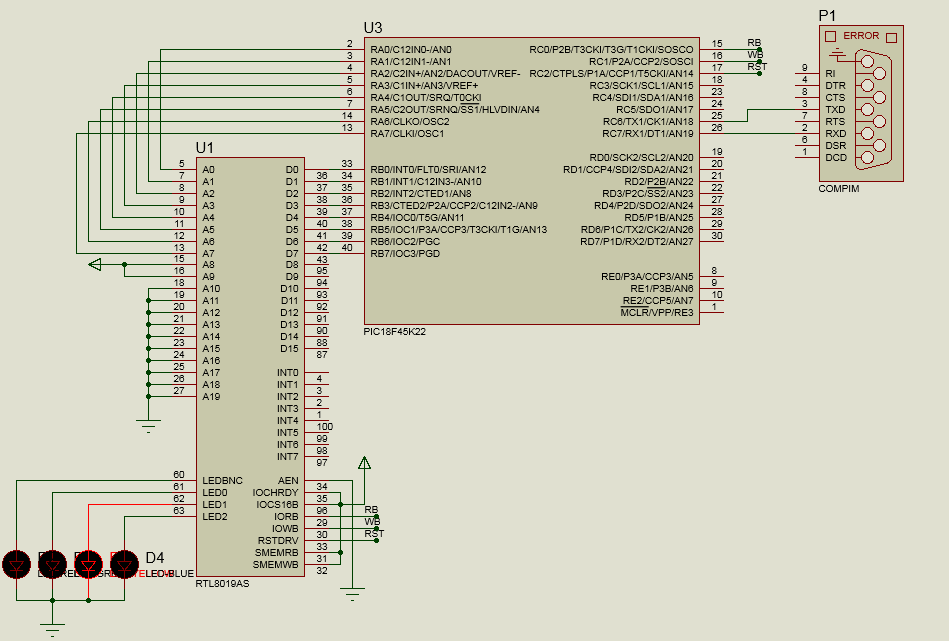
Here is just an example of what works in the gland, but does not always work in the simulator. In Proteus, VSM models are implemented for ENC28J60 and RTL8019 microcircuits. Yes, yes, the same chip that we all knew from budget network cards. The use of ENC is described quite widely and there should be no problems here. For example, the distinguished Lifelover aka Redsh described everything for a long time and most elaborately. Therefore, so as not to be boring, take 8019, the more I write software for it for use with the Z80.
As with USB, we need to install drivers, but now WinPCAP. They lie in the Virtual Network folder, next to the USB drivers. Or download the latest version from the site.
After that, we will have a new virtual network interface with the address 192.168.95.1, which, of course, can be changed.
We make a debugging interface on the UART using the scheme we already know.
HINT: If you are annoyed with TEXT inscriptions - put a space in the component Description
In the properties of the chip, write the number or IP of our virtual network card and you can change some settings.
In my case it is 192.168.50.1 (I changed)
Next thing for the software. A full-fledged driver for 8019 is not yet ready for me, and this is the topic of a separate large article, although this anachronism is hardly interesting to someone. But even without setting up the protocols (the IP address is 0.0.0.0 now), since I enabled ICMP / Broadcast in the registers, we can ping some left address in our subnet, and the
Along with the projects, ready-made HEX is attached, so you can not even download the compiler if you just need to check that everything works.
For the simulation to work, do not forget to tell the microcontroller where your HEX file is located.
You can download all the files at this link.
I hope someone will burn the desire to try and implement in the gland.
Source: https://habr.com/ru/post/206034/
All Articles