Test automation of Android applications using UIAutomator

Photo source
Testing is a very important process during application development. In the case of Android, testing of the application should be made on a large number of devices, due to the fact that many of them have significant differences in characteristics (screen resolution, Android version, etc.). Manually testing an application on a large number of devices can be time consuming, tedious, and error prone. A more efficient and reliable approach is to automate user interface testing. Using UIAutomator, you can develop a test script that will work on a variety of Android devices.
with the same accuracy and reproducibility.
Uiautomator
UIAutomator is developed by Google and ships with the Android SDK. UIAutomator is an analogue of Apple's UIAutomation tool for testing Android applications. The Android SDK provides the following tools to support automated functional user interface testing:
- UIAutomatorviewer - a graphical tool for recognizing user interface components in an Android application;
- UIAutomator - Java API libraries containing methods for creating user interface tests.
To use these tools, you need to install the following components of the Android environment:
- Android SDK Tools, version 21 or higher;
- Android SDK platform, with API 16 or higher.
UIAutomator is constantly being updated, so the latest documentation can be found on the website: http://developer.android.com/tools/help/uiautomator/index.html .
')
Advantages of UIAutomator, for testing applications:
- No dependence on the screen resolution;
- Actions are tied to the Android UI components. This allows you to work directly with user interface elements. For example, if you need to click the OK button, you can send a command to the script using the UIAutomator API means: click the button that says OK, and it presses it. Thus, it is not necessary to attach to coordinates;
- You can play complex sequences of user actions, and always this sequence will be the same;
- Tests can be run as many times as needed on different devices without having to change the Java code;
- You can use the external buttons on the device (the button "back", "turn off", "volume", etc.).
But there are also disadvantages:
- It is difficult to use for applications written in HTML 5 and OpenGL, since these applications do not have Android UI elements. In this regard, it is necessary either to be attached to the coordinates, or to look for alternative testing options;
- It is necessary to check and, if necessary, update Java scripts when updating Android applications.
Testing the application using UIAutomator consists of the following steps:
- Preparation for the test: installing the application on the device, analyzing its UI components;
- Creating an automated test for the application;
- Compiling a test into a JAR file and copying it to the device;
- Run the test and analyze the results;
- Correction of various errors found in the testing process.
Script development
To familiarize yourself with the technologies of UIAutomator, a simple program will be presented that performs simple actions with the device. A standard Android application, Messaging, will be used as the test application, and UIAutomator will send an SMS message to a specific number.
We define the actions that will be implemented in the test:
- Search and launch the application;
- Create and send a message.
As you can see, everything is quite simple.
Preparation for the test
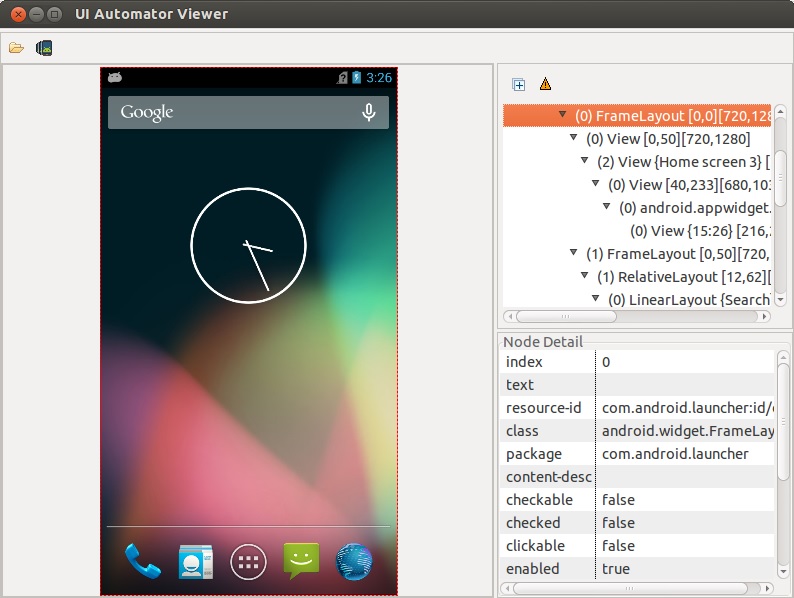
UIAutomatorviewer will be used to analyze the user interface of the application. UIAutomatorviewer takes a screen shot of a device that is connected to a computer, and also provides a convenient graphical interface for displaying the hierarchy of layers and viewing the properties of each component of the interface separately. Having this information greatly simplifies the process of creating a UIAutomator script.
To analyze the user interface, you must:
- Connect Android device to computer;
- Launch UIAutomatorviewer located in: <android-sdk> / tools /
$ uiautomatorviewer - Click on the Device Screenshot button in UIAutomatorviewer to capture the image from the device;
- When you select a specific interface element, its properties are displayed on the right. By these properties, the element can easily be found in the test script.
If UIAutomatorviewer cannot decompose an image into components, then the application is written using HTML 5 or OpenGL.
Setting up the development environment
If you are using Eclipse:
- Create a new Java project in Eclipse. In this project we will implement the UIAutomator script. Let's name the project: SendMessage
- Call the context menu by right-clicking on the project in the Project Explorer, and select the Properties item. In Properties, we find the Java Build Path and add the necessary libraries:
- To add support for JUnit, you must select Add Library> JUnit;
- By clicking Add External JARs ... you need to go to the directory with the latest SDK version in <android-sdk> / platforms / and select 2 files in it: uiautomator.jar and android.jar
When using a different development environment, make sure that the UIAutomator.jar and android.jar files are added to the project settings.
UIAutomator API
To tell about all the possibilities that UIAutomator has for creating test scripts, it will take quite a lot of time. Full details can be found at: http://developer.android.com/tools/help/UIAutomator/index.html
Script creation
First you need to create a new file with a Java class in the “SendMessage” project, for example, under the name SendMessage. This class must be inherited from the UIAutomatorTestCase class. To add a library to Eclipse, just use the keyboard shortcut Ctrl + Shift + o. Other libraries are added in the same way, so I will not focus on this anymore.
Create three functions to test the main functionality of the application:
- Search and launch application
- Sending SMS
- Exit to the main menu of the application
The first function that runs all these methods, a kind of main function, will look like this:
public void test() { // Here will be called for all other functions } Function to search and launch applications
The function will perform the following actions: click on the Home button, to go to the main window, open the menu and find the icon with the desired application, start this application.
Search and launch application
private void findAndRunApp() throws UiObjectNotFoundException { // Go to main screen getUiDevice().pressHome(); // Find menu button UiObject allAppsButton = new UiObject(new UiSelector() .description("Apps")); // Click on menu button and wait new window allAppsButton.clickAndWaitForNewWindow(); // Find App tab UiObject appsTab = new UiObject(new UiSelector() .text("Apps")); // Click on app tab appsTab.click(); // Find scroll object (menu scroll) UiScrollable appViews = new UiScrollable(new UiSelector() .scrollable(true)); // Set the swiping mode to horizontal (the default is vertical) appViews.setAsHorizontalList(); // Find Messaging application UiObject settingsApp = appViews.getChildByText(new UiSelector() .className("android.widget.TextView"), "Messaging"); // Open Messaging application settingsApp.clickAndWaitForNewWindow(); // Validate that the package name is the expected one UiObject settingsValidation = new UiObject(new UiSelector() .packageName("com.android.mms")); assertTrue("Unable to detect Messaging", settingsValidation.exists()); } All names of classes, text on buttons, etc. were obtained using uiautomatorviewer.
Sending SMS
In this function, we implement the search and click on the button to create a new message, enter the phone number, the text of the message and send it later. The number and text will be passed through the function arguments:
SMS function
private void sendMessage(String toNumber, String text) throws UiObjectNotFoundException { // Find and click New message button UiObject newMessageButton = new UiObject(new UiSelector() .className("android.widget.TextView").description("New message")); newMessageButton.clickAndWaitForNewWindow(); // Find to box and enter the number into it UiObject toBox = new UiObject(new UiSelector() .className("android.widget.MultiAutoCompleteTextView").instance(0)); toBox.setText(toNumber); // Find text box and enter the message into it UiObject textBox = new UiObject(new UiSelector() .className("android.widget.EditText").instance(0)); textBox.setText(text); // Find send button and send message UiObject sendButton = new UiObject(new UiSelector() .className("android.widget.ImageButton").description("Send")); sendButton.click(); } The field for the number and the field for the message we could not find on any particular grounds, since there is no text or description for these forms. Therefore, we find them using the instance method. This method can be used to obtain an element by its ordinal number in the interface hierarchy.
We realize the possibility of receiving the recipient's phone number as parameters, as well as the text of the message. In the test () function, you need to add initialization of the default parameters, which should be overwritten by user values if they were passed as arguments to the corresponding function:
Reception parameters in the test
// Default parameters String toNumber = "123456"; String text = "Test message"; String toParam = getParams().getString("to"); String textParam = getParams().getString("text"); if (toParam != null) { // Remove spaces toNumber = toParam.trim(); } if (textParam != null) { text = textParam.trim(); } Thus, you can pass parameters through the command line to the script. This can be done with the –e key. After it 2 values are transferred: the name of the parameter and the value. For example, to transfer the number “777777”, as the recipient's number, we will pass the parameters: -e to 777777. To get these parameters, the script uses the method: getParams ().
But there are several pitfalls. For example, it is impossible to transfer text with some characters, UIAutomator does not perceive them (space, &, <,>, (,), “, ', etc., as well as Unicode characters). To do this, I propose to do the replacement of these characters when submitting them to the script with some string, for example, replace the space with the string: blogspaceblog. This is convenient when using the script that will process input parameters to run the UIAutomator script. Let's add parsing and replacing these lines to the input parameters check:
Line replacement code
if (toParam != null) { toNumber = toParam.trim(); } if (textParam != null) { textParam = textParam.replace("blogspaceblog", " "); textParam = textParam.replace("blogamperblog", "&"); textParam = textParam.replace("bloglessblog", "<"); textParam = textParam.replace("blogmoreblog", ">"); textParam = textParam.replace("blogopenbktblog", "("); textParam = textParam.replace("blogclosebktblog", ")"); textParam = textParam.replace("blogonequoteblog", "'"); textParam = textParam.replace("blogtwicequoteblog", "\""); text = textParam.trim(); } Exit to the main menu of the application
This function is the simplest of all those that we implemented before. She presses the back button until she finds a button to create a new message.
private void exitToMainWindow() { // Find New message button UiObject newMessageButton = new UiObject(new UiSelector() .className("android.widget.TextView").description("New message")); // Press back button while new message button doesn't exist while(!newMessageButton.exists()) { getUiDevice().pressBack(); } } Collecting logs from the test
In order to log the test results, you can use the standard Android buffer. To work with it you need to connect the library in the script:
import android.util.Log; All information that is interesting can be recorded in the logs. This can be done using the function:
Log.i(String title, String title); Logs can be read from the device using the command:
$ adb logcat More information on logcat can be found on the official website: developer.android.com/tools/help/logcat.html
The resulting code
Thus, we got this code:
View code
package blog.send.message; import android.util.Log; import com.android.UIAutomator.core.UiObject; import com.android.UIAutomator.core.UiObjectNotFoundException; import com.android.UIAutomator.core.UiScrollable; import com.android.UIAutomator.core.UiSelector; import com.android.UIAutomator.testrunner.UiAutomatorTestCase; public class SendMessage extends UiAutomatorTestCase { public void test() throws UiObjectNotFoundException { // Default parameters String toNumber = "123456"; String text = "Test message"; String toParam = getParams().getString("to"); String textParam = getParams().getString("text"); if (toParam != null) { toNumber = toParam.trim(); } if (textParam != null) { textParam = textParam.replace("blogspaceblog", " "); textParam = textParam.replace("blogamperblog", "&"); textParam = textParam.replace("bloglessblog", "<"); textParam = textParam.replace("blogmoreblog", ">"); textParam = textParam.replace("blogopenbktblog", "("); textParam = textParam.replace("blogclosebktblog", ")"); textParam = textParam.replace("blogonequoteblog", "'"); textParam = textParam.replace("blogtwicequoteblog", "\""); text = textParam.trim(); } Log.i("SendMessageTest", "Start SendMessage"); findAndRunApp(); sendMessage(toNumber, text); exitToMainWindow(); Log.i("SendMessageTest", "End SendMessage"); } // Here will be called for all other functions private void findAndRunApp() throws UiObjectNotFoundException { // Go to main screen getUiDevice().pressHome(); // Find menu button UiObject allAppsButton = new UiObject(new UiSelector() .description("Apps")); // Click on menu button and wait new window allAppsButton.clickAndWaitForNewWindow(); // Find App tab UiObject appsTab = new UiObject(new UiSelector() .text("Apps")); // Click on app tab appsTab.click(); // Find scroll object (menu scroll) UiScrollable appViews = new UiScrollable(new UiSelector() .scrollable(true)); // Set the swiping mode to horizontal (the default is vertical) appViews.setAsHorizontalList(); // Find Messaging application UiObject settingsApp = appViews.getChildByText(new UiSelector() .className("android.widget.TextView"), "Messaging"); // Open Messaging application settingsApp.clickAndWaitForNewWindow(); // Validate that the package name is the expected one UiObject settingsValidation = new UiObject(new UiSelector() .packageName("com.android.mms")); assertTrue("Unable to detect Messaging", settingsValidation.exists()); } private void sendMessage(String toNumber, String text) throws UiObjectNotFoundException { // Find and click New message button UiObject newMessageButton = new UiObject(new UiSelector() .className("android.widget.TextView").description("New message")); newMessageButton.clickAndWaitForNewWindow(); // Find to box and enter the number into it UiObject toBox = new UiObject(new UiSelector() .className("android.widget.MultiAutoCompleteTextView").instance(0)); toBox.setText(toNumber); // Find text box and enter the message into it UiObject textBox = new UiObject(new UiSelector() .className("android.widget.EditText").instance(0)); textBox.setText(text); // Find send button and send message UiObject sendButton = new UiObject(new UiSelector() .className("android.widget.ImageButton").description("Send")); sendButton.click(); } private void exitToMainWindow() { // Find New message button UiObject newMessageButton = new UiObject(new UiSelector() .className("android.widget.TextView").description("New message")); // Press back button while new message button doesn't exist while(!newMessageButton.exists()) { getUiDevice().pressBack(); sleep(500); } } } Compiling and running the UIAutomator test
- To generate test build configuration files, run the following command in a terminal:
Where$ <android-sdk>/tools/android create uitest-project -n <name> -t <target-id> -p <path>- , UIAutomator ( : SendMessage), <target-id> - Android API Level ( : <android-sdk>/tools/android list targets) - .
ANDROID_HOME:- , UIAutomator ( : SendMessage), <target-id> - Android API Level ( : <android-sdk>/tools/android list targets) - .
ANDROID_HOME:- Windows:
set ANDROID_HOME=<path_to_your_sdk> - Unix:
export ANDROID_HOME=<path_to_your_sdk>
Go to the directory with the project, in which the build.xml file generated in step 1 is located and execute the command:$ ant build
Copy the collected JAR file to the device using the adb push command:$ adb push <path_to_output_jar> /data/local/tmp/$ adb push <project_dir>/bin/SendMessage.jar /data/local/tmp/
Run the script:$ adb shell uiautomator runtest /data/local/tmp/SendMessage.jar –c blog.send.message.SendMessage -e to 777777Conclusion
Using UIAutomator is very convenient for high-quality application testing on a large number of devices. With this technology, you can create various Demo to showcase the application. - Windows:
Source: https://habr.com/ru/post/205864/
All Articles