Installing ADB driver for phones of lesser-known manufacturers
Hello!
There was a need to get root on the smartphone DNS S5301, read online, w3bsit3-dns.com, etc. Most of the links are outdated or not credible, I tried to solve it myself. There was a problem installing the ADB drivers.
As kAIST suggested, you can only download the driver http://developer.android.com/sdk/win-usb.html , unpack them and not go for more
Go to the folder:
We copy drains, for example
On the phone , we turn on the USB debugging mode (Main menu -> Settings -> Developer options), connect the phone to the computer, the system finds new devices, refuse to install drivers.
Now we open the device manager (Computer Management or Win + Break \ Hardware \ or any other available method), we find our device there (I have S5301)

Go to the properties tab "Details", select the line type USB \ VID_0BB4 & PID_0C03 & MI_01 \ 6 & 1E68B3CF & 0 & 0001 , click on it, copy (Ctrl + Ins)

We switch to our text editor, replace the lines there, which we previously copied to the data of our device by shortening the lines from USB \ VID_0BB4 & PID_0C03 & MI_01 \ 6 & 1E68B3 & PF_0 & PID_0 and PID_0 and PID_0C03 and USB \ VID_0BB4 & PID4 & PID4
The result is something like this:

Lines starting with ; - a comment, and not important.
We save our file, select our device in the device manager, go to the properties, the “Driver” tab, click the “Update ...” button, do not agree to search for drivers in Windows Update, select “Install from a specified location”, tick the “Enable” next search place ",
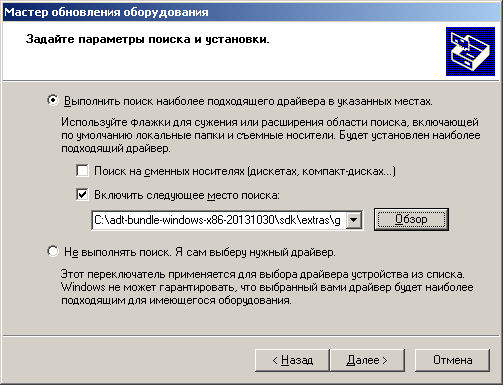
Click "Next", the system installs the driver.
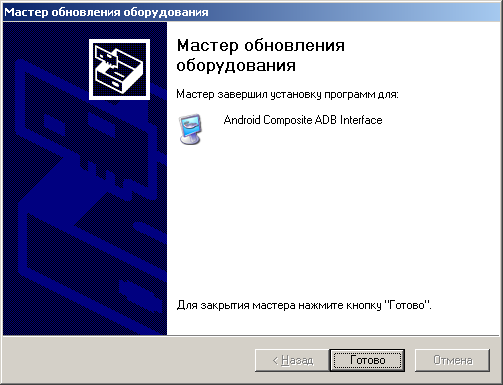
Everything.
')
Due to the fact that a UFO has flown in and made something, deviations in any direction from the described path are possible, therefore at your own risk and peril.
Thanks for attention.
UPDATED
Experiments on getting root continue, on a home laptop Windows 7 64bit, you need to add lines to the [Google.NTamd64] section and not [Google.NTx86] :
There was a need to get root on the smartphone DNS S5301, read online, w3bsit3-dns.com, etc. Most of the links are outdated or not credible, I tried to solve it myself. There was a problem installing the ADB drivers.
As kAIST suggested, you can only download the driver http://developer.android.com/sdk/win-usb.html , unpack them and not go for more
long way
Before installing the Android SDK, you need to download and install Java - at the time of writing - http://www.java.com/ru/download/manual.jsp jre-7u45-windows-i586.exe.
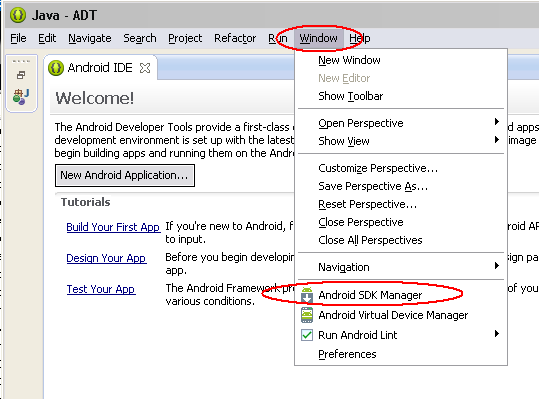
Download the Android SDK ( https://developer.android.com/sdk/index.html ) for your operating system (I have Windows XP SP3 RU x86) - adt-bundle-windows-x86-20131030.zip at the time of writing. Unpack, run. \ Eclipse \ eclipse.exe, select Window -> Android SDK Manager,
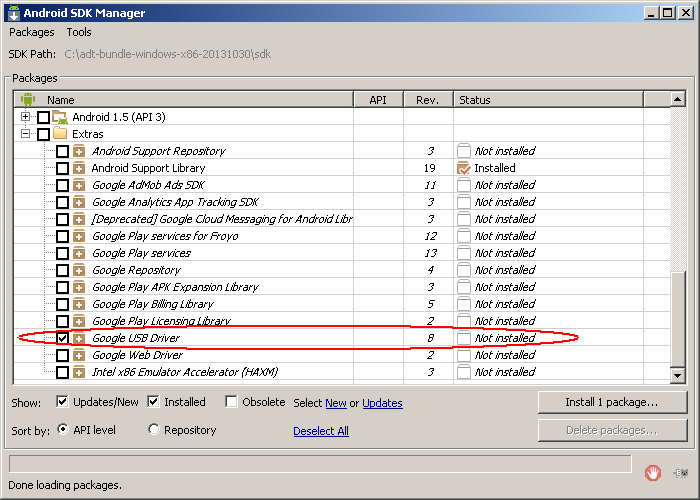
waiting for the data update, scrolling down the list, finding the Google USB Driver, clicking “Install Packages”, agreeing to the license, downloading.
Download the Android SDK ( https://developer.android.com/sdk/index.html ) for your operating system (I have Windows XP SP3 RU x86) - adt-bundle-windows-x86-20131030.zip at the time of writing. Unpack, run. \ Eclipse \ eclipse.exe, select Window -> Android SDK Manager,
waiting for the data update, scrolling down the list, finding the Google USB Driver, clicking “Install Packages”, agreeing to the license, downloading.
Go to the folder:
- If only driver downloaded - usb_driver
- If the Android SDK, then sdk \ extras \ google \ usb_driver \
[Google.NTx86] ;Google Nexus One %SingleAdbInterface% = USB_Install, USB\VID_18D1&PID_0D02 %CompositeAdbInterface% = USB_Install, USB\VID_18D1&PID_0D02&MI_01 %SingleAdbInterface% = USB_Install, USB\VID_18D1&PID_4E11 %CompositeAdbInterface% = USB_Install, USB\VID_18D1&PID_4E12&MI_01 We copy drains, for example
[Google.NTx86] ;Google Nexus One %SingleAdbInterface% = USB_Install, USB\VID_18D1&PID_0D02 %CompositeAdbInterface% = USB_Install, USB\VID_18D1&PID_0D02&MI_01 ;Google Nexus One %SingleAdbInterface% = USB_Install, USB\VID_18D1&PID_0D02 %CompositeAdbInterface% = USB_Install, USB\VID_18D1&PID_0D02&MI_01 %SingleAdbInterface% = USB_Install, USB\VID_18D1&PID_4E11 %CompositeAdbInterface% = USB_Install, USB\VID_18D1&PID_4E12&MI_01 On the phone , we turn on the USB debugging mode (Main menu -> Settings -> Developer options), connect the phone to the computer, the system finds new devices, refuse to install drivers.
Now we open the device manager (Computer Management or Win + Break \ Hardware \ or any other available method), we find our device there (I have S5301)
Go to the properties tab "Details", select the line type USB \ VID_0BB4 & PID_0C03 & MI_01 \ 6 & 1E68B3CF & 0 & 0001 , click on it, copy (Ctrl + Ins)
We switch to our text editor, replace the lines there, which we previously copied to the data of our device by shortening the lines from USB \ VID_0BB4 & PID_0C03 & MI_01 \ 6 & 1E68B3 & PF_0 & PID_0 and PID_0 and PID_0C03 and USB \ VID_0BB4 & PID4 & PID4
[Google.NTx86] ;Google Nexus One %SingleAdbInterface% = USB_Install, USB\VID_0BB4&PID_0C03 %CompositeAdbInterface% = USB_Install, USB\VID_0BB4&PID_0C03&MI_01 ;Google Nexus One %SingleAdbInterface% = USB_Install, USB\VID_18D1&PID_0D02 %CompositeAdbInterface% = USB_Install, USB\VID_18D1&PID_0D02&MI_01 %SingleAdbInterface% = USB_Install, USB\VID_18D1&PID_4E11 %CompositeAdbInterface% = USB_Install, USB\VID_18D1&PID_4E12&MI_01 The result is something like this:
Lines starting with ; - a comment, and not important.
We save our file, select our device in the device manager, go to the properties, the “Driver” tab, click the “Update ...” button, do not agree to search for drivers in Windows Update, select “Install from a specified location”, tick the “Enable” next search place ",
Click "Next", the system installs the driver.
Everything.
')
Due to the fact that a UFO has flown in and made something, deviations in any direction from the described path are possible, therefore at your own risk and peril.
Thanks for attention.
UPDATED
Experiments on getting root continue, on a home laptop Windows 7 64bit, you need to add lines to the [Google.NTamd64] section and not [Google.NTx86] :
[Google.NTamd64] %SingleAdbInterface% = USB_Install, USB\VID_0BB4&PID_0C03 %CompositeAdbInterface% = USB_Install, USB\VID_0BB4&PID_0C03&MI_01 Source: https://habr.com/ru/post/205572/
All Articles