Dynamic access control: working with centralized rules and access policies
 Such technology as dynamic access control has been considered in my articles for quite a long time, but, honestly, I haven’t even gotten to half of all topics that I would like to consider. But, nevertheless, this article will allow you to much better master this technology and learn about the next brick that is attached to the entire foundation of dynamic access control. Figuratively speaking, this block of dynamic access control can be attributed to nothing but the centralized access itself. Central access, in its essence, allows you to implement a centralized mechanism of appropriate authorization policies, thanks to which you can automate the “smart” distribution of rights in your company. After all, if you properly generate your assertions, plan and create all the resource property objects that have been sharpened for your business, configure the required property property lists and implement a beautiful and correct classification, but make unintended banal errors when working with centralized rules or access policies, all your work can fly to hell.
It is for this reason that it is extremely important to pay due attention to creating your own unique centralized rules and access policies and to spend as much time on it as it will be necessary in order to fully anticipate all possible situations that may occur after you implement the dynamic control technology. access to your production environment. It is very important for you to carry out all the tests initially in the laboratory and, if possible, with the pilot group, otherwise the outcome may be the most unpredictable. In principle, we will return to planning of dynamic access control in one of the last articles of this cycle, therefore, it is simply meaningless to dwell at this stage in more detail on this topic.
Today will be considered such moments as the appointment of the centralized access rules themselves and centralized access policies. You will learn how to create, edit and delete such rules and policies. Moreover, in this article you will learn about the very distribution and application of centralized access policies. It turns out, as in the case of the fourth article of this cycle, there will be quite a lot of material in this article, for this reason we will move on to the first section.
Centralized Access Rules
Before we start creating centralized access rules, we should determine what this is and what these objects are for. By definition, the Centralized Access Rule is an expression of authorization rules that can include one or more conditions affecting user groups, user and device requirements, and resource properties. It turns out that the generated centralized access rule determines who will be granted access to a specific area of resources. Like all objects of the dynamic access control technology, such rules must include unique names and, of course, optional, clear descriptions. Moreover, as I have already indicated before, these rules also include certain expressions, which are conditional expressions of the SDDL (Security Descriptor Definition Language) language.
You can also note that several centralized access rules can be combined into a centralized access policy. In general, if one or more centralized access rules are defined for a domain, file resource administrators can easily match certain rules with specific resources and business requirements.
In principle, according to the theoretical part regarding the centralized access rules, there is already nothing to say, so we move on to the more interesting part: the practical one. Next, I will talk about creating, editing, and removing centralized access rules. We will naturally begin with
Create a centralized access rule
First of all, you should be aware that by default no centralized rule is created on the servers. Therefore, in order to further use centralized access rules, and even more so centralized access policies, you will need to create those yourself. The creation of unique centralized access rules in itself is not a difficult task. This process can remind you of creating all the objects that we talked about during all the previous articles in this series, since you can accomplish this task using the Active Directory Administrative Center and tools from Windows PowerShell. We will begin, naturally, from the console of the Central Administration of Active Directory. This whole process is as follows:
- On the domain controller, you need to open the Active Directory Administration Center console, where in the area of transition nodes you need to select the Dynamic Access Control node and then select Central Access Rules ( Dynamic Access Control> Central Access Rules ). You can also go to this node by selecting the option number 3 - “Create a centralized access rule” on the dynamic access control tile on the initial screen of this console;
- In the second step of this procedure, you need either from the context menu of the details pane, or from the Tasks area to successively select the Create options and also the New> Central Access Rule , as seen in the following illustration. :
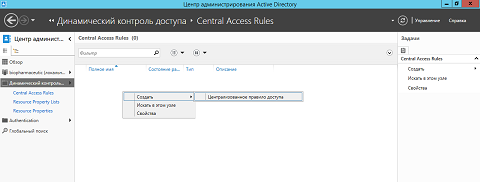
Fig. 1. Creating a new centralized access rule - As you can see in the illustration under number 2, in the dialog box that appears, you should define the values of the required controls in three different groups, and to create a new rule, you even have to fill out only the first control of the upper group. But first things first:
- Group "General" ( General ). This group has almost a standard set of parameters for most of the objects created by dynamic access control technology. In this group you are allowed to define the following three main parameters, namely:
- Name Everything is clear here: to identify each such rule, you must specify its name. Names must be unique, in alphanumeric format, and filling in this parameter is considered a prerequisite for creating an access rule. By the way, even while planning your centralized access rules, be sure to note that the maximum number of characters allowed for the name of your rule is 64 characters. That is, you need not to exceed this limit. For example, in this example, let the rule be called “ Allowing the reading of the resources of the branches to marketing specialists central. office ";
- Description (Description) . An optional text field, but a description can help you if you have generated dozens, if not more, of centralized access rules. As with the name, the number of characters in this field is also limited. You must fit the description of your rule to a maximum of 1024 characters, otherwise you simply cannot create such a rule. In the description we will write “ Allows the marketing specialists of the main office to get access to reading to the target resource of the company's branches ”;
- Protection from accidental deletion (Protect from accidental deletion) . The standard check box for Active Directory central administration objects that prohibits everyone except the rule creator from deleting the current rule, even considering that only administrators in the security groups of domain administrators and enterprise administrators can create, modify or delete such rules.
- Group "Target Resources" ( Target Resources ). The second group of this dialog box is used to define the so-called scope of the centralized access rule. Such an action area is created by defining resource property objects created earlier as so-called conditional expressions. Thus, for the rules you create, you can define almost any possible scope. Although it is common practice to apply centralized access rules exclusively to small groups of the same disk space, you can leave the default value, so the rule will apply to all possible target resources. You can group such conditional expressions with standard AND or OR operators. Moreover, to create more complex scenarios, you can simultaneously group together several conditional expressions, combining the scope of such results. In other words, if you want to change the default scope of your rule, click on the Edit button.
- The Permissions group . Thanks to this final group of parameters, you can predetermine the permissions for the rule you create with two different functionalities, namely:
- “Use the following permissions as proposed” (Use following permissions as proposed permissions) . According to the official definition, this parameter allows you to audit the results of requests for access to target objects, without affecting the operation of the system. In other words, by selecting this option, you will be able to add permission entries from the corresponding list to the list of proposed permission entries for the centralized access rule you create. A list of proposed permissions can be combined with an audit file system to model the effective access that users will receive to a resource, without changing permissions per se in the list of current permissions. The proposed permissions generate a special audit event that can be detected in the event log, where you can already take a closer look at all access attempts performed by your users;
- "Use the following permissions as current" (Use the following permissions as current permission s ) . By selecting this option, you will be able to provide access to target resources after the publication of a centralized access policy, where such a rule will appear. In other words, the current list of permissions represents additional permissions that the Windows operating system will read when deploying a centralized access rule on a file server. As I said before, centralized access rules do not replace existing security settings, and when deciding on authorization, Windows will necessarily evaluate the permissions records of the centralized access rule, the current list of NTFS permissions, and the share permissions lists.
In this case, you should stop at the second option and after clicking on the “Edit” button in the already familiar many advanced security settings dialog box add the required group, for example, “ Los Angeles Marketers ”, which will be assigned the “Read and Execute” rights , as well as the usual "Reading" .
Fig. 2. Dialog box for creating a new centralized access rule
- Group "General" ( General ). This group has almost a standard set of parameters for most of the objects created by dynamic access control technology. In this group you are allowed to define the following three main parameters, namely:
- After all the settings are defined, you can safely save your access rule.
As you can see, there is nothing complicated. Now, perhaps, we will consider such a moment as the creation of centralized access rules by a somewhat different method, or more precisely, with the help of such a powerful administrative tool as Windows PowerShell. If you fully summarize the PowerShell cmdlets responsible for managing such policies, then, as is the case with managing property resource lists that were discussed in the previous article of this series, you can select three different cmdlets, namely: New-ADCentralAccessRule , due to which You can create new centralized access policies, Set-ADCentralAccessRule , which allows you to edit existing rules, as well as Remove-ADCentralAccessRule , which, respectively, is responsible for removing the latter. Since editing and deleting existing access rules using PowerShell is quite simple, these operations will be simply omitted in the current article. And now let's create a new centralized access policy.
For example, you now need to create a policy that will be called “ Marketing Access in Los Angeles to Marketing Resources ” with the description “ Policy allowing marketing specialists to access all resources classified for the Marketing Division ”, which allows the relevant group to access all resources with the correct by classification. In this case, the PowerShell team will look like this:
')
New-ADCentralAccessRule -CurrentAcl:"O:SYG:SYD:AR(A;;FA;;;S-1-5-21-3046794806-2660339953-3139999740-1107)" -description:", , Marketing" -Name:" - " -ProposedAcl:$null -ProtectedFromAccidentalDeletion:$true -ResourceCondition:"(@RESOURCE.Department_MS == `"Marketing`")" -Server:"DC.biopharmaceutic.local"
Where:
- The Name parameter is responsible for the name of the object being created. The purpose and limitations of this parameter are identical to the capabilities of the central administration console;
- The Description parameter is used to specify the description of the rule you are creating;
- The CurrentACL parameter allows you to define the current list of permissions for the access rule you are creating. The most difficult thing in the meaning of this parameter is that you need to specify all your permissions in a short form written in SDDL. With this parameter, the most important thing is a thorough study of the ACE Strings and SID Strings documents. In general, always double-check the correctness of the indication of this parameter, since errors associated with this parameter may be decisive;
- The ProposedAcl parameter defines the proposed permissions, which are specified in the same format as the previous parameter, and which we will discuss in more detail in the next subsection of this article;
- The ProtectedFromAccidentalDeletion parameter is a standard parameter of the general group of the dialog box for creating centralized access rules responsible for protecting against accidental deletion;
- The ResourceCondition parameter is a parameter whose value should be the condition of this rule. In this example ( @ RESOURCE.Department_MS == `" Marketing` " ), everything is exactly the same as pronounced out loud, that is, the unit’s (@RESOURCE) resource (Department_MS) equals (==) the Marketing value (` "Marketing` "). It takes a lot of practice to learn how to make such conditions correctly, and, if you wish, you can periodically after creating rules manually study the Windows PowerShell log;
- The Server parameter is simply the name of the server on which such a rule should be created. Since in this particular case the server name is DC domain diopharmaceutic.local, we get the corresponding value of this parameter.
The output of this command is very simple: if you did not see the error, everything is fine and you have created a centralized access rule. An example of the output of this command can be seen below:
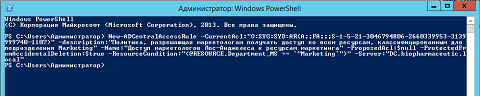
Fig. 3. Creating a Centralized Access Rule Using Windows PowerShell
Modify an existing centralized access rule
There are always situations when, after creating a new object, it becomes necessary to change it. Perhaps, during the creation a mistake was made, maybe you just forgot to add the required resolution, maybe the specified condition was not sufficiently exhaustive ... There may be many options. But the most important thing is that in case of lack of the required information, the created object must be modified. Of course, centralized access rules normally apply to such a situation, and to change an existing object, no supernatural actions are required of you. Roughly speaking, you go to the same node where the rule itself was created ( Dynamic Access Control> Central Access Rules ), find such a rule in the list of the details pane, and then either from the context menu of such an object or from the taskbar select the option “ Properties ( Properties ).
In the displayed dialog box for changing the rules you created, you are provided with practically the same possibilities as when creating such a rule, with the exception of three points:
- First, you cannot change the name of your rule. You do not have such an opportunity and all;
- Secondly, in addition to editing the current permissions, you are also given the opportunity to customize the proposed permissions , which I mentioned in passing when creating a centralized access rule using Windows PowerShell. What are these proposed permissions? First of all, it is necessary to understand the difference between current and proposed permissions. The current list of permissions is the records that define access to resources for your centralized access rule. These permissions will take effect after you deploy your centralized access rule using a centralized access policy, which you will learn further from this article. In turn, the proposed permissions can only be detected if you want to view the properties or modify your existing access rule. In the list of proposed permissions, you can view all possible changes in permissions between current security principals with a list of proposed permissions. But despite this, you should pay attention to the fact that such a list of proposed permissions will not affect the current user permissions. Also, be sure to pay attention to the fact that if you want to be able to view and analyze such intermediate permissions, you need to activate the “ Enable permission staging configuration ” checkbox. Moreover, when working with the proposed permissions, be sure to pay attention to the following features:
- The "Edit" option . As is obvious, this button brings up an advanced security settings dialog box, allowing you to change or add permissions to the group of proposed permissions;
- “Apply Proposed” option ( Apply Proposed ). This option allows you to replace the current permissions with the permissions that you defined in the group of proposed permissions;
- The option "Copy from Current" ( Copy from Current ). In turn, this parameter allows you to perform the reverse action, that is, this action simply replaces the permissions in the list of proposed permissions with the permissions from the current list of permissions.
- Third, after you once change the permissions that were initially set, each time you open the properties dialog box of the centralized access rule that you changed, you will have the opportunity of another group — the “Previous Permissions” group. What happens after you change your rule? After changing the permissions of the centralized access rule, the operating system copies the original current permissions to the list of the Previous Permissions group, and then saves the list of current permissions, as well as the list of previous permissions, updated from the proposed permissions. The main thing to remember is that this list includes only one copy of previous permission entries. In other words, the Active Directory Administration Center functionality does not support the complete history of all your changes in permissions of the current list of permissions.
You can look at the properties dialog box of a modified centralized access rule in the following illustration:
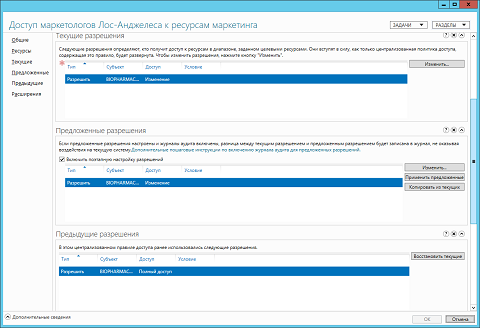
Fig. 4. Properties dialog box of a modified centralized access rule
Remove existing centralized access rule
Operations to remove existing centralized access rules are most likely the simplest operations that can be performed. To do this, you should select the unnecessary more access rule in the Dynamic Access Control> Central Access Rules node of the Active Directory Administrative Center, and then select the “Remove” command from the context menu or from the taskbar. In the delete confirmation dialog box that appears, you will need to click on the “Yes” button, which means that you have definitely made your choice. And everything, the rule will be instantly deleted.
In the event that a dialog box appears in front of you indicating a lack of rights, open the properties dialog box of the rule you are deleting, and then uncheck the box next to Protect from accidental deletion . After this, repeat the steps to delete the rule.
Managing Centralized Access Policies
We have already dealt with the centralized access rules, so it is worthwhile to proceed to the next topic of this article, which is dedicated to centralized access policies. Centralized access policies are authorization policies that first appeared in the Windows Server 2012 server operating system and include conditional expressions. In principle, such policies are collections of objects of centralized access rules. You can create such policies using Active Directory Administrative Center, and after that you can distribute them using Group Policy functionality. For example, if an organization's business requirements include restricting access to personal information of files by the file owner and members of a department, say, the personnel department, who are allowed to view personal information, then this is a general organization policy applicable to personal information files, no matter which file servers of the organization they are not located. As I said, centralized access policies can include one or more centralized access rules, and centralized access rules, in turn, can be members of several different centralized access policies.
Here, as I mentioned earlier, you should definitely pay attention to the fact that centralized access policies increase the security of access to files and folders that are located on dedicated file servers , but do not replace any local access policies or selective management tables. Access (DACL) that already applies to the same files or folders. In other words, they work harmoniously and together. Take this simplest example: the centralized access policy clearly states that a user can use a specific document hosted on a file server, but it is determined in the DACL that access to the file is denied. Thus, the user will not be able to access such a document. Such a restriction can be encountered for the reason that the prohibition rules will always prevail over the permitting rules, regardless of the technology with which you have prohibited or allowed access to the file or folder itself.
We have dealt with the appointment of centralized access policies, but it is also advisable to know more about some prerequisites that must be met before you begin to implement centralized access policies in your organization. These requirements include the fact that:
- You must create assertions that will be connected to the objects of user accounts or computers using the appropriate attributes;
- You will also need to create file property definitions;
- You must create one or more centralized access rules, of course, depending on your business requirements;
- At least one central access policy object should be created and, as a result, its parameters should be defined;
- Using Group Policy functionality, you should extend these policies to file servers. Thus, your file servers running Windows Server 2012/2012 R2 operating systems will already be aware of the existence of dynamic access control and that centralized access policies have been created in your organization;
- After all, on the end servers, you need to apply these policies to the public folders you choose.
, , , , , Active Directory, Windows PowerShell.
, , , . , . , , :
- Active Directory « > Central Access Policies » ( Dynamic Access Control > Central Access Policies ), 4, « » . , «» « » ( New > Central Access Policy ), :
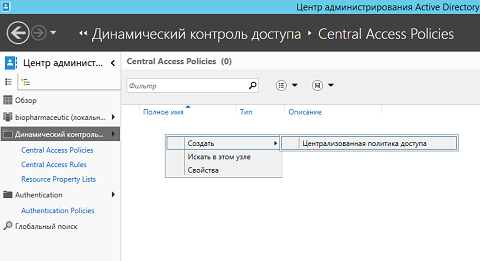
Fig. 5. - , « » ( Create Central Access Policy ), . , , :
- «» ( General ). , , . :
- (Name) . . « - »;
- (Description) . . « - »;
- (Protect from accidental deletion) . , . , .
- «» ( Member ). , . «» ( Add ) , (. ) . , , , . , (, ) .
, , « » ( Permission State ) , . , « », « » ( Proposed, Current ).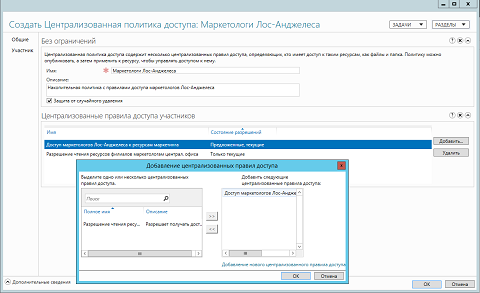
Fig. 6. - «» ( General ). , , . :
- «» , .
GUI- , , Windows PowerShell. , , - Windows PowerShell. , , . , .
, Windows PowerShell: New-ADCentralAccessPolicywith which you create the central access policy object itself; Set-ADCentralAccessPolicy , responsible for changing the existing policy; Remove-ADCentralAccessPolicy , thanks to which, in fact, you remove unnecessary access policies, as well as the Add-ADCentralAccessPolicyMember and Remove-ADCentralAccessPolicyMember cmdlets , which are designed to add centralized access rules to selected policies or to delete them. In the following example, only two cmdlets will be considered, which allow you to add a new centralized access policy and add one access rule for it. So, first you need to use the following cmdlet:
New-ADCentralAccessPolicy -description:"Just another CAP" -Name:"Test CAP" -Server:"DC.biopharmaceutic.local" -ProtectedFromAccidentalDeletion:$true
, . Name , Description – , Server , ProtectedFromAccidentalDeletion – .
. , . :
Add-ADCentralAccessPolicyMember -Identity:"CN=Test CAP,CN=Central Access Policies,CN=Claims Configuration,CN=Services,CN=Configuration,DC=biopharmaceutic,DC=local" -Members:"CN= - ,CN=Central Access Rules,CN=Claims Configuration,CN=Services,CN=Configuration,DC=biopharmaceutic,DC=local" -Server:"DC.biopharmaceutic.local"
, : Identity , , Members , . , , , . :
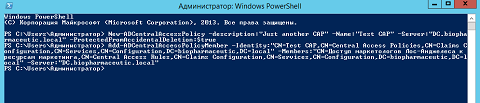
Fig. 7. Windows PowerShell
, , . , , - . , Active Directory Dynamic Access Control > Central Access Policies , , , «» ( Tasks ) «» ( Properties ).
, , « » ( Add Central Access Rule ). , .
- . Central Access Policies , «» ( Delete ) .
, . , . Windows . , , . - , , – , . – CSE GPSI , , , , , , Windows IPSEC – « Windows» . - , , , . , , , .
And such a technology as Dynamic Access Control , of course, did not go without its expansion of the client side for group policy. Since all the rules and policies you create are stored in Active Directory Domain Services, by and large, all that remains is to remove such objects from the required containers, and then distribute the parameters specified in them to specific machines. In words, it sounds very simple, but let's see what this procedure is in practice.
So, to distribute your previously created centralized access policies to file servers, you will need to perform the following steps:
- « » ( Group Policy Management ), , « Dynamic Access Control 01 », ;
- CSE . \\ Windows\ \ ( Computer Configuration \ Policies\Windows Settings \ Security Settings\File System ). Microsoft, , , « . 6: , , ». , Windows Server 2012, , « » ( Central Access Policy ) . , , , , « » ( Manage Central Access Policies… ):
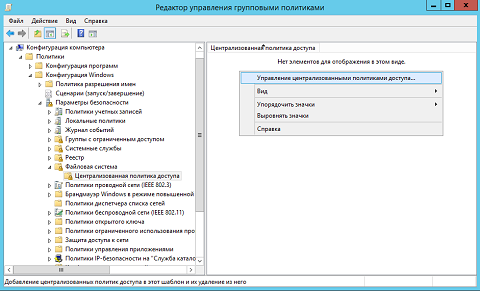
Fig. 8. GPME - « » ( Central Access Policies Configuration ), . , , « » ( Available Central Access Policies ) ( , CTRL ), , « » ( Add ), « » ( Applicable Central Access Policies ):
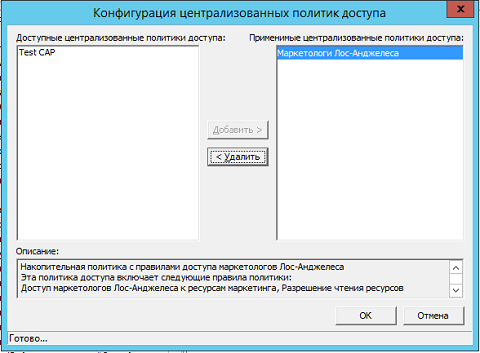
Fig. 9. - , .
, , , - SYSVOL , . , , C:\Windows\SYSVOL\domain\Policies\{6DF180BA-22E3-4D52-A34F-158633E56956}\Machine\Microsoft\Windows NT\Cap , C:\Windows\SYSVOL\domain\Policies , {6DF180BA-22E3-4D52-A34F-158633E56956}- this is the GUID of the GPO itself, which has just been created and configured (you can find it out by calling the properties dialog for the topmost node directly from the Group Policy Management Editor), and Machine \ Microsoft \ Windows NT \ Cap is already the path to the folder where the file is located, in which the policy settings you specified will be defined.
In this directory you can find a single .inf file called cap.inf (short for Central Access Policy). This file is not encrypted, and if you wish, you can view its contents. For example, in my case, such a file will include the following lines:
[Version]
Signature = "$ Windows NT $"
[CAPS]
«CN=Test CAP,CN=Central Access Policies,CN=Claims Configuration,CN=Services,CN=Configuration,DC=biopharmaceutic,DC=local»
«CN= -,CN=Central Access Policies,CN=Claims Configuration,CN=Services,CN=Configuration,DC=biopharmaceutic,DC=local»
, . , , , , Active Directory.
It turns out that in this .inf file you can find only the name of the policy and its location. That is, if after receiving such a file, no action is taken at all, then the client will simply not know what these policies are, not to mention the rules. It is for this reason that the operating system needs to take some action and implement mechanisms that allow “to understand what these policies are for and what can be done with them”. Fortunately, in Windows Server 2012/2012 R2 everything is already implemented out of the box. After updating the Group Policy settings, the system library auditcse.dll reads the required information about centralized access policies from the .inf file,and then, through LDAP queries, all the necessary system data will be obtained from the domain services due to the expansion of the client side and recorded in the system registry of the target computer.
, , regerdit, HKEY_LOCAL_MACHINE\SYSTEM\CurrentControlSet\Control\Lsa\CentralizedAccessPolicies. , CAPEs , CAPs , . , , Name Description , , , . , , :
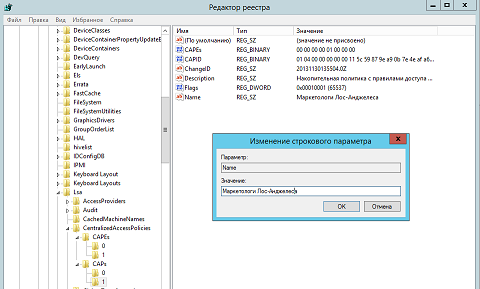
Fig. 10.
, , .
, , , , , , , . .
, :
- Windows , . « » ( Properties );
- «» ( Security ), , , «» ( Advanced );
- , «» , «» « » ( Permissions, Auditing, Effective Access ) « » ( Central Policy ), . .
, . , . , « -», , . , , , Active Directory . , . :
Fig. 11. - , . , , SACL . , S-1-17, , , .
Conclusion
, . , , Active Directory, Windows PowerShell. , , . , . , , , , .
, «» , , .
Source: https://habr.com/ru/post/205336/
All Articles