Continuous Integration for Android using Jenkins + Gradle
I want to share my work on the automatic assembly of the Android application. In this article I will give an example of a build for two types of applications, the first is a simple application containing unit-tests in a separate folder, the second is an application using the project library (android library project).
In the end, we will receive a report on completed tests as well as a signed apk file, available for download from Jenkins build artifacts.
When all the requirements are met, proceed to the setup
In my work, I use Eclipse, so the projects have, so to speak, an old structure, not typical for gradle projects (such as it creates androidStudio). Further examples will be given based on the fact that the project looks like this:
To begin with we will configure the normal project. The first step is to create the build.gradle file in the project root.
The part of the config responsible for signing the application will be described below. After creating the config, let's start configuring Jenkins.
')
The first step is to specify the repository with the project. Then you need to select the Run an Android emulator during build item in which you need to choose one of two options - either specify the name of an existing emulator, or specify the parameters for starting a new one. In this case, leave a tick on the Show emulator window
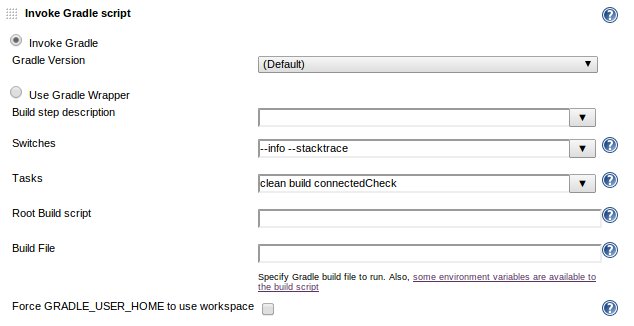
The next step is to add an Invoke Gradle script build step and specify the necessary commands for the Gradle. To build and run tests, it is enough to specify build and connectedCheck
The last thing you need to add actions performed after the assembly.
1. Publish JUnit test result report (we publish reports on the execution of unit tests). In the line for the xml file, with a report on the tests performed, you must write the following path:
Gradle creates 2 report types - html and xml. HTML reports can be found in the folder build / reports / instrumentTests / connected /, but for Jenkins you need to specify the xml report.
2. Archive artifacts (give the opportunity to download the compiled signed application directly from the artifacts). Path to archive file:
Now back to signing the app
To sign an application, you must have a key created using the keytool utility, which stores information about the application developer. Standard command to create:
The alias parameter must be used for each application, its own, then it will need to be specified when signing the application.
For security reasons, the key should not be kept under a version control system, since having this key, you can sign any other application, but the system will recognize it as one and the same. Therefore, the file must be stored directly on the CI server.
Based on these considerations, I added the file gradle.properties to the project root, in which I indicated only a couple of settings:
release.keystore is the key for the release build of the application
releaseProperties - parameters for the release key
debug.keystore is the key for building the application
debugProperties - parameters for debug key
Each of the * Properties files should have the following structure:
Example:
All other actions were specified in the build.gradle file. What is convenient to Gradle, so that inside the config you can also execute regular java code, which made it possible to make a similar signature mechanism. Everything, now you can safely run the assembly and get a signed and tested application.
Now let's look at the second example of building an application that uses a library application.
In my case, the project and the library project are in different repositories. To be able to work with multiple repositories for Jenkins, you must install the Multiple SCMs Plugin plugin. First of all, you need to create configs for gradle again. The first file is in the library project.
The second config is already inside the project
Now you need to correctly specify the repositories in Jenkins.
Unlike the previous example, in this case, in the “Source Code Management” section, it is necessary to choose not some specific version control system but “Multiple SCMs”. After that there will be an opportunity to add your system and specify the path to the repository. The first is to specify the repository with the project, the second - with the library, while for the repository with the library, specify the additional setting “Check out to a sub-directory”, containing the name of the folder in which the code will be located. The name of this folder must match the name of the project that we specified in the dependencies inside the build.gradle file (in the example, this is MyLibrary)
Thus, the working directory will look like a normal project, with only one additional folder MyLibrary, in which the library will be located.
All other settings are exactly the same as for a regular project.
In my project I have to work with various environments. For example, for a test version of an application, you need to send requests, in order to get any data, to a test server, during development, to a local server. Thus, we can distinguish 3 typical dev, stage and prod environments. I placed the settings depending on the environment in the application's resources, in the res / values / environment.xml file, which contains the URL where you need to access the data. I made the configuration files for specific environments in a separate environment folder, in which there are 3 configuration files: dev.xml, stage.xml, and prod.xml. In order for the application to work with the necessary environment, you just need to substitute one of these files instead of environment.xml.
To do this, you need to add the start of the shell command to the Jenkins first step of the assembly and specify the following:
Useful links
www.gradle.org/docs/current/javadoc - Gradle documentation
tools.android.com/tech-docs/new-build-system/user-guide technical documentation
tools.android.com/recent/updatingsdkfromcommand-line - update the Android SDK through the console (in case there are no X)
vimeo.com/34436402 - video explaining the work of gradle wrapper
In the end, we will receive a report on completed tests as well as a signed apk file, available for download from Jenkins build artifacts.
Requirements for configuring automatic builds
- Required Jenkins Plugins
- Android Emulator Plugin
- Git Plugin (if you use git)
- Multiple SCMs Plugin (for the ability to work with multiple repositories)
- Xvnc Plugin (to be able to start the emulator if the X server is not installed on the server)
- Android SDK
Download from here . Section DOWNLOAD FOR OTHER PLATFORMS -> SDK Tools only - Gradle
It is better to download the archive here (gradle - ** - bin.zip) and unpack it in / usr / local / lib - Environment variables
ANDROID_HOME = / usr / local / lib / android / sdk
GRADLE_HOME = / usr / local / lib / gradle-1.8
JAVA_HOME = / usr / lib / jvm / jdk1.7.0_03
PATH = $ PATH: $ ANDROID_HOME / tools: $ ANDROID_HOME / platform-tools: $ JAVA_HOME / bin: $ GRADLE_HOME / bin - Library to run the emulator
In case Jenkins works on a 64-bit OS, you need to add the library ia32-libs, otherwise the emulator will not start
sudo apt-get install ia32-libs
When all the requirements are met, proceed to the setup
In my work, I use Eclipse, so the projects have, so to speak, an old structure, not typical for gradle projects (such as it creates androidStudio). Further examples will be given based on the fact that the project looks like this:
  Project
  | -res
  | -src
  | -assets
  | -libs
  | -tests (folder containing the project with unit tests)
      | -src
      | -res
      | -AndroidManifest.xml
  | -AndroidManifest.xml
  | -build.gradle
  | -gradle.properties
Customization
To begin with we will configure the normal project. The first step is to create the build.gradle file in the project root.
buile.gradle
To run the tests, it is enough to specify the instrumentTest section in android.sourceSets, which will indicate the paths to the folders in the test project. When I understood Gradle I saw more than one article in which it was written that to run unit tests you need to create a separate task, create a separate entry for it in the sourceSets and add junit dependencies. In general, only wasted time on this, everything is much simpler.buildscript { repositories { mavenCentral() } dependencies { classpath 'com.android.tools.build:gradle:0.6+' } } apply plugin: 'android' android { compileSdkVersion 18 buildToolsVersion "18.1.1" defaultConfig { minSdkVersion 8 targetSdkVersion 18 testPackageName "com.project.tests" testInstrumentationRunner "android.test.InstrumentationTestRunner" } sourceSets { main { manifest.srcFile file('AndroidManifest.xml') java.srcDirs = ['src'] resources.srcDirs = ['src'] res.srcDirs = ['res'] assets.srcDirs = ['assets'] } instrumentTest { java.srcDirs = ['tests/src'] manifest.srcFile file('tests/AndroidManifest.xml') java.srcDirs = ['tests/src'] resources.srcDirs = ['tests/src'] res.srcDirs = ['tests/res'] assets.srcDirs = ['tests/assets'] } } dependencies { compile fileTree(dir: 'libs', include: '*.jar') } // if(project.hasProperty("debugSigningPropertiesPath") && project.hasProperty("releaseSigningPropertiesPath")) { // File debugPropsFile = new File(System.getenv('HOME') + "/" + project.property("debugSigningPropertiesPath")) File releasePropsFile = new File(System.getenv('HOME') + "/" + project.property("releaseSigningPropertiesPath")) if(debugPropsFile.exists() && releasePropsFile.exists()) { Properties debugProps = new Properties() debugProps.load(new FileInputStream(debugPropsFile)) Properties releaseProps = new Properties() releaseProps.load(new FileInputStream(releasePropsFile)) // signingConfigs { debug { storeFile file(debugPropsFile.getParent() + "/" + debugProps['keystore']) storePassword debugProps['keystore.password'] keyAlias debugProps['keyAlias'] keyPassword debugProps['keyPassword'] } release { storeFile file(releasePropsFile.getParent() + "/" + releaseProps['keystore']) storePassword releaseProps['keystore.password'] keyAlias releaseProps['keyAlias'] keyPassword releaseProps['keyPassword'] } } buildTypes { debug { signingConfig signingConfigs.debug } release { signingConfig signingConfigs.release } } } } } The part of the config responsible for signing the application will be described below. After creating the config, let's start configuring Jenkins.
')
Jenkins setup
The first step is to specify the repository with the project. Then you need to select the Run an Android emulator during build item in which you need to choose one of two options - either specify the name of an existing emulator, or specify the parameters for starting a new one. In this case, leave a tick on the Show emulator window
The next step is to add an Invoke Gradle script build step and specify the necessary commands for the Gradle. To build and run tests, it is enough to specify build and connectedCheck
The last thing you need to add actions performed after the assembly.
1. Publish JUnit test result report (we publish reports on the execution of unit tests). In the line for the xml file, with a report on the tests performed, you must write the following path:
**/build/instrumentTest-results/*/*.xmlGradle creates 2 report types - html and xml. HTML reports can be found in the folder build / reports / instrumentTests / connected /, but for Jenkins you need to specify the xml report.
2. Archive artifacts (give the opportunity to download the compiled signed application directly from the artifacts). Path to archive file:
**/build/apk/workspace-release.apkNow back to signing the app
Signature of the application
To sign an application, you must have a key created using the keytool utility, which stores information about the application developer. Standard command to create:
keytool -genkey -v -alias appAlias -keyalg RSA -keysize 2048 -keystore release.keystore -validity 10000The alias parameter must be used for each application, its own, then it will need to be specified when signing the application.
For security reasons, the key should not be kept under a version control system, since having this key, you can sign any other application, but the system will recognize it as one and the same. Therefore, the file must be stored directly on the CI server.
Based on these considerations, I added the file gradle.properties to the project root, in which I indicated only a couple of settings:
releaseSigningPropertiesPath=.androidSigning/releaseProperties debugSigningPropertiesPath=.androidSigning/debugProperties The value of releaseSigningPropertiesPath indicates the path (relative to the home directory, ~ / .androidSigning /) where the file with the parameters for the keys (passwords and alias) is located. For a project, 4 files should be stored in this folder:release.keystore is the key for the release build of the application
releaseProperties - parameters for the release key
debug.keystore is the key for building the application
debugProperties - parameters for debug key
Each of the * Properties files should have the following structure:
keystore=- ( ) keystore.password= keyAlias=alias keyPassword= Example:
keystore=release.keystore keystore.password=mypassword keyAlias=appAlias keyPassword=mypassword All these parameters are specified when creating the key.All other actions were specified in the build.gradle file. What is convenient to Gradle, so that inside the config you can also execute regular java code, which made it possible to make a similar signature mechanism. Everything, now you can safely run the assembly and get a signed and tested application.
Now let's look at the second example of building an application that uses a library application.
Building an application using android-library
In my case, the project and the library project are in different repositories. To be able to work with multiple repositories for Jenkins, you must install the Multiple SCMs Plugin plugin. First of all, you need to create configs for gradle again. The first file is in the library project.
library build.gradle
The main difference of the library project is the plugin used: apply plugin: 'android-library' buildscript { repositories { mavenCentral() } dependencies { classpath 'com.android.tools.build:gradle:0.6.3' } } apply plugin: 'android-library' android { compileSdkVersion 18 buildToolsVersion "19.0.0" defaultConfig { minSdkVersion 8 targetSdkVersion 18 testPackageName "com.project.tests" testInstrumentationRunner "android.test.InstrumentationTestRunner" } sourceSets { main { manifest.srcFile file('AndroidManifest.xml') java.srcDirs = ['src'] resources.srcDirs = ['src'] res.srcDirs = ['res'] assets.srcDirs = ['assets'] } instrumentTest { manifest.srcFile file('tests/AndroidManifest.xml') java.srcDirs = ['tests/src'] resources.srcDirs = ['tests/src'] res.srcDirs = ['tests/res'] assets.srcDirs = ['tests/assets'] } } dependencies { compile fileTree(dir: 'libs', include: '*.jar') } } The second config is already inside the project
project build.gradle
buildscript { repositories { mavenCentral() } dependencies { classpath 'com.android.tools.build:gradle:0.6.3' } } apply plugin: 'android' android { compileSdkVersion 18 buildToolsVersion "19.0.0" defaultConfig { minSdkVersion 8 targetSdkVersion 18 } sourceSets { main { manifest.srcFile file('AndroidManifest.xml') java.srcDirs = ['src'] resources.srcDirs = ['src'] res.srcDirs = ['res'] assets.srcDirs = ['assets'] } } dependencies { compile fileTree(dir: 'libs', include: '*.jar') compile project(':MyLibrary') } // if(project.hasProperty("debugSigningPropertiesPath") && project.hasProperty("releaseSigningPropertiesPath")) { // File debugPropsFile = new File(System.getenv('HOME') + "/" + project.property("debugSigningPropertiesPath")) File releasePropsFile = new File(System.getenv('HOME') + "/" + project.property("releaseSigningPropertiesPath")) if(debugPropsFile.exists() && releasePropsFile.exists()) { Properties debugProps = new Properties() debugProps.load(new FileInputStream(debugPropsFile)) Properties releaseProps = new Properties() releaseProps.load(new FileInputStream(releasePropsFile)) // signingConfigs { debug { storeFile file(debugPropsFile.getParent() + "/" + debugProps['keystore']) storePassword debugProps['keystore.password'] keyAlias debugProps['keyAlias'] keyPassword debugProps['keyPassword'] } release { storeFile file(releasePropsFile.getParent() + "/" + releaseProps['keystore']) storePassword releaseProps['keystore.password'] keyAlias releaseProps['keyAlias'] keyPassword releaseProps['keyPassword'] } } buildTypes { debug { signingConfig signingConfigs.debug } release { signingConfig signingConfigs.release } } } } } Now you need to correctly specify the repositories in Jenkins.
Unlike the previous example, in this case, in the “Source Code Management” section, it is necessary to choose not some specific version control system but “Multiple SCMs”. After that there will be an opportunity to add your system and specify the path to the repository. The first is to specify the repository with the project, the second - with the library, while for the repository with the library, specify the additional setting “Check out to a sub-directory”, containing the name of the folder in which the code will be located. The name of this folder must match the name of the project that we specified in the dependencies inside the build.gradle file (in the example, this is MyLibrary)
compile project(':MyLibrary')Thus, the working directory will look like a normal project, with only one additional folder MyLibrary, in which the library will be located.
All other settings are exactly the same as for a regular project.
As a bonus
In my project I have to work with various environments. For example, for a test version of an application, you need to send requests, in order to get any data, to a test server, during development, to a local server. Thus, we can distinguish 3 typical dev, stage and prod environments. I placed the settings depending on the environment in the application's resources, in the res / values / environment.xml file, which contains the URL where you need to access the data. I made the configuration files for specific environments in a separate environment folder, in which there are 3 configuration files: dev.xml, stage.xml, and prod.xml. In order for the application to work with the necessary environment, you just need to substitute one of these files instead of environment.xml.
To do this, you need to add the start of the shell command to the Jenkins first step of the assembly and specify the following:
cp $WORKSPACE/environment/prod.xml $WORKSPACE/res/values/environment.xmlUseful links
www.gradle.org/docs/current/javadoc - Gradle documentation
tools.android.com/tech-docs/new-build-system/user-guide technical documentation
tools.android.com/recent/updatingsdkfromcommand-line - update the Android SDK through the console (in case there are no X)
vimeo.com/34436402 - video explaining the work of gradle wrapper
Source: https://habr.com/ru/post/205308/
All Articles