Another story about the home server, or the operation "silence"
Good afternoon, habrayuzer!
 Surely every developer, sooner or later, is faced with the problem of the test environment. It is not very convenient to keep the PC turned on 24x7, and even fill it up with software for experiments to the eyeballs. On the other hand, finding hosting on your own, not expensive either, is not an easy task. What to do? There is a solution - deploy the sandbox at home. As I was convinced about this in more detail below, it is not expensive, it is convenient and very fascinating.
Disclaimer: The post is published at the request of icepro , so do not rush to change karma to me, but rather help a good person with an invite. You will not find revelations or unexpected solutions here, but going through a similar path you will be able to find everything you need in one place.
I will warn you in advance: article one, do not hit hard.
')
And now to the details. I ask the bearded administrators and all the people competent in this topic in advance, do not grab the heart, fukat and rush to put minuses, because I’m just learning and didn’t deal with the administration. But I hope the beginners can cut the path to Linux by a couple of steps and go through a quick acquaintance really quickly :)
So, the idea is, let's start to embody. The most important criterion for me when choosing iron was the price, low energy consumption and the absence of noise (otherwise there was a risk that my wife would send my sandbox to the balcony, and even with me :)). All this indicated that the form factor would be the target - MiniITX.
After wandering through online shopping, I found just such a motherboard: Intel BOXD2500HN .
It is based on the Intel Atom D2500 processor (1.86 GHz) . For me, this power was enough. Energy consumption - 10 watts. Price - about $ 70. Passive cooling - no noise. Also at home there was a 2 GB SO-DIMM memory and a semi-terabyte screw.
Now about the case. Again, I wanted less noise, and therefore the choice fell on the case with an external power supply unit - DELUX E-2012 Black Mini-ITX
Total single cooler - 40 mm, placed above the hard drive (well, it was a regular place, so I decided to complete it completely).
The choice of OSes was not long. Previously, I had to work with Ubuntu, so the choice fell on its foundation - Debian. At the time of this writing, the latest version (which I installed) was 7.0 - Wheezy. You can download it on offsite, where it is presented in several variations depending on the graphical shell. I did not dare to install the bare console, and therefore I chose the most lightweight one among the options presented - LXDE.
Immediately make a reservation - Debian struck me with the wealth of the software repository. You can find anything in it. In order to search by name the program of interest, we use the command:
Hereinafter, I will mention the installation of software, but you will already know how to do it.
Installing Debian is not difficult. Download the image and make a bootable USB flash drive ( LinuxLive USB Creator helps). Next, boot from it and turn on the graphical installer (it will be easier). Basically, the installation is similar to the installation of windows: click Next, Next, Next. But some points are still there:
- at the step of choosing markup, select individual sections
- after the master of the automatic shredding of the disk shows you the intended structure - do not agree, increase the RootFS (the same "/") to at least a couple of gigabytes (I now have 512 MB and I have to keep a close eye on the partition)
- the choice of software is left as is (daws on the "Desktop Environment" and "Standard System", the rest will be set later)
If you still need step-by-step installation assistance, then I recommend to find on the Internet open spaces the Maunal "Web-server on Debian GNU_Linux for beginners".
Next, several small system tweaks were produced:
So, now the most interesting thing is that I managed to cram it into this little box.
LAMP | nginx | Node.js | MongoDB | Git | Java | Python | Ruby | .NET | Jenkins
Yes, I am an active web developer without hands on this platform. Everything is put elementary:
For convenient debug php, I installed and configured xdebug . Installation is described in detail at the following links:
- Configuring Xdebug for PHP development / Linux
- Remote Xdebug on PhpStorm
When creating virtual hosts do not forget to register them in hosts
To increase Apache's performance, it is recommended to use it in conjunction with nginx with the following distribution of roles: apache - backend, nginx - frontend. The article “ Installation and configuration of Nginx” describes how to perform such a configuration . Nginx frontend + Apache backend.
Excellent platform, especially for creating small client-server applications. Only web-sockets are worth. Well, okay, back to the installation. Putting node.js is a little trivial, but not difficult - in a true way, that is, from the sources:
A little more detailed installation is painted here - Installing Node.js
Why not join the NoSQL community? So I asked this question. Well, maybe I did not plan to use NoSQL closely, but to touch it - why not?
Install!
It has long been wanted to move out of the public repositories on github. And now the time has come. Git is not difficult to install, it is called git in the package repository, but it is a little more difficult to configure it for convenient operation, we need:
- create a separate user - git
- install giolite for administering repositories
This video helped overcome the situation when my keys generated in putty were ignored - How To Fix "Server Refused Our Key" Error That Caused By The RSA Public Key Generated By Puttygen
Next, we clone the giolite repository - ssh: //git@192.168.1.110: /gitolite-admin.git and voila, manage turnips.
The following links helped to set up git + gitolite:
- Server setup. Gitolite - hosting git repositories
- Own git-server from scratch
For a convenient review of repositories from the browser exists - gitweb. How to install it is described here - Setting up Gitweb on Debian .
From myself I will add:
Go to the java platform. First, remove openjdk and install Java 7.
From above, I added the following software:
- scala (just studying, why not practice on your server)
- glassfish is one of the most actively developed (if not the most) application servers
* if glassfish does not start due to the fact that port 8080 is busy (as it happened with me), then we will change the default port. To do this, in GlassFish_Server \ glassfish \ domains \ domain1 \ config we find our port and set another one:
Next came python along with django. Putting from the repository is pretty easy. Here you can look at the ease of use - Writing your first Django app
Like a python, I chopped Ruby with my own framework - Rails. Putting a little harder, so the drive instructions:
Well, it's still as easy to use - Getting Started with Rails
For internal needs, it was also decided to deploy a bug tracker, and it became - Redmine .
Put like this:
Go to the mysql client and create a database and user:
Create a base configuration
Create a configuration file:
Now we put ruby bundle
After all this, you need to configure a virtual host in the Apache and you can use it.
Configuration (getting information about the commit from the repository) is described here - Redmine Settings . I chose the option in which the automatic polling of repositories is configured using Cron.
Do not forget about the .NET platform. The main components are the actual mono platform and XSP (ASP.NET server) are put like this:
All, now almost all the delights of .NET are available to us.
Details can be found here: Mono for Debian .
And crowning it all - CI server. Let's take a look at how to put it and configure it for example for ... PHP:
We put Jenkins
Configuring:
- download /build.xml from http://jenkins-php.org/ and edit for your project
- download the PMD rules http://phpmd.org/ and put as / build / phpmd.xml in the project
- optionally, you can add its rules http://pear.php.net/ and put it as /build/phpcs.xml in the project
- configure PHPUnit in / tests/phpunit.xml
- download task template
It is clear that you can not avoid equipment breakdowns, but completely different sensations arise at this thought when you have a backup copy of the data (and even fresh).
The process itself is divided into 2 types:
- full (I do selectively, when I feel that a lot of changes have passed in the system and need to be preserved)
- partial (all nodes of the system that are subject to daily changes: bases, sources, etc.)
I make a complete dump using the remastersys script.
Partial is done with scrutine in cron nightly.
Thank! I hope it was interesting!
PS If you have questions, I will be happy to help.
PPS Give an invite, please.
Surely every developer, sooner or later, is faced with the problem of the test environment. It is not very convenient to keep the PC turned on 24x7, and even fill it up with software for experiments to the eyeballs. On the other hand, finding hosting on your own, not expensive either, is not an easy task. What to do? There is a solution - deploy the sandbox at home. As I was convinced about this in more detail below, it is not expensive, it is convenient and very fascinating.Disclaimer: The post is published at the request of icepro , so do not rush to change karma to me, but rather help a good person with an invite. You will not find revelations or unexpected solutions here, but going through a similar path you will be able to find everything you need in one place.
I will warn you in advance: article one, do not hit hard.
')
And now to the details. I ask the bearded administrators and all the people competent in this topic in advance, do not grab the heart, fukat and rush to put minuses, because I’m just learning and didn’t deal with the administration. But I hope the beginners can cut the path to Linux by a couple of steps and go through a quick acquaintance really quickly :)
Summary
Filling
So, the idea is, let's start to embody. The most important criterion for me when choosing iron was the price, low energy consumption and the absence of noise (otherwise there was a risk that my wife would send my sandbox to the balcony, and even with me :)). All this indicated that the form factor would be the target - MiniITX.
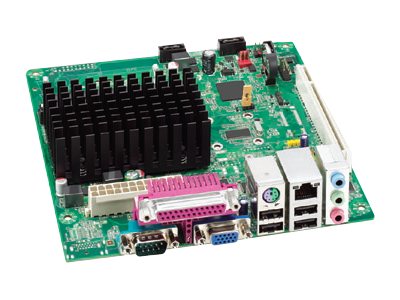 |  |
After wandering through online shopping, I found just such a motherboard: Intel BOXD2500HN .
It is based on the Intel Atom D2500 processor (1.86 GHz) . For me, this power was enough. Energy consumption - 10 watts. Price - about $ 70. Passive cooling - no noise. Also at home there was a 2 GB SO-DIMM memory and a semi-terabyte screw.
Now about the case. Again, I wanted less noise, and therefore the choice fell on the case with an external power supply unit - DELUX E-2012 Black Mini-ITX
Total single cooler - 40 mm, placed above the hard drive (well, it was a regular place, so I decided to complete it completely).
OS
The choice of OSes was not long. Previously, I had to work with Ubuntu, so the choice fell on its foundation - Debian. At the time of this writing, the latest version (which I installed) was 7.0 - Wheezy. You can download it on offsite, where it is presented in several variations depending on the graphical shell. I did not dare to install the bare console, and therefore I chose the most lightweight one among the options presented - LXDE.
Immediately make a reservation - Debian struck me with the wealth of the software repository. You can find anything in it. In order to search by name the program of interest, we use the command:
sudo apt-cache search < , > sudo apt-get install < > Hereinafter, I will mention the installation of software, but you will already know how to do it.
Installing Debian is not difficult. Download the image and make a bootable USB flash drive ( LinuxLive USB Creator helps). Next, boot from it and turn on the graphical installer (it will be easier). Basically, the installation is similar to the installation of windows: click Next, Next, Next. But some points are still there:
- at the step of choosing markup, select individual sections
- after the master of the automatic shredding of the disk shows you the intended structure - do not agree, increase the RootFS (the same "/") to at least a couple of gigabytes (I now have 512 MB and I have to keep a close eye on the partition)
- the choice of software is left as is (daws on the "Desktop Environment" and "Standard System", the rest will be set later)
If you still need step-by-step installation assistance, then I recommend to find on the Internet open spaces the Maunal "Web-server on Debian GNU_Linux for beginners".
Next, several small system tweaks were produced:
sudo
In order to be able to allow your user to execute commands on behalf of the superuser, you need to add it to the sudoer list. Details of the settings can be found in the document I mentioned above, in the section “1.2.1 Basic sudo setup”Remote access
In order to be able to remote access, I'm not talking about ssh, but just the desktop, the VNC server was installed - x11vnc.
The configuration is quite easy, first we generate the authorization file:x11vnc -storepasswd <pass> <file>
and then add the VNC server to autoload (/ etc / xdg / lxsession / LXDE / autostart)@/usr/bin/x11vnc -dontdisconnect -display :0 -notruecolor -noxfixes -shared -forever -rfbport 5900 -bg -o /var/log/x11vnc.log -rfbauth /home/ice/.vnc/passwdAutologin
The motherboard is able to restore its state after the electricity was interrupted and resumed. But if the monitor is not connected to the server and the system state is not visible, then after a power outage, the graphical environment will hang on the Login page after a reboot. In order to eliminate this inconvenience we add the autologon feature for our user, for this we add the lines to the /etc/lightdm/lightdm.conf file:autologin-user=ice autologin-user-timeout=0Hardware monitor
Monitor the equipment will helplshw lshw-gtk
For temperature monitoring, I delivered lm-sensors and hddtemp.
Team
shows information about MPs from available sensors.sensors
Before using the utility, it is necessary that it detects all the sensors, for this it is necessary to run:/usr/sbin/sensors-detect
And the team
prompts to what temperature the hard drive has heated up.hddtemp /dev/sda
The first time I had a mania to check the temperature and other sensors, so I wrote a brief script for collecting and logging data:#!/bin/bash echo '################## TIME ##################' date echo '################# UP TIME ################' uptime echo '################# MB TEMP ################' sensors echo '################ HDD TEMP ################' sudo hddtemp /dev/sda echo echo
Now we will create a script launch schedule, but first we will issue the right to execute it:
and now cron:visudo ice ALL=NOPASSWD: /home/ice/scripts/monitoring/temp.shsudo crontab -e -u ice */10 * * * * sudo /home/ice/scripts/monitoring/temp.sh >> /home/ice/scripts/monitoring/temp.log 2>&1
Check that starts can be done with the command:grep CRON /var/log/syslogsudo apt-get install logrotate
And then we will create a configuration file in the /etc/logrotate.d/ folder. My looks like this:/home/ice/scripts/monitoring/temp.log { # daily # missingok # rotate 30 # 30 compress # delaycompress # (.. *.log.1 , *.log.2 ) notifempty # create 640 ice ice # }Other stuff
- htop - advanced process monitor
- package for measuring system performance, the details here are sysstat , and the configuration here is Permanent link / sar on Ubuntu / Debian
- lynis is a utility that helps overcome the desire to "need more control and monitoring over the system", description - lynis
- rtorrent - a console torrent client (by the way, I also added a web-muzzle to it, very conveniently), details of the settings can be found here - Installing rtorent + rutorrent on Debian / Ubuntu
- exim4 - mail server, configuration using GMail SMTP is described here - Configuring exim4 in Ubuntu to use GMail for SMTP
- proftpd - FTP server (peeped on setting up a home server based on Debian )
- samba - network file system (I wanted to try everything, I installed it here), the configuration can be found here - Installing and configuring Samba on Debian GNU / Linux and Ubuntu Linux
For access, samba uses system users, you can add them to the SMB database using the commandsmbpasswd -a ice - mc - useful file manager
- ssh - here without comments
- in the mount option (/ etc / fstab) added commit = 60 to combat excessive logging which the hard disk constantly tormented (jbd2 process)
- htop - advanced process monitor
Dev Environment
So, now the most interesting thing is that I managed to cram it into this little box.
LAMP | nginx | Node.js | MongoDB | Git | Java | Python | Ruby | .NET | Jenkins
LAMP
Yes, I am an active web developer without hands on this platform. Everything is put elementary:
sudo apt-get update sudo apt-get upgrade sudo apt-get install apache2 apache2-doc php5 libapache2-mod-php5 php-pear sudo apt-get install mysql-server mysql-client php5-mysql sudo apt-get install php5-curl php5-gd php5-imagick php5-ldap php5-imap php5-memcache php5-common php5-mysql php5-ps php5-tidy imagemagick php5-xcache php5-xdebug php5-xmlrpc php5-xsl But immediately after the installation, I suffered a failure - php files did not want to be processed by apache in any way. In order to fix this, I made the following manipulations: /etc/apache2$ sudo gedit apache2.con # AddHandler application/x-httpd-php .php .php4 .php3 .html AddType application/x-httpd-php .html For convenient debug php, I installed and configured xdebug . Installation is described in detail at the following links:
- Configuring Xdebug for PHP development / Linux
- Remote Xdebug on PhpStorm
When creating virtual hosts do not forget to register them in hosts
nginx
To increase Apache's performance, it is recommended to use it in conjunction with nginx with the following distribution of roles: apache - backend, nginx - frontend. The article “ Installation and configuration of Nginx” describes how to perform such a configuration . Nginx frontend + Apache backend.
Node.js
Excellent platform, especially for creating small client-server applications. Only web-sockets are worth. Well, okay, back to the installation. Putting node.js is a little trivial, but not difficult - in a true way, that is, from the sources:
sudo apt-get install python g++ make checkinstall mkdir ~/src && cd $_ wget -N http://nodejs.org/dist/node-latest.tar.gz tar xzvf node-latest.tar.gz && cd node-v* # "v" ./configure checkinstall sudo dpkg -i node_* A little more detailed installation is painted here - Installing Node.js
MongoDB
Why not join the NoSQL community? So I asked this question. Well, maybe I did not plan to use NoSQL closely, but to touch it - why not?
Install!
sudo apt-key adv --keyserver keyserver.ubuntu.com --recv 7F0CEB10 echo 'deb http://downloads-distro.mongodb.org/repo/debian-sysvinit dist 10gen' | sudo tee /etc/apt/sources.list.d/mongodb.list sudo apt-get update sudo apt-get install mongodb-10gen ... and run sudo /etc/init.d/mongodb start Git
It has long been wanted to move out of the public repositories on github. And now the time has come. Git is not difficult to install, it is called git in the package repository, but it is a little more difficult to configure it for convenient operation, we need:
- create a separate user - git
- install giolite for administering repositories
This video helped overcome the situation when my keys generated in putty were ignored - How To Fix "Server Refused Our Key" Error That Caused By The RSA Public Key Generated By Puttygen
Next, we clone the giolite repository - ssh: //git@192.168.1.110: /gitolite-admin.git and voila, manage turnips.
The following links helped to set up git + gitolite:
- Server setup. Gitolite - hosting git repositories
- Own git-server from scratch
For a convenient review of repositories from the browser exists - gitweb. How to install it is described here - Setting up Gitweb on Debian .
From myself I will add:
usermod -a -G gitolite www-data in order that apach and gitolite make friends.But setting up a virtual host (bit by bit collected from various sources has not worked yet)
<VirtualHost *:81> ServerAdmin webmaster@localhost ServerName git-web.loc SetEnv GITWEB_CONFIG /etc/gitweb.conf DocumentRoot /home/git/repositories Alias /static/gitweb.css /usr/share/gitweb/static/gitweb.css Alias /static/git-logo.png /usr/share/gitweb/static/git-logo.png Alias /static/git-favicon.png /usr/share/gitweb/static/git-favicon.png Alias /static/gitweb.js /usr/share/gitweb/static/gitweb.js Alias /git /home/git/repositories ScriptAlias /gitweb.cgi /usr/lib/cgi-bin/gitweb.cgi DirectoryIndex gitweb.cgi <Directory /home/git/repositories/> Allow from All Options +ExecCGI AllowOverride All AuthType Basic AuthName "Private Repository" AuthUserFile /home/ice/stuff/keys/.htpasswd-gitweb Require valid-user AddHandler cgi-script .cgi DirectoryIndex gitweb.cgi RewriteEngine On RewriteCond %{REQUEST_FILENAME} !-f RewriteRule ^.* /gitweb.cgi/$0 [L,PT] </Directory> SetEnv GIT_PROJECT_ROOT /home/git/repositories SetEnv GIT_HTTP_EXPORT_ALL ErrorLog ${APACHE_LOG_DIR}/git_web_error.log LogLevel warn CustomLog ${APACHE_LOG_DIR}/git_web_access.log combined </VirtualHost> Basic authorization to taste, you can disable.Java
Go to the java platform. First, remove openjdk and install Java 7.
sudo apt-get remove openjdk* su - # java echo "deb http://ppa.launchpad.net/webupd8team/java/ubuntu precise main" | tee -a /etc/apt/sources.list echo "deb-src http://ppa.launchpad.net/webupd8team/java/ubuntu precise main" | tee -a /etc/apt/sources.list apt-key adv --keyserver keyserver.ubuntu.com --recv-keys EEA14886 apt-get update # Oracle software license echo oracle-java7-installer shared/accepted-oracle-license-v1-1 select true | /usr/bin/debconf-set-selections # Oracle JDK7 apt-get install oracle-java7-installer # root exit # java java -version From above, I added the following software:
- scala (just studying, why not practice on your server)
- glassfish is one of the most actively developed (if not the most) application servers
* if glassfish does not start due to the fact that port 8080 is busy (as it happened with me), then we will change the default port. To do this, in GlassFish_Server \ glassfish \ domains \ domain1 \ config we find our port and set another one:
<network-listener name="http-listener-1" port="8081" protocol="http-listener-1" thread-pool="http-thread-pool" transport="tcp"</network-listener>Python
Next came python along with django. Putting from the repository is pretty easy. Here you can look at the ease of use - Writing your first Django app
Ruby
Like a python, I chopped Ruby with my own framework - Rails. Putting a little harder, so the drive instructions:
apt-get install build-essential libapache2-mod-passenger ruby rdoc ruby-dev libopenssl-ruby rubygems gem install fastthread gem install rails --version 3.0.4 And also do not forget to add rails in $ PATH:PATH=".../var/lib/gems/VERSION/bin"Well, it's still as easy to use - Getting Started with Rails
For internal needs, it was also decided to deploy a bug tracker, and it became - Redmine .
Put like this:
# aptitude install libmagickcode-dev aptitude install libmagickwand-dev aptitude install ruby1.9.1-dev aptitude install libmysqlclient-dev # redmine cd /opt wget http://files.rubyforge.vm.bytemark.co.uk/redmine/redmine-2.3.1.tar.gz tar -zxvf redmine-2.3.1.tar.gz cd /var/www ln -s /redmine-2.3.1/public redmine chown -R www-data:www-data /opt/redmine-2.3.1 Go to the mysql client and create a database and user:
CREATE DATABASE redmine_default CHARACTER SET utf8; CREATE USER 'redmine'@'localhost' IDENTIFIED BY 'my-password'; GRANT ALL PRIVILEGES ON redmine_default.* TO 'redmine'@'localhost'; Create a base configuration
cd /redmine-2.3.1/config cp database.yml.example database.yml vi database.yml and fill it up production: adapter: mysql2 database: redmine_default host: localhost username: redmine password: my-password encoding: utf8 Create a configuration file:
cd /redmine-2.3.1/config cp configuration.yml.example configuration.yml vi configuration.yml and we are adjusted (the benefit in a config is full of comments).Now we put ruby bundle
gem install bundler bundle install --without development test postgresql sqlite rake generate_secret_token bundle install and prepare the database: RAILS_ENV=production rake db:migrate RAILS_ENV=production rake redmine:load_default_data After all this, you need to configure a virtual host in the Apache and you can use it.
Configuration (getting information about the commit from the repository) is described here - Redmine Settings . I chose the option in which the automatic polling of repositories is configured using Cron.
.NET
Do not forget about the .NET platform. The main components are the actual mono platform and XSP (ASP.NET server) are put like this:
sudo apt-get install mono-common mono-xsp4 All, now almost all the delights of .NET are available to us.
Details can be found here: Mono for Debian .
Jenkins
And crowning it all - CI server. Let's take a look at how to put it and configure it for example for ... PHP:
We put Jenkins
sudo apt-get update sudo apt-get install php5-cli php5-xdebug php-pear ant git php -r 'echo "Xdebug loaded? "; echo (extension_loaded("xdebug")) ? "yes" : "no"; echo chr(10);' wget -q -O - http://pkg.jenkins-ci.org/debian/jenkins-ci.org.key | sudo apt-key add - sudo bash -c "echo 'deb http://pkg.jenkins-ci.org/debian binary/' > /etc/apt/sources.list.d/jenkins.list" sudo apt-get update sudo apt-get install jenkins Add Plugins
wget http://localhost:8080/jnlpJars/jenkins-cli.jar java -jar jenkins-cli.jar -s http://localhost:8080 install-plugin checkstyle java -jar jenkins-cli.jar -s http://localhost:8080 install-plugin cloverphp java -jar jenkins-cli.jar -s http://localhost:8080 install-plugin dry java -jar jenkins-cli.jar -s http://localhost:8080 install-plugin htmlpublisher java -jar jenkins-cli.jar -s http://localhost:8080 install-plugin jdepend java -jar jenkins-cli.jar -s http://localhost:8080 install-plugin plot java -jar jenkins-cli.jar -s http://localhost:8080 install-plugin pmd java -jar jenkins-cli.jar -s http://localhost:8080 install-plugin violations java -jar jenkins-cli.jar -s http://localhost:8080 install-plugin xunit java -jar jenkins-cli.jar -s http://localhost:8080 install-plugin git java -jar jenkins-cli.jar -s http://localhost:8080 safe-restart Install PHPUnit and additional tools.
sudo pear upgrade PEAR sudo pear channel-discover pear.pdepend.org sudo pear channel-discover pear.phpmd.org sudo pear channel-discover pear.phpunit.de sudo pear channel-discover components.ez.no sudo pear channel-discover pear.symfony-project.com sudo pear install pdepend/PHP_Depend sudo pear install phpmd/PHP_PMD sudo pear install phpunit/phpcpd sudo pear install phpunit/phploc sudo pear install PHPDocumentor sudo pear install PHP_CodeSniffer sudo pear install --alldeps phpunit/PHP_CodeBrowser sudo pear install --alldeps phpunit/PHPUnit Configuring:
- download /build.xml from http://jenkins-php.org/ and edit for your project
- download the PMD rules http://phpmd.org/ and put as / build / phpmd.xml in the project
- optionally, you can add its rules http://pear.php.net/ and put it as /build/phpcs.xml in the project
- configure PHPUnit in / tests/phpunit.xml
- download task template
cd /var/lib/jenkins/jobs/ sudo git clone git://github.com/sebastianbergmann/php-jenkins-template.git php-template sudo chown -R jenkins:nogroup php-template/ sudo /etc/init.d/jenkins stop sudo /etc/init.d/jenkins start - create a new task from the template, link it to the repository (you may have to add a plugin under your version control system) and rejoice.Backup
It is clear that you can not avoid equipment breakdowns, but completely different sensations arise at this thought when you have a backup copy of the data (and even fresh).
The process itself is divided into 2 types:
- full (I do selectively, when I feel that a lot of changes have passed in the system and need to be preserved)
- partial (all nodes of the system that are subject to daily changes: bases, sources, etc.)
I make a complete dump using the remastersys script.
View script
#!/bin/bash # start=`date +%s` echo '[FULL BACK UP Start]' DATE_NOW=`date +%F` echo '[FULL BACK UP Dump Creation]' # sudo remastersys backup install-$DATE_NOW.iso echo '[FULL BACK UP Dump Saving]' # sudo cp /home/remastersys/remastersys/install-$DATE_NOW.iso /home/backups/system-iso/install-$DATE_NOW.iso sudo cp /home/remastersys/remastersys/install-$DATE_NOW.iso.md5 /home/backups/system-iso/install-$DATE_NOW.iso.md5 echo '[FULL BACK UP Clean up]' # tmp sudo remastersys clean echo '[FULL BACK UP End]' end=`date +%s` runtime=$((end-start)) echo 'Backup time =' $runtime 'sec(s)' Partial is done with scrutine in cron nightly.
View script
As you can see - I keep the last 7 copies.
#!/bin/bash start=`date +%s` echo '[BACK UP Start]' DATE_PREF=`date +%F` echo '[BACK UP Config]' # BACKUP_MYSQL_DIR=/home/backups/mysql/$DATE_PREF BACKUP_WWW_DIR=/home/backups/www/$DATE_PREF BACKUP_GIT_DIR=/home/backups/git/$DATE_PREF echo '[BACK UP Clean up]' # find /home/backups/mysql/ -mtime +7 -print -mindepth 1 -delete >/dev/null 2>&1 find /home/backups/www/ -mtime +7 -print -mindepth 1 -delete >/dev/null 2>&1 find /home/backups/git/ -mtime +7 -print -mindepth 1 -delete >/dev/null 2>&1 echo '[BACK UP Not Clened Items]' ls /home/backups/mysql/ ls /home/backups/www/ ls /home/backups/git/ echo '[BACK UP Back Up Hosts]' # tar cpzf $BACKUP_WWW_DIR\-www.tgz /home/www/ >/dev/null 2>&1 echo '[BACK UP Back Up Repositories]' # tar cpzf $BACKUP_GIT_DIR\-git.tgz /home/git/ >/dev/null 2>&1 echo '[BACK UP Back Up MySQL]' # mysqldump -q -u root -p<password> -h localhost tt_rss | gzip -c > $BACKUP_MYSQL_DIR\-tt_rss.sql.gz mysqldump -q -u root -p<password> -h localhost test | gzip -c > $BACKUP_MYSQL_DIR\-test.sql.gz mysqldump -q -u root -p<password> -h localhost redmine | gzip -c > $BACKUP_MYSQL_DIR\-redmine.sql.gz mysqldump -q -u root -p<password> -h localhost phpmyadmin | gzip -c > $BACKUP_MYSQL_DIR\-phpmyadmin.sql.gz mysqldump -q -u root -p<password> --skip-lock-tables -h localhost performance_schema | gzip -c > $BACKUP_MYSQL_DIR\-performance_schema.sql.gz mysqldump -q -u root -p<password> --skip-lock-tables -h localhost information_schema | gzip -c > $BACKUP_MYSQL_DIR\-information_schema.sql.gz mysqldump -q -u root -p<password> --events -h localhost mysql | gzip -c > $BACKUP_MYSQL_DIR\-mysql.sql.gz echo '[BACK UP New Items]' ls /home/backups/mysql/ | grep $DATE_PREF ls /home/backups/www/ | grep $DATE_PREF ls /home/backups/git/ | grep $DATE_PREF echo '[BACK UP End]' end=`date +%s` runtime=$((end-start)) echo 'Backup time =' $runtime 'sec(s)' echo '=========================================================' As you can see - I keep the last 7 copies.
Thank! I hope it was interesting!
PS If you have questions, I will be happy to help.
PPS Give an invite, please.
Source: https://habr.com/ru/post/205120/
All Articles