Build a RESTful web API in Caché
InterSystems Caché has added support for REST. That is REST on Habré already written more than once . In short, this is the RESTful web API construction pattern, and it has the following properties:
In Caché, REST support has been appearing since version 2014.1 - this version is still available as a field test version for partners and universities of InterSystems Campus. To create a REST application, you need to define a broker class in the settings of the Caché web application, which indicates the possible extensions of the base URL and the corresponding actions of the application when requesting these extensions.
The broker class is created as an inheritor of the% CSP.REST class. Next, it contains the map of the paths of the application URL (for example, example.com/resources/ID - GET), with each URL being assigned a Caché class method that will do all the work.
A pathmap is a listing of all possible URLs for accessing an application to retrieve data or to modify data on a server.
At the address http: // <server address> / rest / test the message “Works!” Should be displayed. Example
The simplest RESTful web API is complete.
')
Fill the class with test data using the command in the terminal: w ## class ( Data.Company ). Populate (10)
To demonstrate the CRUD operation Return (HTTP - GET), we will create a new class REST.JSON for the tasks of generating JSON responses to requests to a RESTful service.
We learned to give data to JSON, but the broker does not know about it.
Done! Now at http: // <server address> / rest / json / companies you are waiting for a list of companies in JSON, for example .
And on the client side, we will turn JSON into something pleasant to the eye. To do this, use the MVC JS framework AngularJS .
We compile the page, go to http: // <server address> /csp/user/rest.csp and look at the full list of companies. As before, an example .
We implement server-side business logic for the remaining 3 CRUD operations: adding, modifying, and deleting a company.
This completes the creation of a CRUD-complete RESTful web API in Caché.
As a result, the front-end to the web API is ready at http: // <server address> /csp/user/rest.csp. An example .
In this article, we learned how to build and configure the RESTful web API on the Caché server. Building the client side is also possible on the basis of the Caché server.
If anyone is interested, I can tell you about security, separation of rights, and other usefulness for developing a RESTful web API based on Caché.
Download the RESTful web API built in this tutorial.
RESTful web API example
InterSystems Technology Glossary - RESTful web API as well
JSON export - class - class2 (SQL)
% request - class
% response - class
XML export - class
- separation of client and server
- statelessness,
- cached and layered architecture
- single interface
- all requests to the RESTful web API consist of the root URL of the application plus private subqueries,
- CRUD over HTTP - HTTP methods GET, PUT, POST, DELETE (RESTful web API).
| Method | Queries to the collection of items example.com/resources | Requests to a single item example.com/resources/itemID |
| Get | Get a list of URI elements of the collection, possibly add. information | Get all the information about the item |
| PUT | Replace the existing collection with a new one. | Replace existing item with a new one. |
| POST | Create new collection item | Generally not used |
| DELETE | Delete entire collection | Delete collection item |
What about Caché?
In Caché, REST support has been appearing since version 2014.1 - this version is still available as a field test version for partners and universities of InterSystems Campus. To create a REST application, you need to define a broker class in the settings of the Caché web application, which indicates the possible extensions of the base URL and the corresponding actions of the application when requesting these extensions.
The broker class is created as an inheritor of the% CSP.REST class. Next, it contains the map of the paths of the application URL (for example, example.com/resources/ID - GET), with each URL being assigned a Caché class method that will do all the work.
A pathmap is a listing of all possible URLs for accessing an application to retrieve data or to modify data on a server.
Approximate block diagram of the REST web application in Caché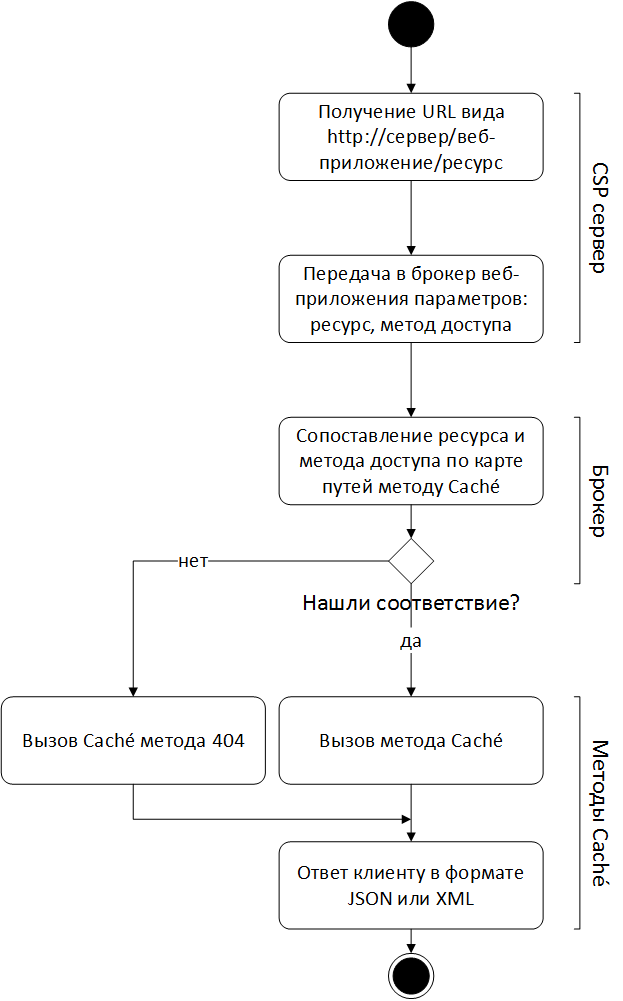
For the cause
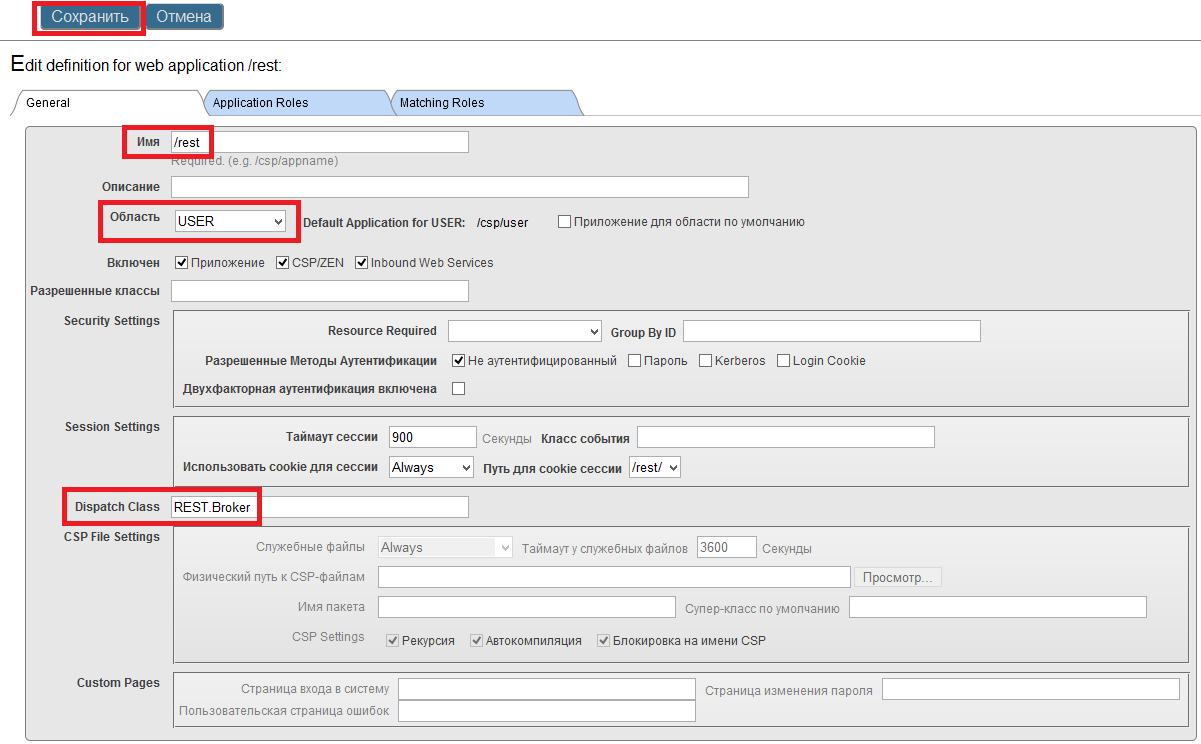
First, create a / rest web application with the Dispatch Class REST.Broker
- In the System Management Portal (Portal):
- Portal → System Administration → Security → Applications → Web Applications
- Click “Create New Web Application”
- On the web application editing page, fill in the following fields (the remaining fields remain unchanged):
- Name: / rest (a slash is required)
- Area: USER
- Dispatch Class: REST.Broker (string is case sensitive)
- Click Save
Now you need to create a class REST.Broker - a map of the future ways of the web API. Open Studio
- Go to the USER area
- Create a new class REST.Broker by pressing Ctrl + N or from Menu: File → New.
- Select the General tab and there Caché Class
- In the class creation wizard:
- Enter the package name: REST
- Enter class name: Broker
- Press "Next
- In the Class Type box:
- Click on the Extensions button
- Ancestor class name: % CSP.REST
- Click Finish
Register a path map and a handler method in the broker class
Class REST.Broker Extends% CSP.REST
{
XData UrlMap
{
< Routes >
< Route Url = "/ test" Method = "GET" Call = "Test" />
</ Routes >
}
ClassMethod Test () As% Status
{
& html < Works! >
quit $$$ OK
}
}
In the XData UrlMap path map, when accessing the / test URL, the Test method of the REST.Broker class is called. In the case of calling methods of other classes, you must also specify the class name in Call
{
XData UrlMap
{
< Routes >
< Route Url = "/ test" Method = "GET" Call = "Test" />
</ Routes >
}
ClassMethod Test () As% Status
{
& html < Works! >
quit $$$ OK
}
}
In the XData UrlMap path map, when accessing the / test URL, the Test method of the REST.Broker class is called. In the case of calling methods of other classes, you must also specify the class name in Call
At the address http: // <server address> / rest / test the message “Works!” Should be displayed. Example
The simplest RESTful web API is complete.
')
Data preparation
For a more complex example, we need data. Create a class Data.Company
- In the class creation wizard:
- Package Name: Data
- Class Name: Company
- Press "Next.
- In the Class Type box:
- Click the Persistent button
- Press "Next
- Select XML Enabled option
- Select the Data Population option.
- Click Finish
Create a property Name - each company must have a name
Class Data.Company Extends ( % Persistent , % Populate , % XML.Adaptor )
{
Property Name As% String ( POPSPEC = "Company ()" );
}
POPSPEC = "Company ()" - we inform the test data generator what we want from it, otherwise it would give us the names of people here.
{
Property Name As% String ( POPSPEC = "Company ()" );
}
POPSPEC = "Company ()" - we inform the test data generator what we want from it, otherwise it would give us the names of people here.
Fill the class with test data using the command in the terminal: w ## class ( Data.Company ). Populate (10)
Server side
To demonstrate the CRUD operation Return (HTTP - GET), we will create a new class REST.JSON for the tasks of generating JSON responses to requests to a RESTful service.
Create a class REST.JSON
- In the class creation wizard:
- Package Name: REST
- Class Name: JSON
- Press "Next.
- In the Class Type box:
- Click on the Extensions button
- Ancestor class name: % Base
- Click Finish
First, let's write a method that gives JSON, containing a list of companies with all their properties
ClassMethod GetAllCompanies () As% Status
{
set st = $$$ OK
try {
do ## class ( % ZEN.Auxiliary.jsonSQLProvider ). % WriteJSONFromSQL (, "select * from Data.Company" )
} catch ex {
set st = ex . AsStatus ()
}
quit st
}
The only interesting thing here is the jsonSQLProvider class method - it displays the result of an SQL query in JSON format on the current device. Pay attention to the comma in the list of parameters, it is required, because The first parameter is the optional name of the javascript variable on the client side.
We learned to give data to JSON, but the broker does not know about it.
Add a path to the REST.Broker path map so that you know
Route Url = "/ json / companies" Method = "GET" Call = "REST.JSON: GetAllCompanies" />
Done! Now at http: // <server address> / rest / json / companies you are waiting for a list of companies in JSON, for example .
Client server!
And on the client side, we will turn JSON into something pleasant to the eye. To do this, use the MVC JS framework AngularJS .
But first, create a new CSP page.
- In Caché Studio, create a new CSP page by pressing Ctrl + N or from Menu: File → New
- Select the CSP file tab
- Select Caché Server Page and click OK.
- Save the created page in the csp / user folder as rest.csp
We make a request to the server, we get the answer - the list of companies in JSON - we display it
<! doctype html>
< html ng-app >
< head >
< title > REST Academy </ title >
< script src = " ajax.googleapis.com/ajax/libs/angularjs/1.2.3/angular.min.js" > </ script >
< script language = "javascript" >
function ctrl ($ scope, $ http) {
// GET request to the RESTful web API
$ http.get ( "/ rest / json / companies" ) .success ( function (data) {
// Put the server response in the companies variable
$ scope.companies = data.children;
}). error ( function (data, status) {
// Display error information, if any
alert ( "[" + status + "] Error loading companies! [" + data + "]" );
})
};
</ script >
</ head >
< body ng-controller = "ctrl" >
< div ng-repeat = "company in companies" >
{{company.Name}}
</ div >
</ body >
</ html >
We compile the page, go to http: // <server address> /csp/user/rest.csp and look at the full list of companies. As before, an example .
Implementing Create, Update, Delete on server
We implement server-side business logic for the remaining 3 CRUD operations: adding, modifying, and deleting a company.
To do this, add methods to the REST.JSON class.
ClassMethod CreateCompany () As% Status
{
s st = $$$ OK
try {
// Take JSON from the request and convert it to an object of the Data.Company class
$$$ THROWONERROR ( st , ## class ( % ZEN.Auxiliary.jsonProvider ). % ConvertJSONToObject ( % request . Content , "Data.Company",. Obj , 1))
$$$ THROWONERROR ( st , obj . % Save ())
}
catch ex {
s st = ex . AsStatus ()
}
quit st
}
ClassMethod DeleteCompany ( compid As% String ) As% Status
{
set st = $$$ OK
try {
$$$ THROWONERROR ( st , ## class ( Data.Company ). % DeleteId ( compid ))
} catch ex {
s st = ex . AsStatus ()
}
quit st
}
ClassMethod UpdateCompany ( compid As% String ) As% Status
{
set st = $$$ OK
try {
$$$ THROWONERROR ( st , ## class ( % ZEN.Auxiliary.jsonProvider ). % ConvertJSONToObject ( % request . Content ,,. Obj , 1))
// Open the object that we want to edit.
set comp = ## class ( Data.Company ). % OpenId ( compid )
throw : comp = $$$ NULLOREF ## class ( % Exception.StatusException ). CreateFromStatus ( $$$ ERROR (5001, "Company does not exist" ))
// Edit and save
set comp . Name = obj . Name
$$$ THROWONERROR ( st , comp . % Save ())
}
catch ex {
set st = ex . AsStatus ()
}
quit st
}
{
s st = $$$ OK
try {
// Take JSON from the request and convert it to an object of the Data.Company class
$$$ THROWONERROR ( st , ## class ( % ZEN.Auxiliary.jsonProvider ). % ConvertJSONToObject ( % request . Content , "Data.Company",. Obj , 1))
$$$ THROWONERROR ( st , obj . % Save ())
}
catch ex {
s st = ex . AsStatus ()
}
quit st
}
ClassMethod DeleteCompany ( compid As% String ) As% Status
{
set st = $$$ OK
try {
$$$ THROWONERROR ( st , ## class ( Data.Company ). % DeleteId ( compid ))
} catch ex {
s st = ex . AsStatus ()
}
quit st
}
ClassMethod UpdateCompany ( compid As% String ) As% Status
{
set st = $$$ OK
try {
$$$ THROWONERROR ( st , ## class ( % ZEN.Auxiliary.jsonProvider ). % ConvertJSONToObject ( % request . Content ,,. Obj , 1))
// Open the object that we want to edit.
set comp = ## class ( Data.Company ). % OpenId ( compid )
throw : comp = $$$ NULLOREF ## class ( % Exception.StatusException ). CreateFromStatus ( $$$ ERROR (5001, "Company does not exist" ))
// Edit and save
set comp . Name = obj . Name
$$$ THROWONERROR ( st , comp . % Save ())
}
catch ex {
set st = ex . AsStatus ()
}
quit st
}
Add the appropriate path to the broker
< Route Url = "/ json / company" Method = "POST" Call = "REST.JSON: CreateCompany" />
< Route Url = "/ json / company /: compid" Method = "DELETE" Call = "REST.JSON: DeleteCompany" />
< Route Url = "/ json / company /: compid" Method = "PUT" Call = "REST.JSON: UpdateCompany" />
< Route Url = "/ json / company /: compid" Method = "DELETE" Call = "REST.JSON: DeleteCompany" />
< Route Url = "/ json / company /: compid" Method = "PUT" Call = "REST.JSON: UpdateCompany" />
This completes the creation of a CRUD-complete RESTful web API in Caché.
Client implementation Create, Update, Delete
Add the rest.csp functionality to create, modify, delete companies.
<!doctype html> <html ng-app> <head> <title>REST Academy</title> <script src="https://ajax.googleapis.com/ajax/libs/angularjs/1.2.3/angular.min.js"></script> <script language="javascript"> function ctrl($scope,$http) { // GET RESTful web API $scope.getCompanies=function() { $http.get("/rest/json/companies").success(function(data) { // companies $scope.companies=data.children; }).error(function(data, status) { // , alert("["+status+"] ! ["+data+"]"); }); }; // $scope.create = function (company){ $http.post("/rest/json/company",company) .success(function(data){$scope.getCompanies();$scope.alertzone=" "+company.Name;}).error(function(data,status){ $scope.alertzone="["+status+"] :( ["+data+"]"; }); } // $scope.update = function (company){ $http.put("/rest/json/company/"+company.ID,company) .success(function(data){$scope.alertzone=" "+company.Name;}).error(function(data,status){ // alert(....); alertzone $scope.alertzone="["+status+"] :( ["+data+"]"; }); } // $scope.delete = function (company){ $http.delete("/rest/json/company/"+company.ID) .success(function(data){$scope.getCompanies();$scope.alertzone=" "+company.Name;}).error(function(data,status){ $scope.alertzone="["+status+"] :( ["+data+"]"; }); } }; </script> </head> <body ng-controller="ctrl" ng-init="getCompanies();"> <h4 ng-model="alertzone"><font color=red>{{alertzone}}</font></h4> <form name="compCreateForm" ng-model="company" ng-submit="create(company); company='';"> <input type="text" ng-model="company.Name"/> <input type="submit" value=""/> </form> <br> <div ng-repeat="company in companies"> <form name="compForm" ng-submit="update(company); compForm.$setPristine();"> <input type="text" ng-model="company.Name"/> <input type="submit" value="" ng-show="compForm.$dirty"/> <input type="button" value="X" ng-click="delete(company);"/> </form> </div> </body> </html> As a result, the front-end to the web API is ready at http: // <server address> /csp/user/rest.csp. An example .
Total
In this article, we learned how to build and configure the RESTful web API on the Caché server. Building the client side is also possible on the basis of the Caché server.
What's next?
If anyone is interested, I can tell you about security, separation of rights, and other usefulness for developing a RESTful web API based on Caché.
useful links
Download the RESTful web API built in this tutorial.
RESTful web API example
InterSystems Technology Glossary - RESTful web API as well
JSON export - class - class2 (SQL)
% request - class
% response - class
XML export - class
Source: https://habr.com/ru/post/204576/
All Articles